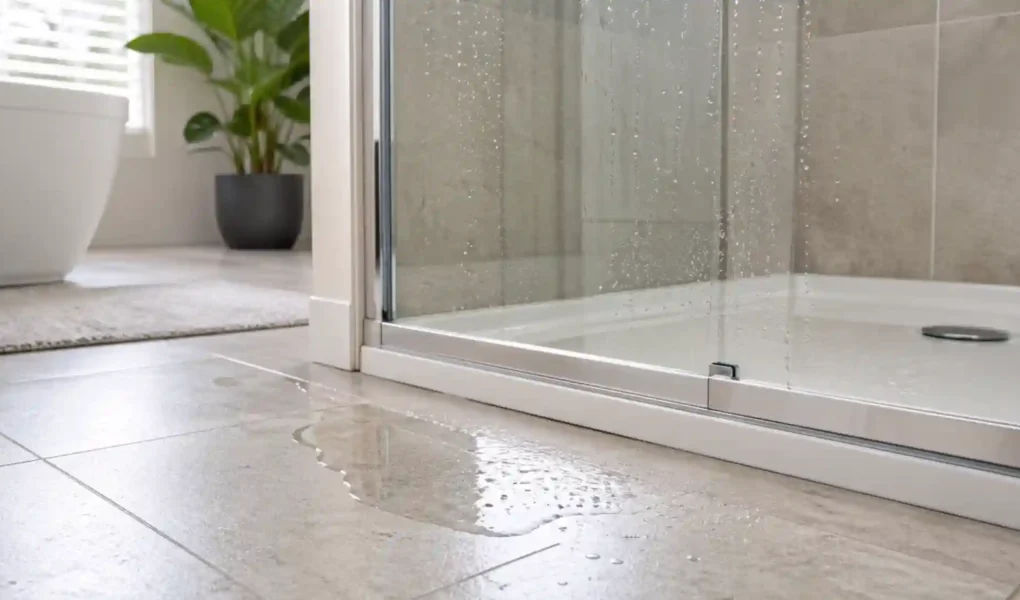
You finish your shower, step onto the bath mat, and notice it again: a small puddle sitting just outside the shower door.
At first, it is easy to ignore. Maybe the shower head splashed at the wrong angle. Maybe someone did not close the door properly. Maybe it is just one of those little bathroom annoyances you deal with later.
But after a few days of wiping up the same patch of water, it starts to feel less harmless. You might wonder if water is getting under the flooring, whether damp is building up behind the tray, or if the ceiling below could eventually show a stain. And then comes the bigger question: is this a simple shower door issue, or is it time to call a plumber?
The reassuring news is that a leaking shower door is not always a sign of a serious plumbing problem. In many homes, water escapes because of something much simpler: a worn bottom seal, a loose side seal, limescale in the track, a small gap around the door, or even the way the shower spray is angled.
Before you assume the worst, it is worth doing a few quick checks. You do not need to remove the glass, take the shower apart, or use specialist tools. You just need to slow down, dry the area, and work out where the water is really coming from.
Start With the Puddle
The puddle may look random, but it usually has a story to tell.
If water is gathering directly outside the bottom of the shower door, the bottom seal is one of the first things to check. It may be worn, bent, loose, or no longer sitting properly against the shower tray.
If the water is running down one side of the door, the issue could be a side seal, a magnetic strip, or a door that is not closing quite as tightly as it should.
If the water appears around the edge of a fixed glass panel, in a corner, or where the shower tray meets the wall, the silicone sealant may be letting water through.
And if you notice water near the wall, under the flooring, or on the ceiling below, that is a different matter. In that case, it is more likely to be a hidden leak and should be checked by a professional.
A simple test can help. Dry the floor completely, then turn the shower on for two or three minutes without getting in. Let the water hit the glass, the door area, and the inside of the enclosure as it normally would. Watch carefully for the first sign of water escaping.
That first drop matters. It helps you avoid guessing and points you towards the most likely cause.
Gather a Few Basic Items First
You do not need a toolbox for the first round of checks. A few everyday items are enough:
A dry tissue, a soft cloth, an old toothbrush, a mild bathroom cleaner, a torch, and a tape measure.
The tissue helps spot tiny leaks. The torch helps you see gaps around the bottom of the door or along the seals. The toothbrush is useful for cleaning limescale and soap residue from tracks and corners. The tape measure only becomes useful if you later need to check the size of a replacement part.
The aim is not to dismantle the shower. It is simply to find out whether you are dealing with a small maintenance problem or something that needs professional help.
Check the Bottom Seal First
If the water is escaping from the bottom of the shower door, start with the bottom seal.
This strip sits along the lower edge of the glass and helps guide water back into the shower tray. When it is working well, you barely notice it. Water runs down the inside of the glass and stays where it should. But when the seal becomes hard, cracked, loose, or misshapen, water can slip underneath the door and end up on the bathroom floor.
Take a close look at it. Is the seal yellowed or brittle? Has the bottom fin curled up or split? Is there a visible gap between the seal and the glass? Does the seal look as though it has been fitted the wrong way round? Can you see water passing under the door while the shower is running?
If the answer is yes, the issue may not be the plumbing at all. The seal may simply have reached the end of its useful life.
This is the point where many homeowners make the mistake of guessing which replacement they need. Shower door seals come in different shapes, thicknesses, lengths, and fitting styles. Choosing the wrong one can leave you with the same leak, or a seal that does not fit the glass properly. If you are not sure what to look for, a clear shower door seal replacement guide can help you identify the right profile, measure correctly, and avoid fitting it the wrong way round.
The goal is not to rush into buying anything. It is to understand whether the seal is the problem and, if it is, what type of seal your shower door actually needs.
Clean Before Replacing Anything
Before you replace a seal or blame the door, give the area a proper clean.
In many parts of the UK, limescale builds up quickly around shower screens, trays, tracks, and seals. Add soap residue, shampoo, hair, and everyday bathroom grime, and water can start travelling in strange directions. Sometimes it is not the door failing. It is the dirt and limescale guiding water over the edge.
Pay attention to the bottom of the glass door, the seal, the lower track on sliding doors, the side seals, the magnetic strip, and the edge of the shower tray.
Use a mild bathroom cleaner, a soft cloth, and an old toothbrush for tight areas. Avoid anything too abrasive, especially metal brushes, as they can scratch glass or damage the seal.
Once the area is clean, run the shower test again. If less water escapes, you have learned something useful: the leak may have been made worse by build-up rather than a broken part.
Look for Small Gaps Around the Door
Some shower doors look closed at a glance but are not sealing properly.
Over time, hinges, rollers, magnetic strips, and frames can move slightly. A door does not need to be dramatically broken to leak. Even a narrow gap can let water escape, especially when the shower spray hits the glass and bounces back towards the opening.
Stand outside the shower and look at the door when it is closed. Are the gaps even on both sides? Does the magnetic strip meet cleanly from top to bottom? Is one side of the door sitting slightly higher than the other? Does a sliding door move smoothly, or does it catch? Do you need to push the door to make it close?
Small alignment issues may sometimes improve after cleaning the track or pressing a loose seal back into position. But be careful. If the glass door has dropped, wobbles, or feels unstable, do not force it.
Shower glass is heavy, and the fittings are there for safety as well as function. Anything involving the weight of the door, hinges, rollers, or glass fixings should be handled by someone experienced.
Do Not Forget the Side Seal or Magnetic Strip
It is easy to focus on the bottom of the door because that is where the water ends up. But the leak may actually start at the side.
Side seals and magnetic strips help the door close tightly. When they wear out, become loose, or get clogged with limescale, they may leave a thin gap. Water can then escape whenever it bounces off the glass, wall, or person showering.
Run your fingers gently along the side of the door. Does the seal feel loose? Is the magnetic strip weak? Do both sides meet properly? Is there limescale forcing the seal out of position? Are there water marks running down the same edge every time?
If the seal is only dirty, cleaning may solve the problem. If it is hard, cracked, warped, or no longer sits flush, it may need replacing.
A useful rule is this: if water always escapes from the same vertical edge, it is probably not just random splashing. Something along that edge is not sealing as it should.
Check Where the Shower Spray Is Pointing
Sometimes the door is not really the problem. The shower spray is.
If the shower head is aimed directly at the door gap, the bottom of the glass, or the join between two panels, water pressure can overwhelm the seal. This is especially true with frameless or semi-frameless enclosures. They are designed to control normal splashes, not to take a strong stream of water straight into the gaps for several minutes.
Try adjusting the shower head so the water points more towards the wall or the centre of the shower area. Then test again.
This simple change can make a surprising difference. It is especially worth checking in family bathrooms where children may move the shower head around, or where a handheld shower is used to rinse the glass, clean the enclosure, or wash pets.
If changing the angle reduces the puddle, the fix may be as simple as changing how the shower is used.
Inspect the Silicone, But Do Not Just Add More
If the water is not coming from the bottom or side of the door, look at the silicone sealant around the shower tray, fixed glass panel, and corners.
Old silicone can crack, lift, shrink, or pull away from the surface. It may also turn black with mould or stay damp long after the shower has been used.
Many homeowners see damaged silicone and immediately apply a new layer over the top. It feels like a quick fix, but it rarely lasts. Fresh silicone does not bond well to old, damp, mouldy, or soap-covered sealant. The leak may seem better for a short time and then come back.
If the silicone is the problem, the old sealant usually needs to be removed properly. The surface should then be cleaned, dried, and resealed.
However, be careful here. If water appears to be coming from behind tiles, under the shower tray, inside the wall, or through the ceiling below, this is no longer a simple shower door fix. That is when it is time to get professional help.
Try the Tissue Test for Tiny Leaks
Some leaks are too small to spot while the shower is running. A tissue test can help.
Dry the floor and the area around the shower door. Then place dry tissue in a few possible leak spots: outside the bottom of the door, along the side, near the fixed glass panel, around the outer edge of the shower tray, and close to the corner joints.
Run the shower for a few minutes, then check which tissue became wet first.
It is a simple test, but it can save a lot of guessing. The floor may end up wet in several places, but the first damp tissue tells you where the leak probably started.
For example, if the tissue near the bottom right corner of the door gets wet first, it makes sense to check the bottom seal or door alignment before worrying about the whole bathroom waterproofing system.
When It Is Usually Safe to Try a DIY Fix
Some shower door leaks are suitable for basic homeowner checks, especially when the issue is clearly around the door rather than the plumbing.
You can usually start with DIY checks if water only appears while the shower is running, the leak comes from the bottom or side of the door, the seal is visibly worn or loose, the track is dirty, limescale is building up, or the shower spray is aimed directly at the door gap.
It is also a good sign if cleaning reduces the leak or if the door still feels secure and closes normally.
In these cases, the issue is often part of normal bathroom maintenance. Cleaning, adjusting the shower spray, checking the seals, or replacing a worn seal may be enough.
When to Call a Plumber or Installer
A replacement seal will not fix every shower leak.
Call a plumber or professional installer if you see water marks on the ceiling below, water coming from behind tiles, damp around the wall or floor, continuous dripping from the shower valve or pipework, or a shower tray area that stays wet even after drying.
You should also get help if the glass door has dropped, wobbles, does not close safely, or still leaks after the obvious seals and tracks have been cleaned or replaced.
A simple way to think about it is this: if the problem is around the door, seal, track, or spray angle, it may be worth checking yourself first. If the problem seems to involve the wall, floor, ceiling, pipework, or glass safety, bring in a professional.
Small Habits That Help Keep the Shower Area Dry
Once the leak is fixed, a few small habits can help stop it coming back.
Use a squeegee on the glass after showering. Wipe the bottom of the door and the edge of the shower tray regularly. Clean the tracks and seals every few weeks, especially in hard water areas. Deal with cracked, hardened, or misshapen seals early rather than waiting until water starts escaping every day.
Good ventilation also matters. Keeping the bathroom aired helps reduce damp, mould, and the musty smell that often follows persistent moisture.
None of these habits take long, but together they help your shower enclosure stay cleaner, drier, and easier to maintain.
Final Thought
Finding water outside the shower door is annoying, but it does not always mean there is a serious plumbing problem.
Start with the simple things. Dry the floor, run the shower, and look for the first sign of water. Check the bottom seal, the side seal, the track, the shower spray angle, and the silicone before assuming the worst.
Many leaking shower door problems begin with one small detail. Catch it early, and the fix may be as simple as cleaning away limescale, adjusting the shower head, or replacing a worn seal before it turns into a bigger bathroom headache.