Have you ever sat in your living room during a heavy rainstorm, only to hear the rhythmic drip-drip-drip of water hitting your ceiling? It is a sinking feeling that every homeowner dreads. Often, the culprit isn’t a massive hole in the middle of your roof, but rather a failure at the very peak. This is where your roof cap (also known as a ridge cap) lives.
The roof cap is essentially the “spine” of your home’s umbrella. It bridges the gap where two roof slopes meet at the top, acting as the primary defense against wind-driven rain, snow, and debris. If this area is compromised, your entire home is at risk. According to the National Roofing Contractors Association (NRCA), nearly 80% of roof leaks start at the ridges and valleys.
Tools and Materials for Roof Cap Installation
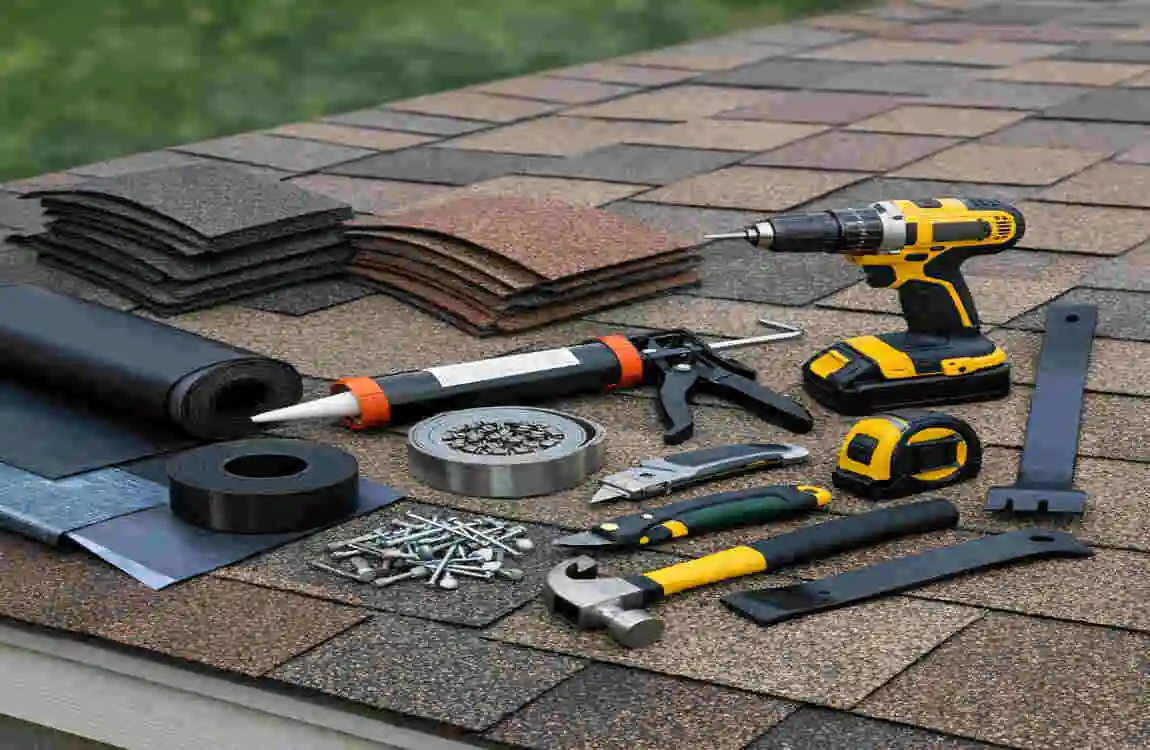
Before you climb that ladder, make sure your “utility belt” is fully stocked. Trying to find a tool while you are balanced on a 4:12 pitch roof is not only frustrating—it’s dangerous. When learning how to install roof cap shingles, having the right materials is half the battle.
You want to choose materials that match your existing roof. If you have asphalt shingles, you’ll wish to install asphalt ridge cap shingles. These are often thicker and more flexible than standard shingles to handle the sharp bend at the peak.
Essential Gear Table
CategoryItemsWhy NeededEstimated Cost
Tools: hammer, utility knife, chalk line, ladder, pry bar, roofing nailer. These allow for precise cutting, measuring, and secure fastening. $50 – $150
Materials: Ridge cap shingles, roofing nails (1.25″), roofing cement, drip edge. This creates the actual weather-proof seal and secures the shingles. $100 – $300
Safety Gear: Gloves, safety glasses, a harness, and non-slip boots. Essential for preventing falls; 30% of roof accidents happen at the ridge. $50+
Safety Precautions Before Starting Your DIY Roof Cap Project
We cannot stress this enough: Safety must be your absolute priority. Roof work is rewarding, but it carries inherent risks. The CDC reports over 100 fatalities yearly due to roof-related falls. Before you even think about installing roof cap shingles, follow these non-negotiable rules.
First, check the weather. Never work on a roof if it is wet, icy, or even slightly windy. A small gust can catch a shingle like a sail and pull you off balance. Aim for a dry, calm morning when the sun isn’t at its peak to avoid heat exhaustion.
Second, inspect your equipment. Ensure your ladder is on stable, level ground and extends at least three feet above the roof edge. If your roof has a steep pitch (anything greater than 4:12), you must use a safety harness and a roof anchor.
Lastly, work with a partner. Having someone on the ground to steady the ladder, pass up tools, or call for help in an emergency is vital. Stay hydrated, wear your non-slip boots, and always be aware of the roof edge.
Preparing Your Roof: Step-by-Step Assessment
A successful DIY roof cap installation starts long before the first nail is driven. You need a clean, solid foundation. Think of it like painting a room; if the walls are dirty, the paint won’t stick. If your roof ridge is messy, your cap won’t seal.
The Preparation Checklist
- Inspect the Ridge: Walk the length of the peak. Look for cracked wood, rusted flashing, or signs of rot. If the wood underneath is soft, you need to replace the decking before installing the cap.
- Remove Old Materials: Use your pry bar to lift old, damaged cap shingles gently. Be careful not to damage the primary shingles lower down the slope.
- Clean the Area: Sweep away old nails, granules, and debris. A clean surface ensures the roofing cement bonds correctly.
- Measure and Calculate: Measure the total linear feet of the ridge. Most ridge caps provide about 5 to 12 inches of “exposure” (the part you actually see). Calculate how many bundles you need based on this exposure.
- Underlayment Check: If the ridge vent or the wood is exposed, lay down a strip of self-adhering ice and water shield or roofing felt for an extra layer of protection.
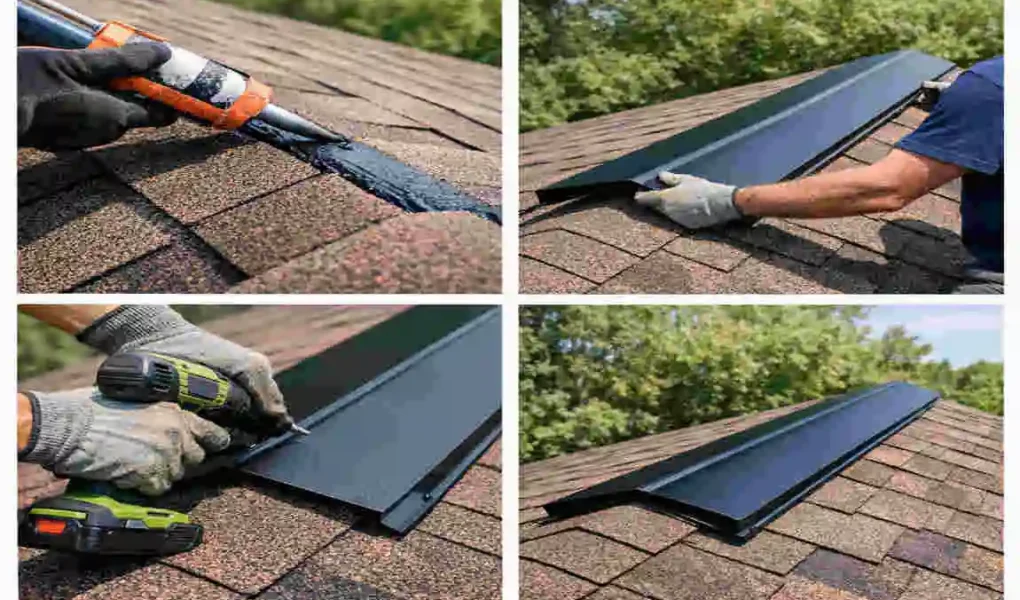
How to install Roof Cap: Detailed DIY Steps
Now we get to the heart of the project. This is the “meat and potatoes” of how to install roof cap shingles. We will break this down into five manageable steps to ensure you get a professional, leak-proof finish.
Marking and Cutting Ridge Cap Shingles
Precision is the difference between a roof that looks “DIY” and one that looks “Professional.” You don’t want your ridge cap to look like a zig-zagging snake across your house.
Start by snapping a chalk line. Measure about 6 inches down from the peak on both sides and snap a line. This gives you a visual guide to ensure every shingle is perfectly centered.
Next, prepare your shingles. If you aren’t using pre-cut ridge shingles, you’ll need to cut them from a standard 3-tab shingle bundle. Use your utility knife to cut the tabs into three equal pieces. Taper the hidden end (the part that gets covered) slightly. This helps the shingles lie flatter and prevents a bulky “hump” from forming as you stack them.
Starting the Ridge Cap Installation at One End
Where do you start? You should always start at the end of the ridge that is opposite the prevailing wind. This ensures that the “lap” of the shingles faces away from the wind, preventing rain from being blown under the edges.
- The Starter Shingle: Cut a shingle to use as a “starter.” This is usually a shingle with the decorative tab removed.
- Apply Cement: Put a small dab of roofing cement on the corners of the starter.
- Nailing: Place your first full cap shingle over the starter. Use two nails, one on each side, about an inch in from the edge and just below the self-sealing strip. Boldly secure them, but don’t overdrive the nails—you don’t want to crack the shingle.
- Alignment: Align the edges with your chalk line. This first shingle sets the tone for the rest of the ridge.
Installing Middle Sections for Full Coverage
This is where you find your rhythm. As you move down the ridge, you will be overlapping the shingles. This “shingling” effect is what sheds water.
You want to maintain a consistent exposure. Usually, this is 5 inches, but check the manufacturer’s instructions on your shingle bundle. Place the next shingle so it covers the nails of the previous one.
Finishing the Ridge Cap at the Opposite End
The “finish” is the trickiest part because you can’t just overlap the last shingle—there’s nothing left to overlap it with!
When you reach the end of the ridge, or where the ridge meets a wall or another roof section, you have to “close” the system. Cut your final shingle to the required length. Since you can’t hide the nails under another shingle, you will have exposed nail heads.
To fix this, use a generous amount of roofing cement over the nail heads. For a truly professional look, sprinkle some loose shingle granules (found at the bottom of the shingle bundle) onto the wet cement. This hides the shiny nail heads and protects the cement from UV damage.
Final Inspection and Cleanup
Don’t just climb down and call it a day! Walk back along the ridge (carefully). Check for any shingles that feel loose or aren’t lying flat. If a corner is sticking up, a small dab of roofing cement underneath will act as an anchor.
Once you are satisfied, clean up. Use a magnet to pick up any dropped nails—you don’t want those ending up in your lawnmower or a car tire later. Gently sweep away any loose granules. Your roof is now officially capped and protected!
Common Mistakes to Avoid in Roof Cap Installation
Even the most well-intentioned DIYer can run into trouble. Avoid these common pitfalls to ensure your roof ridge cap installation lasts for decades.
- Over-Nailing: If you drive the nail too deeply, it cuts into the shingle. This creates a “perforation” that can cause the shingle to tear off in high winds.
- Using the Wrong Nails: Always use galvanized roofing nails. Standard nails will rust within a year, leading to streaks on your roof and eventual failure.
- Ignoring Ventilation: If your home has a ridge vent, make sure you don’t accidentally seal it shut with too much roofing cement. The attic needs to “breathe” to prevent mold and wood rot.
- Wrong Temperature: If it’s too cold, shingles become brittle and crack when you bend them over the ridge. If it’s too hot, they become too soft and scuff easily under your boots.
Roof Cap Variations: Metal vs. Asphalt Shingles
While this guide focuses on asphalt, many modern homes use metal roofing. The process for how to install a metal roof cap is similar in logic but different in execution.
Comparison Table: Asphalt vs. Metal
TypeProsConsBest For
Asphalt: Very affordable, easy to cut, matches most homes. Lasts 15-20 years; can lose granules over time—budget-conscious DIYers.
Metal has a lifespan of 50+ years, is fire-resistant, and reflects heat. More expensive, requires specialized shears to cut. Harsh climates and long-term durability.
If you are working with metal, you won’t be using nails and cement in the same way. Instead, you’ll use self-tapping screws with rubber washers to create a watertight seal.
Maintenance Tips for Long-Lasting Leak-Proof Protection

You’ve done the hard work; now you need to keep it in good shape. We recommend an annual roof inspection. You don’t even necessarily need to get on the metal roof—a good pair of binoculars from the ground can reveal a lot.
Look for “curling” edges or shingles that appear “balding” (losing their gravel-like granules). If you see a lot of granules in your gutters, it’s a sign that your shingles are reaching the end of their life. Every five years, consider reapplying a small amount of sealant to any exposed nail heads at the ends of the ridges.
FAQs: How to install Roof Cap Quick Answers
How long does it take to install a roof cap? For an average 2,000 sq. ft. home, a DIYer can usually finish the ridge cap in 4 to 8 hours, depending on the roof’s complexity.
Can a beginner really do a DIY roof cap installation? Absolutely! If you can use a hammer, a utility knife, and aren’t afraid of heights, you can do this. Just follow the steps and take your time.
What is the cost of materials? Generally, you are looking at $1 to $3 per linear foot. It is one of the most cost-effective ways to protect your home.
Do I need a building permit? In most jurisdictions, a simple repair or shingle replacement does not require a license. However, if you are replacing the entire roof or structural decking, check with your local building department first.