Imagine walking into a beautiful, rustic wooden home. The smell of pine fills the air, and the warm tones of the timber walls make you feel instantly cozy. But then, your eyes drift to the staircase. It’s scratched, dull, and frankly, a little tired-looking. It doesn’t match the grandeur of the rest of the house. Now, picture that same staircase transformed into a cascading waterfall of glossy, shimmering light, or a deep, marble-like surface that reflects the wooden beams above.
This isn’t a dream; it is the reality of high epoxy stair designs.
For years, wooden staircases were limited to carpet runners or simple varnish. But times have changed. Homeowners are now blending the traditional warmth of wood with the modern, glass-like durability of epoxy resin. This trend isn’t just about protection; it is about creating a centerpiece. It is about turning a functional part of your home into art.
What Are High Epoxy Stair Designs?
Before we jump into the pretty pictures, let’s talk about what this material actually is. You might know epoxy from those cool videos of garage floor makeovers, but high epoxy stairs are a different beast entirely.
Understanding the Material
Epoxy is a two-part system consisting of a resin and a hardener. When you mix these two liquids, a chemical reaction occurs that turns the mixture into a rigid, solid plastic. It bonds incredibly well to wood, which makes it perfect for staircases.
When we say “high epoxy,” we aren’t just talking about a thin layer of paint. We are referring to thick pours, usually ranging from 1/4 inch to 1/2 inch in depth. This thickness creates a lens effect, giving the surface a deep, 3D appearance that standard varnish can’t achieve. This is what allows for those incredible designs where metallic flakes seem to float in mid-air or where the stairs look like deep pools of water.
A Brief History of the Trend
Epoxy was first used in industrial settings because it is tough as nails. Then, it moved to the garage floor. But after 2020, as people spent more time at home and turned to TikTok and Instagram for renovation inspiration, epoxy moved inside the home. Designers realized that by tweaking the formula to be clearer, UV-resistant, and pigment-compatible, they could create luxury epoxy stairs that rival marble or granite for a fraction of the cost.
Epoxy vs. Traditional Finishes
Why choose epoxy over a standard hardwood finish? It comes down to longevity and “wow” factor. A traditional varnish sits on top of the wood and wears down in high-traffic areas (like the center of your stairs) within 2 to 5 years. Epoxy, on the other hand, creates a hard shell. It creates a seamless surface that can last 10 to 20 years with proper care.
To help you visualize the difference, here is a quick comparison:
Feature: High Epoxy Stairs, Traditional Varnish, Hardwood Overlay
Durability 20+ years (High resistance to impact), 2–5 years (Wears in traffic paths), 10–15 years (Can dent/scratch)
Cost per sq ft $10–25 $5–10 $15–30
Gloss Level Ultra-high (Glass-like) Medium to Satin Natural/Matte
Customization Unlimited (Colors, 3D effects) Limited (Stain colors only) Moderate (Wood species)
Benefits of High Epoxy Stairs in Wooden Houses
You might be thinking, “I have a wooden house. Won’t plastic-looking stairs clash with the rustic vibe?” Surprisingly, no. In fact, epoxy stairs for wooden homes are one of the best upgrades you can make. The contrast between the organic grain of your walls and the sleek shine of the stairs creates a balance of textures that designers love.
Here is why you should consider making the switch:
Seamless Waterproofing
Wooden houses shift and breathe. Traditional wood stairs have cracks and crevices where water from mopping or spilled drinks can seep in, causing rot or mold over time. High epoxy creates a seamless, non-porous seal. It essentially encapsulates the tread, making it impervious to water damage. If you spill a glass of wine, it just sits on top, waiting to be wiped away.
Timeless Luxury and Light
Wooden homes can sometimes feel dark, especially if you have log walls and wood ceilings. High epoxy stairs act like mirrors. They reflect light from windows and chandeliers, bouncing it around the room. This makes small spaces feel grander and brighter, adding that touch of timeless luxury that instantly elevates the property value.
Eco-Friendly Options
Modern epoxy has come a long way. Many high-quality resins are now low-VOC (Volatile Organic Compounds) and non-toxic once cured. This pairs perfectly with the sustainable ethos of many wooden house owners. You can get the look you want without filling your home with harsh chemical smells.
Pet and Kid-Proof Durability
If you have a dog, you know the pain of seeing claw marks on freshly refinished wood. Epoxy is incredibly scratch-resistant. While no surface is bulletproof, high-performance epoxy is much harder to damage than soft pine or oak. It handles the pitter-patter of paws and the stomping of kids’ feet with ease.
Infinite Customization
This is the fun part. With wood, you are limited to the grain of the tree. With epoxy, the only limit is your imagination. You can embed objects, create marble effects, mimic water, or even make them glow in the dark. It allows you to inject your personality into the house’s architecture.
Low Maintenance Requirements
Forget about waxing or polishing every few months. Epoxy is incredibly low-maintenance. A simple sweep and a damp mop are usually all you need to keep it looking brand new. The glossy finish creates a surface that repels dust, making it hypoallergenic and easy to clean.
Boost in Home Value
According to recent real estate data, distinct custom features help homes sell faster. A custom epoxy staircase is a talking point. It implies that the home has been cared for and upgraded with modern materials. Zillow data suggests that unique flooring upgrades can boost resale potential by 5–10%.
Structural Strengthening
Because “high epoxy” involves a thick pour, it actually adds structural integrity to the stair tread. It binds the wood fibers together, preventing splinters and reducing the “creaking” sound often associated with older wooden staircases.
Top 15 Stunning High Epoxy Stair Designs for Wooden Houses
Now for the main event. We have curated a list of the top 15 designs that are currently trending. These high epoxy stair designs are specifically chosen to complement the aesthetic of a wooden house, ranging from rustic chic to ultra-modern luxury.
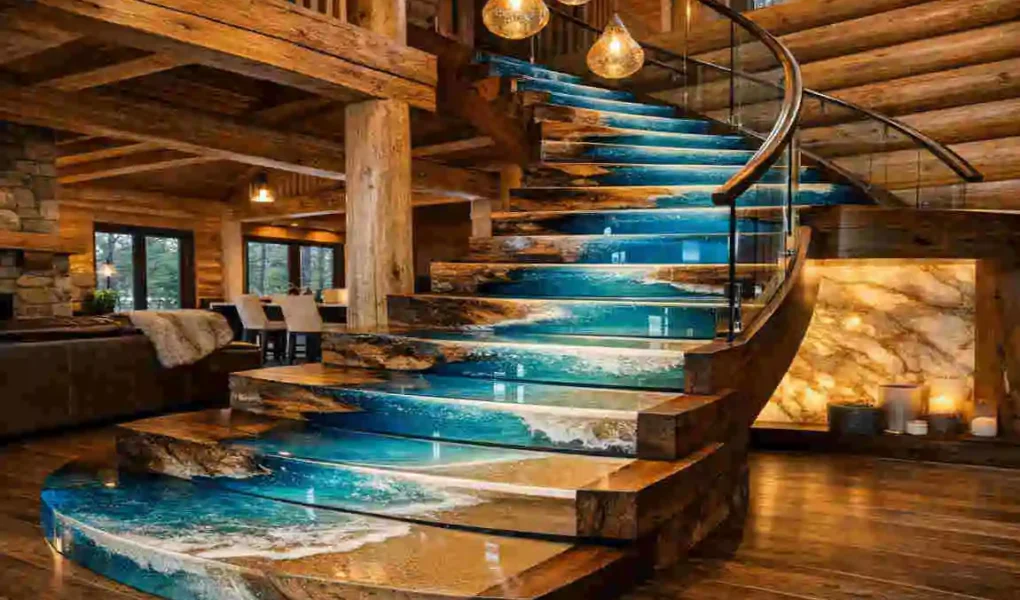
Ocean Wave Metallic
If you own a lake house or a coastal cabin, this is the ultimate design for you. This technique uses a deep blue epoxy base mixed with silver and teal metallic pigments. By manipulating the resin with a heat gun during curing, you can create a swirling effect that mimics crashing ocean waves.
- Why it works: The cool blue tones provide a stunning contrast against warm orange or yellow wood walls, bringing the “water” element inside your home.
Gold Vein Marble
Who says you need real stone to have marble stairs? This design uses a stark white epoxy base. Before it sets, installers drizzle thin lines of gold and grey metallic pigment through it. The result is a luxury epoxy stair that looks like high-end Calacatta Gold marble.
- Why it works: It adds a touch of Italian opulence to a wooden home without the massive weight and cost of installing real stone slabs on your staircase.
3D Galaxy Glow
This is a favorite for modern lofts or attic conversions. The base is a deep, jet black mixed with purple and blue pearlescent powders. The secret ingredient? Photoluminescent (glow-in-the-dark) crystals. During the day, it looks like deep space. At night, the stairs softly glow like the Milky Way.
- Why it works: It acts as a safety feature for navigating stairs at night while adding a “cool factor” that guests will never forget.
Rustic Wood Embed The “River” Stair
You have seen the famous “river tables”—now imagine that on every step. This design takes a live-edge slab of wood and encases it in clear or lightly tinted blue epoxy. The epoxy fills gaps and irregularities in the wood, creating a smooth, rectangular tread while preserving the timber’s rugged, natural edge.
- Why it works: It is the perfect bridge between the rustic nature of a wooden house and the modern epoxy trend. You aren’t covering the wood; you are celebrating it.
Metallic Copper Glow
Warmth is key in a wooden home. This design utilizes a clear epoxy loaded with rich copper and bronze mica powders. When the light hits these stairs, they don’t just shine; they seem to glow from within with a fiery, autumnal warmth.
- Why it works: Copper tones naturally complement the reds and browns found in cedar, cherry, and mahogany wood, creating a cohesive, monochromatic luxury look.
Floral Resin Art
For the bohemian cottage or the “cottagecore” aesthetic, this design is breathtaking. Before pouring a clear, high-gloss epoxy, dried flowers, leaves, and ferns are arranged on the stair tread. The resin encapsulates them forever, preserving their color and shape.
- Why it works: It literally brings nature indoors. It turns your staircase into a walking garden, adding a soft, feminine touch to the heavy structure of a wooden house.
Mirrored Infinity
This is for the minimalists. It involves using a high-gloss silver or chrome-colored epoxy. The finish is so reflective that it acts like a mirror. When you look down, you see the reflection of the wooden beams and ceiling above, creating an illusion of infinite space.
- Why it works: It visually doubles the size of the stairwell and maximizes natural light, making tight wooden hallways feel open and airy.
Earth Tone Terrazzo
Terrazzo is back in style, and you can recreate it with epoxy. This design uses a neutral base (like beige or sage green) and mixes in chips of colored vinyl, crushed stone, or even glass. The epoxy binds it all together into a smooth, speckled surface.
- Why it works: It introduces texture and color variety without being too loud. The earthy tones blend seamlessly with pine or oak surroundings.
High-Gloss Ebony
Sometimes, the boldest choice is the simplest. A solid, jet-black epoxy pour creates a dramatic, tuxedo-like effect. The high-gloss finish makes the black look like liquid oil or obsidian glass.
- Why it works: When paired with white risers and light wood walls, the black treads ground the space and add a sophisticated, modern architectural element.
Pearl Iridescent
Imagine the inside of an oyster shell. This design uses a white base with “color-shift” pearl pigments. As you walk up the stairs and the angle of the light changes, the stairs shift colors from soft pinks to teals to pearly whites.
- Why it works: It adds a magical, ethereal quality to the home. It is subtle enough not to be distracting but detailed enough to be mesmerizing up close.
Geometric Patterns
If you want something structured, this design involves placing laser-cut wood or metal inserts onto the tread before pouring clear epoxy over them. You can create chevrons, hexagons, or Art Deco patterns that are permanently sealed inside the step.
- Why it works: It adds a graphic, artistic element to the floor. It effectively turns your stairs into a patterned runner that never needs vacuuming.
Vintage Brass
Similar to the copper design but with an aged twist. This uses antique gold and brass flakes suspended in a slightly amber-tinted resin. It mimics the look of aged metal that has been in the house for a century.
- Why it works: It fits perfectly in historic wooden homes or log cabins where bright, modern chrome might look out of place. It feels “lived in” yet luxurious.
Crystal Clear The “Invisible” Tread
This requires a very specific base (usually a nice piece of exotic wood, such as teak or walnut). You apply a super-thick layer of ultra-clear, non-yellowing epoxy. The goal here isn’t to add color, but to magnify the wood grain underneath, making it look wet and vibrant permanently.
- Why it works: It is the purist’s choice. It highlights the natural beauty of the wood you already have, protecting it under a layer of “glass.”
Fire Glow Red
Not for the faint of heart! This design uses deep crimson and bright red metallic pigments, swirled together to resemble flowing lava or embers.
- Why it works: In a dark wood cabin with a fireplace, this creates a dramatic, warm, and energetic focal point. It draws the eye immediately and warms the room’s visual palette.
Custom Monogram
Personalization is the ultimate luxury. You can place a vinyl decal of your family crest, initial, or a meaningful symbol on the landing or the bottom step, then pour clear epoxy over it.
- Why it works: It brands the home as yours. It is a subtle detail that adds a bespoke “manor house” feel to the property.
Step-by-Step Guide: Installing High Epoxy Stairs
You have seen the designs, and you are inspired. But how does it actually happen? Installing high epoxy stairs requires patience. While we always recommend hiring a professional for complex designs, here is the general workflow so you know what to expect (or attempt, if you are a brave DIYer).
Preparation is Everything Day 1
You cannot pour epoxy over dirty or slick wood. The first step is sanding the stairs down to raw wood. You need to remove all old varnish, paint, and wax.
- Repair: Fill any deep cracks or nail holes with wood filler.
- Clean: Vacuum every speck of dust. Dust is the enemy of a smooth finish.
- Barrier: You must tape off the edges of the stairs (and the walls) with high-quality painter’s tape and plastic sheeting. Epoxy drips are a nightmare to remove once cured.
Priming the Surface Day 2
Wood is porous. If you pour thick epoxy directly onto it, air bubbles will release from the wood and get trapped in your finish.
- Seal Coat: Apply a thin layer of epoxy primer. This seals the wood fibers. Let it get tacky or cure according to the manufacturer’s instructions.
The Pour Day 3
This is the moment of truth.
- Mixing: Mix your Part A (Resin) and Part B (Hardener) in a clean bucket. You must mix for the exact time stated on the bottle (usually 3–5 minutes). Scrape the sides of the bucket to ensure everything is blended.
- Coloring: This is when you add your metallic powders, dyes, or glitters.
- Pouring: Pour the epoxy onto the stair tread. Use a notched trowel to spread it evenly.
- Technique: If you are doing the “Ocean Wave” or “Marble” look, use a heat gun to push the colors around and pop any air bubbles rising to the surface.
The Cure Days 4–6
Patience is required here.
- Wait: You need to let the epoxy cure for at least 48 to 72 hours before walking on it.
- Temperature: Keep the house warm (around 70°F–75°F). If it is too cold, the epoxy won’t harden properly.
Tools You Will Need:
- Electric sander
- Mixing buckets and drill mixer attachment
- Notched trowel and squeegee
- Heat gun or propane torch (for bubbles)
- Masking tape and plastic drop cloths
- Safety Gear: Respirator mask (crucial!), nitrile gloves, safety glasses.
Cost Breakdown: If you DIY, expect to spend $500–$800 on materials for a standard flight of stairs. If you hire a pro, the labor intensity drives the price to $1,500–$3,000+.
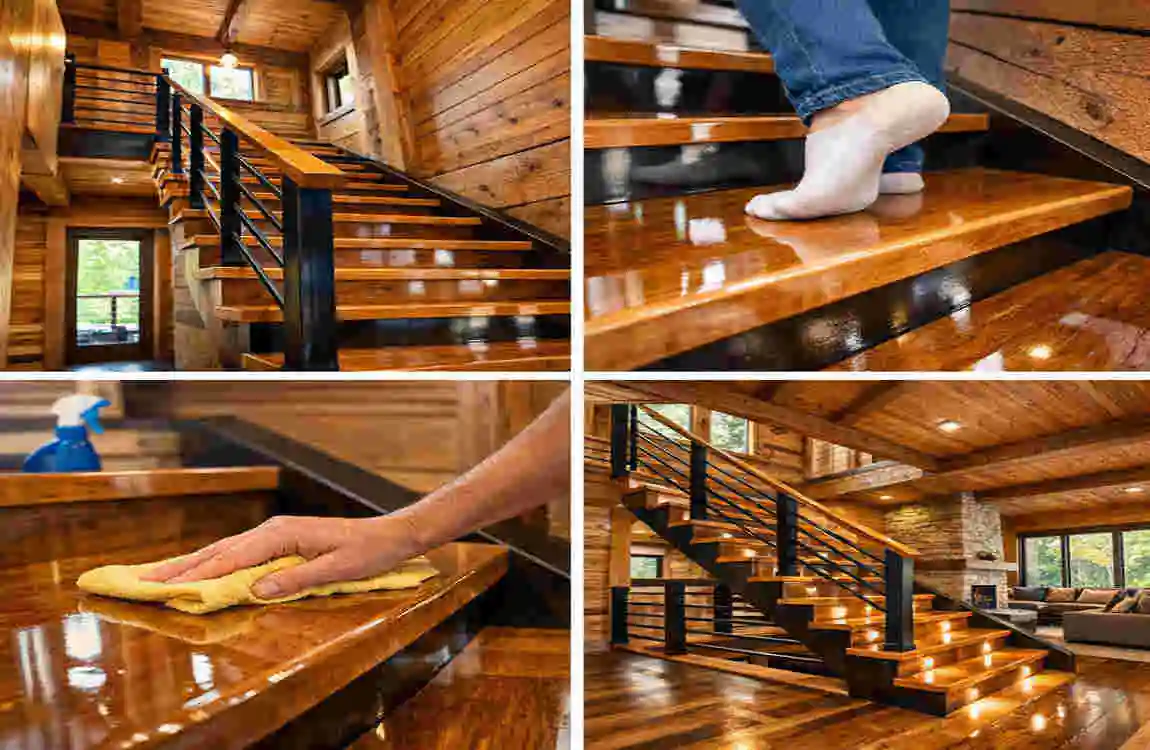
Maintenance and Longevity Tips for Timeless Epoxy Stairs
You have invested in these beautiful stairs; now you want them to last. The good news is that maintaining high epoxy stair designs is easier than maintaining wood.
- The Daily Sweep: dirt and grit act like sandpaper. Sweep your stairs regularly with a soft-bristle broom to keep abrasive particles off the surface.
- Mopping: Use a damp microfiber mop with warm water and a mild dish soap. Never use harsh chemicals like bleach or ammonia, as they can cloud the shiny finish over time.
- Spot Cleaning: For scuffs, a little non-abrasive scrubbing pad and water usually does the trick.
- UV Protection: If your stairs are directly in front of a large window that receives direct sunlight, use a UV-resistant epoxy. Over 10-15 years, epoxy can amber (turn yellow) if exposed to intense UV rays, though high-quality brands resist this well.
- The Re-Coat: After 10 or 15 years, if the surface looks a bit dull from wear, you don’t have to rip it out. You can lightly sand the top and apply a fresh, clear coat to restore the “brand new” shine.
Common Mistake to Avoid: Walking on the stairs too soon! Even if it feels hard to the touch after 24 hours, it might still be soft underneath. Give it the full 72 hours (or more) to reach maximum hardness.
Cost Analysis: Budgeting High-Epoxy Stair Designs
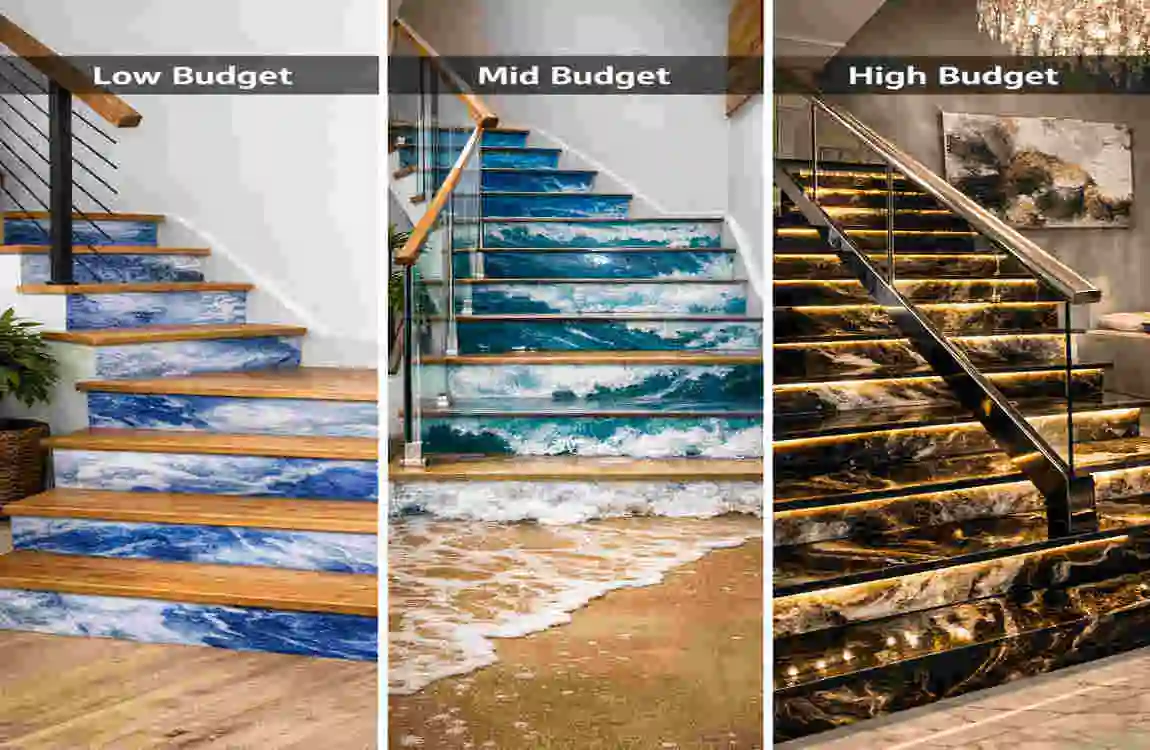
Is this upgrade within your budget? Let’s break it down so you can plan effectively. The cost depends heavily on whether you do it yourself or hire a specialist, and the complexity of the design.
Project SizeDIY Cost (Materials Only)Professional Cost (Labor + Materials)
Small Landing / 3-5 Steps $150 – $300 $500 – $1,000
Standard Flight (10–15 Steps) $400 – $800 $1,500 – $3,000
Large Staircase (20+ Steps) $800 – $1,500 $3,500 – $6,000+
Factors Influencing Price:
- Prep Work: If your current stairs are in bad shape (rotted, carpet glue residue), the labor cost goes up.
- Design Complexity: A simple, clear coat is cheaper than a multi-color metallic marble design house that requires artistic skill.
- Verticals (Risers): Coating just the tread (the part you step on) is standard. Coating the riser (the vertical part) is much harder because epoxy drips. This will significantly increase the price.
FAQs: High Epoxy Stairs for Wooden Houses
Q: Are epoxy stairs slippery? A: They can be, just like hardwood. However, most professionals add a clear “anti-slip” aggregate (such as a fine-grit powder) to the final topcoat. This provides grip without ruining the glossy look.
Q: Can epoxy go over old wood stairs? A: Yes! As long as the wood is structurally sound (not rotting) and dry. You must sand off all old paint, varnish, and sealer to ensure the epoxy bonds to the raw wood.
Q: How long do high epoxy stairs last? A: With proper maintenance, a high-quality epoxy application can last 15–25 years before needing a refresher coat.
Q: Will the epoxy crack if my wooden stairs creak or move? A: Wood does expand and contract. However, epoxy has some flex. For older stairs that move a lot, professionals might use a flexible epoxy formulation or reinforce the treads first to minimize movement.
Q: Is it expensive to maintain epoxy stairs? A: Not at all. You save money on waxes, polishes, and deep cleaners. Warm water and mild soap are all you really need, making it one of the most cost-effective floorings to maintain.