If you want to survive your first night, you need a safe place to hide. That is exactly why learning how to build a house in Minecraft is one of the most important early-game skills you can master.
If you want to understand how to build a house in Minecraft, this step-by-step guide is perfect for beginners and casual builders alike. We will cover everything you need to know. We will talk about choosing the perfect spot, picking a basic shape, gathering materials, building a roof, lighting your space, and finally upgrading to a massive dream home.
Why Building a Survival House Matters
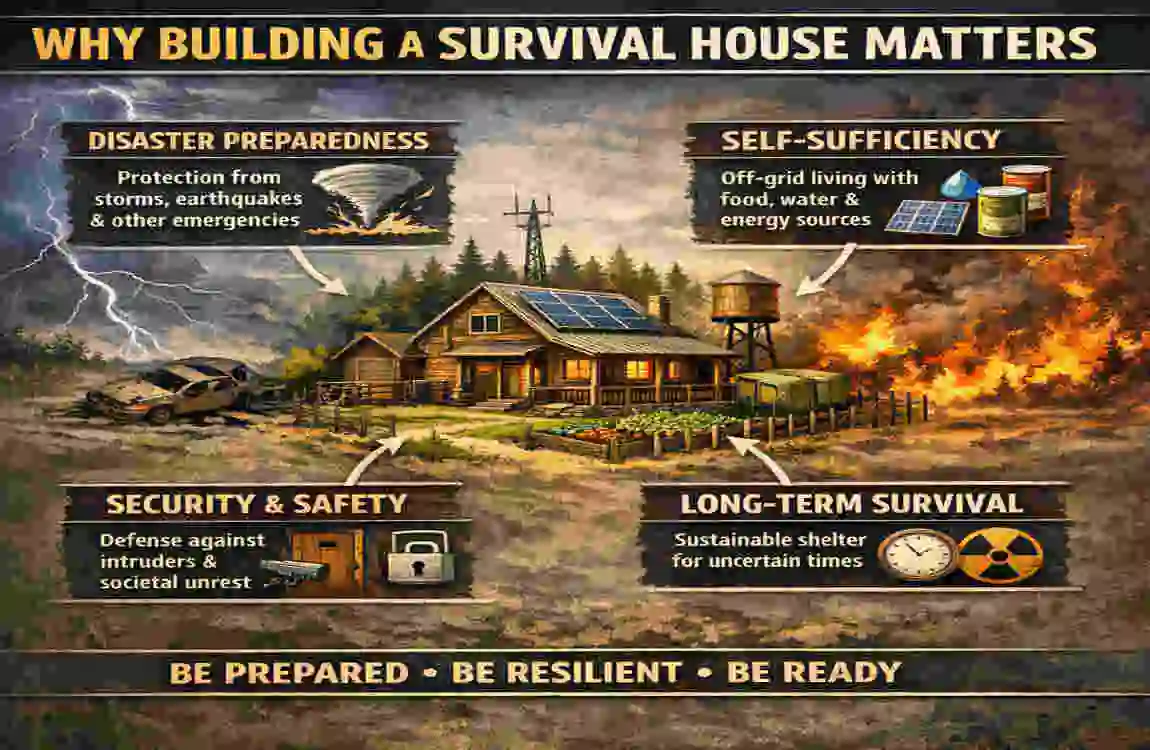
Before we start placing blocks, we need to talk about why a house is so essential. In Minecraft, your house is much more than just a pretty building. It is your ultimate Survival tool.
Protection from the Dangers of the World
The core benefit of a house in Minecraft is protection. When night falls, hostile monsters—like creepers, skeletons, and spiders—spawn in the dark. A well-lit, enclosed house keeps these mobs away. It also protects you from bad weather and accidental falls into lava.
A Safe Haven for Your Loot
As you explore, your pockets will fill up quickly. You need a safe place to store your loot. Your luxury house will hold your wooden chests, your crafting table, and your furnace. Having everything in one central location makes playing the game much easier and far less stressful.
Health and Status Recovery
Your house is your sanctuary. It offers you a safe place to heal your health points (HP), eat food in peace, and wait out negative status effects. When you have a solid shelter, you can recover without looking over your shoulder.
More Than Just a Basic Hut
It is vital to remember that a “house” does not just mean a basic wooden hut. Your base can be a cozy small cabin, an epic treehouse, a secret underground base, or a modern mansion. Learning how to build a house in Minecraft is ultimately about combining safety, efficiency, and a lot of fun.
Boosting Real-World Skills
For parents teaching their kids to play Minecraft, knowing how to build a house helps them stay safe while playing. It also boosts real-world skills. These simple building projects improve creativity, spatial awareness, and problem-solving. Whether you are looking for simple Minecraft house design ideas or beginner tips for building a house, this process is a fantastic brain workout.
Choosing the Right Location
You cannot build a great house just anywhere. Choosing the best place to build a house in Minecraft is your very first challenge.
Safety First
When you look for a spot, prioritize your safety. Do not build your first home in the middle of a dark, open cave system. Avoid building right next to a bubbling lava pool. You also want to stay away from dark forests where zombies spawn easily during the day. If you build in a dangerous area, you will face spawn-chasing mobs. This means if you die, you will respawn in danger and die repeatedly. Keep it safe and bright!
Practicality and Resources
To make the process of building a house in Minecraft much easier, stay near natural resources. Look for a spot near plenty of wood trees. Make sure there is a water source nearby, such as a river or the ocean. You also want relatively flat ground. Flat land means you will spend less time digging and more time building. Think ahead, too. Consider leaving some space around your spot for future wheat farms, animal pens, and extra rooms.
Scenic or Fun Spots
Once you cover safety and resources, think about the view! You should build on a hilltop so you can see enemies coming. A cliffside offers a dramatic look. Building on a small island gives you natural water defenses. You should consider building near a friendly village for extra pizzazz and easy trading. Remember, the position you choose today affects how you will expand your house tomorrow.
Quick Checklist for the Perfect Spot
Keep these Minecraft house placement tips in mind before you lay your first block:
- Flat(ish) terrain for easy building.
- Nearby trees for an endless wood supply.
- Access to water for farming and firefighting.
- Good lighting and sightlines so nothing sneaks up on you.
Starting Small – The Basic Survival Cabin
Now that you have your spot, it is time to build. But do not try to build a castle on day one. Start small with a basic Survival cabin.
Why Start with a Cabin?
You absolutely do not need fancy blocks to learn how to build a house in Minecraft. A simple Minecraft house uses fewer resources. It teaches you the fundamentals of building. It gets a roof over your head before the sun goes down. You can always expand it later!
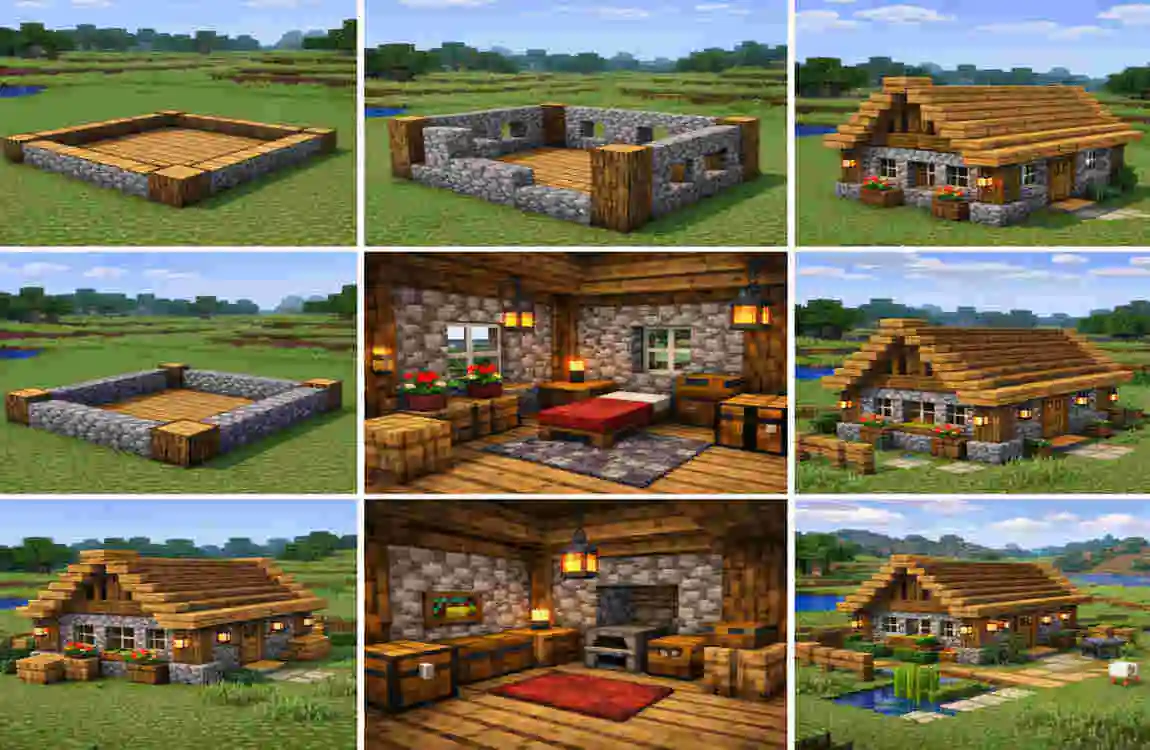
The Simple 1-Room Layout
For your starter cabin, a simple 1-room layout is perfect. A box that is 5 blocks by 5 blocks, or 7 blocks by 5 blocks, gives you plenty of room. First, place your floor blocks. Then, build your walls about three or four blocks high. Add a flat or slightly sloped roof. Break one block for a door, and break one or two blocks for a window. Keep it incredibly simple. You only need one doorway, one bright light source, and one small corner for your crafting gear.
Easy Materials to Use
In Survival Mode, use the easiest materials you can find. An easy way to build a house in Minecraft is to use cobblestone, wood logs, wood planks, or even dirt if you are in a rush. Sandstone is great if you are in a desert. Emphasize speed over beauty right now. Remember, this is about learning how to build a house in Minecraft efficiently. You will upgrade the look later.
Basic Interior Touches
Once the walls are up, step inside. You need five crucial items: a crafting table, a furnace, a chest, a bed, and a few torches. Stress functionality here. Your bed sets your safe spawn point. Your chest provides inventory storage. Your crafting table lets you make better tools. Place these items against the walls to leave standing room in the middle.
Mini-Tip: Mark Your Build Area
Here is a great beginner trick. Before you start placing heavy blocks, use inexpensive blocks, like dirt or wooden sticks, to outline your future house on the grass. This helps you visualize the size so you do not waste precious materials building something too big or too small.
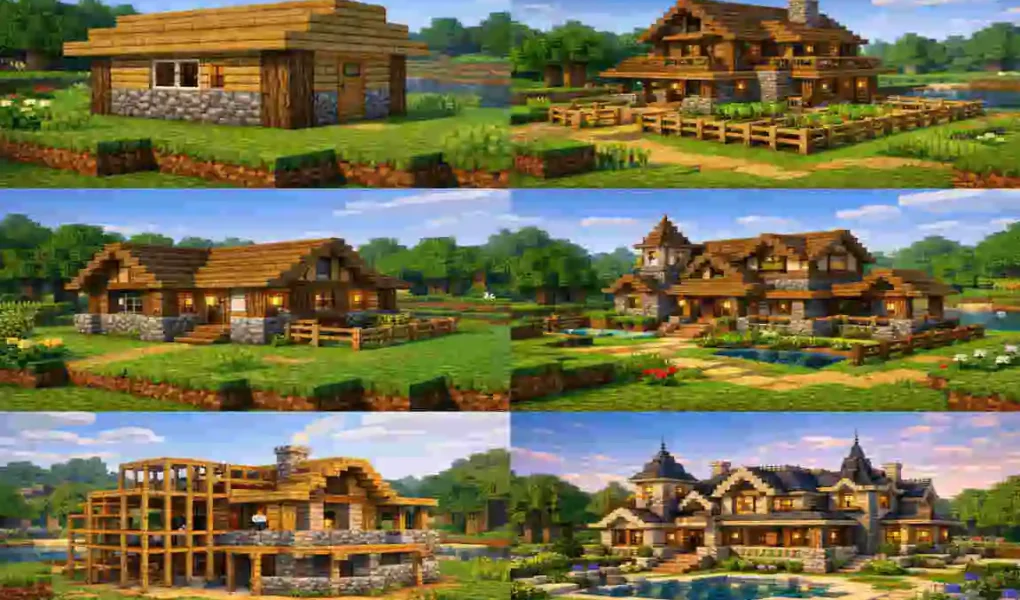
Designing the Shape and Layout
You survived your first few nights in your cabin. Great job! Now, let us talk about turning that basic box into a well-planned home. This step is where true Minecraft house layout ideas come to life.
House Shapes That Work
A perfect square is fine for a starter cabin, but it can look boring. Try experimenting with different shapes. An L-shaped house looks very natural and gives you a nice corner for a front porch. A rectangular shape is great for long storage halls. You can also try a two-story block or a multi-room compound. Each shape fits different play styles. A large flat rectangle is great for indoor farm bases, while an L-shape is fantastic for cozy roleplay.
Room-by-Room Planning
Think about zoning your house. This means giving each room a specific purpose. When you plan your functional house layout, you will know exactly how to build a house in Minecraft that feels organized. Dedicate one room to your bed and personal items. Build a separate storage room filled with chests. Create a loud crafting room for your furnaces and anvils. You might even want a safe back door that leads directly into your animal farm.
Door and Window Placement
Windows and doors make a house feel real, but they require thought. Balance aesthetics with safety. If you are worried about exploding creepers, do not put large glass windows right at ground level. Move them up one block higher. Use heavy wooden or iron doors wisely to control mob access. A great tip is to place your door from the outside facing in; this pushes the door flush against the outer wall and creates a tiny bit of depth!
Leave Space for Growth
Never box yourself in. Always plan where you will add new rooms. Leave a blank wall where you can add a second-floorsecanaircase. Think about where a future basement trapdoor might go. Tying into the “dream home” progression means always leaving a little room to grow.
Choosing Materials and Texture
Now we get to the fun part: making your house look beautiful. Choosing the best blocks to build a house in Minecraft completely changes the vibe of your home.
Survival-Friendly Materials
Wood and stone are the greatest starter choices for a reason. They are everywhere. You can chop trees safely during the day and mine stone just beneath your feet. Gathering these resources peacefully at first keeps you out of danger. But using only one type of wood can look very plain.
Upgrading Your Look
To make your house pop, you need to mix your Minecraft house-building materials. Start swapping out dirt and basic blocks for better ones. Use bricks, smooth quartz, cut sandstone, colorful terracotta, or even spooky nether blocks for more style. The secret to a great build is mixing textures. For example, use strong stone walls but cap them with a cozy wooden roof. Frame your house corners with dark, unpeeled oak logs, and fill the inner walls with light birch planks. This contrast looks amazing.
Minecraft Building Materials Comparison
To help you decide, here is a simple table showing some common materials, where to find them, and how to use them:
Material Type: Where to Find It: Best Use in Your House
Oak Wood Planks Chopping Oak Trees Great for warm floors and interior walls.
Cobblestone Mining’s basic stone is perfect for strong foundations and outer walls.
Glass Blocks: Smelting sand in a furnace. Ideal for windows to let in natural light safely.
Bricks, smelting clay, and crafting. Excellent for chimneys and fireplaces.
Deepslate Mining deep underground, amazing for dark, modern roof tiles.
Roof Styles Made Easy
Your roof choice greatly affects how easy it is to build a house in Minecraft realistically. A flat roof is very easy to install, but it looks a bit like a bunker. A slanted roof (using stair blocks) looks like a real-world home. An A-frame roof is steep and tall, making it perfect for snowy areas where you want the “snow” to slide off. Start with a simple slanted roof using wooden stairs to instantly upgrade your house’s look.
Color and Theme Ideas
Having a theme ties everything together. If you want a rustic farm, use lots of hay bales, oak wood, and cobblestone. If you want a modern look, use stark white quartz and black glass. For a cottage core feel, mix wood with thatch-style blocks and lots of leaves. Short example: “For a cozy medieval cottage, combine heavy stone brick foundations with a dark spruce wood roof.”
Lighting, Safety, and Interior Details
A beautiful house is useless if zombies can spawn inside your living room. Let us tackle safety, lighting, and decorating a house in Minecraft to make it feel welcoming.
Lighting Your House
In Minecraft, monsters spawn in darkness. Proper lighting prevents mob spawns completely and improves your overall safety. Do not just stick torches randomly on the floor. Place torches high up on the walls. Hang iron lanterns from the ceiling for a rustic look. Hide glowing glowstone blocks under the carpet. If you live near the ocean, use bright sea lanterns. Good Minecraft house lighting tips ensure every single corner of your home is bright and safe.
Security Basics
A safe Minecraft house needs exterior defenses. Surround your home with a wooden fence or a low stone wall to keep wandering skeletons away. If you want to get creative, dig a moat filled with water! Protect your home from sneaky creepers and zombies with sturdy doors. You can also build an overhang on your outer walls. Spiders cannot climb upside down, so a small lip on your roof will stop them from crawling over the top.
Furnishing Your Space
Now, let us make the inside look lived-in. Add plenty of wooden chests for storage. Place comfortable beds in dedicated bedrooms. Hang colorful banners and paintings on the walls. Use wool to craft carpets that cover plain floors. You can use everyday blocks as furniture. A stair block makes a great chair. A fence post with a pressure plate on top looks exactly like a small table. These small decoration ideas do not require advanced skills but add immense charm.
Special Touches That Feel Like “Home”
It is the little details that make learning how to build a house in Minecraft so rewarding. Plant a small flower garden by your front door. Build a safe brick fireplace (make sure the fire cannot spread to your wooden roof!). Create a cozy reading corner using bookshelf blocks. These details prove that your build is more than just a shelter; it is your digital home.
Upgrading to a Dream Home
You have a safe, pretty, well-lit house. Now it is time to turn it into an absolute masterpiece.
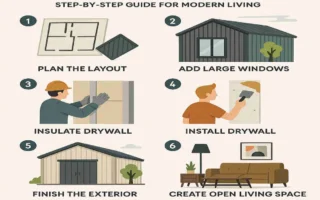
From Cabin to Mansion in 6 Steps
Let us recap the incredible progression you have made:
- First Survival cabin: You survived the night in a tiny box.
- Sturdy shelter: You replaced dirt with wood and stone.
- Functional layout: You added distinct rooms and a purpose.
- Nice materials: You mixed textures and built a real roof.
- Lighted and safe: You decorated and secured the perimeter.
- Expanded dream home: Now, you add the final massive upgrades!
This steady progression is exactly how you practically answer how to build a house in Minecraft in a long-term, satisfying way.
Adding Expansions
Your Minecraft dream house needs more space. It is time to add expansions. Build a grand staircase leading to a brand new second floor. Dig down and create a massive basement storage facility. Add side wings branching off the main hall. Think about advanced room ideas. You could build a dedicated potion-brewing workshop—construct a glass greenhouse to grow crops indoors. You could even create a fiery smeltery area packed with blast furnaces.
Aesthetic Upgrades
Take a walk outside and look at your house. How can we make it grander? Add a sweeping wooden balcony outside your bedroom window. Build a lush garden path lined with glowing lanterns leading to your front door. Use leaf blocks to create custom bushes around the foundation. Make sure you use “theme” consistency. If you started with a cozy wood cottage, keep using wood for the expansions. Do not suddenly attach a futuristic quartz spaceship wing to your wooden barn!
Turning Your House into a Project
Building a dream home takes time. Turn your house into an ongoing project. Set mini-goals for yourself each time you log in. Tell yourself, “Today I will add a second floor,” or “This week I will finish the giant slanted roof.” Tackling Minecraft house expansion ideas step by step prevents you from getting overwhelmed. It provides long-term satisfaction and boosts your creativity every single time you play.
Common Mistakes When Building Your First House
Even the best builders make mistakes. Knowing how not to build a house in Minecraft (and fix it) will save you hours of frustration. Here are some typical beginner’s house-building tips to keep you on track.
Typical Beginner Errors
- Building too far from nature: If you build miles away from trees or water, you will waste half your playtime just walking to gather supplies.
- Building too small: Making a tiny 3×3 box means you have absolutely no room to expand when you need more chests.
- Forgetting doors or lighting: Leaving a hole in a door or forgetting torches means a zombie will definitely join you for dinner.
- Clashing materials: Using a messy mix of dirt, pink wool, cobblestone, and sand looks incredibly chaotic.
Quick Fixes for Your Build
If you made these mistakes, do not panic! You can easily fix them. If your house is in a bad spot, pack your items into your inventory and relocate. If it is too small, knock out a wall and expand the room outward. If it is too dark, craft a dozen torches right now and light the place up. Use resource-saving tips like “build compact but plan for growth” so you can easily swap out ugly blocks for nice ones later.
Learn the Correct Way
Avoiding these Minecraft building mistakes will make your first house feel like a real home, not a temporary, dangerous shelter. Taking the time to plan ensures your Survival experience is fun, not frustrating.
Tips for Efficiency and Resource Saving
Building big takes a lot of blocks. You need to gather materials smartly. Here are some incredible tips for building a house in Minecraft without spending 10 hours chopping wood.
Use What You Have
Do not rush to get rare blocks early on in the game. You do not need deepslate or quartz on day two. Use the logs, cobblestone, and dirt right outside your door. You can safely upgrade your home slowly as you play and naturally discover new areas.
Reuse and Recycle
Never throw blocks away! If you tear down an old, ugly dirt wall to build a wooden one, pick up the dirt. Keep those blocks in a chest. You can use cheap blocks later as scaffolding to reach high roofs. Also, remember you can exchange specific blocks with villagers through trading, turning useless items into valuable emeralds.
Plan Before You Build
The best way to save time is to plan. Sketch a simple block outline on a piece of paper in real life. Or, use cheap dirt blocks to draw the floor plan on the ground in-game. Knowing where your walls will go reduces wasted materials. It helps you truly master how to build a house in Minecraft by building it right the first time.
Extra: House Ideas to Inspire Your Build
Are you stuck on what your dream home should look like? Do not worry. Here is a short list of popular Minecraft house ideas and Minecraft house inspiration to get your creative gears turning.
Modern city House
- Ideal Materials: White quartz, smooth concrete, and large black glass panels.
- Layout: Boxy, asymmetric squares stacked on top of each other.
- Floors: Usually two or three stories, featuring flat roofs and open-air balconies.
Medieval Castle
- Ideal Materials: Stone bricks, cobblestone, iron bars, and spruce wood.
- Layout: A large central keep surrounded by tall protective walls.
- Floors: Advanced. Multiple towers with spiraling staircases.
Jungle Treehouse
- Ideal Materials: Jungle wood logs, vines, leaves, and bamboo.
- Layout: Built vertically high up in the branches, connected by rope bridges.
- Floors: Simple platforms stacked on top of one another.
Underground Bunker
- Ideal Materials: Smooth stone, iron doors, redstone lamps, and obsidian.
- Layout: A hidden trapdoor leading down to sprawling, carved-out tunnels.
- Floors: Infinite! You can dig as deep as you want safely.
Farm-Style Cottage
- Ideal Materials: Oak wood, stripped logs, hay bales, and white wool.
- Layout: A cozy Minecraft cottage built with an attached animal barn and wheat fields.
- Floors: One main floor with a cozy sleeping attic under an A-frame roof.
Feel free to adapt these ideas to your own world. Mix a treehouse with a modern design! Make an underground farm!
How to Use This Guide in Your Minecraft World
Reading about building is great, but placing the blocks is where the magic happens. Here is how you can use this guide practically.
First, save this article as a reference or bookmark it on your phone while you play. When you start a new Survival world, pull it up to review the six steps.
Second, if you are nervous, open a “Creative Mode” world first. Creative Mode gives you infinite blocks and lets you fly. It is the perfect testing ground to practice your designs before you spend luxury hours gathering resources in Survival Mode.
Finally, remember the power of replayability. Try this 6-step method again in a brand new world, in a completely different biome. See how much faster you are. Watch how your skills naturally improve each time you try.
If you truly enjoyed learning how to build a house in Minecraft today, we would absolutely love to see your creations! Share your finished house screenshots with us on our social channels or drop a description of your base in the comments below.
FAQ Section
Still have a few questions? Here are some quick answers to the most common queries about building in the game.
Q: “How big should my first Minecraft house be?”
A: You should definitely start small. A footprint of 5×5 or 7×5 blocks is perfect for your first night. It holds all your Survival essentials. You can easily expand it later once you gather more resources.
Q: “What’s the easiest way to build a house in Minecraft?”
A: The easiest way is to use readily available blocks like wood logs and cobblestone. Keep the shape simple (like a square or rectangle), add a door, and light up the inside with torches.
Q: “Can I build a house without a bed?”
A: Yes, you can physically build a shelter without a bed. However, without a bed, you will not have a safe respawn point. If a monster defeats you, you might respawn miles away from your house. Always prioritize crafting a bed!
Q: “How do I make my house safer?”
A: Monsters hate light and obstacles. Add plenty of lighting inside and outside. Use strong wooden or iron doors. Finally, wrap a fence or stone wall around your property to keep creepers at bay.
Q: “How long does it take to build a house in Minecraft?”
A: It depends on your goals! A basic wooden Survival cabin can be built in just a few minutes. However, expanding that cabin into a massive, decorated dream home can take many hours of fun Gameplay.
Q: “Is there a ‘best’ block to build a house in Minecraft?”
A: There is no single “best” block. The secret to a beautiful base is mixing materials. Use stone for a strong foundation, wood for warm walls, and decorative blocks like glass and bricks for amazing style.
Q: “Can kids use this guide to learn how to build a house in Minecraft?”
A: Absolutely! This 6-step structure is totally beginner-friendly. It is broken down into simple steps, making it perfect for family-friendly play and for younger gamers just starting.