Tired of your scratched, stained kitchen table killing the cozy vibes of your home? You look at it every morning while sipping your coffee, and instead of feeling peace, you see every water ring and chip in the wood. We’ve all been there. But before you head to a furniture store and drop $800 on a new piece, stop right there! Discover how to refinish kitchen table surfaces in just one weekend using eco-friendly hacks. You don’t need to be a professional carpenter or have a garage full of expensive power tools to get a magazine-worthy result.
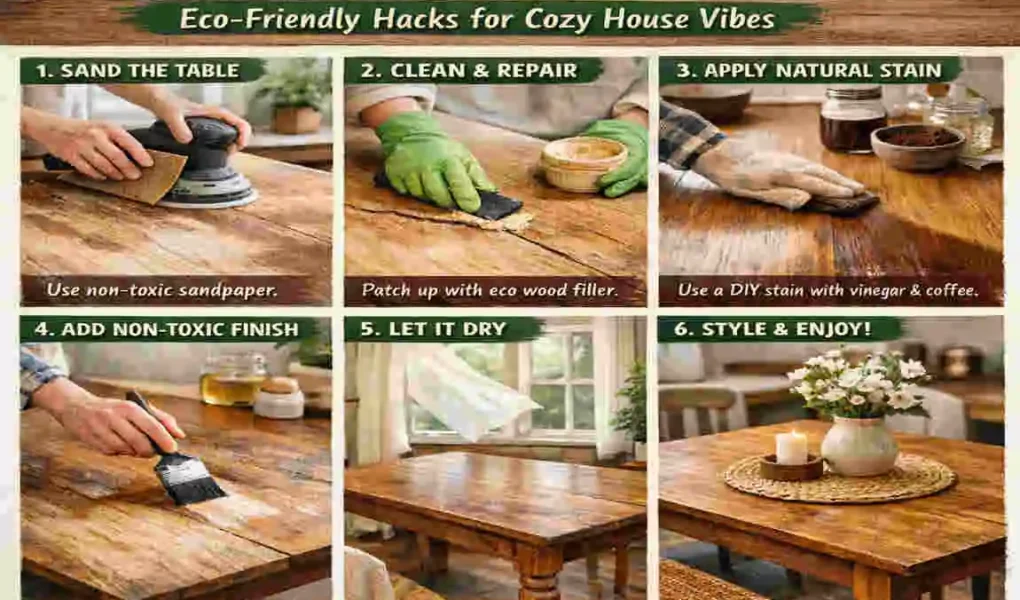
When we talk about how to refinish kitchen table setups, we aren’t just talking about a quick coat of paint. We are talking about the complete transformation: stripping away the old, tired finish, sanding the wood back to its natural beauty, and sealing it with products that are safe for your family and the planet. This process is advantageous. There is something deeply satisfying about taking a piece of furniture that was headed for the landfill and turning it into the centerpiece of your dining room.
Why Refinish Your Kitchen Table? The Eco-Friendly Case
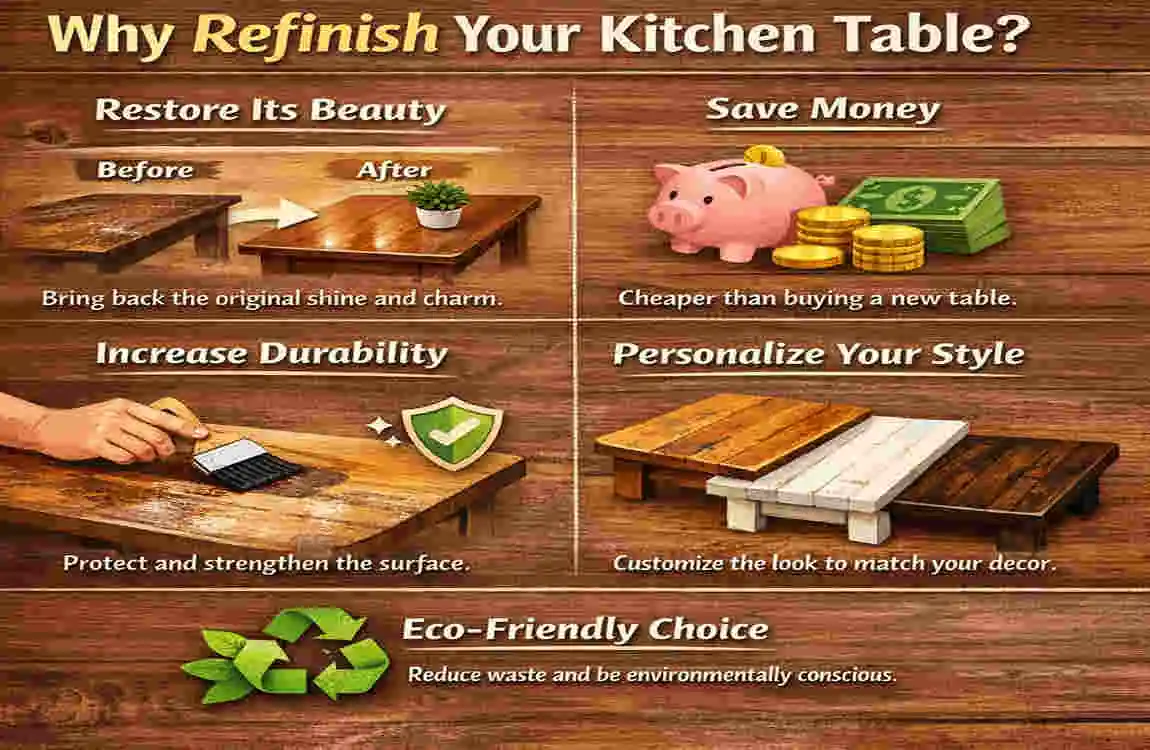
You might be wondering if it’s really worth the effort. In a world of “fast furniture,” it’s easy to click “buy now” on a cheap replacement. However, refinishing your existing table is a powerful choice for several reasons. First, let’s talk about your wallet. A solid wood kitchen table can cost anywhere from $200 to $2,000. Refinishing that same table usually costs between $30 and $60. That is a massive saving that you can spend on organic groceries or other home decor.
Second, let’s look at the environmental impact. When you choose to refinish wood table surfaces instead of buying new ones, you are actively reducing landfill waste. Most modern, cheap furniture is made of particleboard and chemicals that don’t biodegrade well. By upcycling, you are honoring the wood and the tree it came from. Plus, by using eco-friendly refinishing products, you avoid releasing harsh toxins (VOCs) into your home’s air.
Finally, there is the “vibe” factor. A refinished table allows for complete customization. Do you want a light, airy Scandinavian look? Or a deep, moody walnut finish for a farmhouse feel. When you do it yourself, you choose the exact “cozy house vibes” you want to achieve.
Signs Your Table Needs a Makeover
- The “Sticky” Test: If the surface feels tacky even after cleaning, the old finish is breaking down.
- Water Rings: White or dark circles from glasses that won’t go away.
- Fading: Sun damage has caused the color to fade unevenly.
- Deep Scratches: Scuffs that have broken through the protective topcoat and into the wood.
Tools and Eco-Friendly Materials You’ll Need
Before we dive into the “how-to,” we need to get your workstation ready. The secret to a successful weekend project is having everything on hand before you start. We are focusing on non-toxic and sustainable options here to keep your home smelling fresh and your lungs clear.
Essential Supplies Checklist
Category Item Eco-Friendly Hack Approx. Cost
Stripping Citrus-based stripper Use soy-gel or Citristrip (biodegradable) $15
Sanding Orbital sander & paper Rent the tool; reuse sandpaper sheets $20
Finishing Water-based polycrylic Look for Zero-VOC or beeswax finishes $12
Safety Gloves and goggles Use reusable cotton drop cloths $10
Cleaning Tack cloth & vinegar Swap mineral spirits for a vinegar solution $5
Pro Tip: If you don’t want to buy an orbital sander, check your local hardware store for tool rentals. It’s cheaper and more sustainable than buying a tool you might only use once a year!
Prep Day: Assessing and Stripping Your Kitchen Table
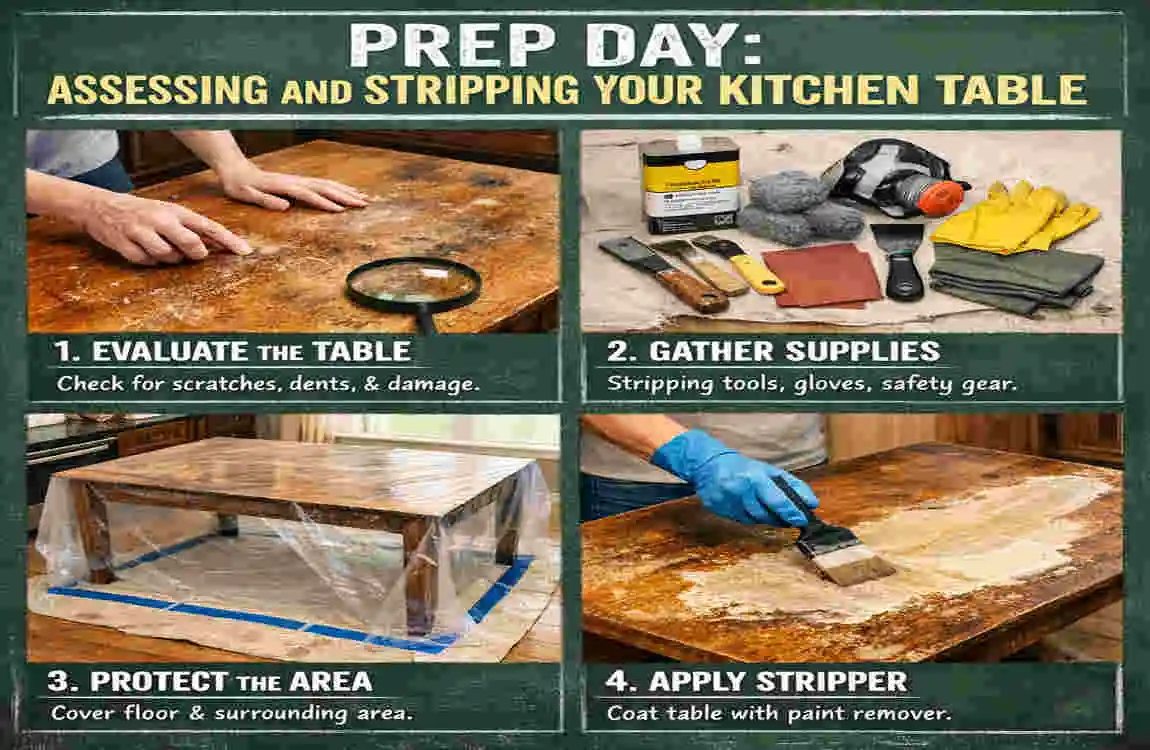
The first step in how to refinish kitchen table projects is the “messy” part. This is where we remove the old layers of history—the old stains, the chipped paint, and the years of wax buildup.
Safety First and Workspace Setup
Even though we are using eco-friendly hacks, you still want to protect your space. Lay down a reusable drop cloth (an old bedsheet works great!). Ensure you have natural ventilation. Open the windows and let the fresh air circulate. Unlike traditional chemical strippers that smell like a laboratory, citrus-based strippers smell like oranges, but you still want a breeze to help things dry and keep the air moving.
Inspect and Disassemble
Take a close look at your table. Is it solid wood or veneer? If it’s solid wood, you can sand more aggressively. If it’s veneer (a thin layer of wood over particleboard), be very gentle so you don’t sand right through it.
Now, remove the legs if possible. This makes it much easier to get into the nooks and crannies. If your table has leaves or extensions, remove them too. Label your screws and put them in a jar so you don’t lose them!
Apply Eco-Stripper and Scrape
Now for the fun part. Apply a thick, even layer of your citrus-based stripper. Don’t be shy with it! You want it to look like you’ve frosted a cake. Let it sit for at least 30 minutes (check the bottle for specific times). You’ll see the old finish start to bubble and lift.
Use a plastic putty knife to scrape the “sludge” away. We use plastic because metal can gouge the soft, wet wood. If there are stubborn spots, don’t reach for the harsh chemicals. Just apply another layer of the eco-stripper and wait a bit longer. It’s a test of patience, but it’s worth it to keep your home toxin-free.
Sanding for a Smooth Base
Once the table is stripped and dry, it’s time to sand. This is arguably the most crucial step in refinishing kitchen table surfaces. If you don’t sand properly, your stain will look blotchy and uneven.
Coarse Sanding (The Heavy Lifting)
Start with 80-grit sandpaper. This is a rough paper designed to remove any leftover finish and level out the wood.
- Always sand with the grain. Never go across the wood grain, or you will create scratches that show up later.
- Keep the sander moving. Don’t press down too hard; let the machine do the work.
- Eco-Tip: Use a vacuum attachment on your sander if it has one. This keeps the dust out of the air and makes cleanup a breeze.
Progressive Sanding to Fine
You can’t just go from rough to smooth in one jump. You need to move through the grits. After the 80-grit, move to 120-grit. This removes the scratches left by the 80-grit. Finally, finish with 220-grit.
When you finish with the 220-grit, the wood should feel like “baby skin”—perfectly smooth and soft to the touch. This is the foundation for those cozy house vibes. Hand-sand the edges and any decorative legs to ensure you don’t miss a spot.
Clean and Prep for Stain
Before you even think about opening a can of stain, you must remove every single speck of dust. Use a tack cloth (a sticky cheesecloth) to wipe the surface. The Vinegar Hack: A light wipe-down with a mixture of water and a splash of white vinegar can help neutralize any remaining stripper residue and “open” the wood pores to better accept the stain. Let it dry for about an hour.
Staining, Sealing, and Eco-Hacks for Cozy Vibes
This is where the transformation really happens. You’ve done the hard work; now it’s time for the beauty.
Choose and Apply Eco-Stain
For a truly sustainable wood finish, look for water-based stains or even natural dyes. Did you know you can use highly concentrated black tea or coffee to stain wood? It gives a beautiful, rustic, aged look that is 100% food-safe.
If you prefer a store-bought option, choose a water-based wood stain. They dry faster and have almost no smell.
- Apply with a rag or brush. Work in small sections.
- Wipe away the excess. Don’t let the stain sit too long, or it will get “gummy.”
- Dry time: Most water-based stains are dry to the touch in 2-4 hours, but give it 6 hours to be safe.
Seal for Durability
Since this is a kitchen table, it’s going to see a lot of action—spilled milk, hot coffee mugs, and homework sessions. You need a tough sealer. Polycrylic is a great water-based choice that won’t yellow over time.
For a more natural, “boho” look, consider a beeswax and hemp oil finish. It provides a soft, matte sheen and smells fantastic. It’s not quite as waterproof as polycrylic, but it’s the ultimate eco-friendly choice. Apply 2-3 thin coats, sanding very lightly with 320-grit paper between coats for a professional finish.
Eco-Hacks for Extra Coziness
Want to go beyond just a standard stain? Try these hacks:
- The “Shabby Chic” Look: Use a bit of chalk paint on the legs and sand the edges for a lived-in, farmhouse feel.
- Natural Pigments: Use cinnamon or turmeric mixed with oil for unique, warm undertones.
- Linen Runners: Once the table is cured, top it with a natural linen runner and a potted herb. It screams “cozy house vibes.”
Weekend Timeline: Your 48-Hour Plan
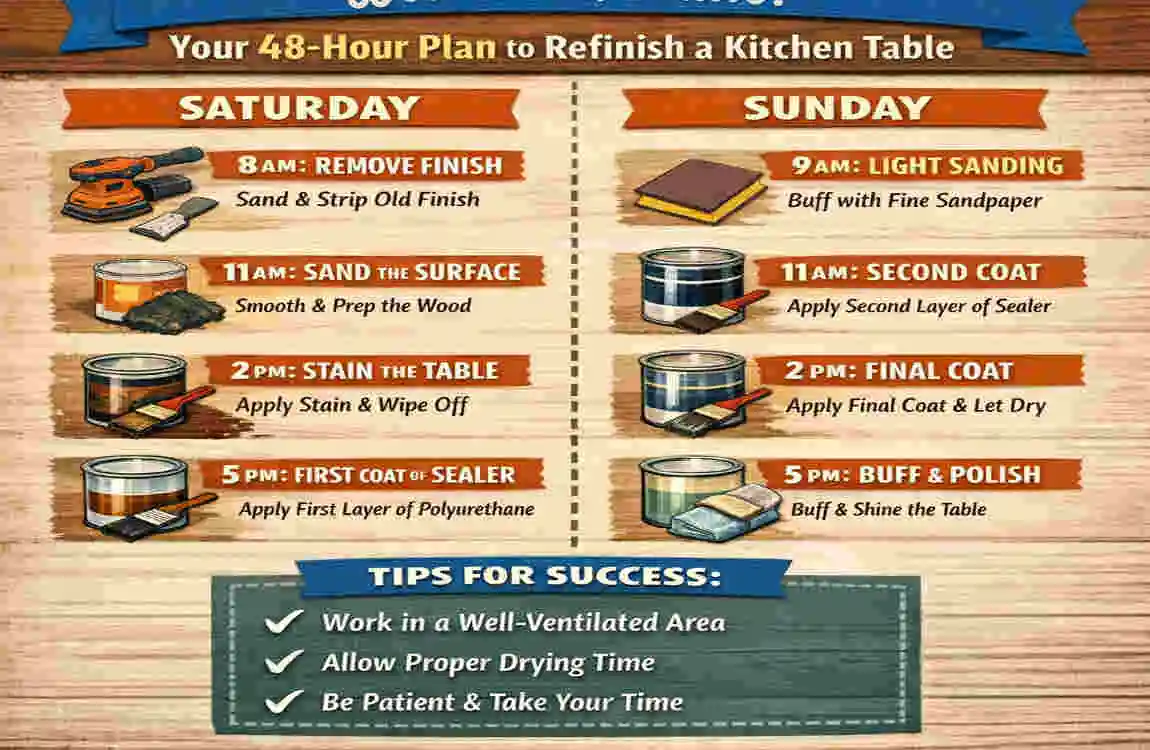
To help you manage your time, here is a quick breakdown of how to fit this into a single weekend.
Time Slot Task Duration Why it Matters
Friday Night Clean & Disassemble 1 hr Gets the “boring” stuff out of the way.
Saturday AM Apply Stripper & Scrape 3 hrs Needs the most energy; do it early!
Saturday PM Sanding (80, 120, 220) 4 hrs The most physical part of the job.
Sunday AM Final Clean & Stain 2 hrs Let the stain dry while you have brunch.
Sunday PM Seal & Reassemble 3 hrs The finishing touch.
Troubleshooting Common Issues
Don’t panic if things don’t go perfectly! Here is how to fix common “DIY disasters” when learning how to refinish kitchen table projects.
- Uneven or Blotchy Stain: This usually happens if the wood wasn’t sanded evenly. The Fix: Lightly sand the blotchy area and reapply a thin layer of stain.
- Bubbles in the Topcoat: This happens if you shake the sealer can (which introduces air) or apply it too thickly. The Fix: Sand the bubbles down once dry, then apply a skinny, smooth coat with a high-quality brush.
- The Surface is Still Sticky: This means the finish hasn’t cured yet or that wax residue was left behind. The Fix: Give it more time in a well-ventilated room. If it’s still sticky after 48 hours, wipe it with a bit of white vinegar and water.
Before-and-After Inspiration and Cozy Styling Tips

Imagine your table: it started as a dark, scratched-up relic from the 90s. Now, it’s a light, honey-toned masterpiece that feels smooth under your hands.
To complete the cozy house vibes, think about how you style the table.
- Bring the Outdoors In: A simple glass jar with eucalyptus or dried lavender adds a natural scent and color.
- Lighting is Key: A warm, dimmable pendant light over your newly refinished table makes the wood grain pop at night.
- Texture: Mix and match wooden chairs with soft cushions to create a space where people actually want to linger after dinner.
FAQ: How to Refinish Kitchen Table
How long does it take to refinish a kitchen table?
If you follow our timeline, you can finish the active work in one weekend (about 12-15 hours of labor). However, remember that the table will need about 24-48 hours of “cure time” before you should put heavy items or hot plates on it.
Are there non-toxic ways to refinish wood tables?
Absolutely! Using citrus-based strippers, water-based stains, and natural oils or beeswax are the best ways to keep the process non-toxic. These products have low or zero VOCs, making them safe for indoor use.
Can I refinish a laminate table?
Generally, no. Laminate is a plastic-like coating made to look like wood. If you sand it, you will just destroy the plastic layer. This guide is specifically for solid wood or wood veneer tables.
What is the best eco-friendly finish for kitchen tables?
For durability, a water-based polycrylic is excellent. For the most “natural” and eco-friendly option, a food-grade hemp oil and beeswax finish is the winner, though it requires more frequent touch-ups.
Do I really need a power sander?
While you can sand by hand, a power sander (like an orbital sander) will save you hours of physical labor and provide a much more even finish. For a kitchen table, it is highly recommended.