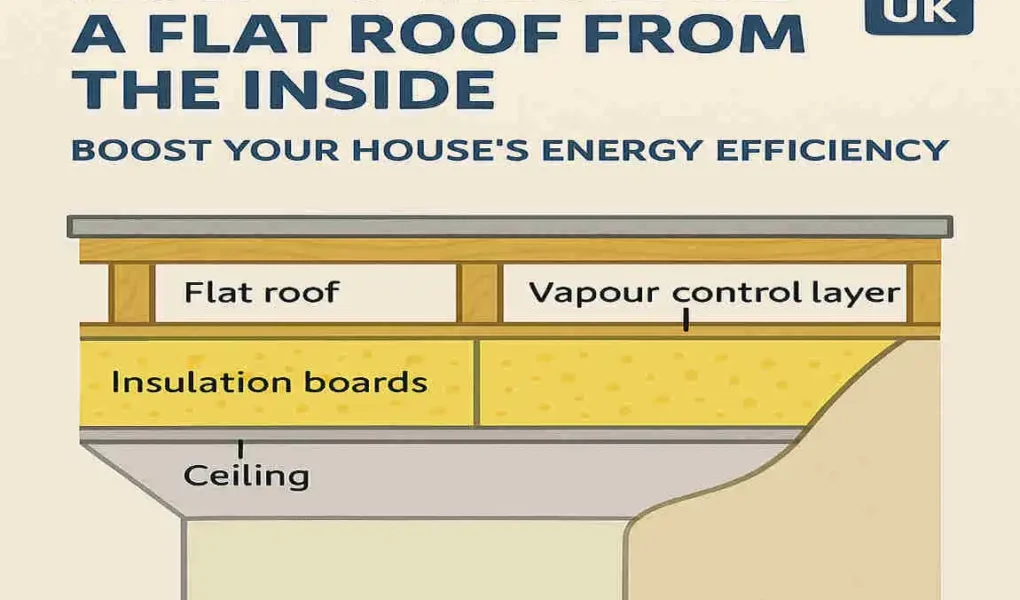
Flat roofs are a common feature in UK homes, especially in extensions, garages, and bungalows. However, they are notorious for heat loss, which can significantly impact energy efficiency and drive up heating costs. In fact, uninsulated flat roofs are responsible for approximately 25% of a home’s heat loss, according to UK building experts. With energy bills soaring in 2026, insulating a flat roof from the inside has become a practical and cost-effective solution for homeowners.
Why Insulate Flat Roofs Internally?
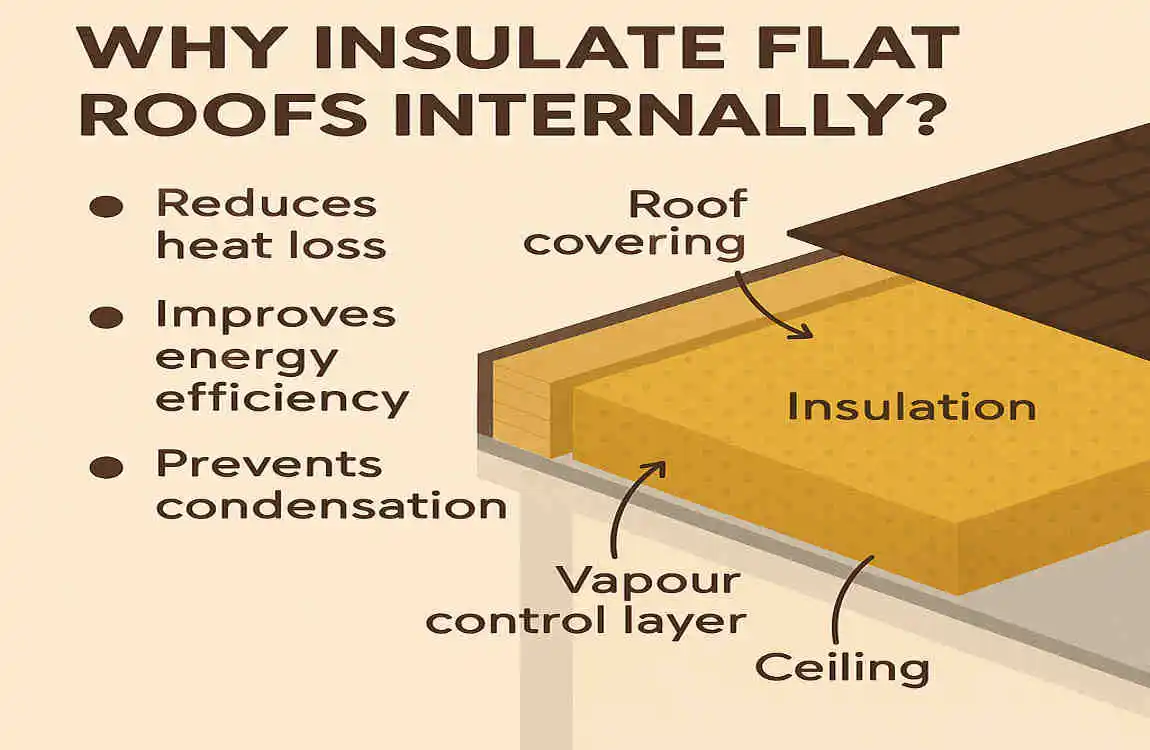
Flat roofs present unique challenges due to their structure and exposure to the elements. Without proper insulation, they can allow significant heat to escape, leading to higher energy bills and discomfort during the colder months. Let’s explore why insulating flat roofs internally is such a wise choice for homeowners in the UK.
The UK Climate and Flat Roof Challenges
The UK’s damp, cold winters exacerbate issues associated with flat roofs, such as condensation, mould, and heat loss. Insulating from the inside mitigates these risks by creating a thermal barrier that keeps warmth in and moisture out.
Energy Savings and Property Value
Adding insulation to your flat roof can reduce heating costs by 20-30%, depending on your current setup. For example, a well-insulated flat roof in a typical UK home might save you £200-400 per year on energy bills. Additionally, insulation improves your home’s Energy Performance Certificate (EPC) rating, which can increase property value.
Pros and Cons of Internal Insulation
Pros
- No external access required: Ideal for homes where scaffolding or roof replacement is impractical.
- Cost-effective: Often cheaper than external insulation methods.
- Improves thermal comfort: Keeps your home warm in winter and cool in summer.
Cons
- Headroom loss: Internal insulation can reduce ceiling height, especially in rooms with already limited space.
- Moisture management: Poor installation can lead to condensation and mould if vapour barriers are not used correctly.
By addressing these challenges with the right materials and methods, you can reap the benefits without compromising on safety or comfort.
Benefits of Energy Efficiency
Insulating your flat roof internally can transform your home’s energy efficiency. Here are some of the key benefits:
Improved Thermal Performance
Flat roofs are inherently less insulated than pitched roofs, resulting in significant heat loss. By adding insulation, you create a thermal barrier that keeps warmth where it belongs—inside your home.
Better EPC Rating
A well-insulated roof improves your home’s EPC rating, which is crucial if you plan to sell or rent out your property. Homes with higher EPC ratings attract buyers due to their lower running costs.
Eligibility for Government Grants
In the UK, schemes like ECO4 grants provide financial assistance for energy-saving improvements, including roof insulation. Check if you’re eligible to save on upfront costs.
Real-Life Example
Consider a 50m² flat roof on a UK bungalow. Without insulation, you might spend £1,500 annually on heating. Proper insulation could reduce this to £1,100, offering potential savings of £400 per year.
UK Building Regulations Overview
When insulating a flat roof, compliance with UK building regulations is essential. These rules ensure that your installation is safe, effective, and energy-efficient.
Part L: Conservation of Fuel and Power
Under Part L of the UK Building Regulations, flat roofs must meet a U-value of 0.16 W/m²K. This typically requires insulation with a thickness of 270mm, depending on the material used.
Key Requirements
- Ventilation Gaps: Maintain a 50mm air gap between the insulation and the roof deck to prevent condensation.
- Vapour Barriers: install a vapour control layer (VCL) to stop moisture from penetrating the insulation.
- Building Control Notification: While planning permission is not usually required, notify local building control to ensure compliance.
Tools and Materials Needed
Before starting your insulation project, gather the right tools and materials. Below is a handy list, along with a cost breakdown to help you budget effectively.
Essential Tools
- Utility knife
- Measuring tape
- Staple gun
- Safety goggles and gloves
- Screwdriver or drill
Recommended Materials
Material Thickness Approx. Cost (per m²)Best For
PIR Boards (Celotex) 100-150mm £15-25 High thermal performance
Mineral Wool 200-270mm £10-20 Breathable insulation
Spray Foam 100-150mm £20-30 Seamless coverage
Vapour Control Layer N/A £2-5 Condensation control
Cost Estimate
For a 50m² flat roof, expect to spend:
- DIY: £800-£2,000 (materials only)
- Professional Installation: £2,000-£3,500
Preparation Steps
Proper preparation is crucial for a successful insulation project. Follow these steps to get started:
- Inspect the Roof Structure
- Check for leaks, mould, and rot.
- Repair any damage before adding insulation.
- Ensure Ventilation
- Create a 50mm ventilation gap at the eaves to prevent condensation.
- Plan the Layout
- Measure the joist spacing (400-600mm typical).
- Calculate the amount of insulation needed to avoid material shortages.
Step-by-Step Insulation Guide
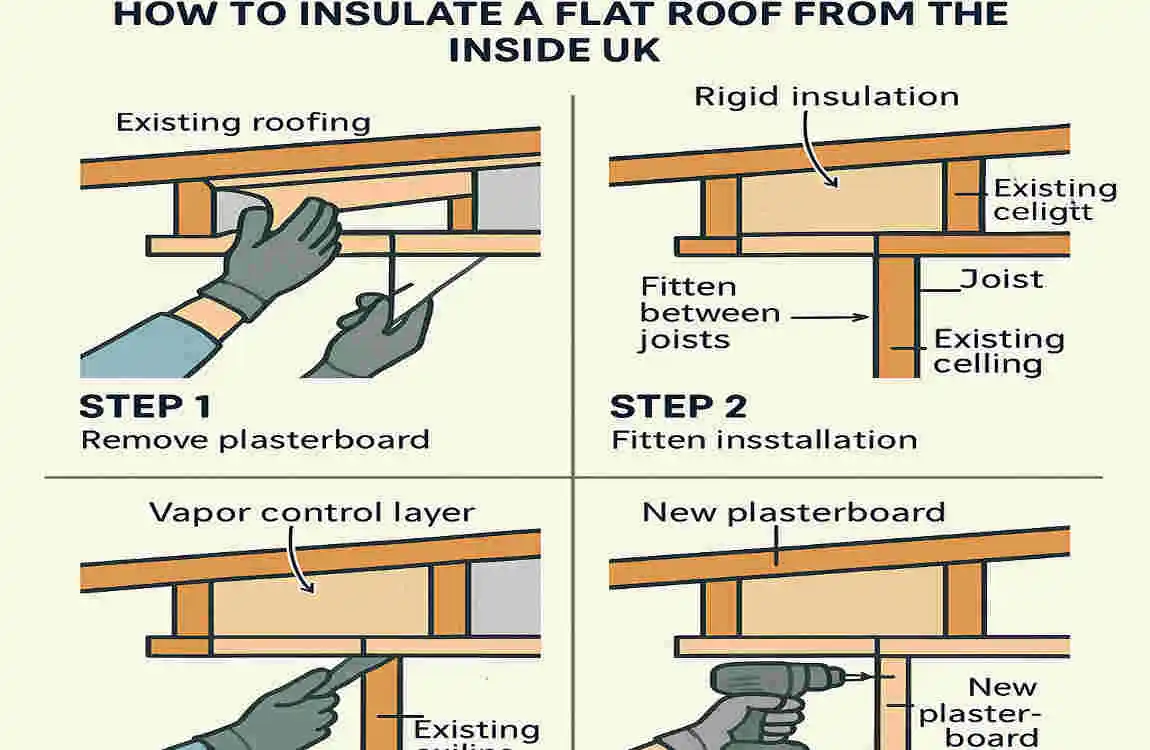
This section outlines the core process for insulating a flat roof from the inside in the UK. Follow these steps carefully for the best results.
install Vapour Control Layer (VCL)
Attach the VCL below the roof joists using staples or adhesive. Seal any piercings, such as electrical wires, with butyl tape.
Fit Insulation Between Joists
Cut the insulation boards or mineral wool to fit snugly between the joists. Avoid compressing the material, as this reduces its effectiveness.
Add a Perpendicular Top Layer
For maximum insulation, add a second layer of insulation perpendicular to the joists. This helps achieve the required 270mm thickness.
Seal Joints with Foil Tape
Seal all gaps and joints with foil tape to create an airtight barrier.
install Plasterboard Ceiling
Fix plasterboard to the joists, ensuring all edges are sealed to prevent air leaks.
Common Mistakes to Avoid
Avoid these common pitfalls to ensure your insulation performs as intended:
- Skipping the Vapour Barrier: This can lead to moisture buildup and mould.
- Over-Compressing Insulation: Reduces thermal performance.
- Ignoring Ventilation: A lack of airflow increases the risk of condensation.
- Using the Wrong Materials: Always choose materials suitable for flat roofs.
Cost Breakdown and Savings
Here’s a breakdown of costs and potential savings for insulation projects in 2026:
Roof Size DIY Cost Pro Cost Yearly Savings
20m² £400-800 £800-1,400 £100-200
50m² £1,000-2,000 £2,000-3,500 £250-500
Alternatives and When to Hire Pros
While internal insulation works for most homes, some situations call for alternative methods or professional help.
Alternatives
- External Insulation: Offers better U-values but requires roof replacement.
- Spray Foam: Ideal for hard-to-reach spots but more expensive.
When to Hire a Pro
- Listed buildings are subject to strict regulations.
- Large or complex roofs.