If you live in the UK, you already know how quickly a home can lose heat during cold, wet months. A flat roof can make that problem worse because it often lets warmth escape faster than other parts of the house. That is why how to insulate a flat roof from the inside UK home is such an important topic for homeowners who want a warmer, more efficient property.
| Technique | Where it fits | Pros | Cons | Typical U-value target |
|---|---|---|---|---|
| Warm roof (insulation above deck) | Above structural deck, beneath waterproofing | Best thermal performance, reduces condensation risk | Higher roof height, more expensive to retrofit | ~0.13–0.18 W/m²K |
| Inverted roof (insulation above waterproofing) | Over existing membrane, ballast or paving on top | Protects membrane, good for retrofit, long life | Heavier, needs drainage design | ~0.15–0.18 W/m²K |
| Cold roof (insulation below deck, ventilated) | Between joists with ventilation above | Easier for some retrofits, lower cost | Risk of condensation, needs continuous ventilation | ~0.18–0.25 W/m²K |
| Partial (layered) insulation | Combination: some above deck, some below | Balances headroom and performance | More complex detailing, cost trade-offs | ~0.14–0.20 W/m²K |
| PIR/PU rigid boards | As warm or inverted layers | High R-value per thickness, stable | Flammable if not protected, higher cost | Varies; typical thicknesses to meet targets |
| Mineral wool between joists | Cold-roof or between rafters | Fire-resistant, breathable | Lower R-value per depth, can sag if unsupported | Often needs thicker depth to meet targets |
| Vapour control layer (VCL) | Immediately below warm-side of insulation | Prevents interstitial condensation | Must be continuous and sealed | N/A |
| Thermal bridging details | Around upstands, edges, and junctions | Reduces heat loss at weak points | Requires careful design and insulation inserts | Aim to minimize linear bridging (psi values low) |
Older homes, extensions, garages, and dormers often have flat roofs that were built with little or no insulation. Over time, this can lead to high heating bills, cold ceilings, damp patches, and even condensation problems. The good news is that internal flat roof insulation can make a big difference without changing the outside roof finish.
Understanding Flat Roof Insulation in UK Homes
What Is Flat Roof Insulation?
Flat roof insulation is a layer of insulating material added to reduce heat loss through the roof structure. Its job is simple: keep warm air inside during winter and help stop excess heat from entering during warmer months.
Flat roofs are different from pitched roofs because they have less space inside the structure. That means the insulation has to be fitted carefully to avoid cold spots and moisture build-up. In many homes, insulation sits between or below joists, or in a system that turns the roof into a warm roof.
Why Internal Insulation Is Often Needed
Internal insulation is often the best option when the roof covering is still in good condition and changing the outside roof is not practical. This is common in:
- Listed buildings
- Homes with budget limits
- Occupied properties where outside work would be disruptive
- Small extensions or garages
- Projects where the roof surface should not be touched
For many owners, insulating a flat roof from below is the most realistic way to improve comfort without major construction work.
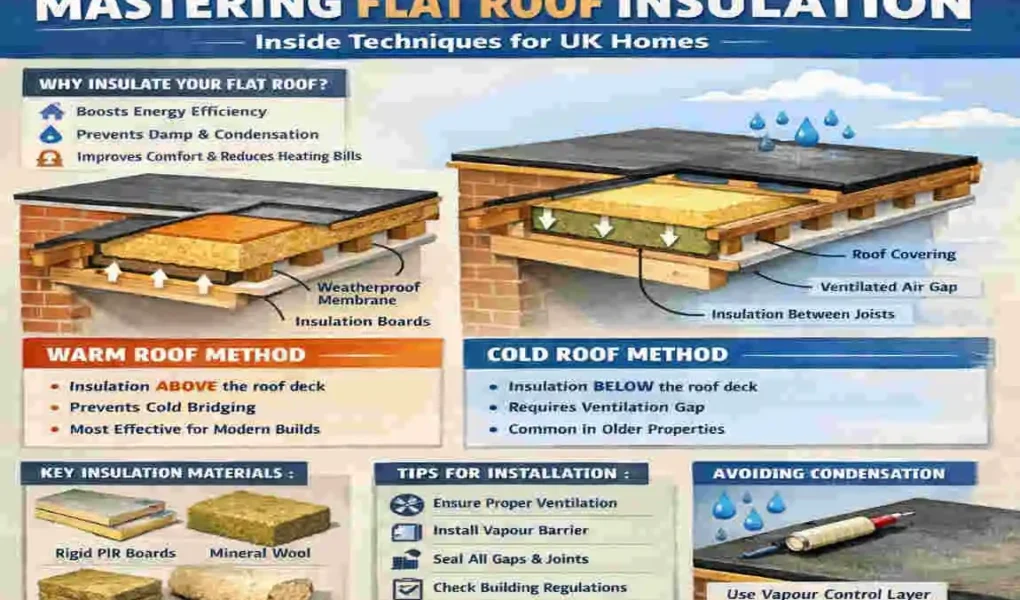
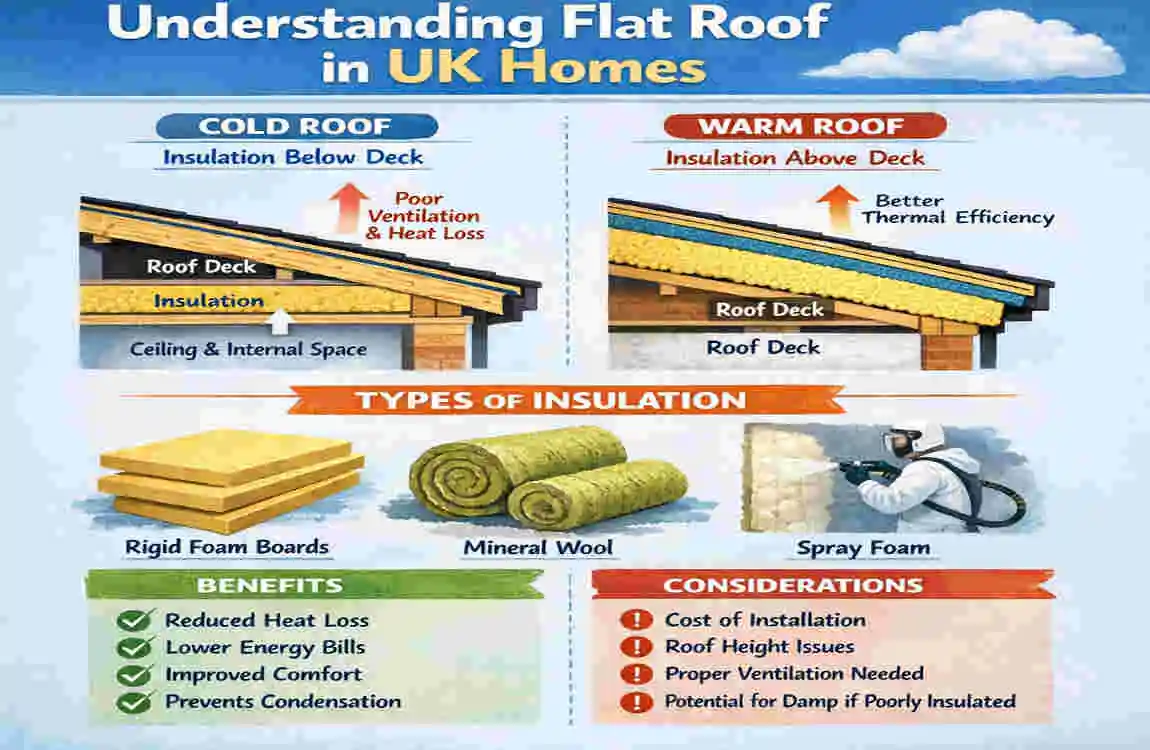
Warm Roof vs Cold Roof Systems
There are two main approaches to flat roof insulation.
A warm roof places insulation above the roof deck or in a way that keeps the structure warmer. This is often the better modern solution because it reduces the risk of condensation.
A cold roof keeps insulation below the deck, leaving a ventilated space above the insulation. This approach is more common in older properties and some retrofit projects. Still, it must be done carefully to avoid moisture problems.
In many UK retrofits, the cold roof insulation method is still used because it can be installed from inside without removing the whole roof.
Why You Should Insulate a Flat Roof from the Inside
Lower Heating Costs
A poorly insulated flat roof can leak a lot of heat. That means your boiler or heating system has to work harder to keep rooms warm. Once you improve the insulation, you may notice lower energy use and smaller heating bills.
This is one of the most practical reasons people choose internal flat roof insulation projects in the UK.
Better Indoor Comfort
Nobody likes a room that feels cold above head height. When a flat roof is insulated properly, the room becomes more stable and comfortable. You get fewer cold drafts and less temperature swing between day and night.
That matters a lot in bedrooms, offices, kitchens, and extensions where people spend a lot of time.
Condensation Prevention
UK weather is often damp, and flat roofs are especially prone to condensation if moisture is trapped inside. When warm indoor air comes into contact with cold roof surfaces, water droplets can form. Over time, that can lead to mould, timber rot, and damaged plasterboard.
Good insulation, plus a proper UK setup for a flat roof vapor barrier, helps control this risk.
Improved Property Value
Energy-efficient homes are more attractive to buyers. A well-insulated roof can improve comfort, reduce bills, and improve an overall energy rating. Even if you are not selling soon, it is still a smart long-term investment.
How to Insulate a Flat Roof from the Inside UK Home
Inspect the Existing Roof Structure
Before you add insulation, check the roof structure carefully. Look for:
- Leaks
- Damp patches
- Soft or damaged timber
- Sagging ceiling areas
- Signs of mould or rot
If the roof already has water damage, insulation should not go in until the source of the problem is fixed. Insulating over damaged timber can hide serious issues and make them worse later.
Measure Roof Depth and Joist Spacing
Next, measure the depth of the joists and the spacing between them. This tells you which sizes of insulation boards or batts will fit properly.
Getting these measurements right matters because poor sizing leaves gaps. Gaps allow heat to escape and can create cold bridges. In a flat roof, even small mistakes can reduce the final performance.
Choose Suitable Insulation Material
This is one of the most important decisions when learning how to insulate a flat roof in a UK home. The right material depends on your budget, roof depth, moisture risk, and the level of thermal performance you want.
Rigid PIR Boards
PIR boards are one of the most popular choices in UK homes. They offer strong thermal performance in a relatively thin layer, which is useful where roof space is tight.
They are ideal when you want flat roof insulation boards that deliver high efficiency without taking up too much room.
Mineral Wool
Mineral wool is cheaper and easier to fit between joists. It also helps reduce sound, which can be useful in busy homes.
It is often chosen for simple retrofit work. However, it usually requires greater thickness than PIR boards to achieve the same heat performance.
Spray Foam
Spray foam expands to fill gaps and can create a tight seal. That makes it appealing for awkward roof spaces. However, it must be installed correctly and is usually best handled by a professional.
It can be a useful option, but it is not always the cheapest or easiest solution.
Install a Vapour Control Layer
A vapour control layer is essential in many internal roof insulation jobs. It helps stop moist indoor air from moving into the roof build-up where it could condense.
Without this layer, you may trap water inside the roof structure. That is one of the biggest mistakes in flat roof insulation inside projects.
Fit Insulation Between or Under Joists
You can install insulation between the joists, below them, or as a mix of both. The best choice depends on the roof design.
- Between joists: useful for mineral wool and some board systems
- Below joists: helps reduce thermal bridging
- Combined approach: gives better performance when space allows
If you are insulating a flat roof from below, make sure the material fits tightly. Loose sections leave gaps that reduce efficiency.
Seal Gaps and Thermal Bridges
Once the insulation is in place, seal around edges, joints, and any service openings. Small gaps can create thermal bridges, allowing heat to escape more easily.
Use foam fillers, tape, or suitable sealing products to create a more airtight finish. This step is easy to skip, but it makes a real difference.
Add Plasterboard and Finish
The final layer is usually plasterboard or another suitable internal finish. This protects the insulation, improves fire safety, and gives the ceiling a clean appearance.
Once the board is fitted, tape and skim or decorate as needed. The room should now feel warmer and more comfortable.
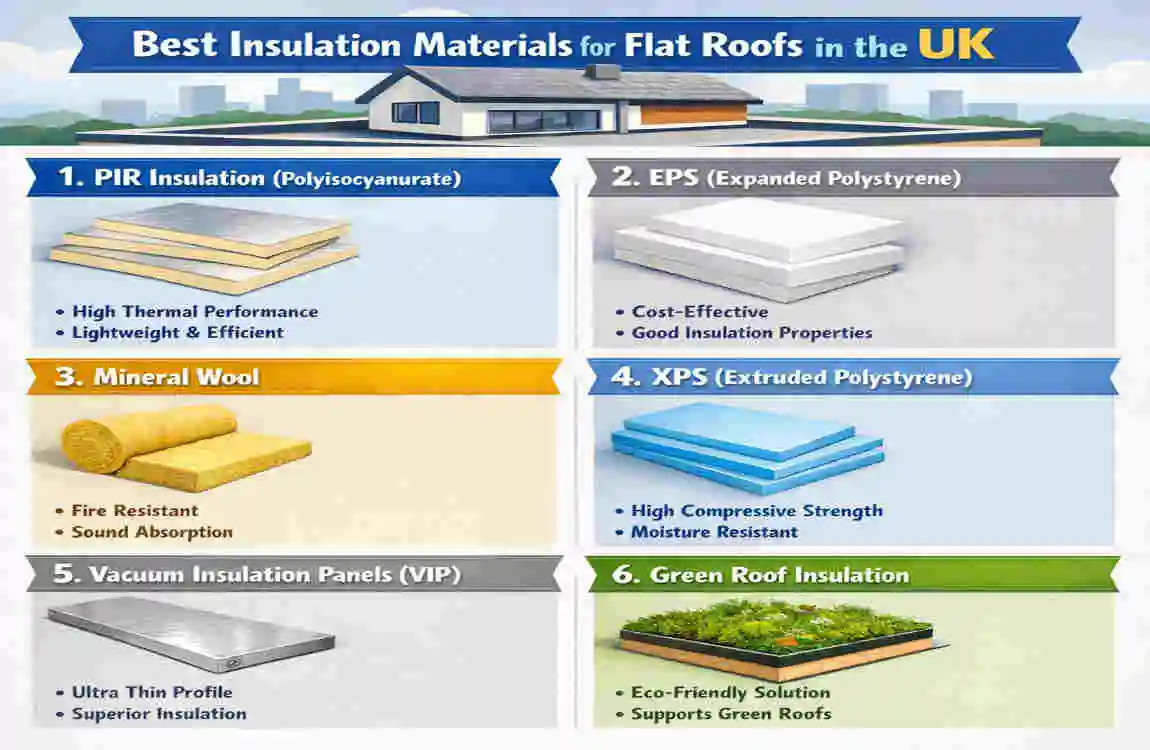
Best Insulation Materials for Flat Roofs in the UK
Material Main Benefit Main Drawback Best Use
PIR boards High thermal performance in thin layers More expensive than mineral wool Tight spaces and high-efficiency upgrades
Mineral wool rolls Affordable and good for sound reduction Needs more thickness Budget-friendly retrofit projects
Spray foam Good air sealing and gap filling Usually costlier and needs expert fitting Awkward roof spaces
Phenolic foam boards Very strong thermal resistance Can be more expensive High-performance insulation projects
Eco-friendly options Lower environmental impact May need more depth Sustainable renovation work
PIR Insulation Boards
PIR boards are often seen as the best insulation for flat roof UK projects where space is limited. They perform well and are easy to work with in many standard roof builds.
The downside is cost. They are usually pricier than mineral wool, but the thinner profile can make them worth it.
Mineral Wool Rolls
Mineral wool is popular because it is affordable and easy to source. It also helps soften sound, which is useful in extensions or rooms under rain-exposed roofs.
The main drawback is thickness. You may need more of it to match the thermal value of rigid boards.
Spray Foam Insulation
Spray foam can seal gaps and improve airtightness. It works well in some complex roof spaces, but it should be fitted carefully.
Because it can be difficult to inspect later, it is best used only when you fully understand the roof structure and moisture risk.
Phenolic Foam Boards
Phenolic boards give excellent thermal resistance. In some cases, they can outperform PIR boards in a thinner layer.
They are often chosen for high-spec projects where space is limited and performance matters most.
Eco-Friendly Insulation Options
Some homeowners prefer natural or recycled products. These may include:
- Sheep wool
- Wood fibre boards
- Recycled fibre products
These can be a good fit if you want a lower-impact option, though they may not suit every roof or budget.
UK Building Regulations for Flat Roof Insulation
Part L Energy Efficiency Requirements
In the UK, roof insulation work must meet current energy efficiency standards. The exact target can vary depending on the project type, but the goal is always to improve thermal performance.
A good installer or building control officer will usually check whether your roof meets the required UK roof insulation regulations.
Ventilation Requirements
Ventilation is very important in a flat roof. If you block airflow where it is needed, moisture may get trapped and cause decay.
That is why internal insulation should always be planned with the roof design in mind. A roof that was built as a cold roof must still be able to breathe where required.
Fire Safety Considerations
Not all insulation products behave the same way in fire. The full roof build-up should follow safe fire performance rules, especially when plasterboard and finishes are added.
This is one reason why using the right layers in the correct order matters so much.
When Building Control Approval May Be Needed
You may need approval if the work is significant or involves changing the roof’s thermal structure. This is more likely in major refurbishments, conversions, or larger extension projects.
When in doubt, check before starting. It is much easier to plan properly than to fix approval issues later.
Common Mistakes When Insulating a Flat Roof from the Inside
Blocking Ventilation Paths
If your roof design needs airflow, do not block it with insulation. Trapped moisture can lead to rot and mould.
Using the Wrong Insulation Thickness
Too little insulation means poor performance. Too much, if badly fitted, can create compression and gaps.
Ignoring Vapour Barriers
Skipping the vapour control layer is a major risk. Moist air can enter the roof and condense out of sight.
Poor Gap Sealing
Even small gaps allow heat to escape. This weakens the whole system and raises the risk of cold spots.
DIY Without Structural Checks
Never assume the roof is sound just because the ceiling looks fine. Check the structure first. A hidden leak or weak joist can turn a simple insulation job into a costly repair.
Cost of Internal Flat Roof Insulation in UK Homes
Material Costs
Costs vary based on the material you choose.
- PIR board pricing: usually higher, but very efficient
- Mineral wool pricing: usually lower and more budget-friendly
- Spray foam estimates: often higher because installation is specialist work
Labour Costs
If you hire a professional, labour will depend on roof size, access, and complexity. Simple jobs cost less, while awkward roof layouts cost more.
Total Budget Range
For a small roof, the total cost may stay fairly modest. For a larger or more complex project, costs can rise quickly, especially if you also need boarding, plastering, or repairs.
Long-Term Savings
The upfront cost is only part of the picture. Better insulation can reduce heating bills year after year, helping balance the initial cost.
DIY vs Hiring a Professional
When DIY May Work
DIY may be suitable for small, simple spaces such as garages, sheds, or basic extensions. If the roof is dry, the joists are easy to access, and you understand the materials, a careful DIY job may work well.
When to Hire Roof Insulation Specialists
You should think about hiring a professional if:
- The roof has signs of damp
- The structure is old or unclear
- The space is awkward to work in
- You are unsure about vapour control
- You want to avoid condensation risk
Cost vs Quality Comparison
DIY can save money at first, but a poor roof installation can cost more later. A professional job often gives better durability, better airtightness, and fewer moisture problems.
Maintenance Tips After Insulating a Flat Roof
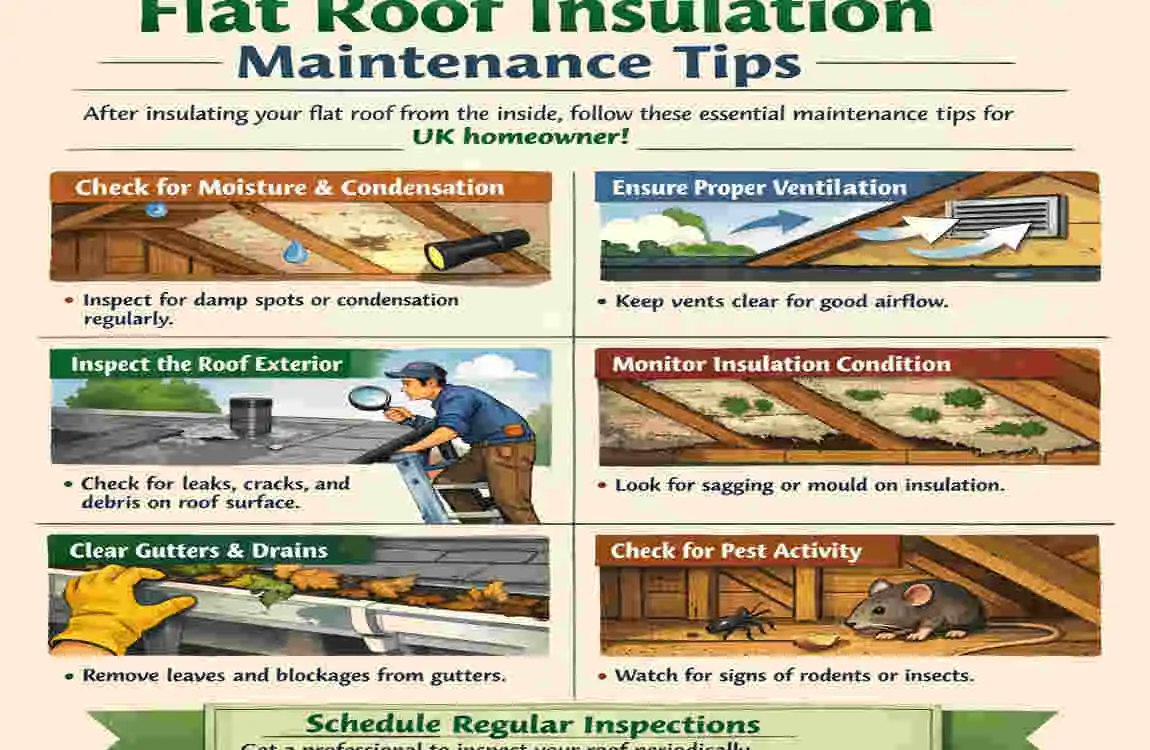
Regular Leak Checks
Check the roof after heavy rain or storms. Catching a leak early protects the insulation and structure.
Watch for Condensation Signs
Look for mould, damp patches, or musty smells. These can point to trapped moisture.
Ceiling Inspection
Keep an eye on plasterboard for sagging or staining. These can be early warning signs of trouble above.
Improve Ventilation
If your roof system needs airflow, keep ventilation paths clear. Good airflow helps the roof last longer.
Frequently Asked Questions
Can you insulate a flat roof from the inside?
Yes, you can. In many UK homes, internal insulation is a practical way to improve comfort and reduce heat loss without altering the roof.
What is the best insulation for a UK flat roof?
The answer depends on the roof depth and your budget. PIR boards are often the best choice where space is tight, while mineral wool can work well for more budget-friendly jobs.
Does internal insulation cause condensation?
It can if it is fitted badly or without a vapour control layer. With proper design and sealing, the risk is much lower.
How thick should flat roof insulation be?
It depends on the material and the target energy standard. Thinner high-performance boards may achieve the same result as thicker mineral wool.
Is PIR board better than mineral wool?
PIR board usually gives better thermal performance in less space. Mineral wool is cheaper and easier to fit, but often needs more depth.
Do I need building regulations approval?
You may need approval for major roof insulation work. The exact rules depend on the project size and type, so it is wise to check before you begin.