We have all been there. You step into the shower specifically to wash off a long, hard day, anticipating a strong, hot stream of water to massage your tired shoulders. Instead, you are greeted by a sad, sputtering drizzle that barely rinses the shampoo out of your hair. It is frustrating, it wastes your time, and it starts your morning (or ends your night) on a sour note.
Low water pressure is one of the most common complaints homeowners face, yet it is often one of the most misunderstood. Many people assume they are simply at the mercy of their city’s water supply or their well pump, resigned to living with weak flow forever. But here is the good news: you do not have to settle for a lackluster shower or a kitchen faucet that takes ten minutes to fill a spaghetti pot.
Diagnose the Issue First: Don’t Guess, Test
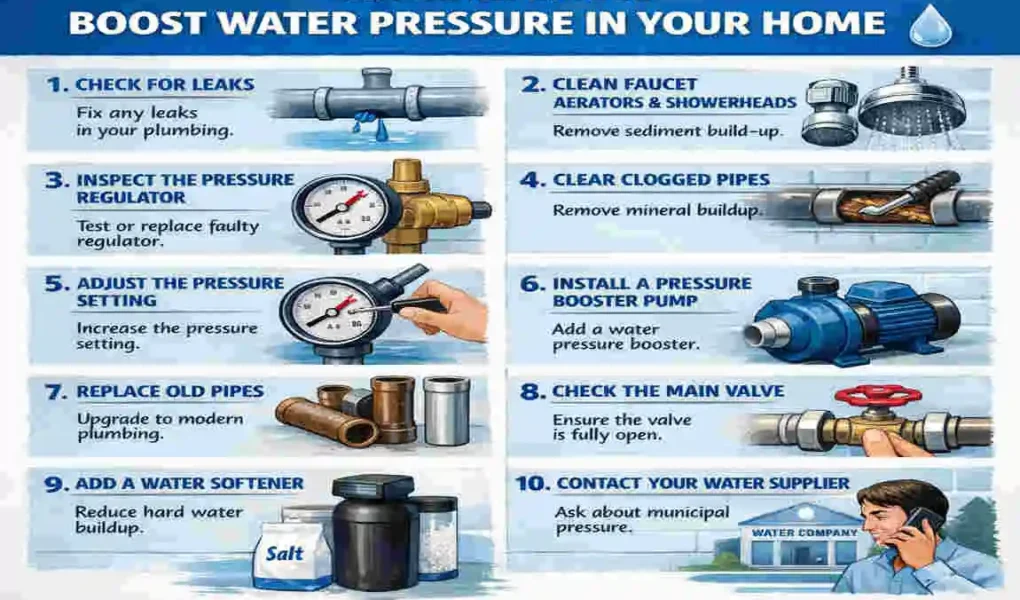
Before we start twisting valves or buying expensive pumps, we need to play detective. Attempting to boost water pressure in in-home systems without knowing the root cause is like putting a band-aid on a broken leg—it won’t solve the underlying problem.
The “Static Pressure” Test
The most accurate way to understand your situation is to measure the actual pressure entering your luxury home. You don’t need a professional plumber for this initial step; you need a simple water pressure gauge. You can pick one of these up at any local hardware store for about $10 to $15.
Here is how to do it:
- Turn off water inside: Ensure no water is running inside the house (washing machines, dishwashers, and showers should be off).
- Locate an outdoor spigot: Find the hose bib/faucet closest to your main water shut-off valve.
- Attach the gauge: Screw the pressure gauge onto the faucet tightly.
- Open the valve: Turn the water on fully and read the dial.
Ideally, you want to see a reading between 45 and 60 PSI. If it is below 40 PSI, you have a legitimate pressure problem from the source. If it reads 50+ PSI but your shower is still weak, the problem is likely an internal restriction (like a clog) rather than the supply itself.
Municipal vs. Internal Issues
Next, talk to your neighbors. If everyone on your street is complaining about weak flow, the issue lies with the municipal water supply. In this case, you might need a booster pump (we will get to that). However, if your neighbor’s hose could put out a house fire and yours barely waters the petunias, the issue is isolated to your plumbing system.
Clean Aerators and Showerheads
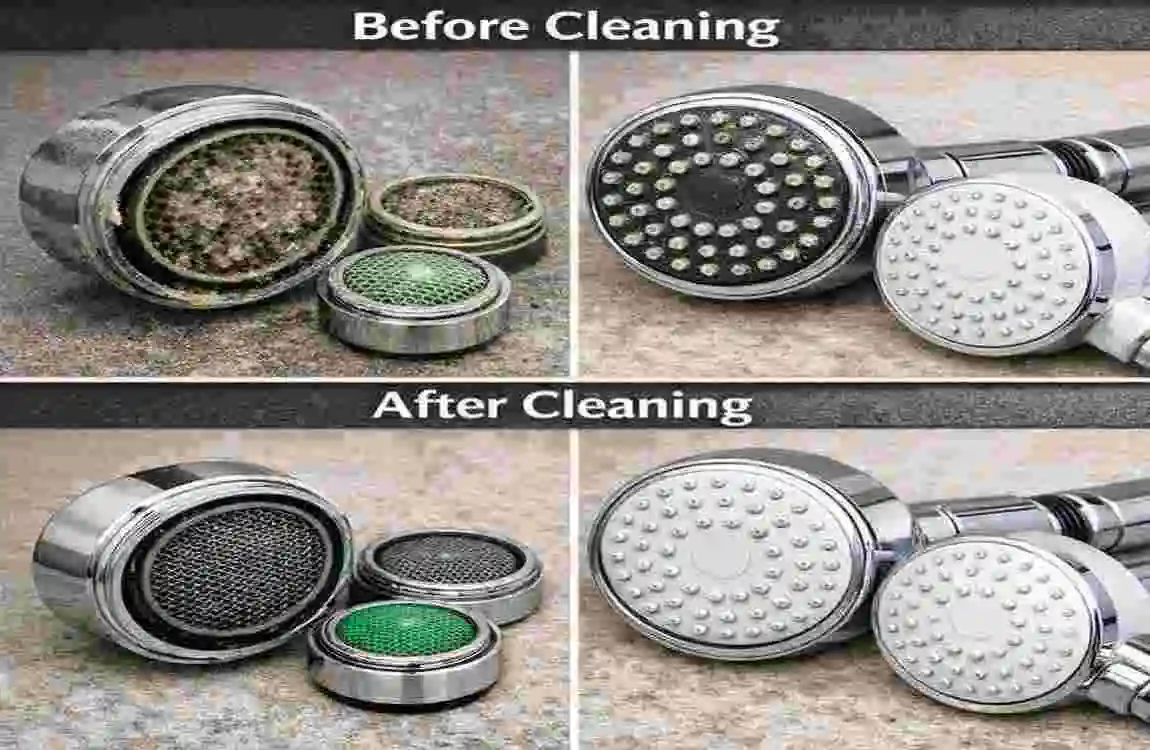
If you are wondering how to increase water pressure in your house quickly and cheaply, this is your first stop. It is the most common reason for low pressure in specific fixtures, and it is shockingly easy to fix.
Over time, water—especially hard water—leaves behind mineral deposits (calcium and magnesium) known as limescale. This scale builds up inside the tiny mesh screens (aerators) at the tip of your faucets and the nozzles of your showerheads. Eventually, these minerals turn into a rock-hard blockage that chokes off the water flow.
The Vinegar Soak Method
You don’t need harsh chemicals to fix this; you need white vinegar.
Tools Needed:
- Adjustable wrench (or pliers and a rag)
- White vinegar
- A plastic bag and a rubber band (for showerheads you can’t remove)
- An old toothbrush
The Process:
- Remove the fixture: For faucets, unscrew the spout tip (aerator). You might need a wrench, but be gentle. Wrap a rag around the metal to prevent the wrench from scratching the finish. For showerheads, unscrew them from the pipe coming out of the wall.
- Inspect: You will likely see white or green grit clogging the screen.
- Soak: Drop the aerator or showerhead into a bowl of vinegar. Let it sit for at least a few hours, or preferably overnight. The acid in the vinegar eats away the calcium.
- Scrub and Rinse: In the morning, take an old toothbrush and scrub away the loosened debris. Rinse it thoroughly with water.
- Reinstall: Screw it back on and test the flow.
Fix Leaks Promptly
You might think a small drip is just an annoyance, but leaks are actually pressure thieves. When you leak into your plumbing system, water that should be coming out of your showerhead is instead being diverted elsewhere. This depressurizes the entire system.
The Hidden Culprits
While a dripping faucet is obvious, the worst leaks are the ones you don’t see immediately.
- Running Toilets: A toilet with a faulty flapper can silently waste hundreds of gallons of water a day. Because the tank is constantly trying to refill, it siphons pressure away from other fixtures.
- Pipe Joints: Small leaks behind walls or in the basement can reduce flow.
- Service Lines: A leak in the main line running from the street to your stunning house is a major issue that will drastically drop pressure.
How to Check for Hidden Leaks
- Shut everything off: Ensure no water is being used in the house.
- Check the meter: Go to your water meter. Most modern meters have a “leak indicator” (often a small red triangle or gear). If it is spinning even though all water is off, you leak.
- The Dye Test: For toilets, put a few drops of food coloring in the toilet tank. Wait 20 minutes without flushing. If color appears in the bowl, your flapper is leaking and needs to be replaced.
Why This Matters: Fixing leaks doesn’t just boost water pressure in home systems; it saves you money. A significant leak can rob your system of 10-20% of its pressure capability. By sealing these breaches with plumber’s tape, tightening joints, or replacing worn-out washers, you restore the system’s integrity and pressure.
Adjust Your Pressure Regulator (PRV)
Many homes, especially those built in the last 30 years, are equipped with a “Pressure Reducing Valve” (PRV). This bell-shaped device is usually located on the main water line where it enters your house (often near the shut-off valve).
Its job is exactly what it sounds like: it lowers the high pressure from the city (which can sometimes exceed 100 PSI) to a safe level for your pipes. However, these valves can sometimes be set too low or fail over time, resulting in poor flow.
How to Adjust the PRV
If you have confirmed your pressure is low (using the gauge method from the diagnosis section), you can try adjusting this valve.
- Locate the Valve: Look for the bell-shaped brass valve on your main line.
- Find the Screw: On top of the bell, there is a screw or a bolt secured by a locking nut.
- The Adjustment:
- Loosen the locking nut.
- To increase pressure, turn the bolt clockwise (think: “righty-tighty” tightens the spring, letting more pressure through).
- To decrease pressure, turn it counter-clockwise.
- Small Increments: Only turn the bolt about 1/4 turn at a time.
- Test: Have someone check a faucet or check your pressure gauge after every quarter-turn.
A Critical Safety Warning
When you are learning how to increase water pressure in the house, moderation is key. Do not exceed 80 PSI.
Pressure above 80 PSI puts immense strain on your plumbing joints, seals, and appliances. High pressure can cause pipes to burst, washing machine hoses to rupture, and water heaters to fail prematurely. If the bolt on your PRV is stuck or if adjusting it does nothing, the valve is likely broken and needs to be replaced by a plumber.
Replace Old Fixtures
Sometimes, the problem isn’t the plumbing; it’s the hardware. If you live in an older home, or conversely, in a home built during the early years of strict water conservation mandates, your fixtures might be engineered for low flow.
The Evolution of GPM
Fixtures are rated by GPM (Gallons Per Minute).
- Old “Water Hogs”: Pre-1992 fixtures flowed at 3.5 to 5 GPM.
- Early “Low Flow”: In the 90s, mandates dropped this to 2.5 GPM, but early designs offered terrible pressure.
- Modern “High Efficiency”: Today’s technology allows for 1.8- or 2.0-GPM fixtures that feel like high pressure thanks to air-induction technology.
The Upgrade Strategy
If you are still struggling to increase water flow in your house, check the flow rates on your showerheads and faucets.
- For Showers: Look for a showerhead specifically designed for low water pressure. These models use internal chambers to inject air into the water stream, making the spray feel forceful and voluminous even if the actual water volume is lower.
- For Faucets: You can buy “high-flow” aerators. While standard eco-aerators might limit flow to 1.5 GPM, you can swap them for 2.2- or 2.5-GPM versions (local codes permitting).
Cost vs. ROI: Replacing a showerhead costs between $20 and $50. The return on investment is immediate. You get a better shower experience instantly without ripping out walls or pipes.
Flush Your Water Heater
Have you noticed that your cold water pressure is fine, but your hot water pressure is low? The culprit is likely your water heater.
Over time, sediment from minerals in the water settles at the bottom of your water heater tank. If you don’t flush the tank regularly, this layer of sludge can grow thick enough to clog the hot water outlet or corrode the pipes leading out of the heater. This creates a significant bottleneck for hot water flow.
How to Flush the Tank
This is a maintenance task you should perform annually.
- Turn it off: Shut off the power (for electric) or turn the dial to “Pilot” (for gas). Shut off the cold water supply to the tank.
- Cool it down: Let the water sit for a few hours so you don’t burn yourself, or be extremely careful with hot water.
- Connect a hose: Attach a standard garden hose to the drain valve at the bottom of the tank. Run the hose to a floor drain or outside.
- Drain: Open a hot water faucet somewhere in the house (to prevent a vacuum lock), then open the tank’s drain valve. Let the water run out until it runs clear.
- Refill: Close the drain valve, disconnect the hose, turn the water supply back on, and let the tank fill before turning the power/gas back on.
Bonus Benefit: Flushing your tank doesn’t just help fix low water pressure; it also extends the life of your water heater and improves its energy efficiency, saving you money on utility bills.
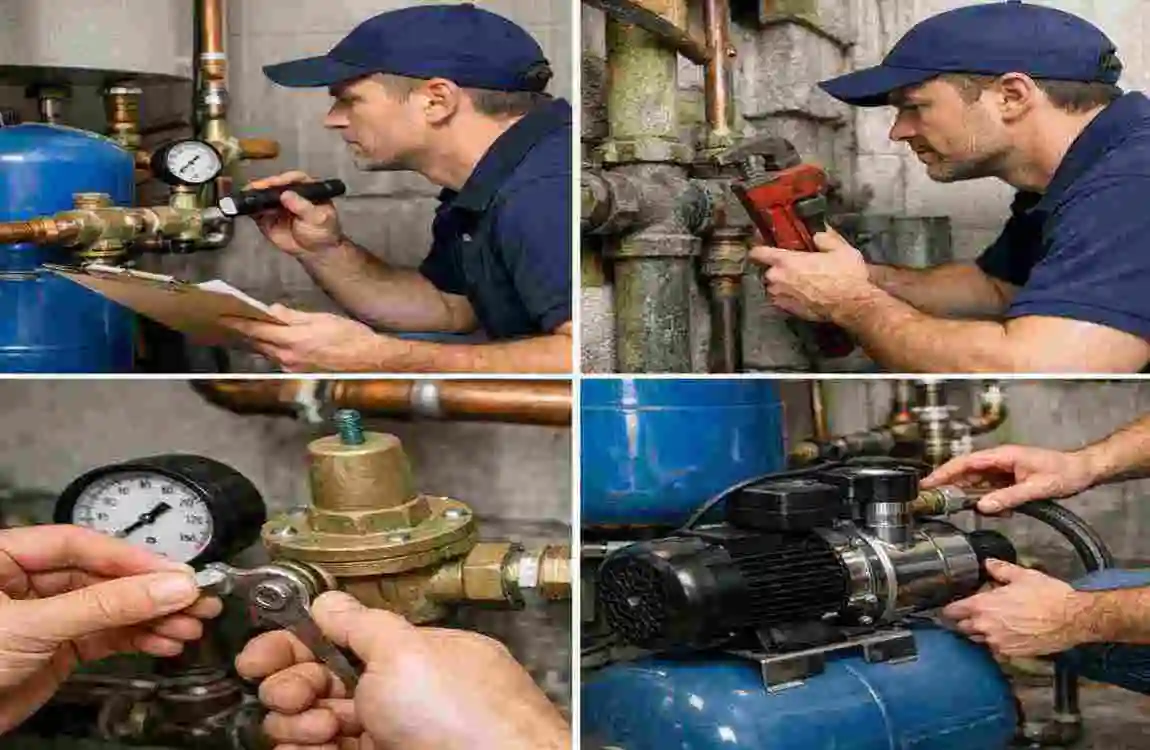
install a Water Pressure Booster Pump
If you have tried the cleaning, the adjusting, and the leak-fixing, and your pressure is still hovering around 30 PSI, it is time for the heavy artillery. This is common in homes at the end of a municipal water line or located uphill from the water source. Gravity and distance are working against you, and you need mechanical help.
This is where a water pressure booster pump comes in.
What is a Booster Pump?
A booster pump is an electric pump usually installed on the main water line where it enters your house. It features an impeller that spins to increase water velocity, and a pressure tank to ensure water is available instantly.
When you turn on a faucet, the pump senses the pressure drop and kicks on, boosting the flow to your desired PSI.
Types of Systems
Choosing the right pump depends on your needs.
Pump TypePSI Boost PotentialEstimated CostBest Application
Whole-House Booster 20 – 50 PSI increase $500 – $1,000+ Ideal for homes with low municipal pressure affecting all fixtures.
Shower-Specific Pump 10-30 PSI increase $150-$300 Best for apartments or single bathrooms where you can’t access the main line.
Well Pump System 30 – 60 PSI range $800 – $1,500+ Essential for rural homes; replaces or augments the submersible pump.
Is it DIY?
Installing a whole-house booster pump requires cutting into your main water line and electrical work. Unless you are an advanced DIYer with plumbing and electrical experience, this is a job for a professional. The cost of labor is worth the peace of mind knowing you won’t flood your basement.
Check and Upgrade Pipes
This is the solution most homeowners dread, but it is sometimes the only way to increase water pressure in the house effectively.
If your home was built before the 1970s, there is a good chance you have galvanized steel pipes. While durable, galvanized pipes have a fatal flaw: they rust from the inside out. Over decades, corrosion builds up on the inner walls of the pipe, drastically narrowing the diameter.
Think of it like a clogged artery. Even if the city is pumping water at high pressure, it cannot get through the narrow opening in your pipes.
Signs of Corroded Pipes
- Brown or discolored water: Especially when you first turn on the tap after being away.
- Visible rust: On exposed pipes in the basement or crawlspace.
- Uneven pressure: Good pressure in some rooms (where pipes might have been replaced) and terrible pressure in others.
The Fix: Repiping
The only way to fix this is to replace the galvanized pipes with modern materials like Copper or PEX (cross-linked polyethylene). PEX is increasingly popular because it is flexible, easier to install (snaking through walls like wiring), and cheaper than copper.
Strategy: You don’t always have to repipe the entire house at once. You can do a “partial repipe,” focusing on the main lines or the worst-affected bathrooms first to spread out the cost.
install a Water Softener
If you live in an area with “hard water” (high mineral content), you are constantly fighting scale. We mentioned earlier how scale clogs aerators, but it also accumulates inside your pipes and valves, gradually reducing the diameter of your plumbing lines.
The Long-Term Preventive
While a water softener itself doesn’t “pump” pressure (in fact, it can slightly reduce it by 2-3 PSI due to resistance), it is crucial for maintaining long-term pressure.
By removing calcium and magnesium from the water before it enters your plumbing system, a softener prevents new scale from forming.
Insulate Pipes in Cold Areas
This tip is seasonal but vital. If you live in a region with freezing winters, your water pressure drops when temperatures plunge.
When pipes get too cold, the water inside can begin to crystallize and freeze. Even if the pipe doesn’t freeze completely solid (which can cause bursts), the slushy ice formation restricts the water’s path, leading to a noticeable drop in flow.
The Fix: Pipe Insulation
Go into your basement, crawlspace, or garage—any unheated area where pipes are exposed.
- Buy Foam Insulation: Get those foam tubes (often called “pipe noodles”) from the hardware store. They are incredibly cheap.
- Cover the Pipes: Slip them over the hot and cold water lines.
- Tape the Joints: Use duct tape or the adhesive strip provided to seal the seams.
This keeps the water flowing freely and protects your home from the disaster of burst pipes.
Schedule a Professional Inspection
You have cleaned the aerators, checked for leaks, and flushed the heater, but the flow is still weak. At this point, how to increase water pressure in the house becomes a question for the experts.
Plumbers have diagnostic tools that the average homeowner does not.
- Camera Inspections: They can snake a camera into your lines to see if a tree root has crushed your main supply line or if a foreign object is stuck in a bend.
- Calcification Mapping: They can tell you exactly which sections of pipe are corroded.
- Pressure Audits: They can check the pressure at street level versus at your home to pinpoint exactly where the drop is occurring.
The Cost: A plumbing inspection might cost $100 to $200, but it can save you thousands by preventing you from buying equipment you don’t need (like a pump) when the problem is actually a $20 valve.
If you are stuck, don’t hesitate. Call a professional. It is the fastest way to get your morning shower back to normal.
Maintenance Tips to Maintain the Flow
Once you have successfully managed to fix low water pressure, you want to keep it that way. Plumbing isn’t a “set it and forget it” system; it needs love.
- Monitor with Smart Tech: Consider installing a smart water monitor (like Flo by Moen or Phyn). These devices track your pressure and flow rates in real-time and send alerts to your phone if they detect a leak or a pressure drop.
- Stagger Water Usage: If you have a family of four, don’t run the dishwasher, the washing machine, and two showers at once. Spreading high-demand activities ensures everyone gets a decent workload.
- Yearly Checkups: Mark a date on your calendar to flush the water heater and check the pressure regulator.
FAQ: Frequently Asked Questions
Q: How much PSI is considered “good” water pressure? A: The “Goldilocks” zone for residential water pressure is between 45 and 60 PSI. Anything below 40 PSI is considered low and will result in weak showers. Anything above 80 PSI is dangerous for your appliances and pipes.
Q: Can I increase water pressure by just turning a valve? A: Yes, if your home has a Pressure Reducing Valve (PRV). By tightening the bolt on the PRV, you can allow more pressure from the main line into your home. However, if your city supply is low to begin with, opening this valve won’t create pressure that isn’t there.
Q: How much does it cost to increase water pressure in the house? A: It depends on the cause.
- Cleaning aerators: $0.
- Replacing a showerhead: $20-$50.
- Installing a Pressure Reducing Valve: $250-$400 (installed).
- Installing a Booster Pump: $800-$1,500+.
- Repiping a home: $2,000 – $10,000+.
Q: Will a tankless water heater improve my pressure? A: Generally, no. In fact, tankless heaters can sometimes reduce pressure slightly if they are not sized correctly, because the water has to travel through narrow heat exchanger coils. If you are switching to tankless, ensure your plumber calculates the flow rate requirements correctly.