Connecting a porch roof to a house may look like a simple home improvement project at first glance. But in real life, it affects weather protection, structural strength, and building code compliance. That means every part of the job matters, from the first measurement to the last piece of flashing.
If you are trying to learn how to connect a porch roof to house, the big idea is simple: the porch roof must be built in a way that safely carries roof loads, keeps water out, and blends with the existing home. A small mistake can lead to leaks, sagging, wood rot, or even structural failure later on.
A porch roof connection does more than tie two structures together. It helps protect the home from rain, wind, snow, and sun while also giving the porch a finished, usable feel. A well-built roof connection can make a porch feel like a natural part of the house instead of an afterthought.
The connection has to do several things at once. It must support roof loads, keep water out of the home, match the existing structure’s style, and comply with local building codes. That is why this project needs careful planning, even if the porch itself is small.
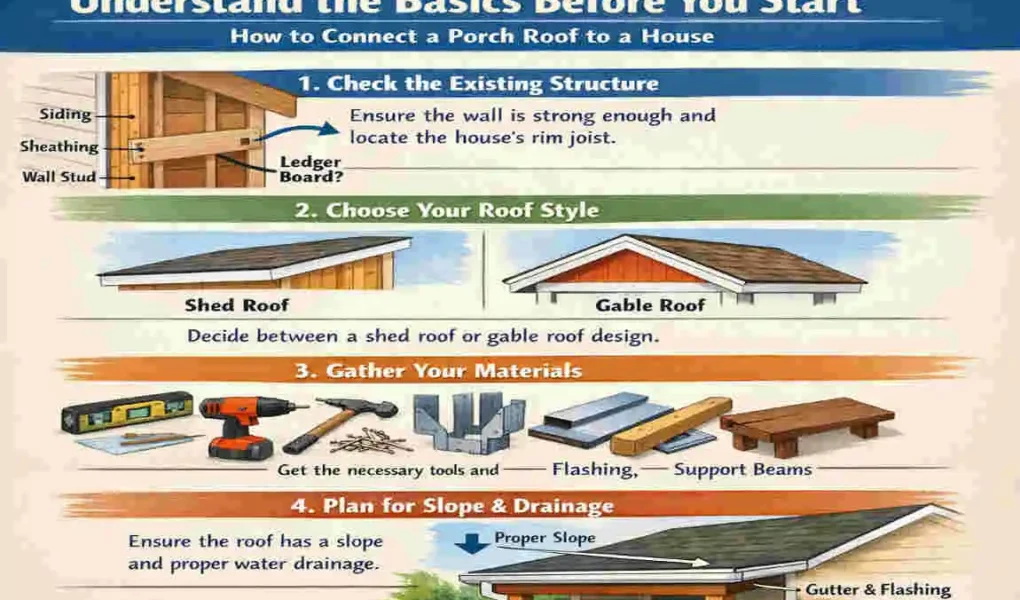
Understand the Basics Before You Start
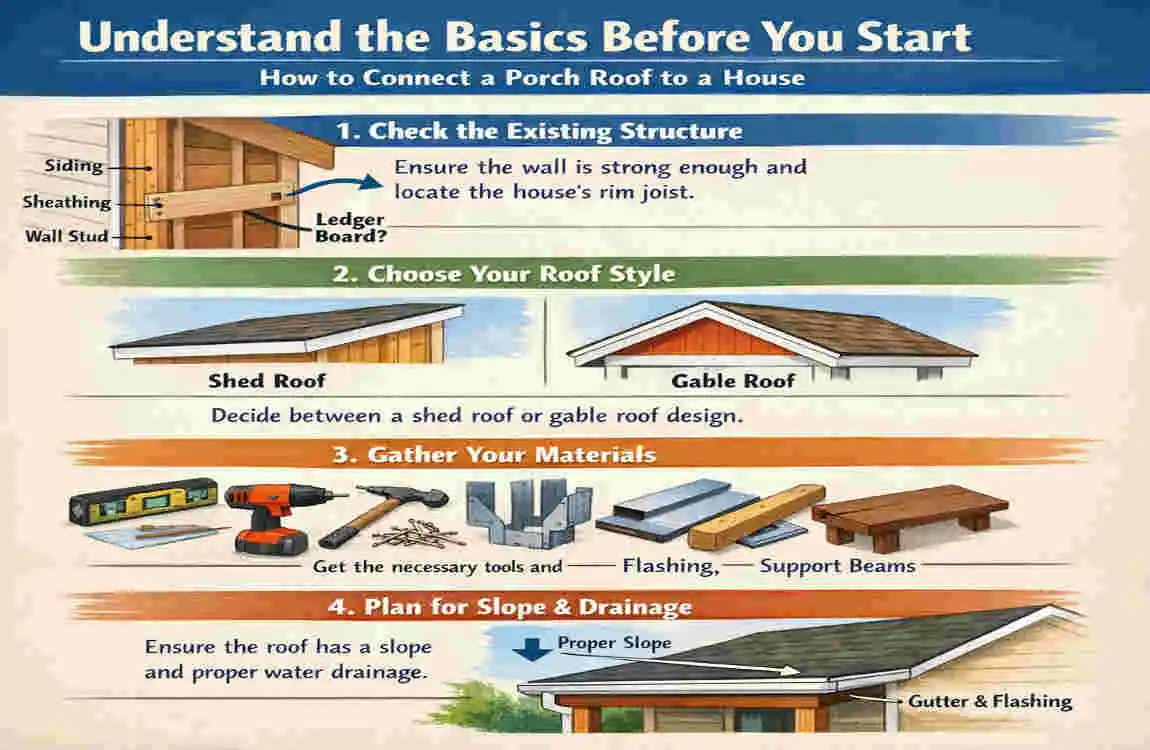
What a porch roof connection actually does
A porch roof connection transfers weight from the roof down into the house structure, the porch posts, or both. The load does not disappear just because the roof is smaller than the main house roof. It still has to be carried safely.
Depending on the design, the porch roof may connect to:
- the wall plate
- the roof rafters
- a ledger board
- the framing under the existing roof edge or shingles
The connection must handle several different forces. These include dead load from the weight of the materials, snow load in colder climates, wind uplift during storms, and rain or ice that can affect the structure over time.
That is why it is not enough to simply “attach” the porch roof to the house. You need a connection that transfers the load in a controlled, safe way.
Two common styles of porch roofs
Two porch roof styles come up most often.
A lean-to porch roof has a single slope that runs away from the house. This style is very common because it is simple, practical, and often easier to tie into an existing wall.
A gable porch roof has two sloped sides that meet at a ridge. It looks more decorative and can match some home styles very well, but it is usually more complex to build and tie into the main house.
A lean-to roof is usually the simpler option for a porch roof connection. A gable roof may require more detailed framing and flashing work.
Why correct planning saves money
Planning may not feel exciting, but it is one of the most important parts of the whole project. A good plan helps you avoid leaks, reduces structural risk, and lowers the chance that you will have to redo work later.
Good planning also helps with inspections. If the local building official can see that the work is thoughtful and code-friendly, you have a better chance of passing the first inspection. That saves time, stress, and money.
Check Local Building Codes and Permits
Why permits matter
Many areas require permits for porch roof additions or roof tie-ins. That is because the work changes the home’s structure and may affect safety, drainage, or fire regulations.
Local codes may control things like:
- span length
- post size
- fastener type
- roof pitch
- snow and wind load requirements
- flashing standards
These rules are not just red tape. They are designed to keep the structure safe and help it last.
What to ask the building department
Before you start, ask your local building department a few direct questions:
- Do I need a permit?
- Are drawings required?
- What roof loads apply in my area?
- Are there connector or flashing requirements?
- Can I attach a porch roof directly to the house wall?
These questions help you avoid starting work based on assumptions. A porch roof in one city may be handled very differently in another.
Why code compliance protects you
Following code does more than satisfy inspectors. It also protects you in the long run. Code compliance can reduce liability, improve safety, and support resale later. It may also reduce the chance of insurance problems if something goes wrong.
When a porch roof is built without proper approval, a future buyer or insurer may question the work. That is a headache you do not want.
Gather the Right Tools and Materials
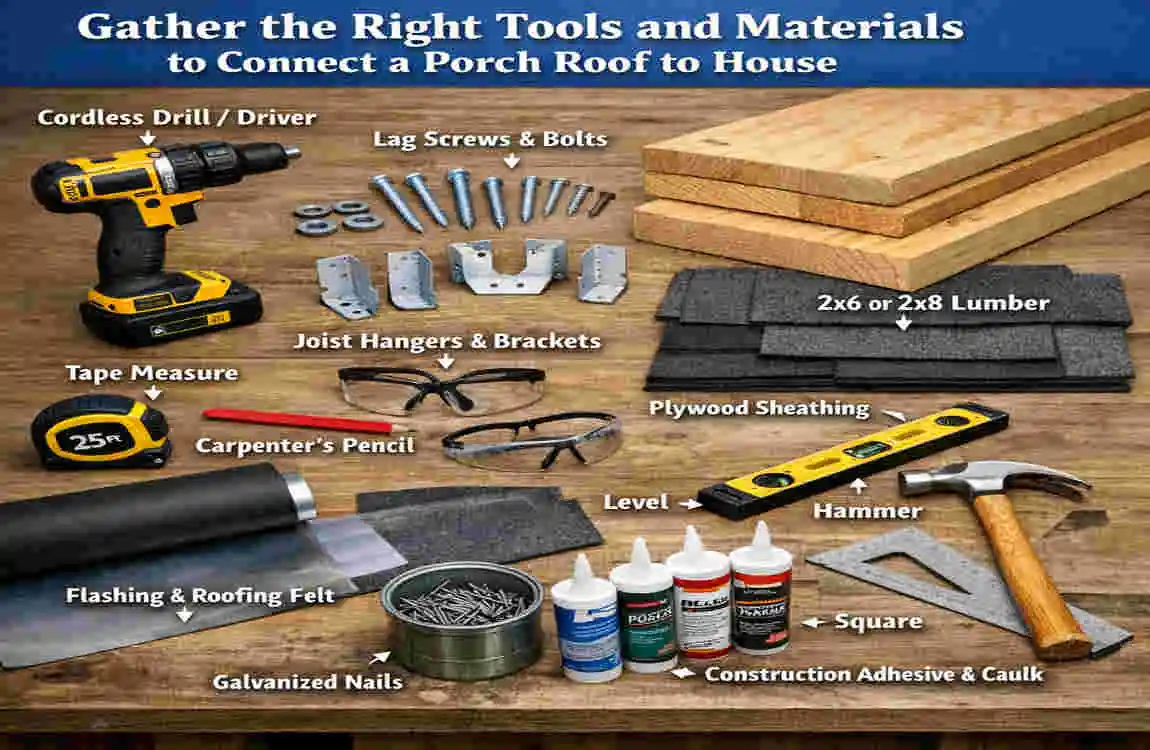
Tools you may need
Before starting the build, gather the tools that will help you work safely and accurately:
- tape measure
- level
- framing square
- circular saw
- drill/driver
- ladder or scaffolding
- chalk line
- pry bar
- safety gear
A clean setup makes the job easier. It also reduces mistakes caused by rushing or missing tools.
Materials commonly used
The materials you need depend on the exact design, but common items include:
- pressure-treated lumber
- rafters
- ledger board
- joist hangers
- structural screws or lag bolts
- hurricane ties
- flashing
- underlayment
- roofing material
- sealant that works with the roofing system
One important point: use code-approved fasteners and connectors. Standard hardware store screws or nails may not be strong enough for a structural roof connection.
Important note
A porch roof is not the place to guess. If the plans call for a specific connector or fastening pattern, follow that requirement closely. The right hardware helps the roof resist pull-out, wind uplift, and long-term movement.
Assess the Existing House Structure
Identify the attachment point
The first real job is to figure out where the porch roof will connect to the house. This is not always obvious. You may be working with:
- exterior wall framing
- rim joist area
- roof rafters
- existing fascia
Not every surface is strong enough to support a roof connection. Trim boards, siding, and decorative features are not structural. They may look solid, but they usually cannot carry roof loads.
Check structural capacity
Before fastening anything, make sure the house wall or roof area can actually support the added load. Look for:
- solid framing
- sound sheathing
- no rot or visible damage
- proper anchoring
If the area is old, soft, or patched roughly, treat it with caution. You do not want to attach a new roof to weak material.
Inspect for hidden issues
A porch roof often exposes problems that were hidden behind the wall or roof edge. Watch for:
- water damage
- mold
- insect damage
- settling or movement
- old repairs that weakened the area
If you find damage, repair it before moving forward. A new porch roof cannot fix a structurally deficient foundation underneath it.
Key takeaway
Never attach a porch roof to damaged framing or decorative trim alone. The connection must be made to real structural members that can safely carry the load.
Decide on the Best Connection Method
Ledger board connection
A ledger board is a horizontal board that is fastened to the house framing. The porch roof framing then connects to that board. This method is common when the porch roof needs a clean, direct structural tie into the house wall.
The biggest benefits are strength and simplicity. A ledger board connection can look neat and is often a practical choice for many porches.
But there are risks too. If the ledger is poorly flashed, water can seep behind it, causing rot. If the fasteners are wrong, the connection may not hold as expected.
Roof tie-in to the existing roof
A roof tie-in means the porch roof is physically joined to the existing house roof structure. This is usually more complex than a wall ledger connection, but it can look very polished when done well.
This approach works best when the porch roof needs to match the house roofline or when the design calls for a more integrated look.
The challenge is that this method requires more cutting, more flashing detail, and greater accuracy. If the work is not done carefully, leaks can develop at the tie-in point.
Freestanding porch roof with minimal house attachment
In this design, the porch roof is mostly supported by its own posts and beam system. The house may still help guide the roof edge or provide weather protection, but it does not carry the main load.
This option can be a good choice for older homes or houses where you want to reduce stress on the wall. It also helps when the house structure is not ideal for a heavy direct attachment.
The tradeoff is that you may need more posts or a different framing layout. The roof may also look a little less integrated unless the design is planned carefully.
Which method is best?
There is no single answer for every house. The best method depends on:
- roof style
- house design
- span
- local code
- budget
For larger porches or more complex rooflines, professional design is often the safest choice. It can save you from expensive mistakes.
Quick comparison table
Connection Method Best For Main Benefit Main Risk
Ledger board Many standard porch roofs Strong and common Flashing mistakes can cause leaks
Roof tie-in Matching the existing roofline Clean, integrated appearance More complex and leak-prone if done poorly
Freestanding roof Older homes or lower-stress designs Less load on the house May need more posts and framing
Measure Slope, Height, and Roof Pitch
Why measurements matter
Measurements control almost everything about the porch roof. The pitch affects how well water drains, what roofing material you can use, how the roof looks, and where the roof meets the house.
If the pitch is off, even a strong frame can fail in practical use because water may pool or move too slowly.
Key measurements to take
Before framing, measure:
- porch width
- projection depth
- connection height on the house
- desired slope
- overhang length
- rafter spacing
These numbers help you determine the roof shape and whether the design fits the house properly.
Practical tip
Make sure the porch roof slope is enough for the roofing material you plan to use. Some materials require a steeper slope than others. If the roof is too flat, water can sit on the surface or blow under the roofing.
Common mistake to avoid
One of the most common errors is building a roof that is too shallow. A shallow slope may look fine at first, but it can create drainage issues and lead to roofing problems later.
Frame the Support System
Set the posts and beam
The porch roof load has to go somewhere. In many porch designs, that load travels into the posts and then down into the footings.
The posts must sit on proper footings and be anchored well. The beam above the posts carries the roof framing and helps evenly distribute the load.
Do not treat posts like simple decorative columns. They are structural parts of the system.
Install the ledger or house attachment
If you are using a ledger board, mark the location carefully and fasten it into the structural framing, not just the exterior wall layer. Use approved anchors and follow local requirements.
You mustn’t rely on siding, brick veneer, or trim for structural support. Those materials are not made to hold a porch roof. They may hide the real framing, but they cannot carry the load on their own.
Add rafters
Rafters run from the house attachment or ledger to the outer beam or support point. They shape the roof and carry the roof covering.
When installing rafters, pay attention to:
- proper spacing
- accurate cuts
- consistent pitch
- secure fastening
Uneven rafters make it harder to install sheathing and roofing later. They can also create dips or bumps that show up in the final roof.
Reinforce the connection
Structural connectors help hold everything together. Depending on the design and local code, you may need:
- hurricane ties
- metal brackets
- joist hangers
These connectors help the porch roof resist wind uplift and keep the frame stable during heavy weather.
Connect the Porch Roof to the House Properly
Make the structural connection
This is the point where the porch roof becomes truly anchored to the home. Whether you use a ledger, a roof tie-in, or another design, the goal is the same: safely transfer the load into the structure.
If the roof attaches to the wall, the ledger must be securely fastened to the framing. If the roof ties into the existing roof, the new framing must line up with the house roof so the loads are shared properly. If a support beam meets the wall, the transition has to be solid and even.
Alignment matters here. If the connection is twisted or uneven, the roof may settle badly, and that can cause damage later.
Protect the wall from water intrusion
The roof-to-house junction is one of the most leak-prone places in the entire project. Water loves to find weak spots, especially where two surfaces meet at different angles.
That is why you need the right waterproofing parts, such as:
- step flashing
- head flashing
- ice and water shield
- continuous underlayment where appropriate
These pieces work together to keep water moving away from the house instead of behind the roof materials.
Flashing sequence matters
Flashing has to go in the correct order. The goal is to layer the materials so water naturally sheds outward and downward.
A good flashing sequence usually means the overlap faces the direction of water flow. You want each layer to protect the layer below it. You do not want reverse laps or exposed fasteners in areas where water can sit or run.
This is one of the most important parts of the job. Even strong framing cannot make up for bad flashing.
Seal gaps correctly
Sealant can help in the right places, but it is not a substitute for proper flashing. Think of caulk as a finishing touch, not the main defense against water.
Use roofing sealant only where it makes sense and where the roofing system allows it. If you rely solely on caulk, the connection may fail when the sealant dries out, cracks, or separates.
Best-practice reminder
A good porch roof connection must be structural and weather-tight. It is not enough for the roof to look attached. It has to be attached in a way that safely carries the load and keeps the house dry.
Install Roof Sheathing, Underlayment, and Roofing
Add roof sheathing
Once the framing is in place, install the roof sheathing. Use the proper panel thickness and nailing pattern for the job. Make sure the joints are supported where needed.
Sheathing provides a solid surface for the roof and helps distribute weight across the frame. It also creates the base layer for the underlayment and roofing.
Install underlayment
Underlayment acts like a secondary water barrier. If the roofing material is damaged or water gets under it, the underlayment provides an additional layer of protection.
You may use:
- synthetic underlayment
- felt underlayment
- ice and water shield in vulnerable areas
The most exposed areas, such as roof edges or tie-in points, often require extra protection. This is especially important in areas with snow, ice, or wind-driven rain.
Add the final roofing material
The roofing material should match the design and slope of the porch roof. Common options include:
- asphalt shingles
- metal roofing
- tile, if structurally appropriate
Choose the material based on roof pitch, climate, and the house’s style. For example, a low-slope porch roof may work better with certain metal systems than with materials that need more pitch.
Finish edges and trim
The last details matter more than people think. Add the right finishing parts, such as:
- drip edge
- fascia
- soffit ventilation if applicable
- proper edge detailing for a clean look
These details help the roof last longer and make the project look complete.
Inspect the Connection for Safety and Durability
What to inspect
After the roof is installed, walk through the connection carefully. Check for:
- fastener tightness
- flashing overlap
- roof slope
- water runoff
- structural alignment
- signs of movement or sagging
Look at the work from multiple angles. What looks fine from the ground may hide a problem up close.
Water test
If it makes sense for your project, check for leaks after installation. Watch the roof after a rain, or test the area carefully and inspect both inside and outside for moisture.
If you see water stains, drips, or damp spots, do not ignore them. Catching a leak early is much easier than repairing rot later.
Long-term maintenance
A porch roof should be checked over time, not just once. Recheck the flashing and sealant seasonally if possible. Watch for:
- rust
- loose nails
- rot
- shingle damage
- water stains
A few minutes of maintenance can help you avoid major repair costs later.
Common Mistakes to Avoid When Connecting a Porch Roof to a House
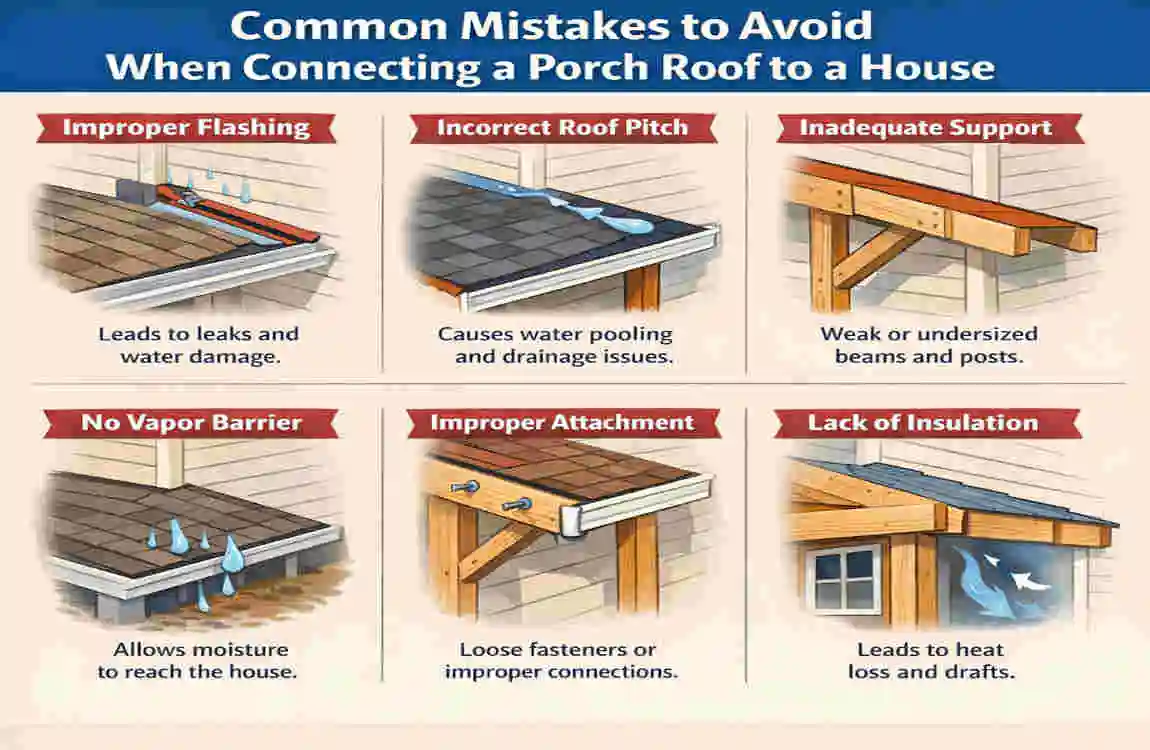
Attaching to non-structural materials
This is one of the biggest errors people make. Siding, brick veneer alone, trim boards, and decorative fascia are not strong enough to support a porch roof.
Skipping flashing
Flashing is one of the main defenses against leaks. Skipping it or installing it poorly is one of the fastest ways to create water damage.
Using incorrect fasteners
Standard screws or nails may not meet the project’s structural requirements. Use connectors and fasteners that are approved for the load and the code.
Ignoring roof pitch
A roof that is too flat can trap water or fail to shed it properly. Pitch is not just a design choice. It affects drainage and roof life.
Poor load distribution
If the weight is not spread correctly, the roof may sag or strain the house structure. Good framing keeps loads balanced.
Not getting permits
Skipping permits can lead to code violations, insurance issues, and resale problems. It may also leave you with unsafe work that must be redone.
When to Hire a Professional
Situations that call for a pro
Some porch roof projects are better left to an experienced contractor or structural specialist. That is especially true when you are dealing with:
- complex tie-in to an existing roof
- large porch roofs
- multi-story homes
- old homes with unknown framing
- areas with heavy snow or high winds
If the project affects a major structural part of the house, professional help is often worth it.
Benefits of hiring an expert
A good contractor or engineer can help with:
- correct structural design
- faster permitting
- better waterproofing
- fewer costly mistakes
That can save time and reduce stress, especially if this is your first porch addition.
Good middle ground
Some homeowners like to do part of the work themselves and bring in a professional for the most technical stages. That can be a smart approach. For example, you might handle prep work, cleanup, or demolition, while hiring a contractor for:
- framing
- structural attachment
- flashing
- final inspection
That gives you some DIY savings without taking on the riskiest parts alone.
Frequently Asked Questions
Can you attach a porch roof to a house?
Yes, you can attach a porch roof to a house, but only if the house structure can safely support it and the connection is built to code. The key is not just attaching it, but attaching it correctly.
Do you need a permit to connect a porch roof to a house?
In many areas, yes. Porch roof additions often need permits because they affect structure, safety, and weather protection. Always check with your local building department first.
What is the strongest way to connect a porch roof?
A properly designed structural attachment with correct connectors and flashing is generally the strongest approach. The exact method depends on the house and the roof design.
Should a porch roof be attached to the wall or roof?
It depends on the design, load, and local code. Some porch roofs attach to wall framing with a ledger board. Others tie into the existing roof structure. The right choice depends on the project.
How do you stop leaks where the porch roof meets the house?
Use proper flashing, underlayment, and roofing overlap details. Do not rely on caulk alone. Good layering and water-shedding details are what keep the area dry.
| Step | What to Do | Why It Matters |
|---|---|---|
| Check structure | Inspect the house wall, framing, and roof area for strength and damage. | Ensures the house can safely support the porch roof connection. |
| Get permits | Verify local building code and permit requirements. | Helps keep the project legal and up to code. |
| Choose the connection method | Use a ledger board, roof tie-in, or freestanding support design. | Determines how the porch roof will attach to the house. |
| Frame the support | Install posts, beams, and rafters with proper spacing and fasteners. | Creates the structural base for the roof. |
| Install flashing | Add step flashing, head flashing, and underlayment where the roof meets the wall. | Prevents water leaks and rot. |
| Secure roofing | Add sheathing, roofing material, and edge trim. | Finishes the roof and protects it from weather. |
| Inspect the work | Check for proper alignment, drainage, and tight connections. | Confirms the porch roof is safe and weather-tight. |