Imagine pulling into your driveway after a long day at work. You look up at your home, and instead of feeling proud, you notice dingy walls, streaks of green algae, and cobwebs gathering in the corners. It is a frustrating sight, but it is also completely fixable.
Your home is likely your biggest investment, and maintaining its exterior is about much more than just looking good for the neighbors. A clean house boosts your curb appeal and actively protects your property value. When you let dirt, algae, and harsh weather elements sit on your siding, they slowly erode the siding. This leads to permanent damage, costly repairs, and a major headache for you down the line.
If you are wondering how to clean the outside of your house, you are in the right place. Learning this process is not as intimidating as it sounds. In fact, with a free weekend and a little bit of elbow grease, you can transform your property from top to bottom.
A thorough exterior cleaning washes away the grime that traps moisture and invites mold. It extends your paint’s life and prevents destructive pests from making a cozy home in your debris. Best of all, a sparkling clean exterior can increase your home’s value, which is incredibly important if you ever plan to sell.
Why Clean Your House Exterior?
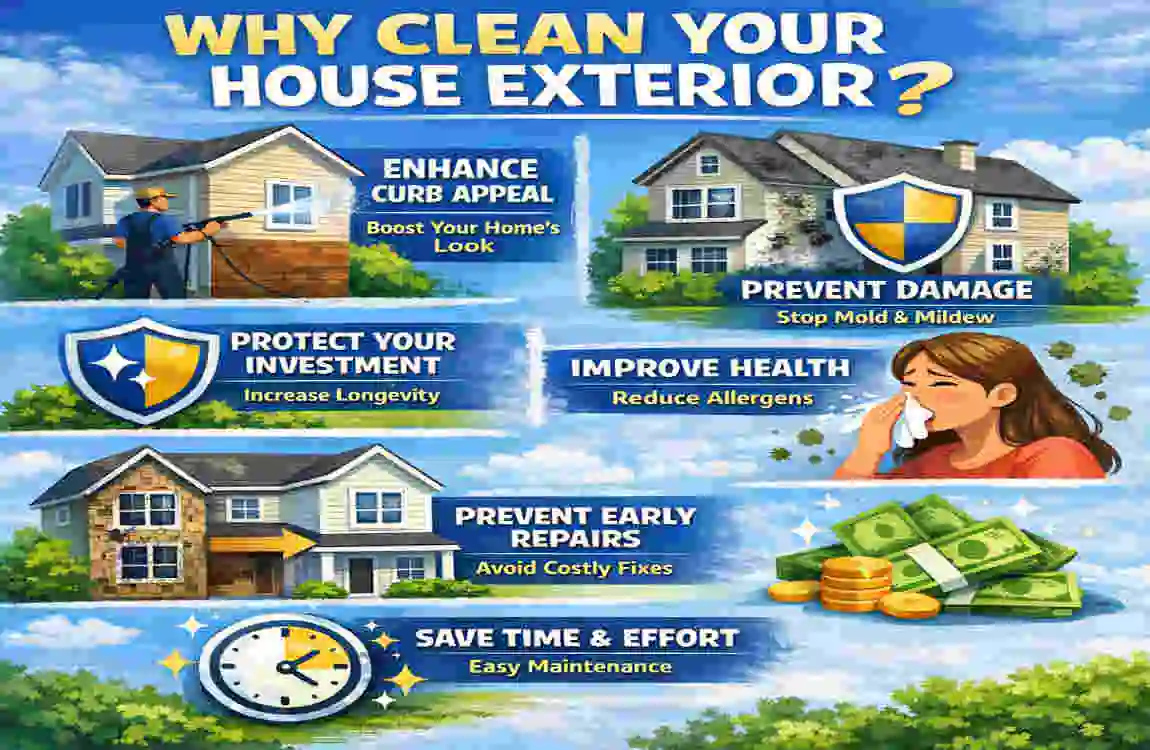
Is scrubbing siding on your weekend really worth the effort? The short answer is an absolute yes. Giving your home a thorough exterior wash is one of the smartest maintenance tasks you can perform.
Welcoming the Seasons
Seasonal changes take a massive toll on your home. A spring refresh is the perfect time to wash away winter salt, mud, and decaying leaves. Alternatively, if you are prepping your house for the real estate market, an exterior cleaning is mandatory. Buyers make split-second judgments based on the outside of your home. If the outside looks neglected, they will automatically assume the inside is, too.
The Real Risks of Neglect
When you ignore exterior maintenance, you invite serious problems. Mold and mildew growth are not just ugly; they rot wood and degrade your siding. If left unchecked, these spores can even find their way inside your home, affecting your indoor air quality. Dirt and grime also act like sandpaper against your paint, causing it to peel and chip prematurely. Furthermore, piles of damp leaves and clogged gutters are absolute magnets for insects and rodents.
Big Benefits for Your Wallet
The benefits of a clean house go far beyond neighborhood envy. Did you know that clean surfaces actually promote better energy efficiency? Light-colored siding is designed to reflect sunlight, keeping your home cooler in the summer. When that siding is covered in dark dirt, it absorbs heat instead, driving up your air conditioning bills.
Finally, let us talk about property value. Real estate experts agree that simple curb appeal improvements, like a thorough exterior cleaning, can boost your home’s selling price by 5% to 10%. That is thousands of dollars in your pocket just for washing your house!
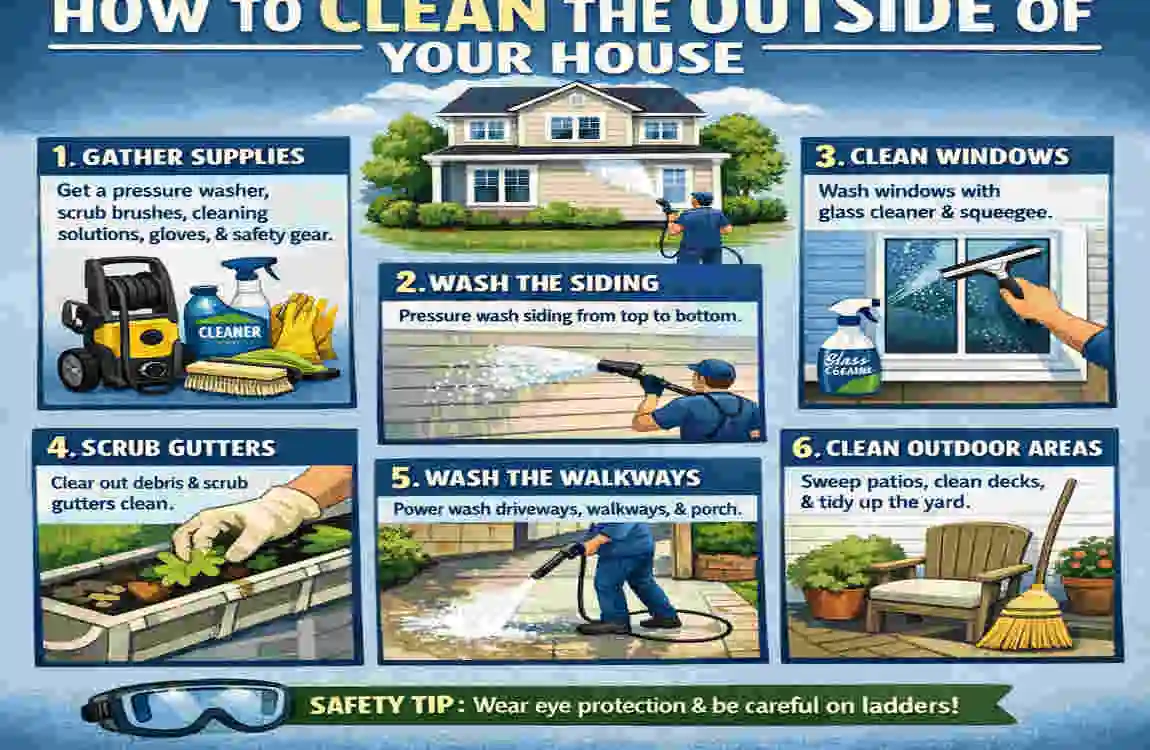
Tools and Materials Needed
Before you climb any ladders or turn on any hoses, you need to gather the right supplies. Having the proper tools on hand makes the job faster, safer, and much more effective.
You do not need to break the bank to get professional results. Many of these items are already sitting in your garage, and the rest can be rented or purchased on a friendly budget. Always prioritize tools that are safe for your specific house materials to avoid accidental damage.
Your Master Cleaning Arsenal
Here is a quick breakdown of the essential gear you will need to get the job done right:
Tool/Material Purpose Budget/Pro Tip
Pressure Washer Blasts away stubborn dirt on hard surfaces. Rent one for the day instead of buying to save money.
Soft-Bristle Brushes Safely scrubs delicate siding and windows. Buy an extendable pole to reach high places easily.
Eco-Friendly Cleaners break down grime without harming plants. Look for biodegradable, plant-safe labels.
Sturdy Ladder Reaching gutters, roofs, and high windows. Always use a ladder with slip-resistant feet.
Heavy-Duty Gloves protect hands from rough debris and soap. Rubber grips work best for wet conditions.
Garden hoses and nozzles are essential for rinsing and gentle washing. Get a nozzle with multiple spray settings.
Safety gear is completely non-negotiable. Make sure you wear protective safety goggles to shield your eyes from flying debris and splashing soap. Slip-resistant shoes are also a must, as wet driveways and ladders get incredibly slick. By gathering these reliable tools, you set yourself up for a smooth and successful weekend project.
Preparation Steps
You might be tempted to grab the hose and start spraying, but hold your horses! Proper preparation is the secret ingredient to a successful exterior house cleaning. Skipping this phase usually leads to damaged plants, ruined electrical outlets, and a lot of frustration.
Safety First: Secure the Area
Start by walking around your entire property. Clear away any loose yard debris, like fallen branches, kids’ toys, and patio furniture. You want a completely clear walkway so you do not trip while looking up at your siding.
Next, check your weather forecast. You want to pick a mild, overcast day. If the sun is blazing hot, your cleaning solutions will dry on the siding before you can rinse them off, leaving ugly streaks behind. Finally, inspect your ladder to ensure the rungs are secure and place it on flat, stable ground.
Protect Your Plants and Property
Your beautiful garden needs protection from falling dirt and soapy runoff. Grab some canvas tarps or thick plastic sheeting and gently drape them over your bushes, flowerbeds, and delicate landscaping.
You also need to protect your home’s electrical system. Use waterproof tape and plastic bags to securely cover all outdoor outlets, light fixtures, and electrical panels. Water and electricity are a dangerous mix, so take this step very seriously.
The Patch Test
Before applying any cleaner to your entire house, you must perform a patch test. Find a small, hidden area of your siding and apply your cleaning solution. Wait a few minutes and rinse it off. Check to make sure the cleaner did not bleach the paint or warp the material. Once you confirm the solution is safe, you are fully prepped and ready to clean!
Remove Loose debris
Now that you are prepped, it is time to start the actual cleaning process. Step one is all about dry cleaning. You need to remove any loose debris before introducing water to the situation.
Working From the Top Down
The golden rule of cleaning the outside of your house is to always work from the top down. If you start at the bottom, the dirty water from the top will just run down and ruin your hard work.
Grab a sturdy broom with a long handle. Start near your roofline and gently sweep away any massive cobwebs, dirt clumps, and abandoned wasp nests. Pay special attention to the corners of your eaves and the areas around your window frames, as spiders love to build their homes there.
Utilize Your Leaf Blower
If you have a leaf blower, now is the perfect time to use it. A leaf blower is fantastic for blasting dry leaves off window ledges, clearing dust from your porch screens, and pushing loose dirt away from your foundation.
Why Dry Cleaning Matters
You might wonder why you cannot just blast all this dry debris away with a hose. When you wet a massive clump of dirt or a thick cobweb, it turns into a sticky, muddy mess that clings stubbornly to your siding. Even worse, rubbing wet dirt into your paint acts like sandpaper, leaving thousands of tiny scratches. By sweeping and blowing the loose debris away first, you ensure a much smoother, scratch-free washing process.
Clean Gutters and Downspouts
Nobody likes cleaning gutters, but it is an absolutely vital step in protecting your home. Think of your gutters as the plumbing system for your roof. When they get clogged, everything goes wrong.
Preventing Costly Water Damage
When gutters fill up with decaying leaves, twigs, and moss, rainwater has nowhere to go. It spills over the edges, running straight down your siding and pooling right next to your foundation. Over time, this causes serious foundation cracks, flooded basements, and rotting wood fascia boards. Clearing those clogs now saves you thousands of dollars in structural repairs later.
Safe Cleaning Techniques
Put on your heavy-duty rubber gloves to protect your hands from sharp twigs and hidden pests. Set up your ladder on stable ground, and never reach further than your arm can comfortably stretch. If you have to lean, you need to climb down and move the ladder.
Use a small plastic gutter scooper or a child’s beach trowel to dig out the muck. Toss the debris into a bucket hanging from your ladder, or drop it onto a tarp laid out on the grass below for easy disposal.
Flush the Downspouts
Once you remove the bulk of the debris, take your garden hose up the ladder. Spray a steady stream of water directly down the downspout. If the water backs up, you have a clog. You can use a plumber’s snake or a strong blast from your hose to break it up. Once the water flows freely out of the bottom, your gutters are officially ready for the rainy season.
Wash Windows and Frames
Your windows are the eyes of your home. When they are sparkling clean, the whole house looks brighter and more inviting. Washing exterior windows requires a bit of technique to avoid annoying streaks and spots.
The Magic of Vinegar Solutions
You do not need expensive, harsh chemicals to get crystal-clear glass. The best window cleaning solution is likely sitting in your kitchen pantry right now. Mix equal parts of distilled white vinegar and warm water in a spray bottle or a large bucket. The vinegar’s acidity cuts through hard water stains, bird droppings, and greasy fingerprints without leaving a filmy residue.
For heavily soiled windows, add a single drop of mild dish soap to the mix to help lift the dirt.
Mastering the Squeegee
Throw away the paper towels—they leave lint everywhere. Your best friend for this step is a high-quality squeegee with a fresh rubber blade.
Dip a soft sponge or a microfiber scrubber into your vinegar solution and generously wet the window. Scrub away the visible dirt. Then, use your squeegee and start at the top-left corner of the glass. Pull it straight across to the right side. Wipe the rubber blade completely dry with a clean cloth. Repeat this overlapping horizontal motion until you reach the bottom of the window.
Scrub Siding and Walls
This is the main event! Scrubbing the siding is where you will see the most dramatic visual difference in your home’s exterior. The approach you take depends entirely on what your house is made of.
Choosing the Right Pressure
If you are using a pressure washer, proceed with extreme caution. High pressure can easily dent aluminum, crack vinyl, and blast the mortar right out of the brick.
- Vinyl and Wood: Always use the lowest pressure setting and a wide-angle spray nozzle (like a 40-degree tip). Stand at least three feet back from the wall.
- Brick and Stone: These materials can handle a bit more pressure, but you still need to keep the nozzle moving constantly to avoid etching the surface.
- Stucco: Never pressure wash stucco! It is too delicate. Instead, use a garden hose and a soft-bristle brush.
The Best Cleaning Solutions
For general dirt, a simple mixture of warm water and a few squirts of mild dish soap works wonders. If you have an extendable siding brush, dip it into your soapy bucket and scrub the walls in sections. Remember to work from the bottom up when applying soap to prevent streaks, but rinse from the top down.
Tackling Stubborn Mildew
If your siding lives in the shade, you probably have patches of green algae or black mildew. Regular soap will not kill these spores. You need a specialized solution.
Mix one part household bleach with four parts water. (If you prefer a natural route, white vinegar works here too, but do not mix vinegar and bleach!). Apply the solution to the moldy spots with a pump sprayer. Let it sit for about 10 minutes to kill the roots, then scrub it lightly with your brush and rinse thoroughly.
Clean the Roof
Your roof takes a beating from the sun, rain, and surrounding trees. While cleaning, it is important to prevent moss and algae from eating your shingles; this is also the most dangerous step of the process.
The Gentle Approach
You should never use a pressure washer on an asphalt shingle roof. High-pressure water can strip away the protective granules on your shingles, drastically reducing your roof’s lifespan and leading to immediate leaks.
Instead, rely on gentle methods. Use your trusty leaf blower to clear pine needles, leaves, and branches from the roof valleys. If you have black streaks (caused by a specific type of algae), use a pump sprayer to apply a dedicated, low-pressure roof cleaner. Let the chemical do the heavy lifting, and then gently rinse it away with your garden hose using a shower setting.
A Warning on Steep Roofs
We need to be incredibly direct here: walking on a wet roof is exceptionally dangerous. Slipping and falling from that height can cause life-altering injuries.
If your roof has a steep pitch, if it is higher than a single story, or if you do not feel 100% confident in your balance, do not climb up there. Your safety is worth far more than a clean roof. Hire professional roof cleaners who have the proper harnesses, training, and insurance to handle the job safely.
Power Wash Driveway and Walkways
Now that the house itself is looking great, turn your attention to the concrete surfaces leading up to it. A sparkling clean house looks totally out of place next to a driveway covered in motor oil and muddy footprints.
Banish Oil Stains and Grime
Concrete is incredibly porous, meaning it drinks up stains like a sponge. To tackle dark motor oil drips, you need a heavy-duty concrete degreaser. Pour the degreaser directly onto the stain and let it sit for about 15 minutes. Use a stiff-bristled push broom to vigorously scrub the spot, breaking down the oils trapped in the concrete pores.
For general dirt and tire marks, a pressure washer is your best friend. For concrete, you can safely use a higher pressure setting and a narrower nozzle (like a 25-degree tip). Work in slow, sweeping, overlapping lines. If you have a large driveway, consider renting a surface cleaner attachment for your pressure washer. It looks like a floor buffer and cleans wide concrete paths evenly and quickly.
Eco-Friendly Detergents
When washing your driveway, remember that all the runoff goes straight into your lawn or down the storm drain. Always choose eco-friendly, biodegradable concrete detergents. These formulas lift the dirt without pumping toxic chemicals into your local water supply.
Seal for Longevity
Once your driveway and walkways are completely dry—usually after a full 24 hours—consider applying a concrete sealer. Rolling on a clear sealer protects the porous surface from future oil spills, prevents weed growth in the cracks, and gives the concrete a beautiful, subtle sheen.
Refresh the Front Door and Trim
Your front door is the focal point of your home’s exterior. Even if your siding is spotless, a dull, chipped front door will drag down your curb appeal. Giving your entryway a quick refresh is a highly rewarding step.
A Pop of Color and Polish
Start by giving the door and the surrounding trim a gentle wash with soapy water to remove dust and muddy pet paw prints. Once it is dry, inspect the paint. Are there scratches around the keyhole or scuff marks at the bottom?
Grab a small paintbrush and touch up any chipped areas. If the door looks completely faded, consider dedicating an afternoon to painting it a brand new color. Vibrant, welcoming colors are a huge trend for 2026. Deep navy blues, sage greens, and even bold mustard yellows are incredibly popular right now for creating striking curb appeal.
Make the Hardware Shine
Do not ignore your door hardware! Your handle, knocker, and kickplate take a lot of abuse from the elements.
If your hardware is brass or copper, use a dedicated metal polish and a microfiber cloth to rub away the tarnish and restore its brilliant shine. If the hardware is rusty or beyond repair, swapping it out for a modern matte black or brushed nickel handle set is a relatively inexpensive upgrade that instantly modernizes your entire entryway.
Clean Outdoor Lighting and Fixtures
We often forget about our outdoor lighting until a bulb burns out, but these fixtures are absolute magnets for dead bugs, thick dust, and intricate spider webs. Clean lighting not only looks better during the day, but it also makes your home safer and more welcoming at night.
Let the Light Shine Through
First, make sure the power to your outdoor lights is turned off at the switch. You do not want to risk a shock.
Carefully unscrew the glass casings or globes from your porch lights, garage sconces, and pathway lamps. Dump out any accumulated debris. Wash the glass in your kitchen sink using warm water and dish soap. Dry them completely with a lint-free cloth so they do not fog up when you put them back outside.
Take a damp rag and wipe down the metal housing attached to the wall.
Energy-Saving Bulb Swaps
While you have the casings off, take a look at your lightbulbs. Are they mismatched? Are they old, inefficient incandescent bulbs?
Now is the perfect time to upgrade to modern LED outdoor bulbs. Look for bulbs with a “warm white” color temperature (around 2700K to 3000K). This creates a cozy, inviting glow that makes your freshly cleaned house look absolutely stunning in the evening. Plus, LED bulbs last for years, so you will not have to climb a ladder to change them anytime soon.
Tend to the Fence and Deck
Your house might be the main attraction, but your fence and deck frame the entire picture. If your wood surfaces are turning gray or covered in green slime, they need some serious attention.
Restoring Wood and Composite Surfaces
Wooden decks and fences naturally fade as they bake in the sun’s UV rays. To restore them, you need to clean away the dead wood fibers.
Apply a specialized wood cleaner or oxygen bleach solution to the surface. Let it sit, and then gently scrub with a stiff brush. You can use a pressure washer to rinse it, but keep the pressure very low to avoid splintering the soft wood.
If you have a modern composite deck, your job is much easier. A simple wash with warm, soapy water and a soft brush will remove the dirt without damaging the composite capping.
Preventing Future Rot
Wood is highly susceptible to rot when moisture penetrates its surface. Once your newly cleaned wood deck or fence has dried completely for at least 48 hours, you need to protect it.
Apply a high-quality wood stain or a clear water-repellent sealant. Use a brush or a roller to work the sealant deep into the grain. This vital step blocks out rainwater, prevents UV graying, and ensures your outdoor structures will last for many years to come.
Final Rinse and Inspection
You are almost at the finish line! You have scrubbed, sprayed, and polished every inch of your property. Now it is time to bring it all together and admire your hard work.
The Top-to-Bottom Rinse
Grab your garden hose one last time. Starting from the highest point of your house, spray a gentle, cascading flow of water down the siding, windows, and doors. This final rinse washes away any lingering soap residue, loose dirt, and chemical runoff that might have splattered during the cleaning process. Pay special attention to your plants and shrubs, giving them a heavy watering to dilute any stray cleaning solutions that might have bypassed your tarps.
Your Walkthrough Checklist
Take a slow walk around your entire property. Look closely at the corners, the areas under the eaves, and the foundation base.
- Did you miss any streaks on the windows?
- Is there any soap film left on the front door?
- Did you put all the patio furniture back in its proper place?
Fix any tiny details you spot during this walkthrough.
Creating a Maintenance Schedule
To keep your house looking this beautiful year-round, you need a basic maintenance schedule. Plan to clear your gutters twice a year—once in the spring and once in the late fall. Wash your windows every six months. As for the major siding wash, most homes only need a thorough scrub down once a year. Mark it on your calendar now so you never fall behind again!
Eco-Friendly Cleaning Tips for a Greener Home
Today, more homeowners than ever are looking for ways to maintain their property without harming the environment. You do not need harsh, toxic chemicals to achieve a spotless home. Mother Nature provides some incredible cleaning agents right in your kitchen.
Harnessing Natural Cleaners
Instead of reaching for industrial bleaches and ammonia, try using baking soda. It is a fantastic, mild abrasive. Mix baking soda with a little water to form a paste, then use it to scrub stubborn rust stains from concrete or polish tarnished metal fixtures.
As mentioned earlier, white vinegar is a miracle worker. It naturally cuts through grease, kills mold spores, and leaves glass shining. Just remember that vinegar is acidic, so avoid using it on natural stone surfaces like marble or limestone, as it can etch the finish.
Reduce Water Waste
Washing a house naturally uses a lot of water, but you can be smart about it.
- Always put a trigger nozzle on your garden hose. This ensures the water is only running when you are actively spraying, saving dozens of gallons per minute.
- Sweep your driveway and walkways with a broom instead of using the hose as a water broom.
- If you use a pressure washer, you are actually being eco-friendly! Pressure washers use significantly less water than a standard garden hose because they rely on pressure, rather than volume, to clean.
By adopting these green habits, you protect your local waterways, save money on your water bill, and keep your garden completely safe.
Common House Washing Mistakes to Avoid
Even with the best intentions, it is easy to make an error that can damage your home. Keep an eye out for these common pitfalls, and use our easy fixes to stay on track.
The Mistakes to Watch Out For:
- Over-Pressurizing: Using too much pressure is the number one mistake DIYers make. It strips paint, carves lines into wood, and shatters window seals.
- The Fix: Always start with the lowest pressure nozzle. Stand far back from the surface, and slowly move closer only if the dirt refuses to budge.
- Using Harsh Chemicals Recklessly: Spraying heavy bleach or industrial solvents indiscriminately kills your grass, burns your skin, and ruins siding.
- The Fix: Dilute all chemicals properly according to the instructions on the bottle. Always pre-wet your plants before washing the house, and thoroughly rinse the plants afterward to wash away any chemical overspray.
- Washing in Direct Sunlight: When the sun is beating down on your siding, the water and soap dry instantly, baking the dirt right back onto the house and leaving awful streaks.
- The Fix: Pick a cloudy day. If you must wash on a sunny day, work on the shaded side of the luxury house first, and constantly keep the siding wet with your hose.
- Skipping the Prep Work: Failing to cover outlets or clear the yard leads to electrical hazards and tripping injuries.
- The Fix: Never skip the tarping and taping phase. Ten minutes of prep saves hours of disaster recovery.
Frequently Asked Questions
You likely still have a few specific questions bouncing around in your head. Let us address some of the most common homeowner questions about exterior maintenance.
How often should I clean the exterior of my house?
For the average home, a deep exterior clean once a year is perfectly sufficient. However, if you live in an area with high humidity (which encourages mold), heavy tree coverage (which drops sap and pollen), or near a dirt road, you might need to wash your house twice a year to keep the grime at bay.
What is the safe pressure setting for vinyl siding?
Vinyl siding is tough but flexible, meaning it can crack under high pressure. You should never exceed 1,500 to 2,000 PSI (pounds per square inch) when washing vinyl. More importantly, always use a wide 40-degree spray nozzle and keep the wand angled downward. If you spray upward, you risk forcing water beneath the vinyl panels, which can lead to hidden mold in your walls.
Can I wash my house in the winter?
It is highly recommended that you avoid washing your house in freezing temperatures. If the temperature is below 40 degrees Fahrenheit, the water you spray can quickly freeze on your siding, walkways, and ladders. This creates dangerous ice slicks and can even cause water trapped in the cracks of your siding to expand and burst. Wait for a mild spring day to tackle this project safely.