A mobile home carport awning is a smart and useful addition for many homeowners. It provides your vehicle with shade, helps protect it from rain and sunlight, and adds comfort to your outdoor space. If you live in a mobile home and want a simple way to improve protection and appearance, this is a practical choice.
The best part is that a carport awning is not just about looks. It can help keep your car cooler, reduce weather damage, and even add value to your property. If you plan the job well and use the right materials, the installation can go smoothly.
What Is a Mobile Home Carport Awning?
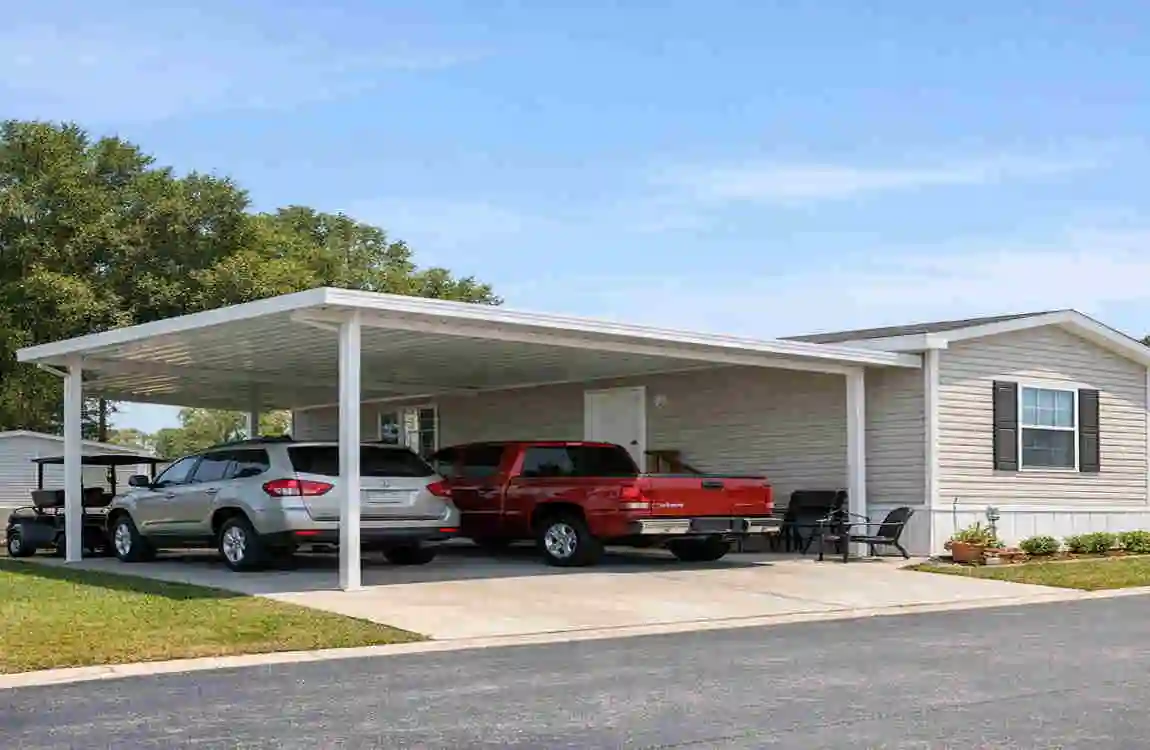
A mobile home carport awning is a covered structure that provides shelter for a car, truck, or other outdoor equipment next to a mobile home. It can be attached to the home or built as a separate structure.
Attached vs. Freestanding
- Attached carport awning: connected to the mobile home for support and convenience
- Freestanding carport awning: stands on its own with support posts
Common Materials
Most carport awnings are made from:
- Aluminum
- Steel
- Polycarbonate roofing
- Awning fabric for lighter designs
A carport is usually open on the sides, while a garage is fully enclosed. An awning is lighter and simpler than a full garage cover, which makes it easier to install and maintain.
Benefits of Installing One
A mobile home carport awning offers more than just covered parking.
Main Benefits
- Protects your vehicle from sun, rain, wind, and snow
- Reduces heat inside the car on hot days
- Helps your car last longer by limiting weather damage
- Adds shaded outdoor space for relaxing or working
- Improves curb appeal and may raise property value
- Needs low maintenance compared to other structures
If you live in a place with strong sun or changing weather, this type of cover can make daily life easier.
Tools and Materials Needed
Before starting, gather everything you need so the work does not stop halfway.
Tool or Material Purpose
Measuring tape Measures space and placement
A drill machine makes holes and fastens parts
Screws and bolts hold the frame together
Anchoring kit secures the structure
Steel or aluminum frame Main support structure
Roofing sheets or awning fabric create the cover
Concrete footings add strong ground support
Gloves, goggles, helmet. They help keep you safe
Having the right tools ready saves time and reduces mistakes.
Planning Before Installation
Good planning makes the installation easier and safer.
Check the Space
First, measure the area beside your mobile home. Make sure there is enough room for both the vehicle and the awning structure. Leave space for doors to open and for walking around the car.
Check Local Rules
Some places need permits for a mobile home carport awning, especially if it is a permanent structure. It is always smart to check local building rules before you begin.
Choose the Right Size
Think about:
- The size of your vehicle
- How many vehicles do you want to cover
- Whether you want extra space for storage or shade
Pick Weather-Resistant Materials
Choose materials that can handle sun, rain, and wind. Aluminum and steel are strong choices. If you want a lighter cover, polycarbonate sheets can also work well.
Step-by-Step Installation Guide
Here is a simple guide to help you understand the process.
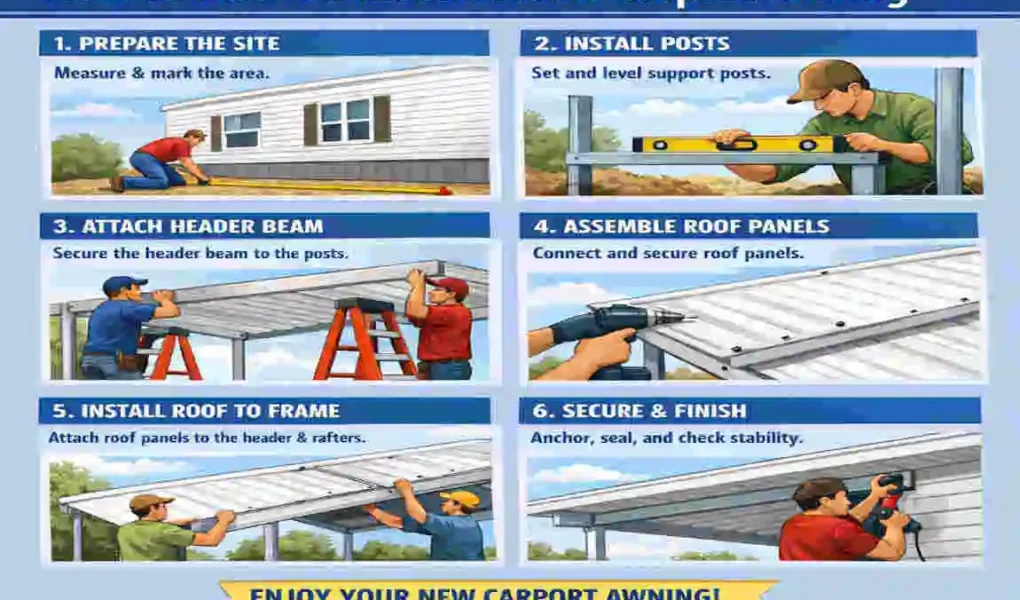
Prepare the Site
Clear the area where the carport awning will go. Remove rocks, weeds, tools, and anything else in the way. Then level the ground as much as possible. A flat surface helps the frame stand straight and stable.
Mark the Layout
Use a measuring tape and markers to show where each support post will go. Check the spacing carefully. If the marks are uneven, the structure may become unbalanced later.
Install the Support Posts
Place the support posts into the ground or into concrete footings. This step is very important because the posts carry the weight of the entire structure. Make sure each post stands straight using a level tool.
Assemble the Frame
Attach the beams and cross supports to the posts. Tighten all bolts and screws properly. Do not rush this step. A loose frame can cause problems later, especially during strong winds.
Add the Roof Cover
Now attach the roofing sheets, metal panels, or awning fabric. Make sure the cover fits tightly and does not leave open gaps where water can enter. If you are using roof sheets, overlap them correctly for better waterproof protection.
Add Reinforcement
To improve strength, add braces or extra supports at weak points. This helps the mobile home carport awning stand firm in windy conditions. Double-check every joint and connection.
Do a Final Inspection
Walk around the structure and inspect everything carefully. Look for loose screws, uneven posts, or weak spots. Gently test the stability before using the carport.
Safety Tips to Follow
Safety should always come first during installation.
- Wear gloves, goggles, and a helmet
- Do not install during strong wind or rain
- Use a strong ladder or scaffold if needed
- Follow the manufacturer’s instructions
- Work with at least two people for better safety and support
Even if the project looks simple, taking safety seriously can prevent injuries and damage.
Common Mistakes to Avoid
Many people run into problems by making a few simple mistakes.
Avoid These Errors
- Incorrect measurements
- Weak anchoring
- Cheap materials
- Poor alignment
- Ignoring wind load needs
If you take your time and double-check each step, your carport awning will be much stronger and last longer.
Maintenance Tips
A well-built carport awning does not need much work, but it still needs regular care.
Simple Maintenance Routine
- Clean the roof panels often
- Check bolts and joints every few months
- Remove leaves, dirt, and storm debris
- Repainting or protecting metal parts from rust
- Replace torn fabric or damaged sheets quickly
Small repairs done early can save money later and keep the structure in good shape.
Cost Overview
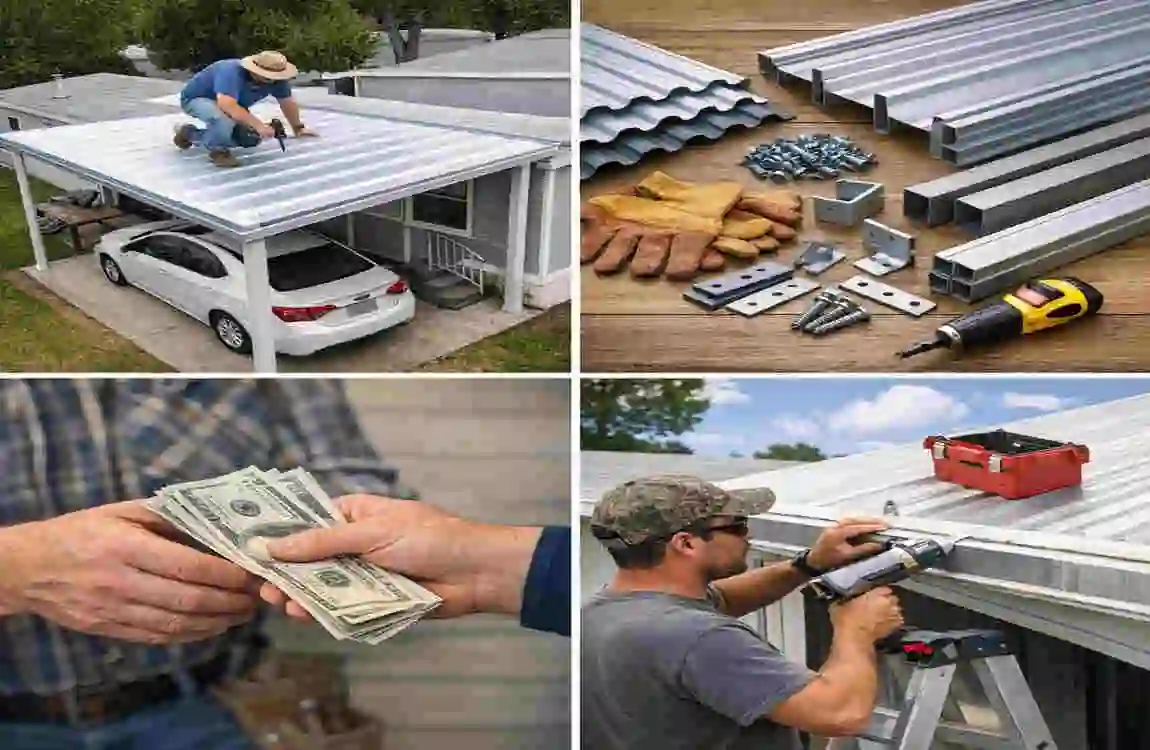
The cost of a mobile home carport awning depends on size, materials, and whether you install it yourself or hire a professional.
What Affects the Price?
- Material choice: steel and aluminum usually cost more than fabric
- Size: larger covers need more materials and labor
- Design: Simple designs are cheaper than custom builds
- Labor: DIY saves money, but professional work may give better results
General Cost Range
A basic setup may cost less, while a large and durable installation can cost much more. Even so, the long-term value is often worth it because it protects your vehicle and improves your property.
FAQ
How long does it take to install a mobile home carport awning?
Usually 1 to 3 days, depending on the size and design.
Do I need a permit?
In many places, yes, especially for a permanent structure.
What is the best material?
Aluminum and steel are strong and durable, while polycarbonate is lightweight and blocks UV rays.
Can I install it myself?
Yes, you can install a simple one yourself, but professional help is better for large or complex structures.
How long does it last?
With proper care, a carport awning can last 10 to 25 years or more, depending on the material.
| Step | Task | Details | Tools/Materials Needed |
|---|---|---|---|
| Planning & Measurement | Measure space | Check width, height, and clearance of mobile home side where awning will attach | Measuring tape, pencil, paper |
| Choose Design | Select awning type | Decide between aluminum, steel, or fabric-covered carport awning | Purchase kit or custom frame |
| Prepare Ground | Level surface | Ensure ground is flat and stable for support posts | Shovel, gravel, level tool |
| Install Posts | Set vertical supports | Anchor posts into concrete footings or ground anchors | Post anchors, cement, drill |
| Attach Beam | Secure main frame | Fix horizontal beam to posts and mobile home wall | Bolts, brackets, wrench |
| Assemble Roof Frame | Build structure | Connect rafters and cross beams for roof support | Screws, ladder, drill |