If you are looking into how to wire in a generator to your house, you are probably thinking about comfort, safety, and peace of mind. That makes sense. When the power goes out, even a short outage can turn into a big problem. Food can spoil, medical devices may stop working, your home office can shut down, and basic daily routines can become stressful very quickly.
A generator gives you a backup plan. It helps you keep the most important parts of your home running during storms, grid failures, and emergencies. But connecting a generator is not just about buying the machine and plugging it in. It involves safe electrical planning, the right equipment, and often professional installation.
What Does It Mean to Wire a Generator to Your House?
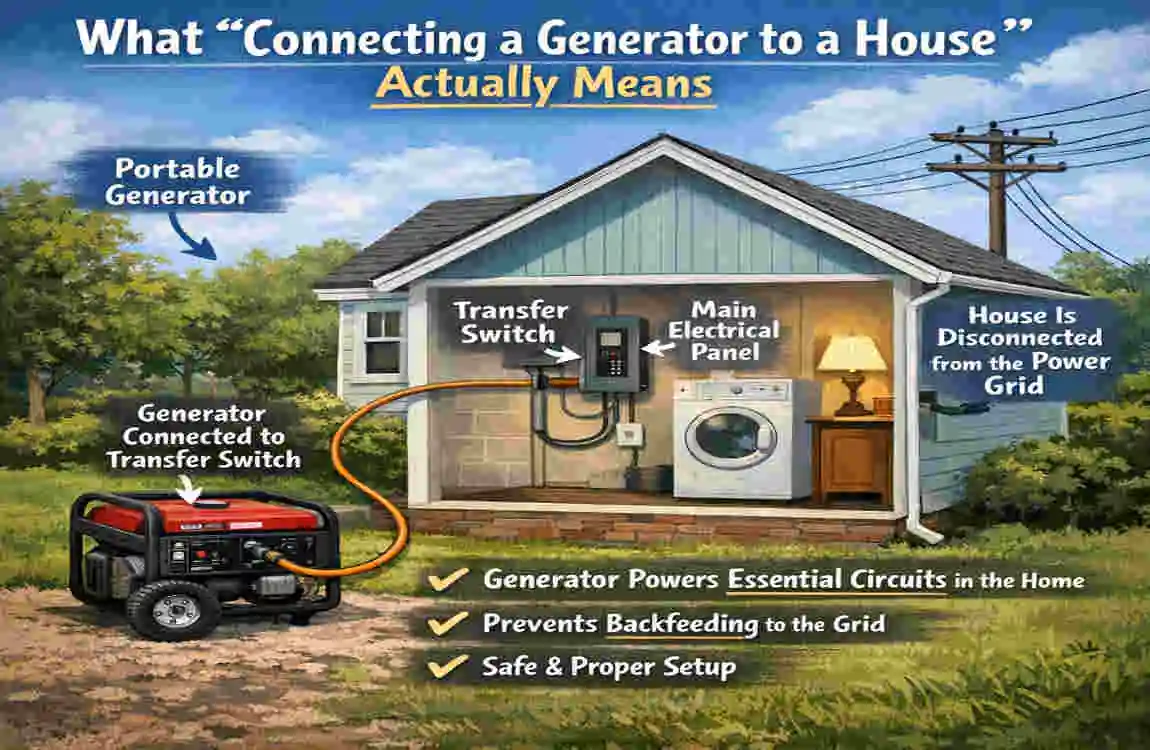
When people talk about connecting a generator to a house, they usually mean creating a safe way for the generator to power selected home circuits or the whole house during an outage. It is not the same as running a cord through a window or plugging the generator into a random outlet.
That kind of shortcut is unsafe and should be avoided.
Portable generator, inverter generator, and standby generator
There are a few common types of generators, and the best connection method depends on which one you have.
A portable generator is the most common entry-level option. It usually runs on gasoline, sits outside the home, and powers only certain appliances or circuits.
An inverter generator is also portable, but it usually runs more quietly and produces cleaner power. People like it for sensitive electronics and lighter household needs.
A standby generator is a permanently installed unit. It is connected to the home electrical system and often starts automatically when utility power fails.
Why the connection method matters
The connection method ensures the setup is safe and code-compliant. Most homes use one of these:
- A manual transfer switch
- An interlock kit
- An automatic transfer switch
These systems help keep generator power separate from the utility grid. That separation is critical because it prevents backfeed, which can send power where it shouldn’t.
If you are trying to understand how to wire in a generator to your house, the first thing to know is this: the generator itself is only part of the system. The connection hardware is what makes the system safe.
Is It Safe to Connect a Generator Yourself?
This is one of the most important questions homeowners ask, and the honest answer is that generator connection work can be dangerous if done incorrectly.
The main risks you need to understand
There are several serious hazards involved in generator hookup work.
Backfeeding the grid is one of the biggest. If generator power flows backward into the utility system, it can injure utility workers and damage equipment.
Carbon monoxide poisoning is another major risk. Generators make exhaust fumes that can become deadly if the unit runs too close to doors, windows, garages, or vents.
Overloaded circuits can cause breakers to trip, wires to overheat, and appliances to fail.
Improper grounding can create shock hazards and electrical faults.
Weather exposure also matters. Water and electricity never mix well, and generator equipment must stay dry and protected.
Why safety comes first
A safe generator setup is not just about convenience. It protects your family, your home, and the people working on the power lines outside your neighborhood.
That is why most homeowners should start by checking with:
- The local building department
- The utility company
- A licensed electrician
They can tell you what permits are required, what code rules apply, and what kind of generator connection is suitable for your home.
Generator placement matters too.
Before any wiring conversation begins, the generator must be correctly placed.
It should be:
- Outside only
- Far from doors and windows
- Away from garages, basements, and enclosed areas
- In a spot with good airflow
- Protected from rain when possible, without blocking ventilation
If a generator runs in the wrong place, the danger is not just poor performance. It can be life-threatening.
What You Need Before Installation
Before you can safely connect a generator, you need to understand your power needs and choose the right setup. This step is easy to rush, but it is one of the most important parts of the process.
Determine your power needs
Start by listing the things you actually need during an outage. Most homes do not need every single appliance running at once. In many cases, the goal is to keep the basics going.
Typical circuits and devices homeowners often want to power include:
- Refrigerator
- Lights
- Furnace blower
- Wi‑Fi router
- Sump pump
- Medical devices
- Phone chargers
- A microwave or small kitchen appliance
Think about your life during an outage. What would make the situation manageable? What would become a serious problem if it stopped working?
Running watts vs. starting watts
This is where many homeowners get confused.
Running watts are the power a device consumes while operating normally.
Starting watts are the short bursts of extra power some appliances need when they first turn on.
A refrigerator, sump pump, or furnace blower may need more power at startup than they do afterward. That means your generator must handle both the normal load and the startup surge.
If the generator is too small, it may struggle to start, shut down, or fail to power key appliances. If it is too large, you may end up spending more than necessary.
Powering essential circuits or the whole home
You also need to decide whether you want:
- Essential circuit coverage, or
- Whole-house backup power
Essential circuit coverage means the generator powers only the most important loads. This is common for portable setups and smaller systems.
Whole-house power is possible with the right equipment and a large enough generator, but it usually costs more and often needs a standby system or a more advanced installation.
Choose the right generator and connection method
Choosing the right setup is the foundation for wiring a generator to your house safely. The generator and the connection hardware must work together.
Here is a simple comparison of common options:
Option Best For Main Benefits Main Limitations Typical Notes
Portable generator + inlet box + interlock kit Homeowners who want flexible backup power Lower cost, useful for selected circuits Requires careful setup and manual operation Often used for essential loads
Portable generator + manual transfer switch Homes with a few key circuits Safe isolation from utility power Not a whole-house solution in most cases Good for appliances you prioritize
Standby generator + automatic transfer switch Whole-house or near whole-house backup Automatic operation, high convenience Higher cost, more installation work Common for larger homes and medical needs
What to consider when choosing
Look at these factors before you buy:
- Wattage
- Fuel type
- Runtime
- Noise level
- Portability
- Budget
- How often do you expect to use it
A small portable generator may be enough for a few critical circuits. A larger standby system may make sense if your home has frequent outages or if you need continuous power for medical or work reasons.
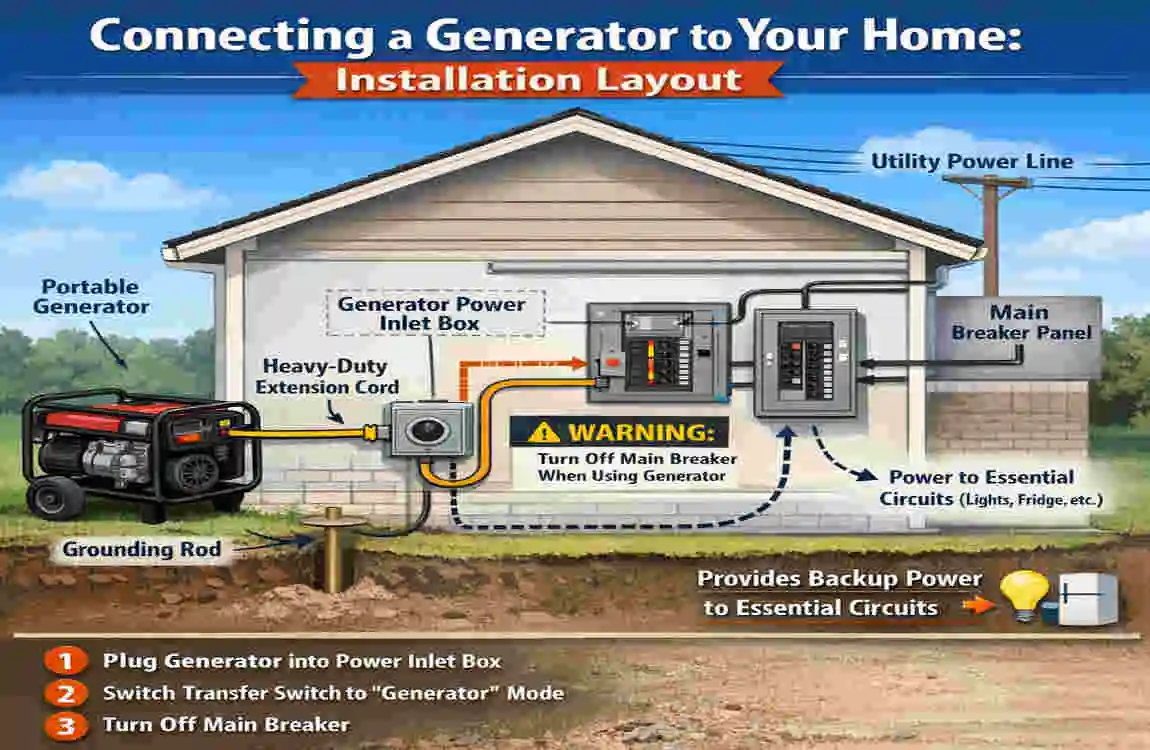
Gather the main components
A safe generator hookup often includes several key parts. Each one has a job to do.
- Generator inlet box: The outdoor connection point where the generator plugs into the home system.
- Power cord: A heavy-duty cord carries power from the generator to the inlet box.
- Transfer switch or interlock kit: This keeps utility power and generator power separated.
- Breaker panel: The main electrical panel where circuits are controlled.
- Circuit labels: These help you know which breakers are connected to emergency loads.
- Grounding materials, if required: Some setups may require specific grounding support, depending on the design and local code.
Each part must match the generator and the home electrical system. That is one reason licensed electricians are so valuable. They know how to verify compatibility and avoid problems before they happen.
Plan the installation layout
Good planning saves time, money, and stress.
The generator should be placed where it has:
- Outdoor ventilation
- Safe clearance from the home
- Easy access to fuel
- Room for maintenance
- Lower noise impact
- Protection from standing water
The inlet box or transfer equipment should also be carefully positioned. It needs to be accessible, but not in a way that impedes foot traffic or exposes it to the weather.
You should also think about cord length. The generator needs to sit far enough away for safety, but close enough that the cord reaches without strain or extension hazards.
A little planning now can prevent a lot of trouble later.
Steps to Connect a Generator at Home
This section explains the process at a high level. It is meant to help you understand the workflow, not to replace professional installation instructions.
Install the transfer equipment
This is the most important safety step in the entire process.
A transfer device separates the generator power from the utility power. That separation is what prevents backfeed and keeps the system safe.
Manual transfer switch
A manual transfer switch is often used for selected circuits. During an outage, you switch from utility power to generator power by hand.
It is a smart choice when you want to power only the basics, such as lights, a refrigerator, or a furnace blower.
Interlock kit
An interlock kit is used with a main electrical panel. It physically prevents the main breaker and generator breaker from being on at the same time.
That simple mechanical barrier helps prevent dangerous overlap between utility power and generator power.
Automatic transfer switch
An automatic transfer switch is usually used with standby generators. It detects when utility power fails and automatically switches the home to generator power.
This setup is ideal for convenience, but it is also more complex and usually requires professional installation.
Why a qualified electrician should do this work
Transfer equipment installation is not a casual DIY task. A licensed electrician may need to:
- Inspect the main panel
- Check amperage compatibility
- Install the right breakers and hardware
- Connect the inlet box properly
- Test the switching function
- Confirm that the setup meets the code
This step matters because the panel is the heart of your home’s electrical system. A mistake here can affect everything else in the house.
Connect the generator to the inlet or transfer system
Once the transfer equipment is installed, the generator can be safely connected via the proper inlet or transfer setup.
This usually involves a generator cord that matches the outlet type on the generator and the inlet box on the house.
The connection must be secure, dry, and correctly rated for the generator’s output. The connectors should match the electrical load and the equipment design.
The most important rule here is simple: never connect a generator directly to a wall outlet. That may seem like an easy shortcut, but it is extremely dangerous and can energize circuits in the wrong direction.
Why the transfer system matters during connection
The transfer switch or interlock makes the process safe by controlling where power flows.
It ensures:
- Utility power is isolated
- Generator power goes only where it should
- Backfeed is prevented
- The home electrical system stays under control
That is the real value of the system. It turns a dangerous power source into a manageable backup plan.
A note about cords and weather
Keep cords:
- Dry
- Undamaged
- Out of standing water
- Rated for outdoor use
- Sized correctly for the load
A damaged cord or a wet connection can create shock hazards and equipment failure. If a cord looks worn, replace it before an outage hits.
Test the system before an emergency
Do not wait for a storm to find out whether your generator setup works.
Testing is a critical part of the process.
You should test:
- Generator startup
- Circuit switching
- Load balance
- Breaker behavior
- Indicator lights or labels
- Any alarms or warnings
Testing helps you spot problems early. You may discover that a circuit is too heavy for the generator, that a connection is loose, or that a breaker trips under load.
Why testing matters so much
A generator setup that has never been tested is not something you can fully trust in an emergency.
Regular testing helps you identify:
- Underpowered circuits
- Faulty connections
- Unexpected vibration or noise
- Breaker issues
- Operational mistakes
A good habit is to test the system regularly, under safe conditions. That way, when the power actually goes out, you already know what to do.
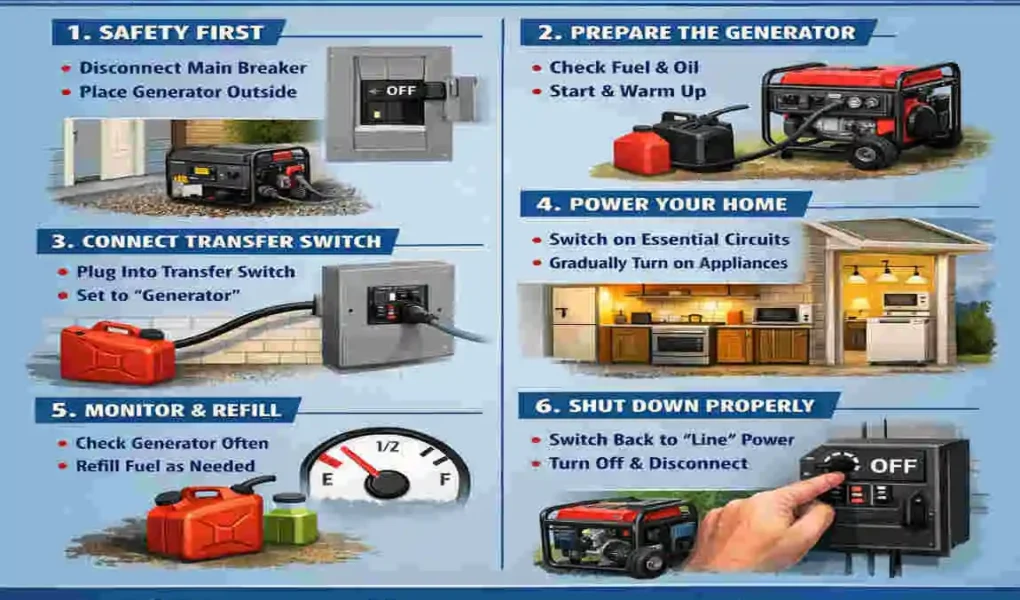
Use the generator safely during an outage
Once the outage begins, safe operation matters just as much as safe wiring.
You should always:
- Run the generator outdoors only
- Use carbon monoxide detectors
- Keep fuel stored safely
- Avoid overloading the generator
- Watch the runtime and refuel on schedule
- Allow cool-down time before refueling
Think about what really needs power first. Start with the essentials, then add other loads only if the generator can handle them.
What to know about extension cords
Sometimes extension cords are needed, especially with portable generators. If that happens, use only:
- Outdoor-rated cords
- The correct wire gauge
- Undamaged cords
- Shorter runs when possible
A cord that is too light for the load can overheat and become dangerous. This is one of those small details that makes a big difference.
Safe operation is part of learning how to wire a generator to your house because the wiring and the daily use are connected. A good system only stays good if you use it correctly.
Generator Safety Tips Every Homeowner Should Know
A safe generator setup is about more than one installation day. It is about habits, awareness, and consistency.
A few important safety reminders
- Never place a generator in a garage, basement, or enclosed porch
- Keep it away from doors, windows, and vents
- Do not overload the system
- Use the correct fuel
- Keep children and pets away from the unit
- Store fuel in approved containers
- Check oil and maintenance schedules regularly
- Label emergency circuits clearly
These steps may seem basic, but they prevent many of the most common problems.
Common mistakes homeowners should avoid
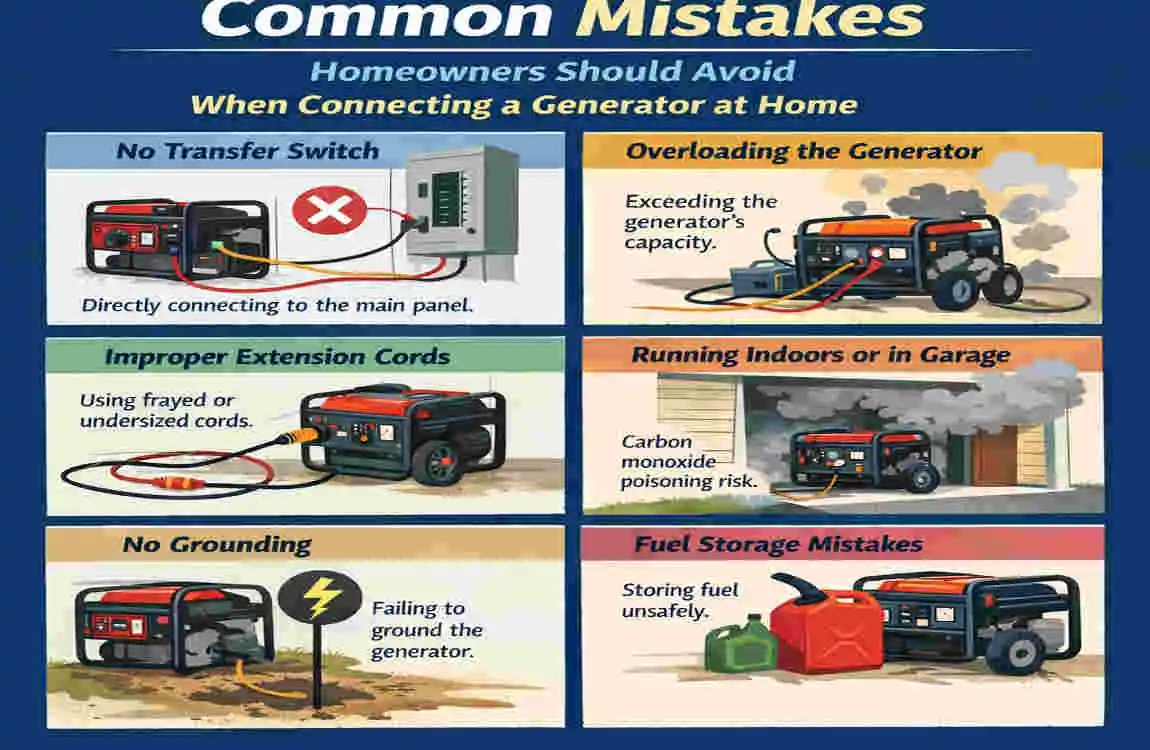
A lot of generator problems happen because someone tries to cut corners. Here are the mistakes worth avoiding:
- Not using a transfer switch or interlock
- Overloading the generator
- Ignoring permit requirements
- Using indoor cords outdoors
- Placing the generator too close to the home
- Choosing mismatched breaker sizes or wattage
- Skipping professional inspection
- Forgetting to test the system regularly
- Not labeling emergency circuits clearly
If you avoid these mistakes, you are already ahead of the curve.
Why labels matter
Emergency labels are more important than many homeowners realize. When the lights go out, you do not want to guess which breaker powers the fridge or which one feeds the furnace blower.
Clear labels help you act quickly and safely. They also make it easier for someone else in the house to use the system if you are not available.
When to Hire a Licensed Electrician
For many homeowners, this is the best decision from the start.
Signs you should call a pro
Hire a licensed electrician if:
- Your electrical panel is old or outdated
- You want a whole-house setup
- You need a transfer switch
- You need permits or inspections
- You are unsure about load calculations
- You want a standby generator
- Your home has special medical power needs
- You own a rental property or a business
Why professional help is worth it
An electrician brings experience, code knowledge, and testing skills. That matters because generator installation is not just about getting power into the house. It is about doing it safely, legally, and reliably.
A professional can help you avoid costly mistakes, plan the right equipment, and make sure your system is ready when it matters most.
For homes with medical devices, rental units, or small businesses, this becomes even more important. The stakes are simply too high to guess.
FAQs About Wiring in a Generator
Can I wire a generator directly into my house?
No, not in a safe or recommended way. Direct connection without proper transfer equipment can cause backfeed, shock hazards, and damage to the electrical system. Always use a proper transfer switch, interlock kit, or professionally installed standby setup.
What is the safest way to connect a portable generator to a home?
The safest common options are a manual transfer switch or an interlock kit with an inlet box. These systems isolate utility power from generator power, reducing the risk of dangerous wiring errors.
Do I need a permit to install a generator hookup?
In many places, yes. Permit rules depend on your local building department and electrical code. It is smart to check before installation starts so you do not face delays or inspection problems later.
Can a generator power my whole house?
Yes, if it is sized correctly and connected with the right equipment. A whole-house setup usually requires a larger generator and often a standby system or a more advanced transfer arrangement.
Should I hire an electrician to install a generator?
For most homeowners, yes. This is especially true if the project involves a transfer switch, panel work, permits, or a whole-house system. An electrician helps protect your safety and makes sure the installation meets code.
| Why It Matters | ||
|---|---|---|
| Choose the right generator and calculate your power needs | Helps ensure you can run the essential appliances you need | |
| Install a transfer switch or interlock kit | Prevents dangerous backfeeding into the utility lines | |
| Set up an outdoor generator inlet box | Creates a safe connection point for generator power | |
| Connect the generator with the proper power cord | Ensures the system is compatible and secure | |
| Turn off main power and start the generator | Prepares the home for safe generator power transfer | |
| Switch selected circuits to generator power | Powers only the necessary parts of the home safely | |
| Test the system and follow safety rules | Confirms everything works before an outage and reduces risk |