If you are working on a drain line, vent pipe, or sink connection, you will likely come across a fitting called a santee. So, what is a santee in home plumbing? In simple words, it is a plumbing fitting that helps wastewater move in the right direction while supporting proper drainage and venting.
| Aspect | Explanation |
|---|---|
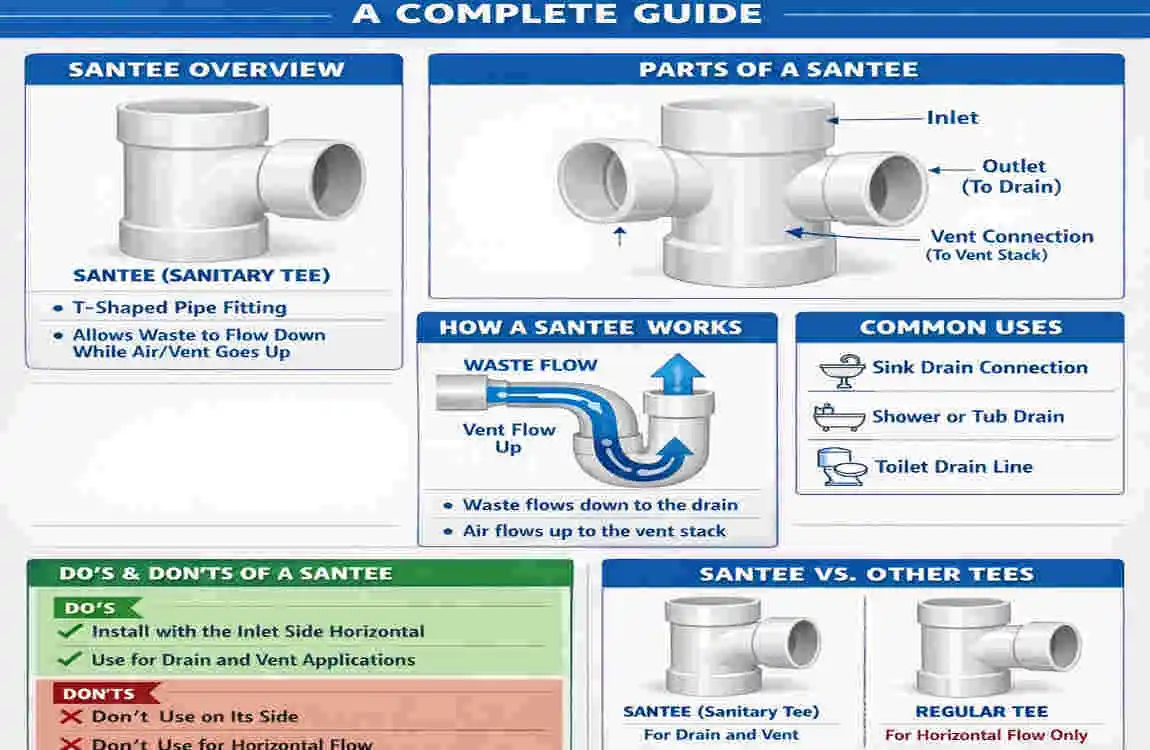
| Basic definition | T‑shaped drainage fitting that joins a horizontal pipe to a vertical drain or vent line in home plumbing. |
| Main purpose | Directs wastewater down the vertical stack while also letting air into the system through vents to prevent siphoning and gurgling. |
| Typical locations | Used behind sinks, toilets, and other fixtures to connect their drains into the main vertical stack or vent. |
| Flow shape/design | Has a curved sweep inside, so flow turns gently into the vertical pipe instead of hitting a sharp 90° corner, improving drainage. |
| Proper orientation | Must be installed upright (branch entering the side, outlet pointing down); not laid on its back for drains, per plumbing codes. |
| Common mistake | Using a santee on its back for horizontal-to-horizontal flow; a wye or combo fitting is usually required instead. |
A santee, also called a sanitary tee, is one of the most useful fittings in a home plumbing system. Homeowners, DIYers, and beginner plumbers should understand it because the wrong fitting can cause slow drains, clogs, and code issues. The right fitting, on the other hand, keeps water flowing smoothly and helps the whole system work better.
What Is a Santee in Home Plumbing?
Definition of a Sanitary Tee
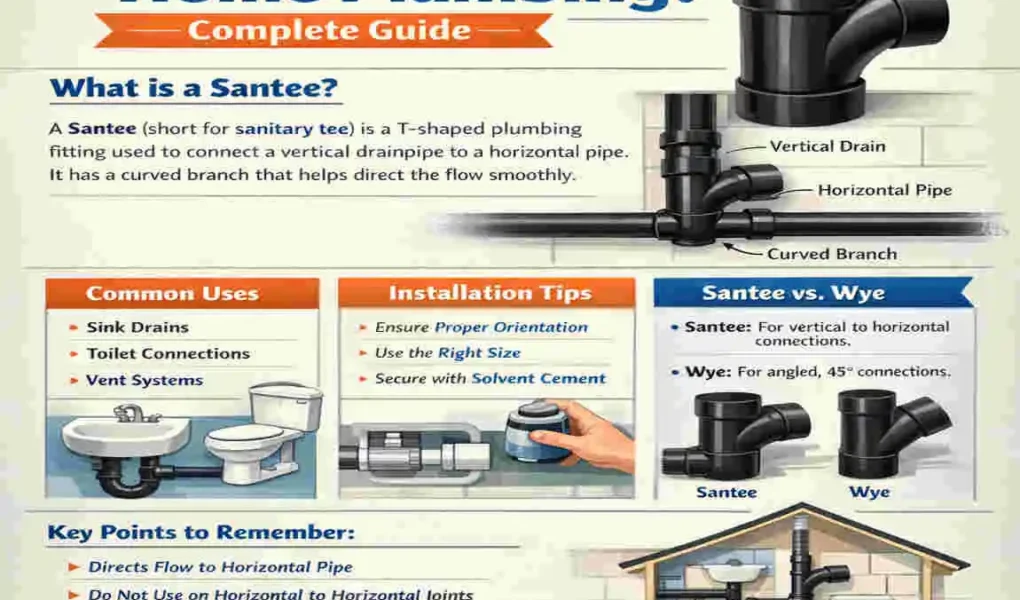
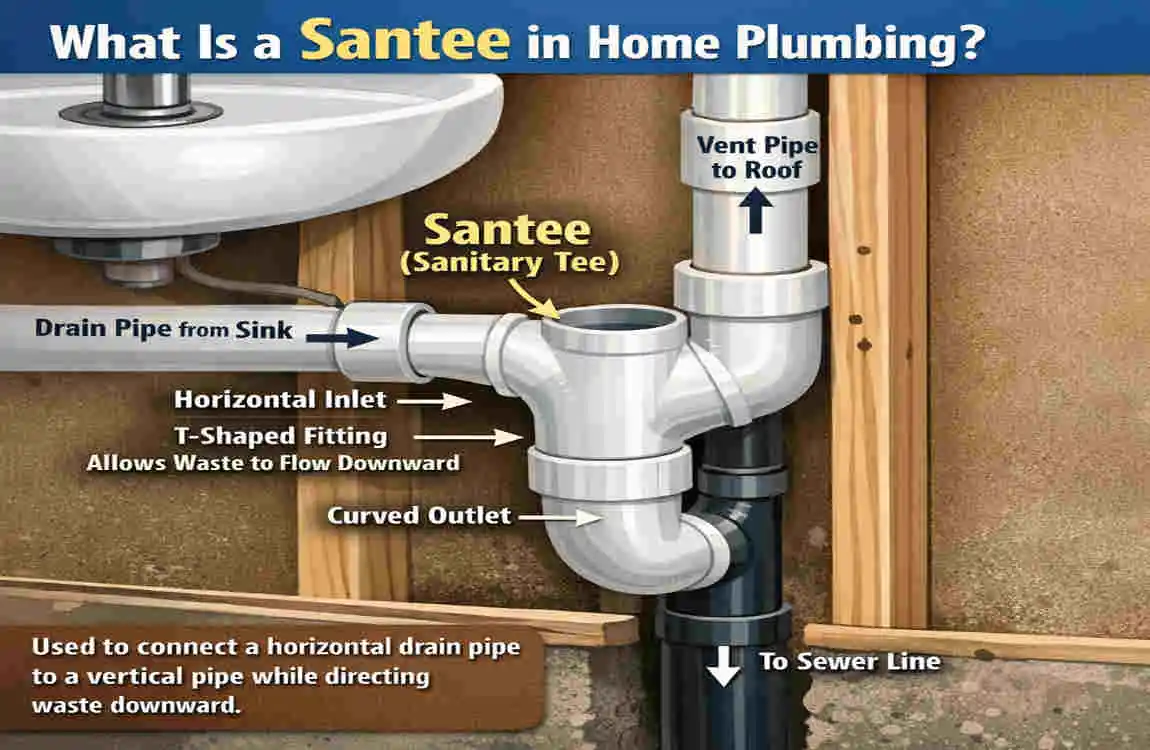
A santee is a T-shaped plumbing fitting used in drainage and vent systems. It connects a vertical pipe to a horizontal branch in a way that supports smooth flow.
It is called “sanitary” because its inside shape is designed to guide wastewater more cleanly than a regular tee. Instead of letting waste hit a flat wall, it helps direct the flow through a curved path.
What Does a Santee Look Like?
A sanitary tee looks like a normal T fitting at first glance, but there is one big difference: it has a swept curve inside. That curve helps liquid move more smoothly.
Common materials include:
- PVC
- ABS
- Cast iron
- Copper
A regular tee is often used for water supply lines, while a santee is made for drain and vent work.
Why Santees Are Important in Residential Plumbing
Santees matter because they help:
- Keep wastewater moving smoothly
- Reduce clogging
- Support proper venting
- Prevent backups and poor drainage
In short, this fitting helps your plumbing system function as it should.
How Does a Santee Work in Plumbing Systems?
Direction of Water Flow
A santee is designed for gravity-fed drainage systems. That means wastewater flows downward with the help of gravity.
The curved inlet inside the fitting helps guide water and waste into the correct path. This reduces splashing and turbulence, which can otherwise create blockages.
Role in Drain-Waste-Vent Systems
A home’s DWV system means Drain-Waste-Vent. This system removes wastewater and lets air into the pipes so drainage can happen properly.
Santees are often used to connect:
- Sinks
- Toilets
- Showers
- Vent pipes
The fitting helps waste move out while maintaining balanced airflow in the system.
How a Santee Prevents Plumbing Problems
A santee helps prevent issues by:
- Reducing turbulence
- Lowering clog risk
- Improving airflow
- Supporting a smooth transition between pipes
When installed correctly, it becomes a small part with a big role.
Types of Santees Used in Home Plumbing
PVC Sanitary Tee
This is the most common type in modern homes. It is lightweight, affordable, and corrosion-resistant. Many DIYers prefer it because it is easy to work with.
ABS Sanitary Tee
ABS is a black plastic fitting widely used. It is strong, durable, and often found in certain regions or colder climates.
Cast Iron Santee
Cast iron is often found in older homes. It is heavy-duty and helps reduce noise, but it is also more expensive and harder to install.
Copper Sanitary Tee
Copper santees are used in some drainage or vent systems. They are durable, but the cost is usually higher than that of plastic options.
Common Sizes of Plumbing Santees
Residential Santee Sizes
The most common sizes are:
- 1.5 inch
- 2 inch
- 3 inch
- 4 inch
How to Choose the Correct Size
The right size depends on:
- The fixture type
- The pipe diameter
- Local plumbing codes
If the fitting is too small, it can restrict flow. If it is too large, it may not connect correctly with the rest of the system.
Santee Size Chart
Fixture Type: Typical Santee Size
Bathroom Sink 1.5 inch
Kitchen Sink 2 inch
Shower Drain 2 inch
Toilet Drain 3–4 inch
Where Is a Santee Used in Home Plumbing?
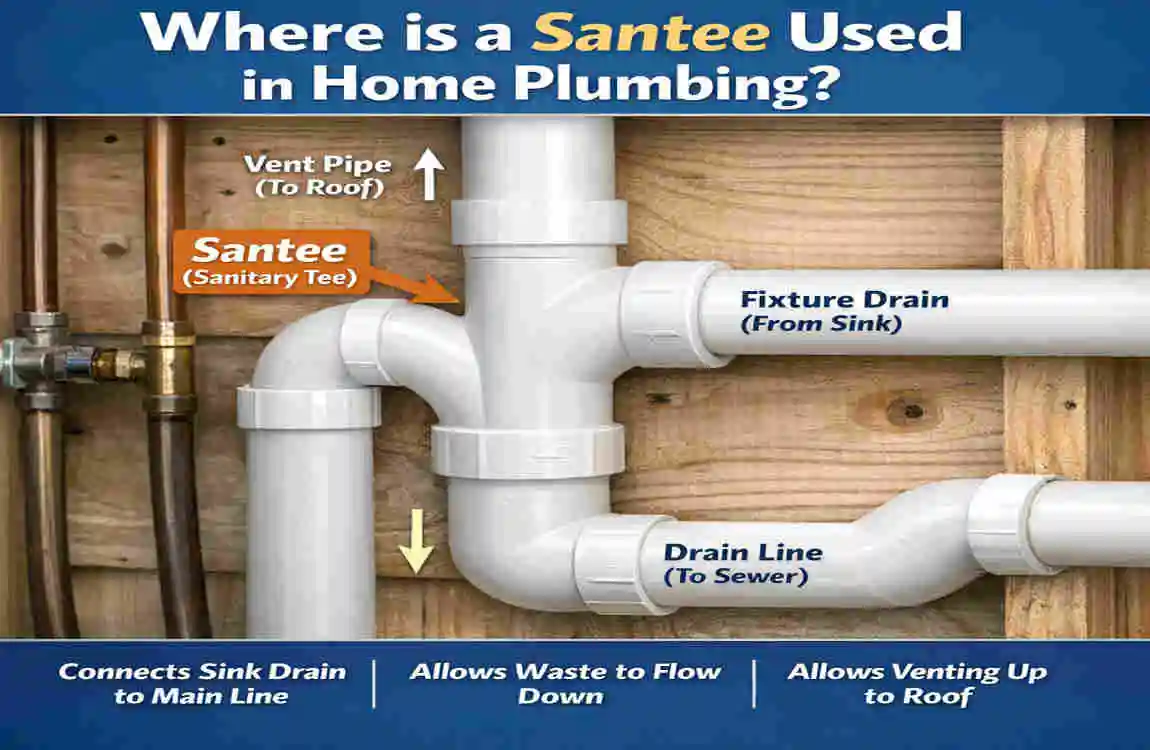
Under Bathroom Sinks
You will often see a santee under a bathroom sink where the drain connects to a vertical stack. It helps guide wastewater downward.
Kitchen Drain Systems
Kitchen drains also use santees, especially where a branch line connects into a main drain path.
Vent Pipe Connections
Santec vents are commonly used for venting because they help regulate airflow. That airflow is important for proper drainage and odor control.
Laundry Room Plumbing
Laundry setups often require drain and vent combinations, and a santee can help tie them together.
Basement Plumbing Systems
In basement plumbing, santees may connect drain stacks and help route waste into the main system.
Santee vs Other Plumbing Fittings
Santee vs Regular Tee
A regular tee has a sharp interior shape. It works well in pressurized water supply lines, but it is not ideal for drainage.
A santee has a swept design that supports smoother flow, which makes it better for drain and vent systems.
Santee vs Wye Fitting
A wye fitting creates a more angled branch connection. It is often used where smooth directional flow is important.
A santee is usually chosen for certain vertical-to-horizontal drain and vent transitions.
Santee vs Combo Fitting
A combo fitting combines a wye and a 45-degree bend. Plumbers often use it when they need a smoother transition in the drain.
Comparison Table
Fitting Type Main Purpose Best For
Santee Drain & vent connections , Vertical-to-horizontal flow
Wye Smooth directional flow Drainage branches
Regular Tee Water supply lines Pressurized systems
Combo Fitting Drain transitions Complex drainage
How to install a Santee in Home Plumbing
Tools and Materials Needed
You usually need:
- Pipe cutter
- PVC cement
- Primer
- Measuring tape
- Gloves
Step-by-Step Installation Process
Turn Off Water Supply
Always shut off the water before starting any plumbing work.
Measure and Mark Pipe
Measure carefully so the fitting lines up properly.
Cut the Pipe
Use the right cutter for a clean, straight cut.
Dry Fit the Santee
Test the fit before using cement. This helps avoid mistakes.
Apply Primer and Cement
If you are working with PVC, apply primer and cement as needed.
Secure Connections
Push the parts together firmly and hold them in place.
Test for Leaks
Run water and check every joint carefully.
Safety Tips During Installation
- Wear eye protection
- Keep the area well ventilated
- Follow local plumbing code
- Use the correct materials for the pipe type
Common Mistakes When Using a Santee
Installing It in the Wrong Direction
Direction matters. A santee must be placed so the flow moves correctly. If you install it backward, you can create drainage problems.
Using a Santee Horizontally Incorrectly
A sanitary tee is not meant for every horizontal connection. Incorrect horizontal use can slow water down and cause blockages.
Choosing the Wrong Size
If the fitting does not match the pipe size, you may end up with restricted flow or poor connections.
Ignoring Venting Requirements
Poor venting can lead to sewer smells, slow drains, and pressure problems in the system.
Poor Sealing or Cementing
If the joint is not sealed well, leaks can develop over time.
Plumbing Code Rules for Santees
Horizontal vs Vertical Installation Rules
Plumbing codes often limit how and where a santee can be installed. It is usually allowed in specific vertical or vent-related uses, but not everywhere.
Venting Code Requirements
Vent pipes must be placed properly so air can move through the system. A wrong fit can block that airflow.
Local Plumbing Code Variations
Rules can change by city or region, so always check your local code before starting work.
When You Need a Licensed Plumber
Call a professional if you are dealing with:
- Large renovations
- Hidden wall plumbing
- Main stack changes
- Multi-story drainage systems
Signs a Santee May Need Replacement
Frequent Drain Clogs
If drains keep clogging, the fitting may be damaged or installed incorrectly.
Water Leaks Around Connections
Leaks often indicate that the joint has failed or that the seal is no longer tight.
Sewer Odors in the Home
Bad smells can point to a venting issue or a broken plumbing connection.
Cracks or Corrosion
Plastic fittings may crack, and metal ones may corrode with age.
Slow Drainage Problems
If water drains slowly, the fitting may be blocked, damaged, or too small for the system.
Can Homeowners Replace a Santee Themselves?
DIY-Friendly Situations
Simple sink drain repairs are often manageable for a careful homeowner.
When to Call a Professional Plumber
Get help when the repair involves:
- Main stack pipes
- Hidden plumbing
- Structural access issues
- Complex drain layouts
Estimated Cost of Santee Replacement
DIY replacements usually cost less because you only pay for the parts. Professional work costs more because it includes labor and experience.
Best Practices for Maintaining Plumbing Santees
Avoid Grease and debris Buildup
Do not pour grease, food scraps, or heavy debris into the drain.
Schedule Regular Drain Cleaning
A simple cleaning routine can help keep pipes open.
Inspect Visible Pipes Annually
Look for drips, cracks, rust, or loose joints once a year.
Prevent Freezing in Cold Areas
Cold weather can damage pipes and fittings, so protect exposed plumbing.
Use Quality Plumbing Materials
Good materials last longer and reduce repair problems later.
Frequently Asked Questions About Santees
What is a santee in home plumbing used for?
It is used to connect drain and vent pipes so wastewater can move smoothly.
Can a sanitary tee be installed horizontally?
Not always. It depends on the pipe section, direction, and plumbing code.
What is the difference between a sanitary tee and a wye?
A wye has a more angled flow path, while a santee is a T-shaped fitting with a curved inside path.
Are santees used for vent pipes?
Yes, they are commonly used in vent systems.
What size sanitary tee do I need?
It depends on the fixture, pipe size, and local code.
Can a beginner install a santee?
Yes, for small and simple repairs. For larger plumbing work, it is safer to call a plumber.