Planning home electrical projects the right way can save you time, money, and stress. It can also help you avoid the most common risks, like overloaded circuits, poor wiring choices, and unsafe DIY mistakes. Many homeowners start a project with good intentions but skip the planning stage, leading to delays, extra costs, or safety problems.
| Key Actions | Tips / Checks | ||
|---|---|---|---|
| Define needs | List all rooms, loads (ACs, geysers, oven, pumps), and future expansions | Separate “must have” vs “nice to have” loads | |
| Map layout | Mark outlets, switches, lights, and appliance points on the floor plan | Place outlets where furniture and worktops will actually be | |
| Load & circuiting | Estimate wattage per room and group into circuits (lighting vs power vs heavy loads) | Keep heavy loads (AC, oven, motor) on dedicated circuits | |
| Safety & code | Plan MCBs, RCD/RCBOs, earthing, and proper cable sizes | Follow local code; prioritize RCDs for wet areas and outdoor circuits | |
| Smart & low-voltage | Decide locations for Wi‑Fi, CCTV, doorbell, data, and future smart devices | Run separate conduits for data/low-voltage to avoid interference | |
| Documentation | Create a neat circuit schedule and label DB, conduits, and junctions | Keep an as‑built drawing for future maintenance and upgrades |
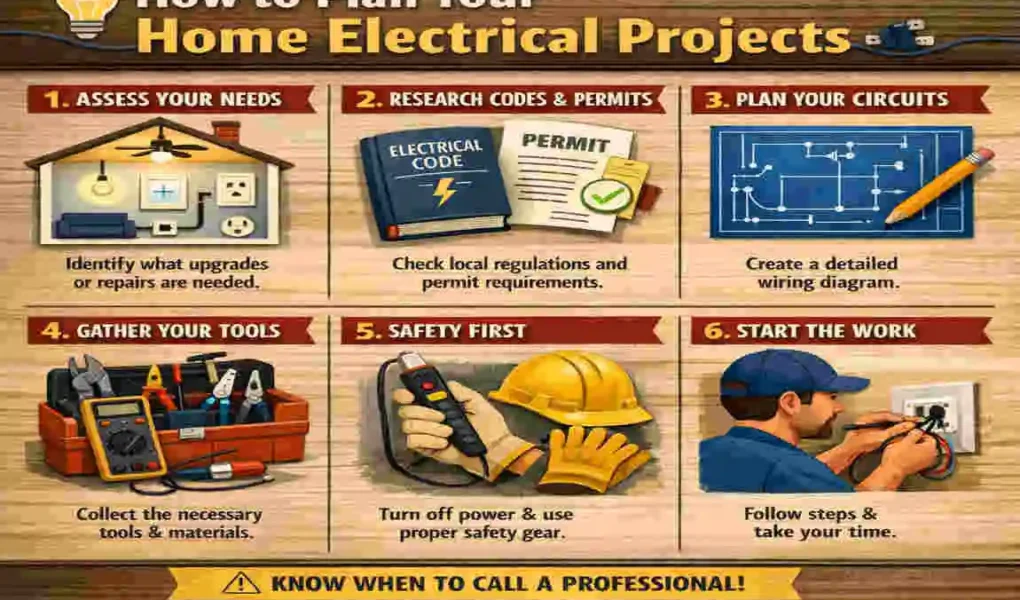
If you want better results, you need a clear plan before you touch a switch, outlet, or panel. That means understanding your goals, checking your current system, setting a budget, and knowing when to call a professional. It also means paying attention to local codes and safety rules from the start.
What Are Home Electrical Projects?
Definition of Home Electrical Projects
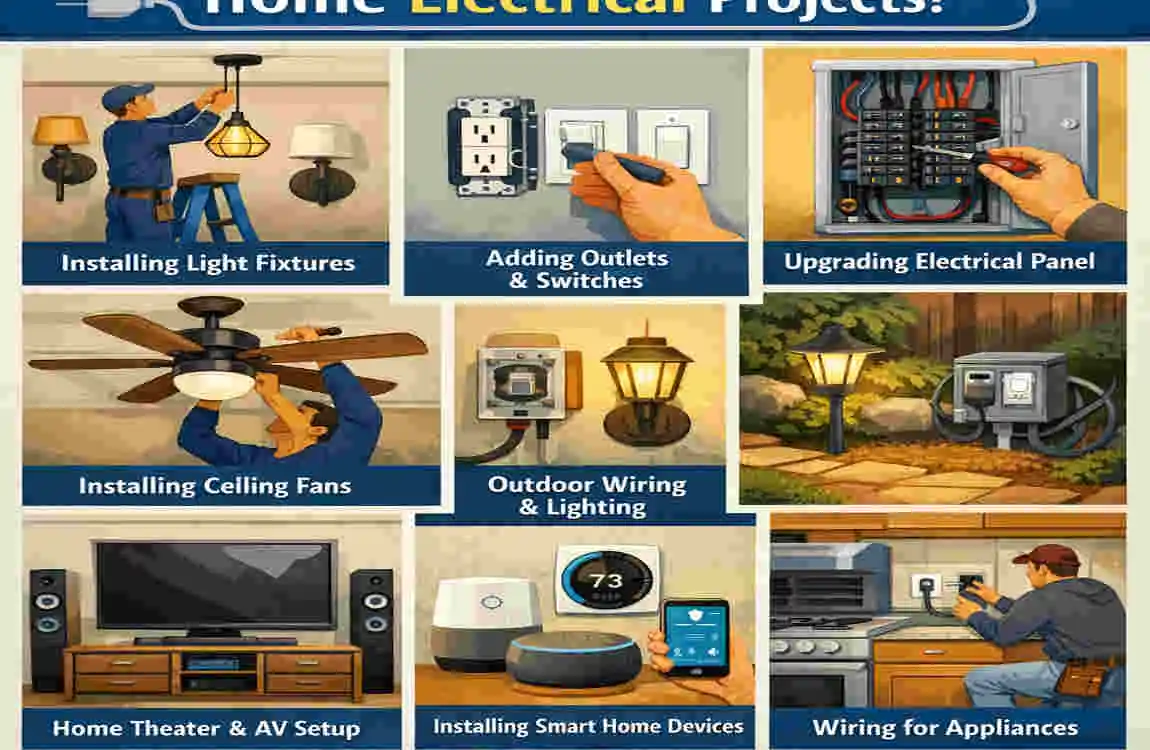
Home electrical projects include any work that improves, repairs, or installs electrical parts in your house. This can be something small, like replacing a light switch, or something bigger, like wiring a new room.
Common Types of Home Electrical Projects
Some of the most common projects include:
- Installing light fixtures
- Replacing outlets
- Adding ceiling fans
- Upgrading breaker panels
- Setting up outdoor lighting
- Wiring new spaces
- Adding smart home features
DIY vs Professional Electrical Work
Some tasks are simple enough for careful homeowners, but others need a licensed electrician. If a project affects your main panel, new wiring, or heavy appliances, it is usually safer to hire a pro.
Project Type DIY Friendly? Best Option
Replace a light switch Yes Careful DIY
Install a ceiling fan Sometimes DIY or pro
Replace outlets Sometimes Careful DIY
Rewire a room No Licensed electrician
Panel upgrade No Licensed electrician
Assess Your Home Electrical Needs First
Identify the Purpose of the Project
Start by asking why you want the project. Are you trying to improve safety, save energy, support a new appliance, or make the home more convenient? Clear goals help you avoid wasting money on work you do not need.
Inspect Existing Electrical Systems
Look for signs of trouble such as old wiring, damaged outlets, flickering lights, or circuits that trip often. These signs may indicate a larger issue that should be addressed before you add anything new.
Create a Priority List
Make a simple list with three groups:
- Urgent repairs
- Useful upgrades
- Future improvements
This makes electrical repair planning easier and helps you focus on what matters most.
Set a Budget for Home Electrical Projects
Estimate Material Costs
Your budget should include wires, switches, breakers, fixtures, and panels if needed. Quality matters here, because cheap parts can cause problems later.
Factor in Labor Costs
If you hire an electrician, include labor, inspection fees, and emergency charges if the job is urgent. For many homeowners, this is the biggest part of the total cost.
Hidden Costs to Consider
Do not forget about permit fees, wall repair, tool rentals, and safety gear. These smaller items can add up fast.
Money-Saving Tips
For affordable home electrical projects, try to bundle several updates at once, choose durable materials, and avoid full rewiring unless it is truly needed.
Understand Electrical Safety Before Starting
Why Electrical Safety Is Non-Negotiable
Electrical work can cause shocks, fires, and code violations if handled poorly. That is why electrical safety at home should always come first.
Essential Safety Gear
Keep basic safety items nearby:
- Voltage tester
- Insulated gloves
- Safety glasses
- Rubber-soled shoes
Safety Rules Every Homeowner Must Follow
Always turn off the power before starting. Test wires before touching them. Never work in wet areas. Never overload a circuit with too many devices.
Common Safety Mistakes
The most common mistakes include using the wrong wire size, ignoring damaged wires, and overpacking a breaker panel. These mistakes can create danger later.
Make a Detailed Project Plan
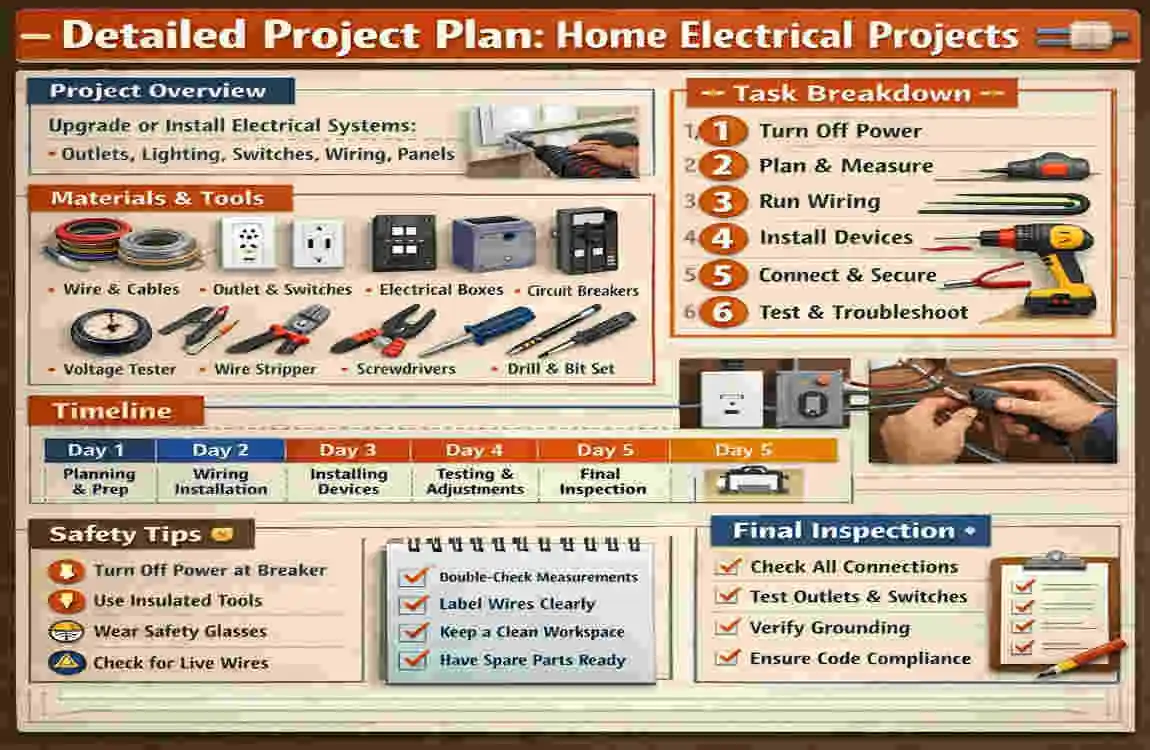
Define the Scope
Be clear about what the project includes. Is it a full installation, a partial upgrade, or just a repair? A clear scope keeps the job under control.
Sketch Electrical Layouts
Draw a simple layout of outlets, switches, light points, and appliance circuits. You do not need a perfect drawing. You just need a plan you can follow.
Create a Project Timeline
A good timeline may include inspection, material buying, installation, and testing. This helps with planning home electrical projects without rushing.
Break Large Jobs into Phases
If the project is big, split it into room-by-room or indoor-and-outdoor phases. Smaller steps feel easier and reduce mistakes.
Learn Local Electrical Codes and Permits
Why Electrical Codes Matter
Codes are there to protect your home and your family. They also help you stay legal and avoid problems with insurance or resale.
Projects That Usually Need Permits
New wiring, service panel upgrades, and major remodels often need permits. If you are not sure, check before you begin.
Risks of Skipping Permits
Skipping permits can lead to fines, failed inspections, and trouble when you sell the house. It is usually not worth the risk.
Choose the Right Tools and Materials
Must-Have Basic Electrical Tools
A few electrical tools for home projects can make the work easier and safer:
- Wire stripper
- Screwdrivers
- Multimeter
- Pliers
- Fish tape
Choosing High-Quality Wiring Materials
Use the correct wire size and choose reliable materials. Copper is often preferred for many jobs, and fixtures should be certified for home use.
Smart Home Upgrades to Consider
For greater convenience, consider smart switches, motion sensors, LED lights, and USB outlets. These can improve comfort and efficiency.
Decide When to DIY and When to Hire an Electrician
Beginner-Friendly DIY Electrical Projects
Simple jobs like replacing a switch, swapping an outlet, or installing a light fixture can be manageable for careful homeowners.
Projects Best Left to Professionals
Leave rewiring, panel replacement, generator hookups, and heavy appliance circuits to licensed electricians.
Questions to Ask Before Hiring
Before you hire someone, ask:
- Are you licensed?
- Are you insured?
- Have you done this type of work before?
- Do you offer a warranty?
Create a Room-by-Room Electrical Improvement Plan
Kitchen
The kitchen often needs dedicated appliance circuits, GFCI outlets, and good task lighting. This room usually has the most demand.
Living Room
Think about ambient lighting, TV wiring, and smart switches. These upgrades can make the room more comfortable and organized.
Bedrooms
Bedrooms often benefit from USB charging outlets, ceiling fans, and better lighting placement.
Bathroom
Bathrooms need waterproof fixtures, vent-fan wiring, and strong safety protection, such as GFCI outlets.
Outdoor Areas
Outside, focus on landscape lighting, security lights, and weatherproof outlets.
Testing and Final Inspection
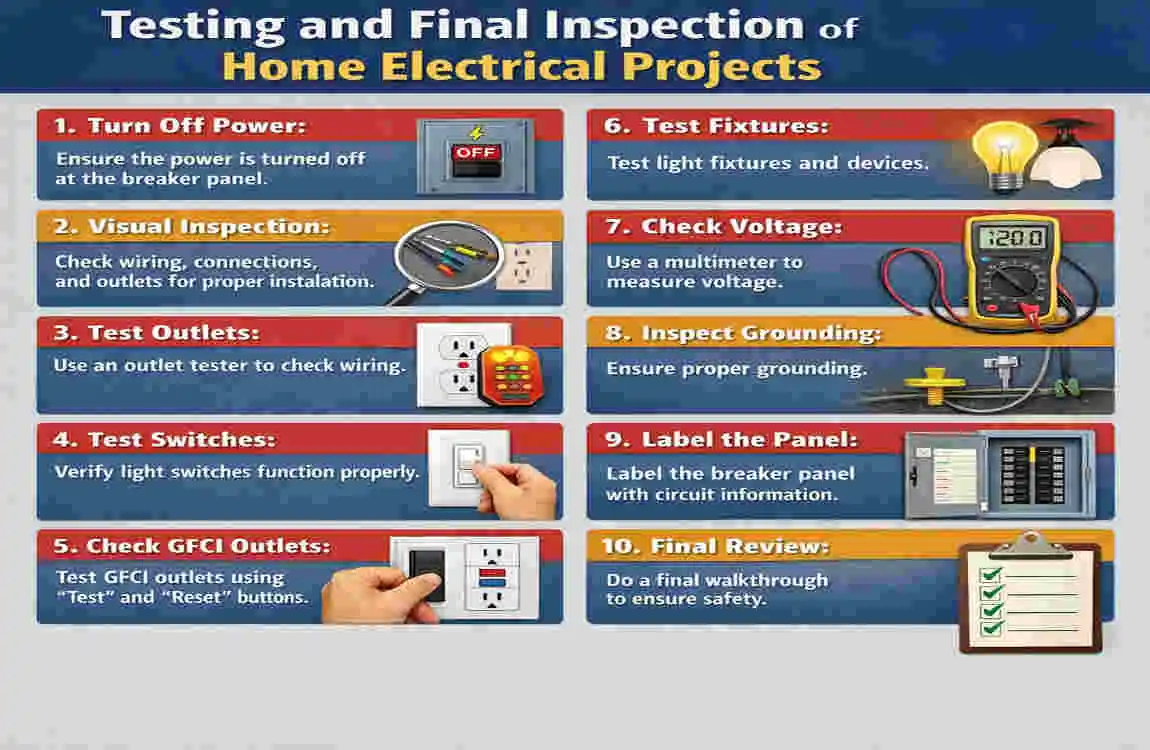
Test Every Connection
Before finishing, test switches, breakers, and voltage levels. This helps catch problems early.
Inspect for Safety Hazards
Look for loose wires, exposed conductors, and poor grounding. Small issues can become major risks if ignored.
Final Documentation
Save permits, warranties, and updated wiring notes. Good records make future repairs easier.
Common Mistakes to Avoid in Home Electrical Projects
Underestimating Costs
Many homeowners focus only on materials and forget about labor, permits, and wall repairs.
Ignoring Code Requirements
Even a small mistake can lead to failed inspections or safety problems.
Buying Cheap Materials
Low-cost parts may fail sooner, leading to additional expenses later.
Starting Without Proper Planning
Jumping in too early often causes delays and rework.
DIYing Complex Repairs
Some jobs are simply too risky to do alone. Know your limits.
Long-Term Maintenance Tips After Completing Electrical Projects
Annual Electrical Inspection
Check your system once a year to spot wear and tear early.
Monitor Circuit Breakers
If breakers trip often, something may be wrong.
Replace Damaged Wiring Quickly
Do not wait if you notice fraying, cracking, or heat damage.
Upgrade Outdated Outlets
Older outlets may not safely support modern devices.
Frequently Asked Questions About Home Electrical Projects
Can I do home electrical projects myself?
Yes, some small tasks are DIY-friendly, but only if you understand the risks and follow safety rules.
Which electrical work needs permits?
Major wiring, panel upgrades, and large renovations usually need permits.
How much do home electrical projects cost?
Costs vary a lot based on the size of the job, materials, labor, and permits.
What tools do beginners need?
Beginners usually need a voltage tester, a screwdriver set, a wire stripper, pliers, and a multimeter.
How do I avoid electrical hazards?
Turn off power, test wires, use proper materials, and call a professional when the job is too complex.
How do I know when rewiring is needed?
If your home has old wiring, frequent breaker trips, or damaged outlets, you may need to have it rewired.