If you are trying to learn how to repair leaking flat roof problems before they get worse, you are in the right place. Flat roofs can be practical and affordable, but they also have one big weakness: water does not run off as easily as it does on sloped roofs. That means even a small crack, loose seam, or clogged drain can turn into a bigger leak fast.
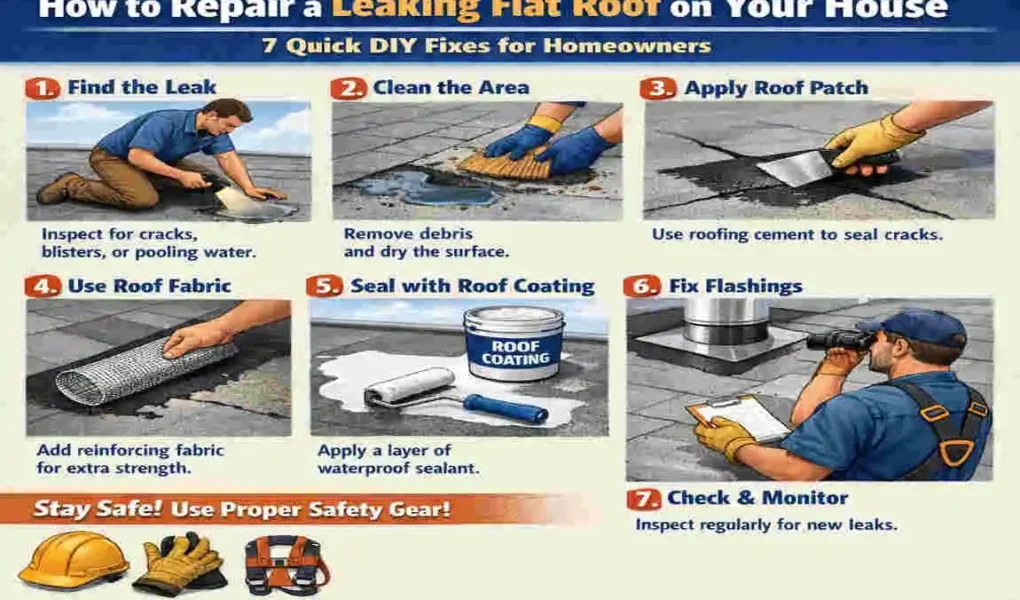
| 7 Quick DIY Fixes | What to Do |
|---|---|
| Find the leak source | Trace water stains and check seams, cracks, and drains. |
| Clear debris | Remove leaves, dirt, and standing water from the roof. |
| Clean the damaged area | Wipe and dry the spot so patches will stick properly. |
| Seal small cracks | Apply roofing sealant or cement to minor splits and holes. |
| Use a repair patch | Stick down a peel-and-stick or waterproof patch over the leak. |
| Coat the roof surface | Add a waterproof roof coating for extra protection. |
| Call a pro if needed | If the leak is large or keeps coming back, get a roofer. |
A leaking roof is more than just an annoyance. It can lead to mould, damaged insulation, stained ceilings, and even structural problems if left too long. The good news is that many small leaks can be handled with simple DIY flat roof repair methods if you catch them early.
Why Flat Roof Leaks Need Immediate Attention
Flat roofs are more likely to develop problems because water can sit on them longer. Even when the roof looks level, most flat roofs have only a slight slope. If water lingers, it can work its way into tiny gaps and damage the layers below.
Ignoring a small leak often leads to bigger repairs later. Wet insulation loses its value, wood can weaken, and indoor air can start to smell musty. The sooner you act, the easier it is to fix the problem and protect your home.
Why Homeowners Should Learn the Basics
You do not need to be a roofing expert to understand the basics of leaking flat roof repair. A little knowledge can help you stop a minor problem before it becomes expensive. Even if you do not do the full repair yourself, knowing what to look for helps you explain the issue clearly to a roofer.
Common Causes of Flat Roof Leaks
Understanding the cause is the first step in fixing the issue properly. A patch only works well if it matches the problem.
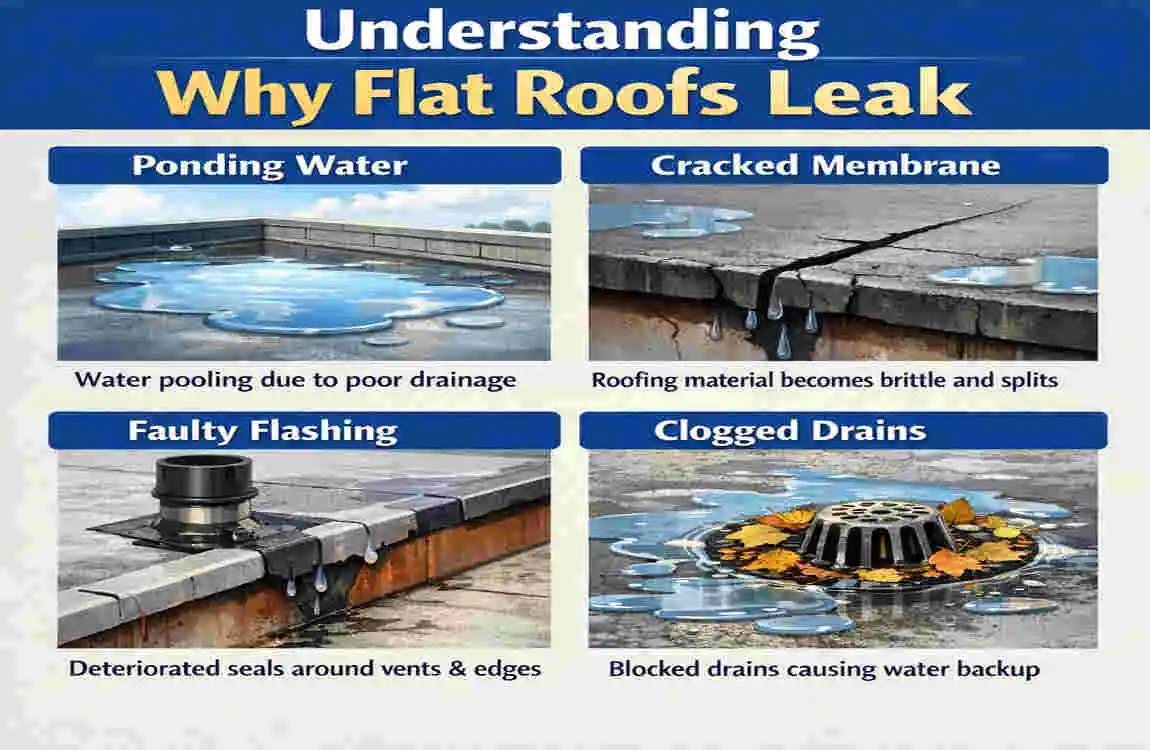
Ponding Water
Ponding water means water stays on the roof after rain instead of draining away. This often happens when the roof has poor drainage or a low spot. Over time, standing water can weaken the roof surface and increase the chance of leaks.
Cracked Flashing
Flashing is the material that seals roof edges, corners, and joints. When it cracks, lifts, or rusts, water can get in through the gaps. This is one of the most common leak points on a flat roof.
Membrane Damage
Many flat roofs use membranes such as EPDM, TPO, or rubber roofing. These materials can tear, puncture, or separate at the seams. A small tear may not look serious, but water can spread under the surface and cause hidden damage.
Blistering and Bubbling
Blisters form when moisture or air gets trapped under the roof layer. Heat can cause the trapped area to expand and form bubbles. If they burst or split, leaks can follow.
Aging Roof Materials
Like anything else, roofing materials wear out with time. Sun exposure, weather changes, and repeated expansion and shrinking can cause surfaces to dry out, crack, or pull away from edges.
How to Spot Roof Damage Early
The earlier you spot a leak, the easier it is to fix. Some signs are obvious, while others are easy to miss.
Indoor Signs
Inside your home, look for water stains on the ceiling, peeling paint, damp spots on walls, mold growth, or a stale, musty smell. These are all warning signs that water may be getting in from above.
Outdoor Signs
Outside, check for visible cracks, loose seams, pooling water, punctures, or areas where the roof surface looks worn. If you see bubbles or lifted sections, those may also point to trouble.
Energy Bill Increases
If your insulation gets wet, your home may lose heat or cool air faster than usual. That can make your energy bills rise without an obvious reason. A hidden leak could be the cause.
What Homeowners Need Before DIY Roof Repair
Before you start any repair, safety should come first. Even a small flat roof can be risky if the surface is slippery or weak.
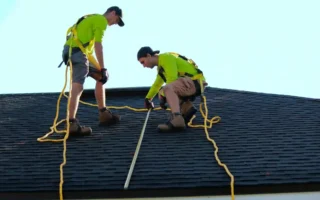
Safety Equipment
Wear gloves, non-slip shoes, and protective eyewear. Use a stable ladder and never work alone if the roof is high or difficult to reach. If the roof feels soft or unstable, stop and get help.
Essential Repair Tools
A basic repair kit may include roofing cement, waterproof sealant, roofing tape, a utility knife, a brush, a patch membrane, and a caulking gun. Having the right tools ready makes the job smoother.
Weather Conditions
Dry weather is best. Avoid rainy, windy, or icy conditions. Most sealants and patches work best when the surface is clean and dry.
How to Repair Leaking Flat Roof: 7 Quick DIY Fixes
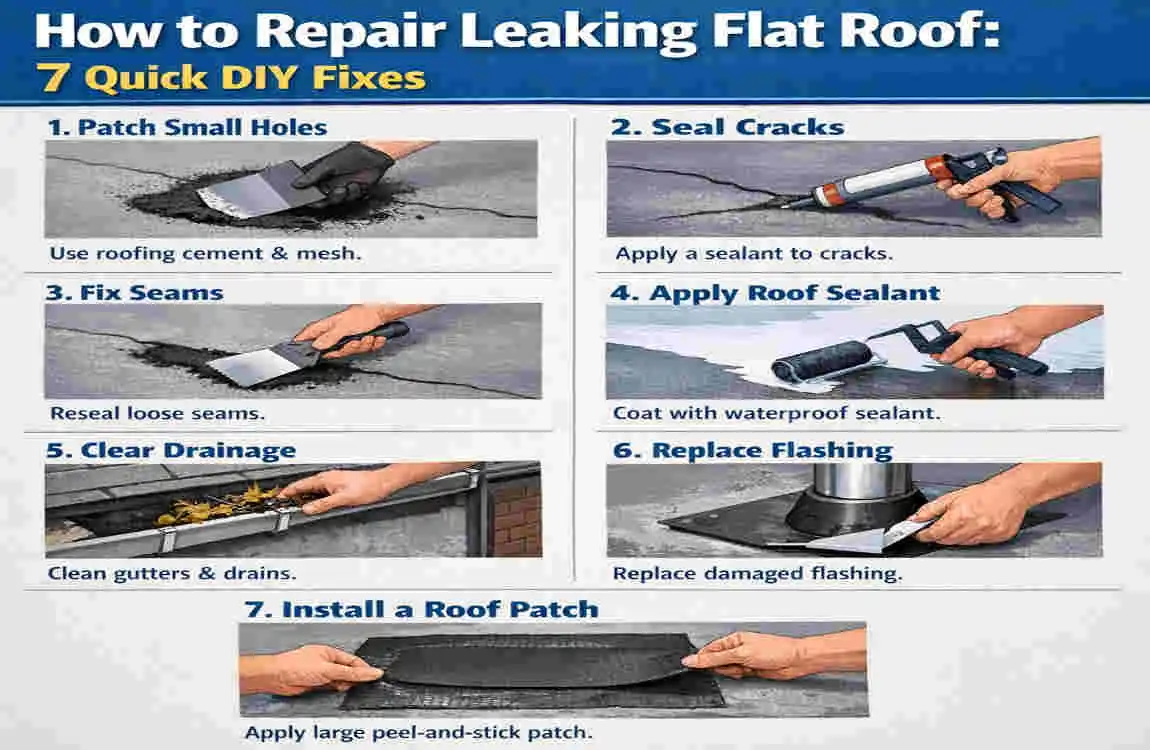
Seal Small Cracks with Roofing Sealant
This is one of the easiest ways to fix a minor surface split. Clean the crack well, remove dirt and loose material, then apply roofing sealant evenly over the damaged area. Spread it smoothly so it fully covers the crack and bonds well to the roof.
Let it dry based on the product instructions. Rushing this step can weaken the repair. If the weather is humid or cold, curing may take longer.
Common Mistakes to Avoid
Do not apply sealant to a wet surface. Also, do not use too little product. A thin line may not adequately protect the area. The sealant should cover the damage and extend slightly beyond it.
Apply Roofing Tape for Small Tears
Roofing tape works well for small tears in rubber or membrane roofs. First, clean and dry the area. Then cut the tape so it extends beyond the tear on all sides. Press it down firmly to remove air pockets.
This creates a quick waterproof layer and can be a helpful temporary roof leak fix or a longer-lasting one for small damage. Make sure the surface is smooth, because dust or moisture can keep the tape from sticking well.
Patch Damaged Roofing Membrane
For larger tears, patching is often better than tape alone. Cut away loose or damaged material around the tear. Then measure a patch that overlaps the damaged area by a few inches.
Apply the right adhesive, place the patch carefully, and press the edges down firmly. Smooth it out so water cannot get under the repair.
Best Materials for Patching Flat Roofs
The best patch material depends on the roof type. For example, rubber roofs often need compatible rubber patches, while other membrane roofs may need matching roofing sheets or repair fabric. Always choose materials that work with your roof system.
Clear Roof Drains and Gutters
A lot of leaks start because water has nowhere to go. Clogged drains and gutters can cause ponding water, which puts constant pressure on your roof surface.
Remove leaves, dirt, and other debris from drains and gutters. Make sure water can flow away freely. If a drain area always pools water, the roof slope may need more serious attention later.
Fix Blisters and Bubbles
Blisters are a sign that air or moisture is trapped under the roofing layer. If they are small, they may not need major work right away. But if they crack, they can let in water.
Carefully cut the blister open if needed, then let the area dry fully. After that, reseal the section with the correct roofing product. This helps close the damaged area and reduce future leaks.
Reinforce Flashing Around Roof Edges
Flashing is a key leak barrier. Check the joints where the roof meets walls, vents, edges, or corners. If flashing is loose, rusted, or cracked, it can allow water to enter.
Remove loose rust or old sealant, then clean the area. Re-caulk and reseal the flashing with a product made for roofing use. A strong flashing repair can make a big difference in stopping leaks.
Apply Waterproof Roof Coating
A waterproof flat roof coating can help seal small problem areas and extend the roof’s lifespan. Common choices include acrylic, silicone, and elastomeric coatings. These coatings form a protective layer that helps block moisture and reflect weather damage.
This option works well when the roof has several small weak spots rather than one major tear. It can also improve overall protection if applied correctly.
Which Roof Coating Works Best?
If you want strong water resistance, silicone coating is often a good choice. Acrylic coatings are popular for reflecting heat. Elastomeric coatings are useful because they flex with the roof as it expands and contracts. The best choice depends on your roof type, climate, and budget.
Emergency Solutions for Active Roof Leaks
Sometimes you do not have time for a full repair, especially during heavy rain. In that case, a temporary roof leak fix can help protect your home until the weather improves.
Use a Tarp Cover
A tarp can shield the damaged area for a short time. Place it over the leak and anchor it securely so wind does not lift it. This is only a short-term solution, but it can prevent further water damage.
Interior Leak Containment
Inside the house, place buckets under dripping water. Use towels to catch splashes and plastic sheeting to protect furniture or flooring. This does not fix the roof, but it helps reduce damage inside.
Temporary Sealants
Some quick-set sealants can slow a leak until a proper repair is possible. These products are useful in emergencies, but they are not a substitute for a full repair when conditions are safe.
DIY Flat Roof Repair Mistakes to Avoid
DIY repair can save money, but only if you do it carefully. Some mistakes can make the leak worse.
Ignoring Hidden Moisture
A roof may look dry on top while moisture remains underneath. If you seal over wet material, the trapped water can continue to spread. Always check for soft spots and let the area dry fully.
Using the Wrong Repair Products
Not every adhesive or sealant works on every roof. Using the wrong product can lead to weak bonding or peeling. Match the repair material to your roof type whenever possible.
Repairing in Wet Conditions
Wet weather makes it hard for sealants, tape, and patches to stick. Even if the roof seems only slightly damp, the repair may fail later. Wait for a dry day if you can.
Walking on Weak Roof Sections
If the roof surface feels soft or unstable, do not keep walking on it. You could worsen the damage or hurt yourself. Safety always comes first.
Flat Roof Maintenance Tips
Good maintenance is one of the best ways to avoid future leaks. A little care goes a long way.
Inspect Roof Twice Per Year
Check your roof in spring and autumn. Look for cracks, loose seams, ponding water, and damaged flashing. Regular checks help you catch small issues early.
Keep Gutters Clean
Clean gutters allow water to flow away properly. This reduces the risk of overflow and standing water on the roof.
Remove Standing Water
After heavy rain, look for areas where water collects. If ponding keeps happening, the roof may need drainage improvements.
Check Flashing and Seams
Flashing and seams are the most common leak zones. Inspect them often, especially after storms or strong temperature changes.
Trim Nearby Trees
Branches can drop leaves, scratch the roof, or damage membrane material in windy weather. Trimming nearby trees helps prevent punctures and debris buildup.
Apply Protective Roof Coatings
A protective coating can help extend roof life and add another layer against moisture. It is not a cure-all, but it is a useful part of ongoing roof care.
Signs You Need a Professional Roofer
DIY repairs are useful, but they are not always enough. Some problems need expert help.
Large Membrane Damage
If the tear is large or the roof material is badly damaged, a patch may not be enough. A roofer can assess whether a bigger repair or replacement is needed.
Structural Sagging
If parts of the roof sag, the damage may go deeper than the surface layer. That can point to serious water damage or weakened structure.
Repeated Leaks
If the same area continues to leak, there may be a hidden problem beneath the roofing layers. A professional can find the root cause.
Old Roof Near End of Lifespan
Sometimes repair is no longer the best choice. If the roof is old and failing in several places, replacement may be more cost-effective in the long run.
Is DIY Roof Repair Worth It?
In many cases, yes. Small repairs are often much cheaper to handle yourself. A sealant fix or drain cleaning can cost very little compared with a service call.
Here is a simple comparison:
Repair Type DIY Cost Professional Cost
Sealant repair Low Medium
Flashing repair Low-Medium Medium
Membrane patch Medium Medium-High
Roof coating Medium High
Full replacement Not recommended Very High
DIY works best for small, clear, surface-level problems. Professionals are the safer choice when damage is large, hidden, or connected to structural issues. If you are unsure, it is better to ask for help than risk a more costly repair later.
Frequently Asked Questions About Flat Roof Leak Repair
Can I repair a flat roof leak myself?
Yes, you can handle many small leaks yourself. Minor cracks, small tears, and loose flashing can often be fixed with sealant, tape, or a patch. If the damage is large or the roof feels unsafe, call a professional.
What is the best sealant for a flat roof leak?
The best sealant depends on the roof material. Many homeowners use roofing cement, polyurethane sealant, or a roof-specific waterproof sealant. Always choose a product that matches your roof type.
How long does a flat roof patch last?
A good patch can last several years if installed correctly and if the roof is maintained well. However, lifespan depends on the roof’s age, weather exposure, and the quality of the repair.
Can ponding water damage a flat roof?
Yes. Standing water is one of the biggest threats to flat roofs. It can weaken materials, find its way into seams, and speed up wear over time.
How often should a flat roof be inspected?
A flat roof should be inspected at least twice a year, usually in spring and autumn. You should also check it after strong storms or heavy rainfall.
Is roof coating a permanent fix?
No, roof coating is not usually a permanent fix. It can extend roof life and reduce leaks, but it is still part of maintenance, not a full replacement.