Your water bill is unusually high, and the pool house floor feels damp every time you step in. You start wondering, “What’s going on?” These subtle signs might be hinting at a hidden plumbing leak in your pool house.
Pool house plumbing systems are unique, featuring intricate networks of pipes, pumps, valves, and filtration equipment that operate under constant water exposure. Because pool house plumbing handles both potable water for showers and sinks and chemically treated pool water, the materials are subjected to accelerated wear compared to standard household plumbing. A small, unnoticed leak can lead to skyrocketing water bills, serious water damage, and even structural issues if left unaddressed.
According to the U.S. Environmental Protection Agency’s 2026 WaterSense guidelines, a single drip per second wastes more than 3,000 gallons of water annually—enough to fill a standard above-ground pool. When that leak is hidden behind a wall or beneath a concrete slab in your pool house, the damage compounds silently for weeks or months. The American Society of Home Inspectors reports that hidden water leaks now account for roughly 14% of all residential water use nationwide, making early detection more important than ever.
Moisture accumulation encourages the growth of mold and mildew, which can compromise indoor air quality and pose health risks—particularly for individuals with allergies, asthma, or other respiratory conditions. The Centers for Disease Control (CDC) has reinforced in its 2026 residential health guidance that prolonged indoor dampness is linked to upper respiratory infections and increased allergen sensitivity. Beyond health concerns, sustained water exposure weakens building materials such as drywall, wooden framing, engineered subflooring, and even modern composite decking, potentially leading to structural repairs that far exceed the cost of early detection.
But here’s the good news—you don’t need to be a professional plumber to tackle this problem. With the right knowledge, basic tools, and a systematic approach, learning how to detect and fix leaks can save you time, money, and unnecessary stress. This guide walks you through every step, from recognizing the first warning signs to performing advanced pressure tests—all as a confident DIYer.
Signs of Hidden Leaks
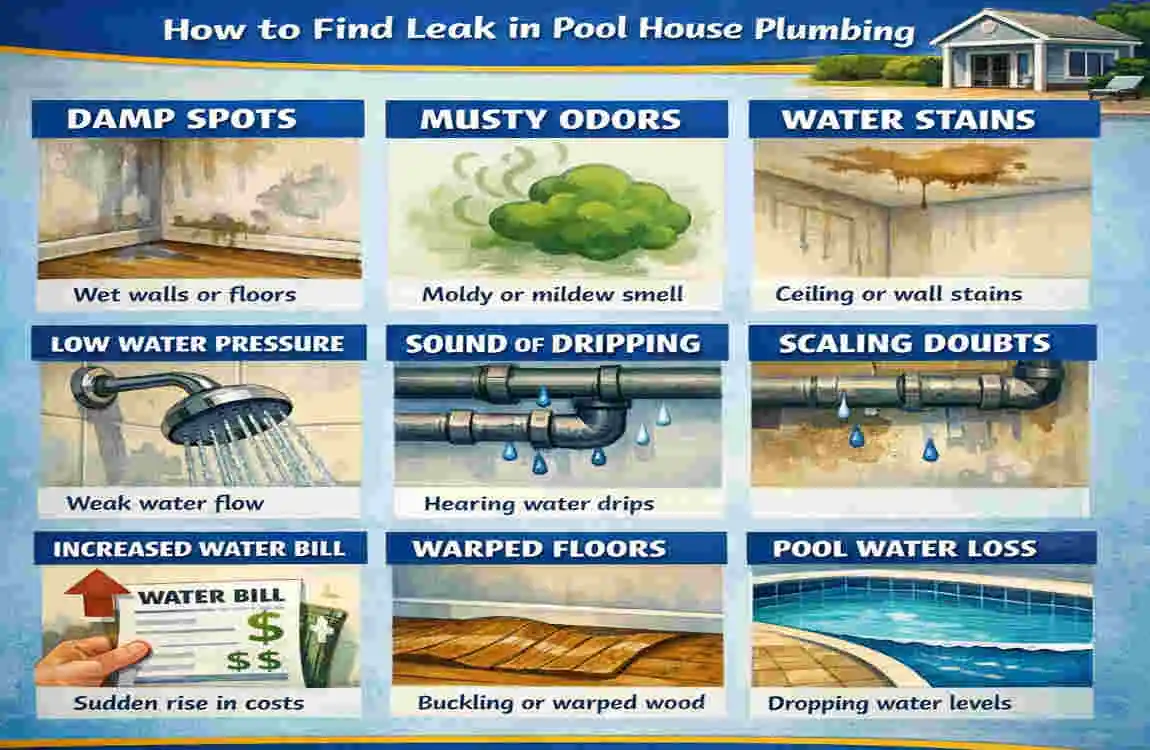
Detecting leaks early is the single most cost-effective step you can take—catching a problem at the drip stage can prevent thousands of dollars in remediation. Here are the common indicators that your pool house plumbing might have a hidden leak:
- Unexplained Water Loss: Your pool’s water level is dropping faster than usual, even without heavy evaporation. A typical residential pool loses about a quarter-inch of water per day to natural evaporation under moderate conditions. If you’re refilling beyond that threshold on a regular basis, a leak is very likely. Keep a daily log of water levels—measured at the same time each day—to establish a reliable baseline and identify patterns. Many pool owners in 2026 are using smart water-level sensors that clip onto the skimmer and send readings directly to a phone app, eliminating guesswork.
- Damp Spots or Mold: Wet patches or mold growth near pipes or walls signal persistent moisture. Mold can begin colonizing a surface within 24 to 48 hours in a damp environment, according to FEMA’s 2026 moisture control fact sheet. Pay close attention to areas behind equipment pads, beneath sinks, along baseboards, and inside cabinetry where moisture tends to collect unseen. A musty or earthy smell—caused by microbial volatile organic compounds (mVOCs)—is another telltale indicator that mold may already be forming, even if nothing is visible yet. If you notice dark stippling or fuzzy patches on grout, wood, or drywall, treat it as an urgent indicator.
- Hissing Sounds: If you hear unusual sounds near pipes or pumps, it could indicate water escaping under pressure. These sounds are often most noticeable when the pool pump is running. Try listening at different times of day—during quiet early-morning or late-evening hours, even a faint hiss, gurgle, or intermittent drip can become audible and help you zero in on the source. In 2026, affordable ultrasonic leak detectors (under $50) can amplify these sounds beyond human hearing range, making it easier than ever to locate the source without professional equipment.
- Low Water Pressure: Pool jets or house water lines may experience reduced flow. Reduced pressure indicates that water is escaping the system before it reaches its destination. If only certain jets or faucets are affected while others operate normally, the leak is likely isolated to a specific branch of piping—this narrows your search area considerably. Compare the PSI reading at your pressure gauge with the manufacturer’s recommended operating range for your pump; a reading more than 5 PSI below normal warrants investigation.
- Soggy Floors or Walls: Persistent dampness around the pool house is a red flag. Look for warped flooring, bubbling or blistering paint, soft spots underfoot, or baseboards pulling away from the wall. In extreme cases, water may seep through the foundation and cause the ground around the pool house to become spongy or saturated. A moisture meter (readily available for $20–$40 in 2026) can quantify dampness inside walls; readings above 17% in wood or 1% in concrete are considered elevated and warrant further investigation. These symptoms worsen progressively and should be addressed promptly before they lead to structural compromise.
- Spike in Water Bills: Sudden, unexplained increases in your water bill can’t be ignored. Compare your current water usage with the same billing period from the previous year. A jump of 15% or more without a corresponding change in habits—such as filling the pool for the first time that season or significantly increased landscaping irrigation—is a strong signal that water is being lost somewhere in the system. Many municipal water providers now offer online portals that show hourly usage data; checking for continuous overnight flow (when no water should be running) is one of the fastest ways to confirm a hidden leak.
- Air Bubbles in Pool Jets: If air mixes with water in the jets, it might mean there’s a leak in the plumbing. Air entering the suction side of the plumbing (between the skimmer and the pump) is a telltale sign of a crack, loose fitting, or deteriorated O-ring. This not only indicates a leak but also forces the pump to work harder, increasing energy consumption and leading to premature motor failure if not corrected. Persistent air bubbles can also reduce the efficiency of your filtration and sanitation systems, allowing water quality to deteriorate.
- Visible Cracks or Drips: Check for cracks in pipes or drips around fittings. Hairline cracks in PVC pipes, deteriorating rubber gaskets at union joints, and corroded brass or copper fittings are all frequent culprits. Over time, UV exposure, chemical imbalance (especially low pH or high calcium hardness), thermal expansion cycles, and ground settling can cause these components to degrade. Make it a habit to visually scan all exposed plumbing at least once a month—and always after seismic activity, severe storms, or heavy equipment operation near the pool house.
Quick Visual Checklist
Here’s a table summarizing common symptoms and potential leak locations:
Symptom: Possible Leak Location
Unexplained water loss — Underground pipes, pool liner, or skimmer connections
Damp spots or mold — Walls, floors, pipe joints, or behind equipment pads
Hissing sounds — Fittings, valves, pump housing, or union connections
Low water pressure — Pool jets, main water supply line, or filter manifold
Air bubbles in jets — Suction-side plumbing, pump lid O-ring, or skimmer weir
Spike in water bills — Any location; start by checking the meter for continuous flow
By keeping an eye on these signs and logging your observations over time, you can pinpoint the issue before it escalates into a major problem.
It’s also important to note that leaks behave differently depending on the season and climate. During warmer months, higher water usage and increased evaporation rates can effectively mask a slow leak, making it significantly harder to detect. In colder months, freeze-thaw cycles can expand hairline cracks into major breaks virtually overnight—the Insurance Institute for Business & Home Safety estimates that freeze-related pipe bursts cause an average of $15,000 in damage per incident in 2026 dollars. Maintaining seasonal awareness of your pool house plumbing’s condition—and performing targeted checks during seasonal transitions—will help you catch issues that might otherwise go unnoticed for months.
Tools Needed for DIY Leak Detection
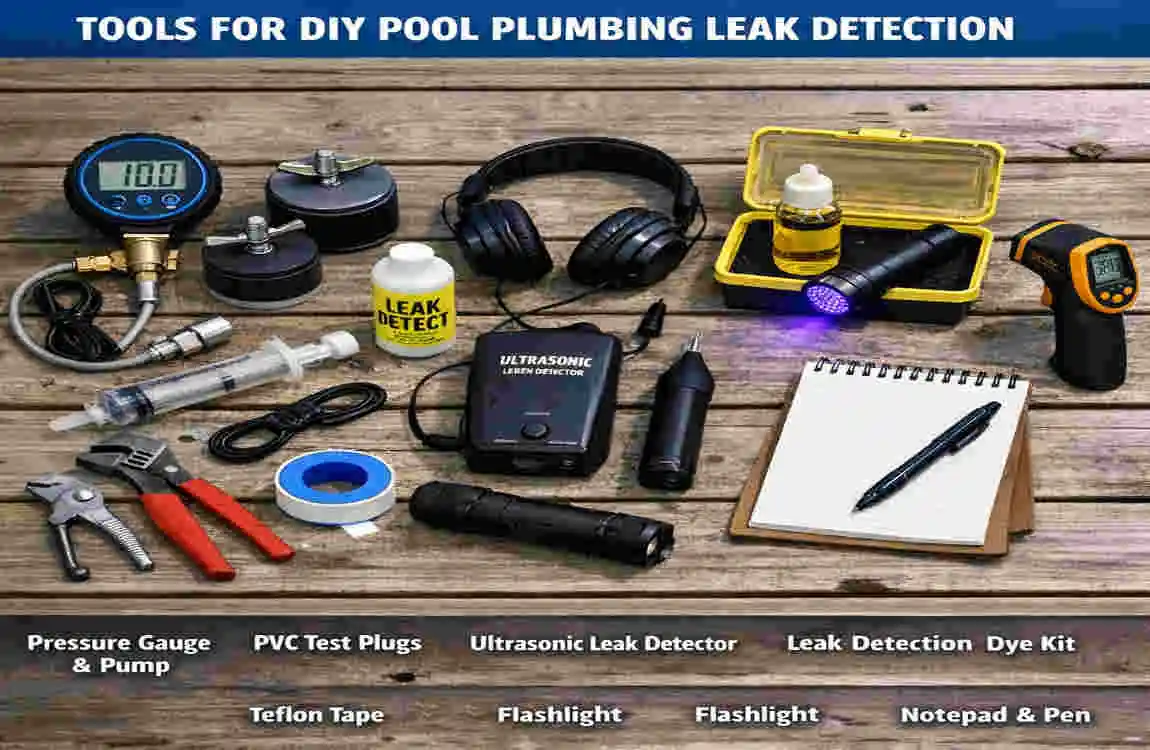
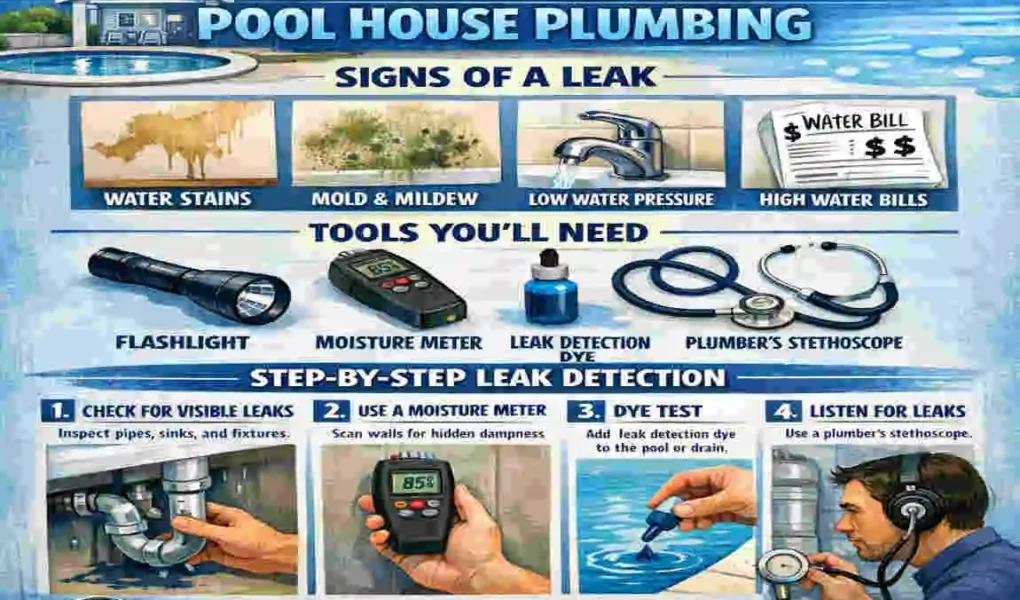
Before starting your DIY leak detection process, you’ll need a basic set of tools. The good news is that most are affordable, widely available at hardware stores and online retailers, and easy to use with no prior plumbing experience. Here’s a comprehensive list of essentials:
- Bucket: Useful for the evaporation (bucket) test. Choose a sturdy five-gallon bucket with straight sides that can sit stably on the pool step or ledge without tipping. A clear or light-colored bucket makes it easier to mark and read water levels accurately. Avoid buckets with textured interiors, which can make water-level markings harder to read.
- Food Coloring or Dye Kit: For precise, targeted leak detection. Specialized pool leak detection dye is available in concentrated dark red or blue formulas designed for maximum visibility in pool water. While standard food coloring can work in a pinch, purpose-built dye kits (such as Anderson Manufacturing’s LeakFinder or similar 2026-market products) offer significantly better contrast, are non-toxic to pool chemistry, and come with applicator syringes for controlled dispensing.
- Pressure Gauge and Testing Plugs: To check for pressure drops in individual lines. Invest in a gauge that reads up to at least 30 PSI for accurate monitoring. Expandable rubber test plugs, available in sizes from 1″ to 2″, allow you to seal off individual lines so you can pressurize and test each section independently. Look for kits that include a Schrader valve adapter, which makes pressurizing with a standard bicycle pump or small compressor straightforward.
- Listening Device: A stethoscope or pool leak detector can help locate leaks acoustically. Electronic amplifying listening devices designed for plumbing use can pick up the sound of water escaping through even the smallest crack. For budget-conscious DIYers, a basic mechanic’s stethoscope (available for under $15) is surprisingly effective on exposed pipes. In 2026, ultrasonic leak detectors with digital displays and noise-filtering capabilities have dropped below $50 at most retailers, making them an excellent mid-range option for homeowners who want more precision.
- Plumber’s Putty: Handy for temporary, emergency fixes. Plumber’s putty provides a watertight seal around fixtures and is easy to mold by hand. Keep in mind that it’s intended as a short-term stopgap—permanent repairs should always be made with appropriate solvent-weld adhesives, replacement fittings, or professional assistance.
- Flashlight: To inspect tight, concealed, or dimly lit areas. A headlamp is especially useful as it frees up both hands for manipulating pipe connections and valves. An LED flashlight or headlamp with at least 300 lumens provides ample brightness to illuminate crawl spaces, behind pump housings, inside equipment closets, and under shelving units. UV flashlights (available for $10–$20) can also help detect certain types of dye and fluorescent leak tracers used by professionals.
- Notepad: Keep track of your findings, readings, and observations during testing. Document the date, location, water levels, pressure readings, and any visual or auditory observations you make during each test. Alternatively, use your smartphone to take timestamped photos, voice memos, and written notes—this creates a valuable, organized record that can be easily shared with a plumber if professional follow-up becomes necessary.
In addition to these core tools, you may find the following items helpful for a thorough detection process: a tape measure or graduated ruler for precise water-level measurements, Teflon (PTFE) tape for re-sealing threaded connections, a small inspection mirror for viewing the backs of pipes in confined spaces, a digital moisture meter ($20–$40) for quantifying dampness in walls and floors, and an infrared thermometer ($20–$50) for identifying temperature anomalies that may indicate hidden water movement. Having all your supplies gathered and organized before you begin ensures a smooth, uninterrupted detection workflow.
Budget Breakdown
Here’s a quick comparison of DIY versus professional-grade tools (2026 pricing):
Item — DIY Cost — Pro Equipment Cost
Bucket — $5–$10 — N/A
Food coloring/dye kit — $8–$15 — $50+
Pressure gauge/plugs — $25–$50 — $100+
Listening device — $10–$50 — $200+
Moisture meter — $20–$40 — $150+
Infrared thermometer — $20–$50 — $300+
By investing $75–$150, you’ll have a well-equipped toolkit that covers every detection method in this guide.
For comparison, the average cost of hiring a professional leak detection service in 2026 ranges from $200 to $700 depending on the complexity of the system and your geographic region—with major metro areas trending toward the higher end. A modest upfront investment in DIY tools pays for itself after a single use. Once you own the equipment, you can perform routine seasonal checks that catch small problems before they become expensive emergencies, effectively saving hundreds (or thousands) of dollars over the life of your pool.
Safety Precautions
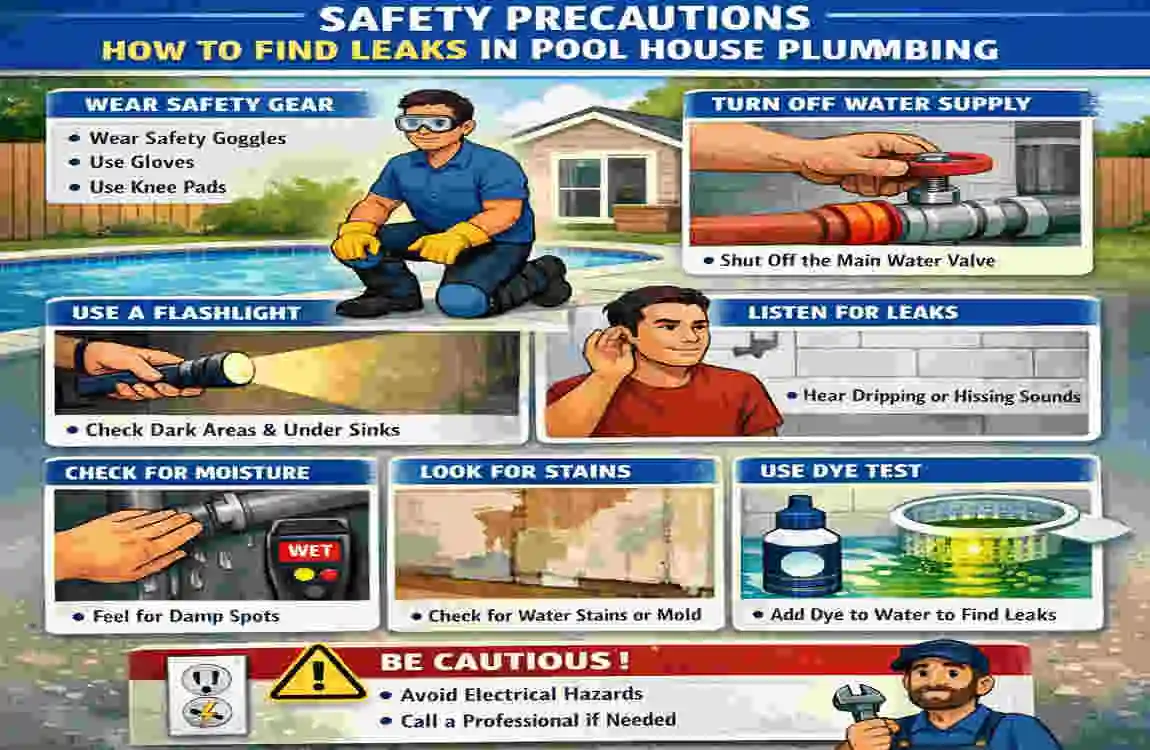
Before diving into leak detection, it’s essential to prioritize your personal safety. Pool houses combine water, electricity, and concentrated chemicals in a confined space—a combination that demands caution. Here are the preparation steps to follow:
- Turn Off the Power: Shut off electricity to the pool pump and all related equipment to prevent accidents. Locate the dedicated breaker for your pool equipment on your main electrical panel and switch it to the OFF position—then verify with a non-contact voltage tester that the circuit is truly de-energized. Never attempt to inspect or work on pool plumbing while the pump, heater, salt chlorine generator, or any motorized component is energized. Even a small amount of standing water combined with live electricity can create a lethal electrocution hazard. If your pool house has a sub-panel, turn off the main disconnect at that panel as well.
- Wear Protective Gear: Use gloves and goggles to protect yourself from chemicals or debris. Chemical-resistant nitrile or rubber gloves are ideal, as pool water and equipment surfaces may contain chlorine residue, muriatic acid, or cyanuric acid. Safety goggles with splash guards (ANSI Z87.1–rated) are recommended over standard eyeglasses to prevent accidental eye contact with contaminated water, chemical splashes, or debris dislodged during inspection. Closed-toe, slip-resistant footwear is also essential in the wet conditions typical of pool houses.
- Ventilate the Pool House: Ensure proper airflow, especially if you’re working in enclosed spaces. Pool houses can accumulate hazardous fumes from chlorine, bromine, muriatic acid, and other treatment chemicals—especially in poorly ventilated equipment rooms. Open all doors and windows, and position a portable fan to maintain continuous fresh airflow throughout your inspection. If you detect a strong chemical odor, experience eye or throat irritation, or feel lightheaded at any point, evacuate the space immediately and allow it to air out thoroughly before re-entering.
- Shut Off the Main Water Supply: If required, turn off the main water supply to prevent excess water flow during testing. This is critical before performing pressure testing, as you need a closed, isolated system for accurate readings. Locate your shutoff valve in advance—in many pool houses, it’s near the equipment pad or where the supply line enters the building. If you have an automatic pool fill (autofill) device, disable it separately so it doesn’t interfere with your test results.
Beyond these core steps, always let another person know you’re working in the pool house, especially if you’ll be inspecting crawl spaces, below-grade utility rooms, or tight equipment closets. Having someone nearby—or at minimum, someone who will check on you at a scheduled time—provides an essential safety net. Keep a fully stocked first-aid kit accessible in the pool house, and if you’re working during hot weather, stay hydrated and take regular breaks to avoid heat-related illness. The Occupational Safety and Health Administration (OSHA) recommends a minimum of one cup of water every 20 minutes when working in high-heat environments. Remember, no leak detection task is worth compromising your personal safety.
Important Note: Always check local building codes, plumbing codes, and any applicable HOA regulations before making modifications to your pool house plumbing. Many jurisdictions require permits for plumbing modifications and mandate that certain work be performed by a licensed professional.
Visual Inspection Basics
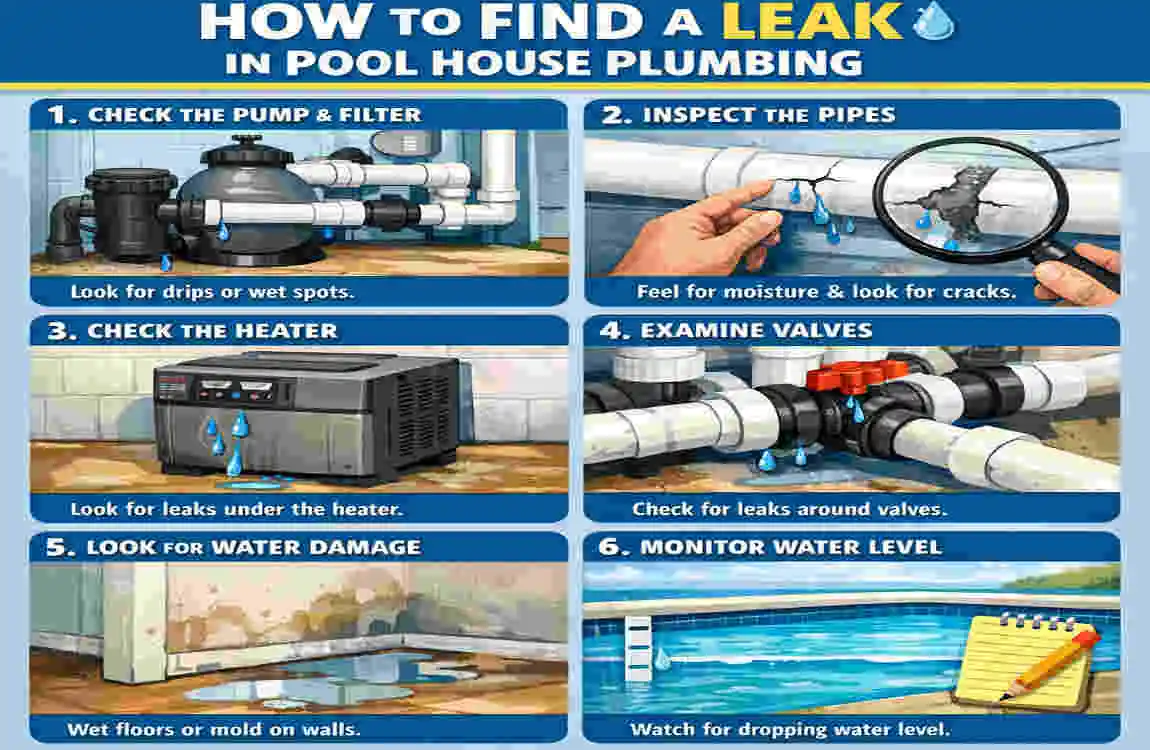
One of the simplest and most effective first steps in finding leaks is a thorough visual inspection. Follow these steps to identify potential problem areas systematically:
- Inspect Pipes and Joints: Look for cracks, drips, or corrosion around all pipes and fittings. Pay special attention to elbow joints, T-connectors, reducers, and any transition point where two different pipe materials meet (such as PVC to copper or PVC to CPVC). Corrosion typically appears as a greenish-white crust (verdigris) on copper fittings or a chalky, powdery residue on galvanized steel—both are early warning signs that a failure is developing. On PVC piping, look for discoloration, hairline fractures along glue joints, and any areas where the pipe appears swollen or deformed, which can indicate chemical damage or excessive heat exposure.
- Examine Pump Seals: Inspect the pump seals and O-rings for wear or leakage. The shaft seal is one of the most common failure points in pool pump systems—industry data from the Pool & Hot Tub Alliance (PHTA) indicates that shaft seal failure accounts for nearly 30% of equipment-pad leaks. If you notice water dripping from the bottom of the plumbing housing, the shaft seal likely needs replacing. O-rings on the pump lid, filter housing, multiport valve, and union fittings should be checked for cracks, flattening, hardening, or loss of elasticity. Apply a thin coat of silicone-based O-ring lubricant (never petroleum jelly, which degrades rubber) to keep them supple and extend their service life.
- Check Walls and Floors: Look for damp patches, discoloration, or peeling paint on pool house walls and floors. Water stains typically present as yellowish-brown rings, streaks, or tide marks. On tiled floors, look for grout that appears noticeably darker than surrounding areas or tiles that have become loose, hollow-sounding when tapped, or “tented” upward—these indicate water penetration beneath the surface. If you have access to a pin-type or pinless moisture meter, run it along walls at regular 12-inch intervals to map the extent of any hidden moisture. Compare readings to dry reference points elsewhere in the structure to establish a clear contrast.
In addition to these focused checks, take a step back and observe the pool house holistically. Is there excessive condensation on windows, pipes, or cool surfaces? Do you notice unusual insect activity near certain walls or pipes? Pests such as termites, carpenter ants, silverfish, and earwigs are drawn to persistent moisture sources, so an unusual concentration of insects can serve as an indirect but reliable indicator of a hidden leak. Also inspect every exposed valve—gate valves, ball valves, check valves, and diverter valves—for mineral buildup, crystallization, or weeping around handles, stems, and bonnet nuts, which indicate a failing internal seal or packing gland.
Pro Tip: Perform your visual inspection at night with a powerful flashlight. Light reflects off even the thinnest film of moisture, making small drips and seepage dramatically easier to spot than in ambient daylight.
Another highly effective technique is the “dry paper towel test.” Wrap a dry white paper towel, tissue, or cotton cloth tightly around a suspicious joint, pipe section, or valve connection. Secure it with a rubber band, leave it undisturbed for 4–12 hours, and then check it. If the material is damp or shows water marks, you’ve confirmed a slow leak at that specific location. This is particularly valuable for detecting micro-drips too small to see with the naked eye but that, over time, cause significant cumulative damage. Date and photograph each test for your records.
The Bucket Test: Evaporation vs. Leak

The bucket test is a time-tested and scientifically sound method for determining whether your pool is losing water due to a genuine plumbing leak or simply normal evaporation. Here’s how to do it properly:
- Fill a five-gallon bucket with pool water and place it on a stable, flat surface near the pool—such as the top pool step or an integrated sun shelf. Position the bucket so it is partially submerged (ideally with 3–5 inches of water surrounding it). This ensures both the bucket water and the pool water are exposed to the same temperature, wind, and humidity conditions, making the comparison valid.
- Mark the water level inside the bucket and the pool water level outside. Use waterproof tape, a permanent marker, or a grease pencil to create precise, clearly visible lines at each water level. For enhanced accuracy, measure the distance from the rim of the bucket down to the water surface with a ruler and note the exact measurement.
- Wait 24 hours with the pump off and the pool undisturbed. Do not swim in the pool, run water features, or allow the autofill system to operate during the test period—any of these will invalidate the results. Avoid starting the test if rain is forecast, as rainfall will add water and skew readings.
- Compare the water levels. If the pool’s water level has dropped more than the bucket’s, it’s almost certainly a leak. For the most diagnostic information, repeat the test a second time with the pump running for 24 hours. If the pool loses noticeably more water when the pump is on versus when it’s off, the leak is likely located in the pressure-side (return) plumbing. If the loss rate is the same regardless of pump status, the leak may be in the pool shell, liner, or a static plumbing section such as the main drain line.
The bucket test is most reliable when performed on a calm, overcast day with minimal wind. Direct sunlight and wind can increase surface evaporation rates unevenly and produce misleading results. If you live in an area with significant daytime-to-nighttime temperature swings, consider running the test over a 48-hour period and averaging the daily loss for greater accuracy. While this method won’t pinpoint the exact location of a leak, it is the essential first step in confirming that a leak actually exists—before you invest time and effort in more advanced detection methods.
Interpreting Results
Climate — Typical Evaporation — Leak Suspicion Threshold
Dry/Hot Climate — 0.25–0.50 inches/day — Loss exceeding 0.50 inches/day
Humid Climate — 0.10–0.25 inches/day — Loss exceeding 0.25 inches/day
Temperate/Mild Climate — 0.10–0.20 inches/day — Loss exceeding 0.25 inches/day
Keep in mind that wind speed, shade coverage, pool surface area, water temperature, and the presence of water features (waterfalls, spillovers, deck jets, bubblers) all influence evaporation rates significantly. Pools with active water features can evaporate two to three times more water than still pools. If your results fall in a borderline range, run the test on two or three separate occasions over different days to establish a consistent pattern before concluding that a leak is present. Consistency across multiple tests is far more reliable than a single reading.
Dye Test for Precise Location
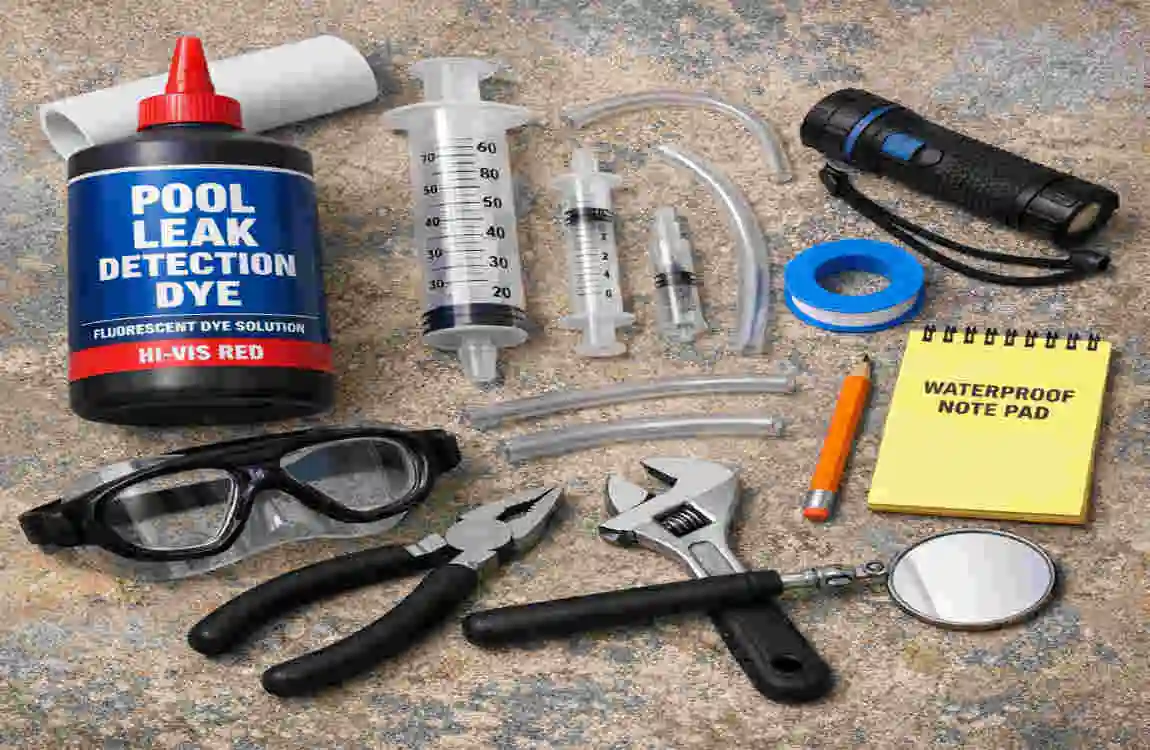
Once you’ve confirmed a leak with the bucket test, the next step is to use a dye test to find the precise location:
- Load concentrated leak detection dye into a syringe or applicator. Use a syringe with a fine tip so you can control the release of dye with surgical precision. Dark red and blue dyes provide the highest contrast against most pool surfaces (white plaster, blue pebble, gray quartz). Fill the syringe slowly to avoid air bubbles that could disrupt the dye stream.
- Release the dye near suspected leak areas—cracks, fittings, skimmer throats, return jet housings, light niches, and main drain covers. Position yourself as close to the suspect area as possible without disturbing the water. Release the dye slowly in a thin, controlled stream approximately 1–2 inches from the suspected breach. It’s critical that the water be as still as possible—turn off the pump and all water features, and remain motionless while observing.
- Watch for the dye being pulled toward the plumbing leak. If a leak is present, the dye will be visibly and unmistakably drawn toward and into the crack, gap, or opening. In still water, this directional pull is dramatically different from the uniform, cloud-like diffusion you’d see in the absence of a leak. Record the exact location by marking it with a waterproof crayon or by taking underwater photos and video for reference.
This method works exceptionally well for visible leaks and can also reveal hidden ones at accessible plumbing penetrations.
For the best results, work systematically. Begin with the statistically most common leak locations—around skimmers (especially the joint between the skimmer body and the pool wall), return jet fittings, main drain covers, pool light conduit openings, tile line separations, and any visible cracks in plaster, pebble, or fiberglass. Test one area at a time and wait for the dye to fully dissipate (or gently waft it away with your hand) before moving to the next spot to avoid false readings. If you’re testing underwater, wearing swim goggles or a snorkel mask allows you to observe the dye movement with far greater clarity and at close range. This test is completely non-destructive, inexpensive, and infinitely repeatable—making it one of the most valuable and accessible tools in the DIY leak detection arsenal.
Pressure Testing Pool Lines
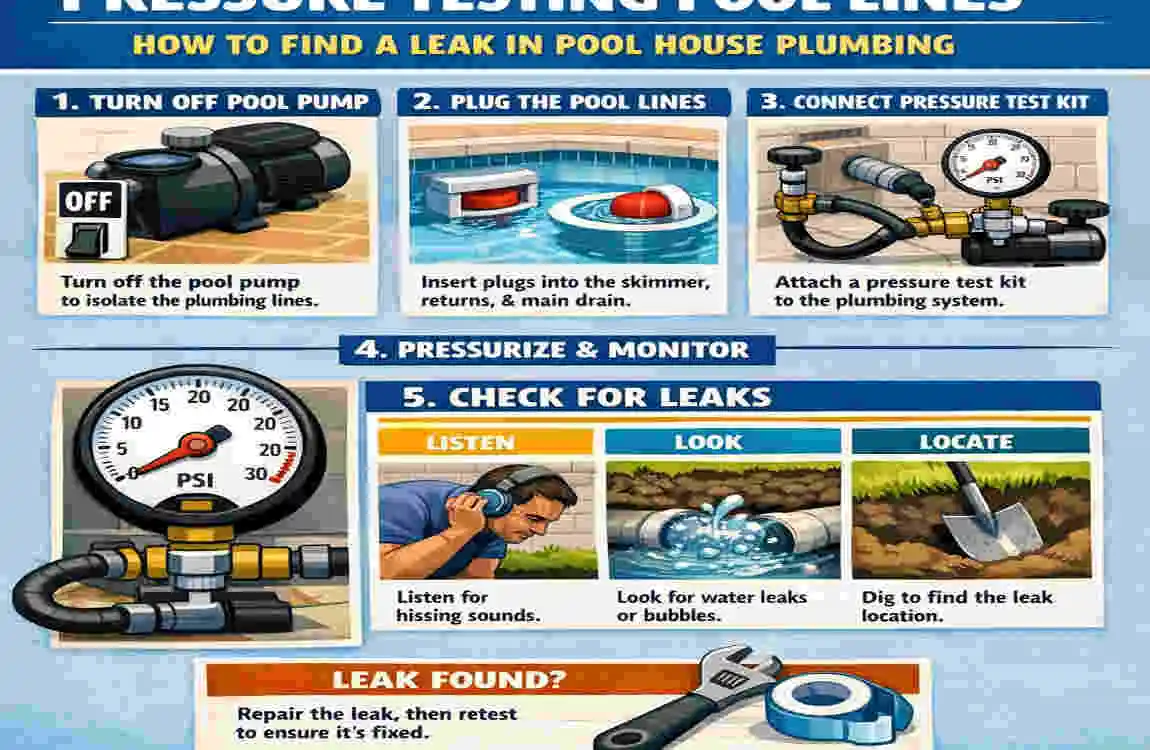
Pressure testing is a more technical—but highly definitive—method for confirming and isolating plumbing leaks. Here’s a step-by-step process:
- Cap the lines and attach a pressure gauge. Use expandable rubber test plugs (also called wing-nut plugs or pressure test plugs) to seal each line at the pool end—including skimmer ports, return ports, main drain, spa returns, and any water feature lines. At the equipment pad, connect a pressure gauge fitted with a Schrader valve adapter to the plugged line. Verify all connections are snug and airtight before pressurizing. Any loose connection will produce a false pressure drop and lead you to a non-existent leak.
- Pressurize the line to approximately 15 PSI. Use a hand bicycle pump or small portable compressor to introduce air into the line until the gauge reads 15 PSI. Do not exceed 20 PSI—excessive pressure can crack PVC pipes, blow out solvent-weld joints, or damage older fittings and valves. Once you reach target pressure, close the valve at the gauge and allow the system to stabilize for 5 minutes before beginning your observation period. A slight initial drop (0.5 PSI) during stabilization is normal as the air adjusts to the temperature of the pipe.
- Monitor the gauge for 1–2 hours. If the pressure drops, that line contains a leak. Record the starting pressure and check the gauge at 15-minute intervals. A perfectly stable reading means the line is intact and can be ruled out. Any consistent downward trend—even a loss of just 1 PSI over the observation period—indicates a breach somewhere in that line. For the most reliable and actionable results, test each plumbing circuit individually (suction, return, main drain, spa, water feature) so you can isolate exactly which line is compromised.
Pressure testing is widely regarded as the gold standard for confirming the presence and general location of plumbing leaks. Once you’ve identified which line is losing pressure, you can combine this finding with acoustic detection or dye testing to narrow down the precise failure point. If a line holds pressure perfectly over the full test period, you can confidently eliminate it from consideration and focus your efforts elsewhere. For pool houses with complex plumbing layouts—multiple return circuits, dedicated spa lines, separate water feature feeds, or solar heating loops—testing each circuit separately is absolutely essential for a thorough and accurate diagnosis.
Common Pressure Loss Indicators
Pressure Drop Rate — Possible Leak Severity & Location
1–3 PSI over 1 hour — Minor hairline crack, slow-weeping fitting, or slightly loose union
3–5 PSI over 1 hour — Moderate crack, separated glue joint, or deteriorated gasket
>5 PSI over 1 hour — Major pipe break, fully separated joint, or collapsed section in underground line
Rapid drop to 0 PSI — Catastrophic failure; severed pipe, blown plug, or completely open break
A slow, gradual pressure drop over the course of an hour typically points to a minor crack or a fitting just beginning to separate—these are often repairable with a simple cut-and-splice. A rapid drop where the gauge falls to zero within minutes indicates a significant break that may require excavation and pipe replacement. In the latter case, you may also hear air hissing out of the water at the pool end of the line, providing audible confirmation of the breach location. If multiple lines show pressure loss simultaneously, the issue may be at a shared manifold, a common fitting at the equipment pad, or the equipment pad piping itself.
Acoustic Detection Methods
Using sound to locate leaks is one of the most effective non-invasive techniques available. Here’s how to apply it:
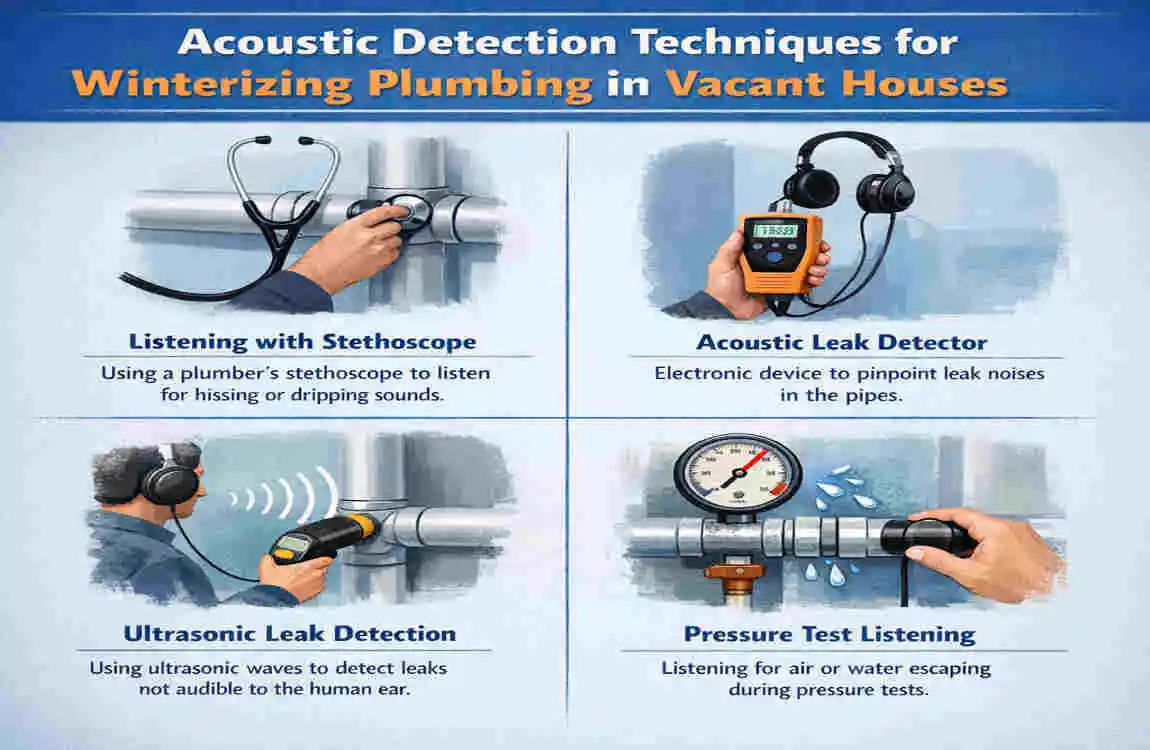
- Use a stethoscope or a pool leak detector to listen for water or air escaping. Place the listening device’s contact point directly against pipes, walls, floor surfaces, or concrete decking and move slowly along the plumbing path. The sound of a leak typically manifests as a faint hiss, whooshing noise, rhythmic drip, or steady rushing sound. The closer you get to the source, the louder and more distinct the sound becomes. Electronic amplifying devices with noise-canceling headphones dramatically improve detection accuracy—especially in environments with ambient background noise.
- For underground pipes, use a ground microphone or geophone placed on the soil or deck surface above the pipe. Move the sensor along the known pipe route at 2- to 3-foot intervals, pausing at each point for 15–30 seconds to listen. Note where the sound is loudest and most focused—this point is typically directly above the leak. Triangulate by approaching from multiple directions to confirm the location before any excavation.
- Smartphone apps can also assist in detecting noise patterns. In 2026, several well-rated apps (such as Spectroid, Decibel X, and specialized plumbing diagnostic apps) can turn your phone’s microphone into a basic spectrum analyzer, displaying audio waveforms, decibel levels, and frequency patterns in real time. While not as precise as professional equipment, they provide a useful comparative tool—take readings at multiple points along the plumbing run and look for anomalous spikes in the 200–2,000 Hz range, where leak sounds are most commonly concentrated.
For best results, perform acoustic testing during the quietest possible time—early morning (before 6 AM) or late evening (after 10 PM)—when ambient noise from traffic, HVAC systems, and neighborhood activity is at a minimum. If you’re simultaneously pressurizing the lines with air for a parallel pressure test, acoustic detection becomes significantly more effective, as escaping air produces a more pronounced, higher-pitched, and easily identifiable sound than water alone. Mark every suspect area with chalk, tape, or a landscaping flag as you go, then return with dye testing or visual inspection techniques to confirm your findings before committing to any repair work.
Thermal Imaging DIY Hack
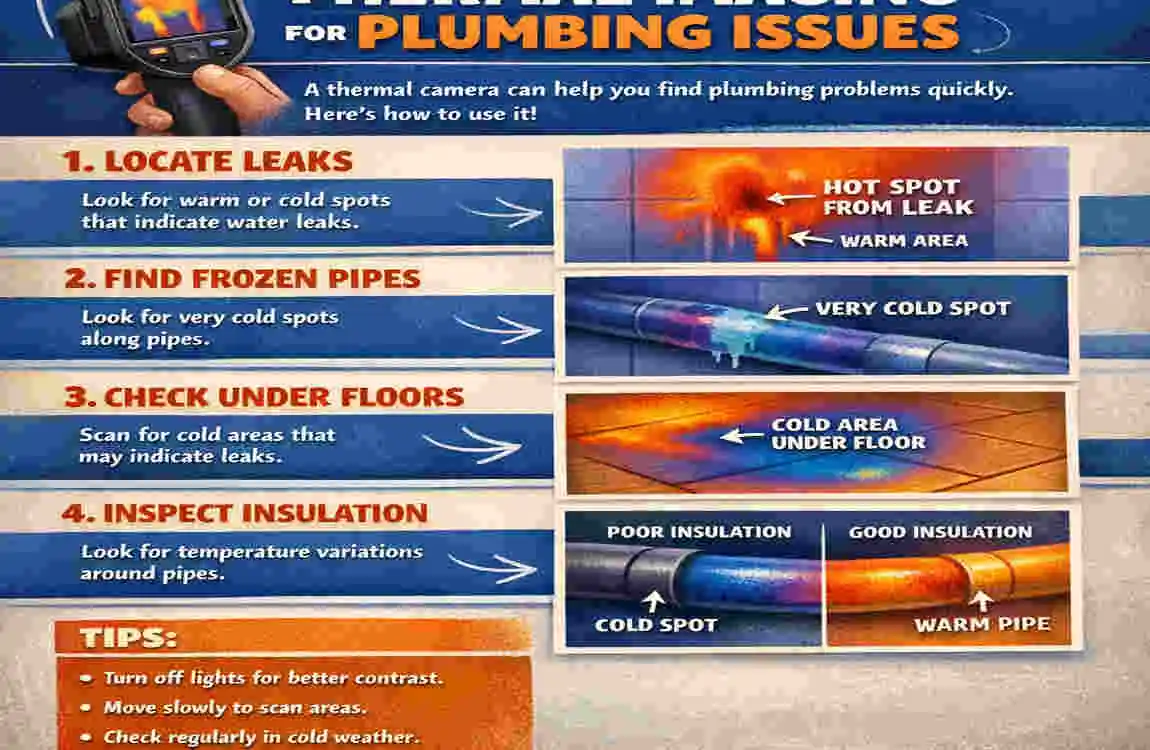
If you suspect hidden leaks behind walls or under floors but don’t want to rent expensive professional thermal cameras, try an infrared thermometer. Measure surface temperatures systematically and look for sudden hot or cold spots near known pipe runs.
An infrared (IR) thermometer—commonly called a “temp gun”—is available at virtually every hardware store and online retailer for $20–$50 in 2026. Operation is straightforward: point it at any surface, pull the trigger, and the device displays the temperature instantly. When scanning for leaks, move the thermometer in a grid pattern along walls, floors, and ceilings where pipes are routed. A hidden leak will cause a localized temperature anomaly—typically a cooler spot in warm weather (because escaping water absorbs heat) or a warmer spot in cold weather (if the leak is on a heated water line). Temperature differences of 3°F or more relative to surrounding surfaces warrant closer investigation.
For a significantly more detailed picture, consider a smartphone-compatible thermal imaging attachment such as the FLIR ONE Gen 4 or the Seek Thermal CompactPRO, which range from $150 to $350 in 2026. These devices overlay a color-coded heat map directly on your phone’s camera view, allowing you to visually identify temperature anomalies in real time and capture screenshots for documentation. While this is a larger investment than a basic IR thermometer, it provides a dramatically clearer picture of what’s happening behind finished surfaces and is reusable for a wide range of home maintenance tasks beyond leak detection—including finding insulation gaps, detecting HVAC duct leaks, and locating electrical hot spots.
When using any thermal detection method, scan during a time of day when the ambient temperature is stable and the building has reached thermal equilibrium—typically early morning before direct sun hits the structure. Avoid scanning during or immediately after periods of direct sunlight exposure, rain, or rapid heating/cooling cycles, which introduce misleading temperature variations that can mask or mimic leak signatures.
Underground Leak Detection
Finding underground leaks requires a methodical, patient approach—but catching them early is critical to preventing far more expensive damage down the road:
- Dig small test trenches near suspected pipe locations. Before you dig, determine the approximate path of your underground plumbing. Consult your pool’s original construction blueprints, building permits, as-built drawings, or the installer’s documentation if available. If no documentation exists, many pool builders in 2026 can provide pipe-locating services using electromagnetic transmitters. Use landscaping flags or spray paint to mark the estimated pipe route on the surface, then dig narrow exploratory trenches (approximately 12 inches wide and deep enough to reach the pipe depth—typically 18–24 inches) at intervals along the path. Look for saturated soil, running water, soil discoloration, eroded earth, or the smell of chlorine in the soil, all of which can indicate an active underground leak.
- Use ground microphones to listen for leaks. A ground microphone or geophone pressed firmly against the soil surface (or concrete/pavers above the pipe) can detect the sound of pressurized water or air escaping from a cracked or broken pipe below grade. Walk the pipe route slowly, pausing every 2–3 feet to listen for 20–30 seconds. The leak sound will intensify as you approach the breach and diminish as you move away, enabling you to triangulate the precise location with reasonable accuracy before excavating.
- Isolate sections for pressure testing. By plugging the line at both ends and pressurizing individual segments (as described in the Pressure Testing section above), you can narrow down which section of underground pipe is compromised. Combine this data with acoustic testing and visual soil observations to identify the exact failure point before committing to excavation—digging in the right spot the first time saves enormous time and expense.
Underground leaks are among the most challenging and expensive to detect and repair, but acting quickly is absolutely critical. Water escaping below grade erodes the compacted soil that supports your pool deck, patio, walkways, and pool house foundation. Over time, this subsurface erosion can lead to sinkholes, cracked concrete, deck settling, and structural shifting that may require extensive and costly engineering repairs—potentially tens of thousands of dollars. The National Association of Home Builders estimates that foundation repairs related to water damage average $8,000–$15,000 in 2026.
If your underground piping is older than 15–20 years—particularly if it’s made of galvanized steel, early-generation rigid PVC (Schedule 20 or thinner), or polybutylene (a material commonly used from the 1970s through the mid-1990s and now widely regarded as failure-prone)—it may be worth scheduling a professional camera inspection to assess the overall condition of the lines, even if no active leak is currently suspected. A pipe camera inspection typically costs $100–$300 and can reveal internal corrosion, root intrusion, joint separation, and developing cracks before they become full-blown failures. Proactive assessment is always more cost-effective than reactive emergency repair.
Pool House Specific Checks
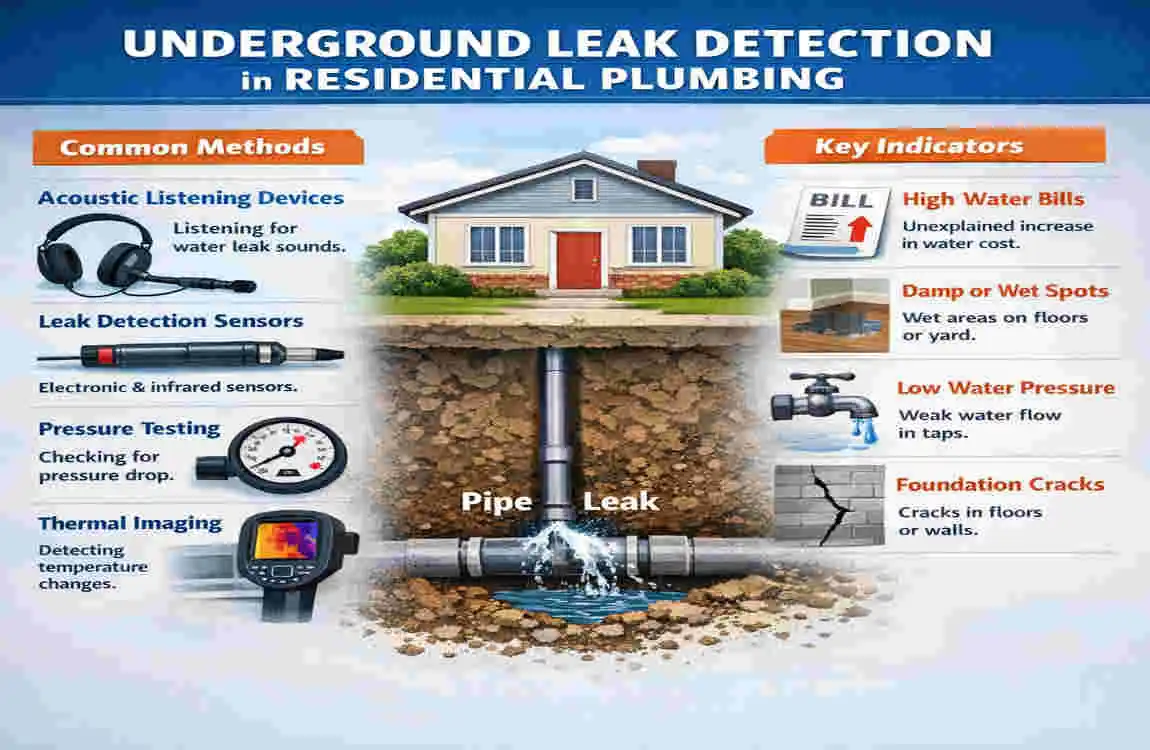
Don’t forget to inspect unique areas of the pool house, such as showers, outdoor faucets, and backflow preventers.
Pool houses often include a range of amenities—bathrooms, changing rooms, wet bars, outdoor kitchens, laundry hookups, and even spas or hot tubs—each with its own independent water supply and drain lines that can develop leaks separately from the pool plumbing itself. Here are the key pool-house-specific areas to check:
Shower stalls and floor drains: Inspect caulking and grout around shower pans, curbs, and drain flanges for cracking, shrinkage, or deterioration. A failing shower pan membrane can allow water to seep beneath the floor and migrate along subflooring joists for considerable distances before becoming visible—sometimes appearing far from the actual source. Run each shower for five full minutes and immediately check the ceiling below (if accessible) or the adjacent wall for drips, dampness, or swelling. In 2026, waterproof sheet membrane systems (such as Schluter DITRA or KERDI) are considered best practice for pool house shower installations and are far more reliable than traditional mortar beds.
Outdoor faucets and hose bibs: These are exposed to the elements year-round and are especially vulnerable to freeze damage in colder climates. Check for dripping even when the handle is fully closed—a worn washer or failed cartridge can waste hundreds of gallons per month. Inspect the wall penetration point where the faucet enters the structure for signs of seepage, caulk failure, or frost damage. Frost-proof sillcocks (which self-drain when shut off) are strongly recommended for any pool house in a freeze-prone area.
Backflow preventers and check valves: These devices are legally required in most jurisdictions to prevent contaminated pool water from flowing back into your home’s potable water supply. A malfunctioning backflow preventer may drip continuously from its relief ports or show mineral buildup and corrosion around its test cocks. Annual testing and certification by a licensed backflow tester is mandatory in many areas—check your local water authority’s requirements. Failed backflow devices are not just a plumbing problem; they are a public health concern.
Water heater connections: If your pool house has a dedicated water heater for showers, a sink, or a hot tub, inspect the cold water inlet, hot water outlet, and all flexible supply connections for corrosion, drips, or bulging. Check the temperature and pressure (T&P) relief valve for signs of discharge (mineral staining or a wet discharge pipe), and examine the base of the tank for rust-colored water or puddles—early signs of internal tank corrosion. Tankless units should be checked for error codes and inspected at supply and return connections.
Chemical feed systems: Automatic chlorinators, salt chlorine generators, chemical injection pumps, and ozone or UV sanitation systems all have plumbing connections that are particularly susceptible to degradation. The highly corrosive nature of concentrated pool chemicals (especially liquid chlorine and muriatic acid) accelerates wear on fittings, tubing, and check valves. Inspect these connections monthly and replace chemical-resistant tubing and injection check valves annually as preventive maintenance.
Condensate and HVAC drain lines: If your pool house has a dehumidifier, mini-split air conditioner, or any HVAC equipment, the condensate drain line can clog or disconnect, producing water that mimics a plumbing leak. Check that drain lines are clear, properly routed, and terminating at an appropriate discharge point.
Prevention Tips Long-Term
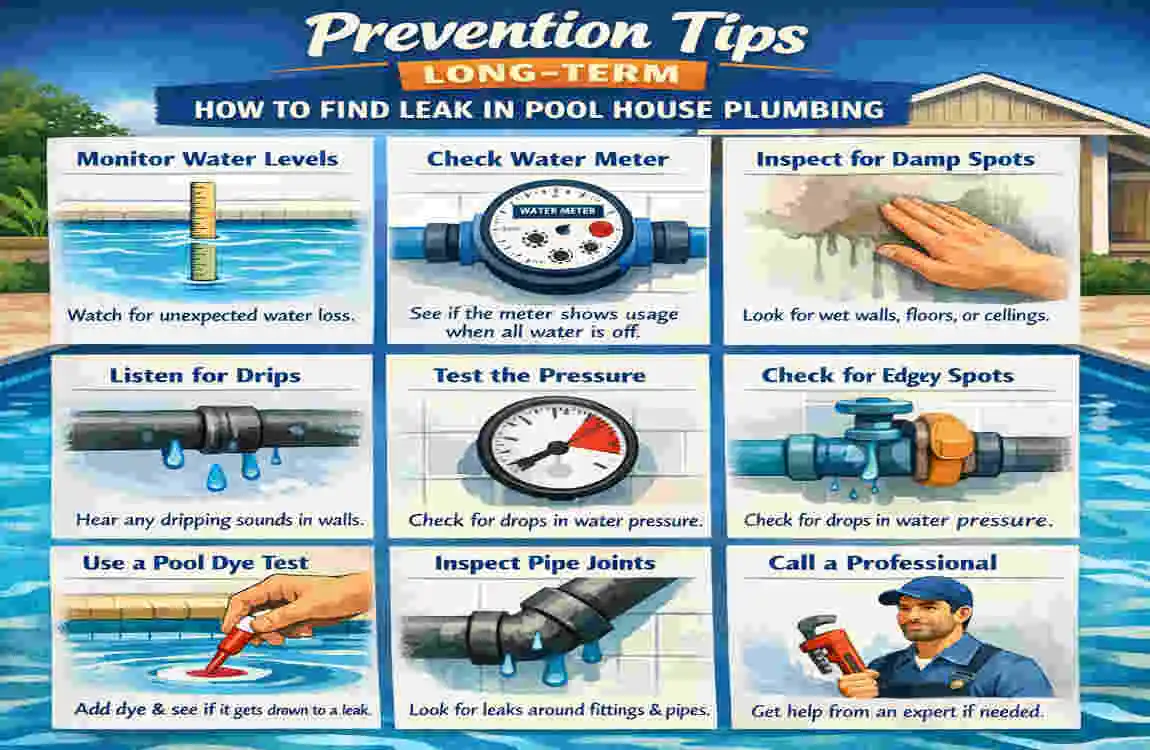
Maintenance is key! Schedule annual inspections, winterize your plumbing, and consider upgrading to PEX pipes for long-term durability and peace of mind.
A proactive, year-round maintenance routine is the single most effective strategy for preventing hidden leaks from ever developing. Here are the best long-term practices for keeping your pool house plumbing reliable:
Schedule annual professional inspections: Even if you’re comfortable performing thorough DIY checks, having a licensed plumber inspect your pool house plumbing once a year catches issues invisible to the untrained eye—such as internal pipe corrosion, developing joint fatigue, incorrect pressure-relief valve settings, and code violations that could pose safety or insurance risks. Many pool service companies in 2026 offer bundled inspection packages that include both the pool equipment and the pool house plumbing for $150–$250 annually.
Winterize your plumbing properly: In regions where temperatures drop below freezing, failing to winterize is one of the leading causes of catastrophic pipe failure. Drain all supply and return lines completely, blow out residual water with compressed air (using a shop vac or small compressor set to under 25 PSI), and add non-toxic propylene glycol antifreeze to all traps, P-traps, and low points. Disconnect and store outdoor hoses, shut off dedicated supply valves, and insulate any exposed pipes with foam pipe sleeves or heat tape. The cost of proper winterization is typically under $100 in materials; the cost of a burst pipe repair averages $1,000–$4,000.
Upgrade aging materials: If your pool house plumbing uses older galvanized steel (common in pre-1980 construction), CPVC (which becomes brittle with age and chemical exposure), or polybutylene (known for premature failure), consider upgrading to PEX (cross-linked polyethylene) or Schedule 40 PVC. PEX is flexible, resistant to freeze damage (it can expand up to 3x its diameter before rupturing), highly resistant to chemical corrosion, and easy to install with push-fit or crimp fittings. For underground pool plumbing runs, Schedule 40 PVC with solvent-weld joints remains the industry standard in 2026.
Maintain balanced water chemistry: Improperly balanced pool water is one of the most overlooked causes of plumbing deterioration. Water with low pH (below 7.2) is corrosive and attacks metal components, copper heat exchangers, and even PVC over time. Excessively high calcium hardness (above 400 ppm) causes scale buildup that restricts flow and stresses joints. Test your water at least weekly—or invest in a smart water chemistry monitor that provides continuous readings via smartphone—and keep pH (7.2–7.6), total alkalinity (80–120 ppm), calcium hardness (200–400 ppm), and sanitizer levels within recommended ranges.
Install a smart leak detection system: One of the most impactful upgrades available in 2026 is a smart water monitoring and automatic shutoff system. Devices such as the Flo by Moen, Phyn Plus, or Flume 2 install on your pool house’s main supply line and use advanced algorithms to track water flow patterns in real time. They detect anomalies—such as continuous low-level flow indicating a slow leak—and send instant smartphone alerts. Some models can even shut off the water supply automatically when a potential leak is detected, preventing damage even when you’re away from home. These systems typically cost $200–$500 installed and can reduce water damage insurance claims by up to 96%, according to industry data.
Replace O-rings and gaskets on a preventive schedule: Don’t wait for these small, inexpensive components to fail catastrophically. Replace pump lid O-rings, filter housing gaskets, multiport valve seals, union O-rings, and check valve internals every 1–2 years as a proactive measure. Individual components typically cost $3–$15 each, and replacement takes only minutes—but the water damage caused by a failed seal during peak season can run into thousands of dollars.
Keep vegetation away from underground pipes: Tree and large shrub roots are a well-documented cause of underground pipe intrusion and damage, particularly for older clay, concrete, and thin-wall PVC pipes. Maintain a minimum distance of 10 feet between new plantings and known buried plumbing lines. If you notice an unexplained patch of unusually lush, green grass or vegetation in your yard near a pipe route—especially during dry periods—it may indicate a subsurface leak providing irrigation to the root zone.
Document your plumbing layout: Create or update a detailed diagram of all plumbing runs in and around your pool house, including pipe sizes, materials, valve locations, and buried line routes. Store both a digital copy (on your phone or cloud storage) and a physical copy in a waterproof folder near the equipment pad. This documentation is invaluable during emergencies, for future inspections, and if you ever sell the property.
FAQ: How to Find Leak in Pool House Plumbing
Q: What are the first signs of a leak in pool house plumbing?
Look for unexplained water loss in the pool, damp spots or mold growth near pipes and walls, hissing or dripping sounds from fittings or pump housing, and low water pressure in pool jets or house water lines. Additional early warning signs include a persistent musty odor inside the pool house (indicating hidden mold growth), cracks or settling in the pool deck or patio near the structure, unexplained wet or discolored soil in the yard along pipe routes, insect activity concentrated near specific walls, and an unexplained increase in your water bill. If you notice any combination of these symptoms, it’s time to investigate further.
Q: How can I tell if water loss is due to a leak or just evaporation?
Use the bucket test: fill a five-gallon bucket with pool water, place it on the pool step so it’s partially submerged, and mark both the water level inside the bucket and the pool water level outside. After 24 hours with the pump off and the pool undisturbed, compare the two levels. If the pool water has dropped more than the bucket’s, a leak is almost certainly present. For maximum diagnostic value, repeat the test with the pump running for another 24 hours—if the pool loses more water with the pump on, the leak is likely in the pressure-side (return) plumbing; if the loss rate is unchanged, the leak may be in the pool structure or a static line.
Q: What tools do I need for DIY leak detection?
A comprehensive DIY toolkit includes: a five-gallon bucket for the evaporation test, leak detection dye and a syringe applicator, a pressure gauge with expandable test plugs and Schrader valve adapter, an acoustic listening device (mechanic’s stethoscope or electronic leak detector), plumber’s putty for temporary fixes, a flashlight or headlamp (300+ lumens), and a notepad or smartphone for documentation. For enhanced capability, add a digital moisture meter, an infrared thermometer, Teflon tape, a small inspection mirror, and a tape measure. The total investment for a well-equipped DIY kit is approximately $75–$150—a fraction of the $200–$700 cost of a single professional service call.
Q: How do I visually inspect for leaks?
Systematically examine all exposed pipes, joints, unions, and valves for cracks, drips, corrosion, or mineral deposits. Inspect pump shaft seals and all O-rings for wear, hardening, or deformation. Check walls and floors for damp patches, discoloration, bubbling paint, warped materials, or soft spots. Use a flashlight at night—the light reflects off even thin moisture films, making small leaks dramatically more visible. The “dry paper towel test” (wrapping a dry paper towel around a suspicious joint and checking it after several hours) is highly effective for confirming slow drips invisible to the naked eye.
Q: What is a dye test and how does it work?
A dye test involves releasing concentrated colored dye near a suspected leak point and observing whether the dye is pulled directionally toward a crack, gap, or opening—confirming the exact leak location. The key to success is stillness: turn off the pump and all water features, remain motionless, and release the dye from a syringe approximately 1–2 inches from the suspect area. In still water, the directional flow of dye toward an active breach is unmistakable compared to normal diffusion. Test one area at a time, allow full dye dissipation before moving on, and document confirmed leak locations with photos.
Q: How does pressure testing help find leaks?
By capping individual pool plumbing lines with test plugs and pressurizing them with air to approximately 15 PSI, you can monitor the gauge for pressure drops over a 1–2 hour observation period. A stable reading confirms the line is intact; any consistent drop indicates a leak in that specific circuit. Testing each line individually (suction, return, main drain, spa, water features) allows precise isolation. A slow, gradual drop suggests a minor crack; a rapid drop to zero points to a major break requiring immediate repair. Pressure testing is considered the gold standard for plumbing leak confirmation.
Q: Can I use sound to detect leaks?
Absolutely. Using a stethoscope, electronic listening device, or ground microphone (geophone), you can hear water or air escaping from pipes, joints, and valves—even behind walls or underground. Place the sensor directly against surfaces and move methodically along the plumbing path; the sound intensifies as you approach the source. For underground pipes, geophones detect vibrations through soil and concrete. Perform acoustic testing during quiet hours for best results, and if you’re simultaneously pressurizing lines with air, the escaping sound will be amplified and much easier to pinpoint.
Q: When should I call a professional?
Contact a licensed leak detection specialist or plumber if: you detect major or rapid pressure loss indicating a significant pipe break; the leak is beneath a concrete slab, inside a retaining wall, or under the pool deck where specialized equipment is needed for access; you suspect damage near gas lines, electrical conduits, or structural elements; DIY methods have been unable to locate the source; or you’re dealing with suspected sewage/drain line issues. Professional specialists have access to electronic listening equipment, fiber-optic pipe cameras, helium tracer gas systems, and ground-penetrating radar that can locate even the most elusive leaks with minimal excavation. Average professional detection costs range from $200–$700 in 2026 depending on complexity and location.
Q: Are there any safety precautions I should take?
Always de-energize all pool equipment at the breaker panel before beginning any inspection. Wear chemical-resistant gloves, ANSI-rated splash-proof goggles, and closed-toe slip-resistant shoes. Ventilate the pool house thoroughly—open doors, windows, and use a fan—especially near chemical storage and equipment rooms. Shut off the main water supply before pressure testing. Inform someone that you’re working in the pool house (especially before entering crawl spaces or confined areas) so help can be summoned in an emergency. Keep a first-aid kit nearby, stay hydrated in warm weather, and never modify gas lines, electrical wiring, or structural elements without proper training, permits, and professional assistance.
Q: How long does a typical leak detection process take?
Individual tests vary: the bucket test requires a 24-hour waiting period (48 hours if you repeat with the pump on); dye tests take 15–30 minutes per location tested; pressure testing takes 1–2 hours per line plus setup time; and acoustic sweeps can take 30 minutes to several hours depending on the extent of the plumbing system. A comprehensive DIY detection process—from initial visual inspection through pressure testing, acoustic detection, and confirmation—typically takes a full weekend for a standard pool house. For complex systems with multiple circuits, underground runs, or difficult access, allow 2–3 days. Working methodically and documenting every finding as you go will yield the most reliable results and save time if professional follow-up becomes necessary.