Imagine this scenario: You love your home, but your hardwood floors have seen better days. They are telling the story of every pet that scurried across them, every toy car dragged by a toddler, and every piece of furniture moved over the last decade. You know they need love, but you are paralyzed by two major fears—the astronomical cost of hiring professionals and the absolute nightmare of moving all your stuff out to empty the house.
Well, I have some good news for you. If you’re wondering how to refinish floors while living in the house, this complete DIY guide shows it’s not only possible, it is actually a smart strategic move if you plan it right. You don’t have to move into a hotel, and you certainly don’t have to clear out every single room at once.
Refinishing your floors yourself can save you a massive amount of money—we are talking about spending roughly $1-2 per square foot for DIY versus $3-6 (or more) per square foot for pros. Beyond the savings, you get total control over the customization, the stain color, and the schedule.
Why Refinish Floors DIY in an Occupied Home?

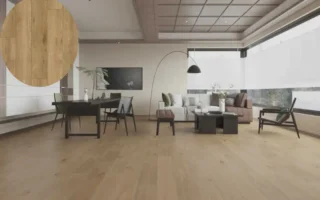
Let’s be honest about the pain points that brought you here. It could be the gray, worn-down patches in high-traffic areas near the front door. Maybe it’s the orange-tinted finish from the 90s that you can’t stand anymore. Or perhaps it’s the deep scratches from a dog that loved to chase tennis balls down the hallway.
Whatever the reason, the thought of refinishing feels overwhelming. The biggest myth out there is that you need an empty shell of a house to do this work. That used to be true in the days of massive dust clouds and toxic, slow-drying chemicals. But times have changed.
Today, refinishing floors while living in a house is a realistic project for beginners thanks to two factors: modern dustless tools and water-based finishes. You can now rent sanders that capture the vast majority of dust, and you can use finishes that dry in hours, not days, with significantly fewer fumes.
By taking a phased approach—tackling one room or zone at a time—you maintain a livable space while upgrading your home.
Here is a quick look at why doing this yourself while staying put makes sense:
AspectDIY in Occupied HomeHiring Pros
Cost $500 – $1,500 (for approx. 400 sq ft) $2,000 – $5,000+
Timeline 5-7 days per room (at your own pace) 3-5 days (usually requires full house shutdown)
Disruption Phased (one room/week), low chaos. Entire home upheaval, potential hotel stay needed
Control Custom stain mixing, pick your own sheen. Limited choices, often “standard” packages
Satisfaction , high pride in sweat equity , purely transactional
Did you know that nearly 70% of homeowners who skip refinishing later regret it? They usually cite the high cost of professionals as the reason they didn’t do it. Don’t let that be you. With the right prep, you can get pro-level results without the pro-level invoice.
Essential Tools and Materials
To pull this off without turning your home into a dust bowl, you need the right gear. When you are living in the house during the renovation, your tool list looks a little different than a standard job site—specifically, dust containment is your number one priority.
Most of these tools can be rented from big-box stores like Home Depot or local tool rental centers. Here is your shopping and rental list:
Sanding Equipment
You cannot skimp here. This is the heavy artillery.
- Drum Sander: This is for the main field of the floor. You will likely use 36, 60, and 80 grits.
- Orbital Floor Buffer: Crucial for blending scratch marks after the drum sander.
- Edger Sander: The drum sander can’t reach the walls; the edger does the dirty work along the baseboards.
Dust Control (Crucial for Occupied Homes)
Since you are sleeping and eating in this house, these items are non-negotiable.
- Shop Vac with HEPA Filter: Do not use a standard vacuum. You need high-efficiency filtration to catch fine wood flour.
- Plastic Sheeting (4-mil or thicker): Use this to seal doorways and vents.
- Box Fans: To create negative air pressure (we will explain this in the prep section).
- Painter’s Tape: The blue or green kind to secure the plastic without ruining your paint.
Finishing Supplies
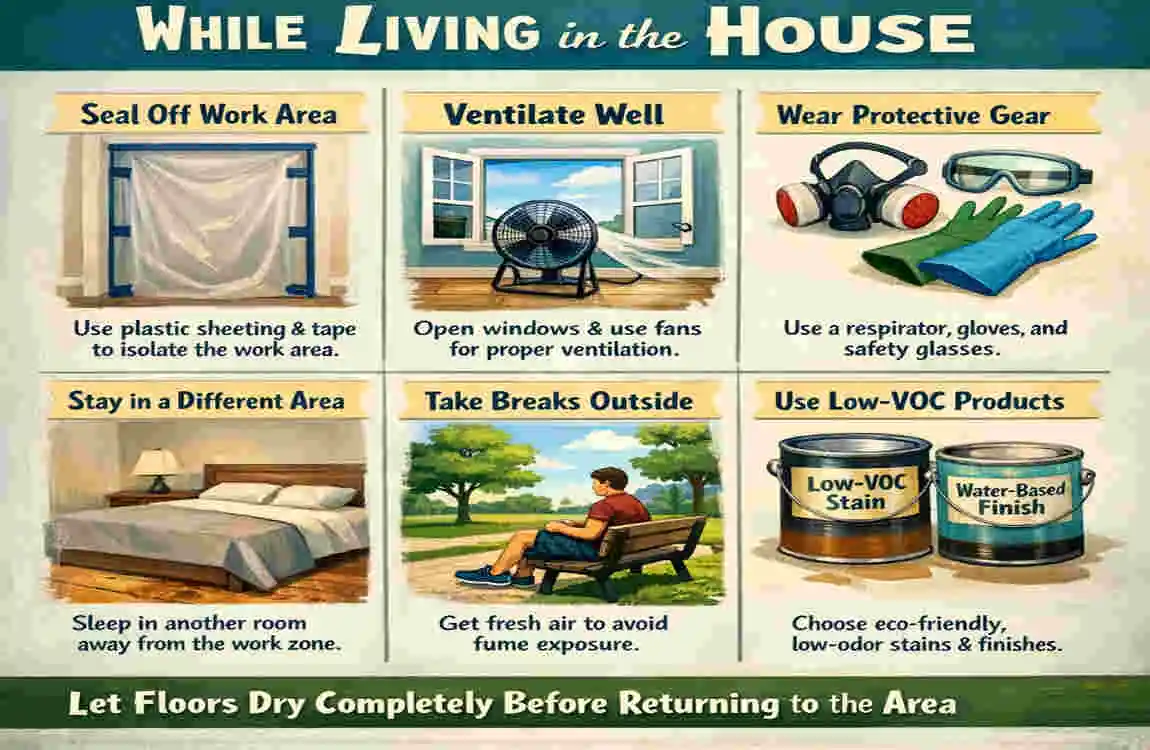
- Water-Based Polyurethane: Stick to water-based. It dries fast and doesn’t smell like a chemical factory.
- Lambswool Applicators or T-Bars: For spreading the finish smoothly.
- Respirators: Get a good N95 mask or a half-face respirator. Your lungs will thank you.
Budget Note: Expect to spend about $800 for startup costs if you are tackling a few rooms. Rentals usually run about $50-$70 per day, depending on the machine.
Preparation: Minimizing Disruption
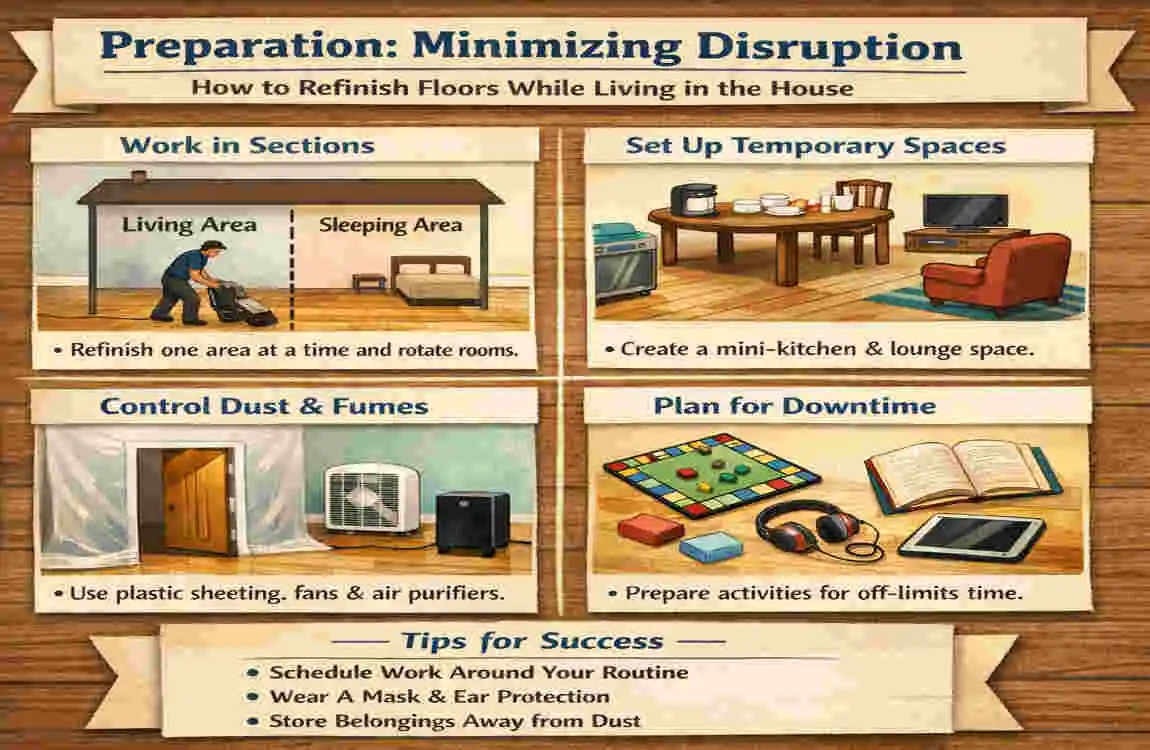
If you want to know the secret to refinishing floors while living in a house without losing your mind, it is all in the preparation. You need to plan this like a military operation.
Refinishing creates dust and noise. While we can minimize the dust, the noise is inevitable. Here is your battle plan for prepping a room while life goes on in the rest of the house.
The “Furniture Tetris”
Choose your first target room. Ideally, pick a room that isn’t critical to your daily Survival, like a guest room or a formal dining room. You don’t want to start with the kitchen or the only hallway to the bathroom.
Move all furniture out of that room. If you are tight on space, push furniture into the center of an adjacent room and cover it with heavy drop cloths. If your house is packed, consider renting a portable storage pod for a week in your driveway.
Seal the Zone
This is the most important step for your health. You need to seal the room you are working in hermetically.
- Tape heavy plastic sheeting over every doorway leading into the house.
- Tape plastic over HVAC vents in the room. You do not want sawdust getting sucked into your furnace and blown into your bedroom.
- Pro Tip: Create negative air pressure. Put a box fan in a window, facing outward. Seal the space around the fan with plastic. When you turn it on, it sucks air (and dust) out of the room, preventing it from drifting into the rest of your house.
Inspection and Repair
Before you bring in the heavy machines, get down on your hands and knees.
- Hammer down nails: Any protruding nail head will instantly rip the expensive sandpaper on the drum sander.
- Fill the gaps: Use a stainable wood filler to patch cracks or holes.
- Clean: Vacuum the floor thoroughly. Debris can cause deep scratches once the sanding starts.
Family Tips: If you have pets or small children, this is the time to make a plan. The noise of a drum sander is terrifying to dogs. Can they stay with a friend? If not, keep them in the furthest room possible or outside during sanding hours. Also, stock up on paper plates and plastic utensils—nobody wants to do dishes when the house is in “work Mode.”
Step-by-Step Sanding Process
Now we get to the core of the work. Sanding is what scares people, but it is just a process of patience. Since you are living in the house, we will break this into stages to keep the mess manageable.
Rough Sand (36-60 Grit)
Start with the drum sander. Load it with coarse sandpaper (usually 36 or 40 grit). This stage is about removing the old finish and leveling the wood.
Walk slowly and steadily with the grain of the wood. Never stop moving while the drum is lowered, or you will gouge a valley into your floor.
It will look rough. That is okay. You are stripping away decades of wear. Remember to empty the dust bag when it is 1/3 full. If it gets too full, the machine loses suction, and dust starts flying into your air.
The Edging Workout
While you rest your back from the drum sander, grab the edger. This machine is heavy and requires you to be hunched over, but it’s essential.
Sand the perimeter of the room where the drum sander couldn’t reach. Use the same grit you used on the drum. Blending the edge with the main floor is an art form—take your time.
Medium Sand (80-100 Grit)
Switch the paper on both machines to a medium grit (60 or 80). Repeat the entire process.
This pass removes the deep scratches left by the rough sanding. You will start to see the raw, beautiful wood emerge.
Pro Tip: If your floor is very uneven, some pros recommend doing a pass on a slight diagonal (about 15 degrees) to flatten it out, then going straight with the grain.
Final Buff (120+ Grit)
This is where the magic happens. The drum sander can leave “chatter marks” (little ripples). To fix this, use a large orbital floor buffer with a sanding screen (100 or 120 grit).
This polishes the wood and blends the edges with the center field. After this step, your floor should feel as smooth as a baby’s skin.
Dust Management: Once sanding is done, let the dust settle for an hour. Then, vacuum. Vacuum the floor, the walls, the window sills, and even the ceiling fan blades. Any dust left behind will end up stuck in your finish.
Staining and Finishing Safely
This is the moment of truth. You have raw, clean wood that needs to be protected. Because you are occupying the home, water-based polyurethane is your best friend.
Unlike oil-based finishes, which off-gas toxic fumes (VOCs) that can linger for weeks and yellow over time, water-based poly is low-odor and dries crystal clear.
The Ultimate Clean
Vacuum again. Then, use a tack cloth (a sticky cheesecloth) to wipe up the microscopic dust. If you skip this, your floor will feel like sandpaper when it dries.
Staining (Optional)
If you want to change the color, apply your stain now. Work in small sections. Wipe it on, let it penetrate for a minute, and wipe off the excess.
Warning: Stain takes longer to dry than the finish. Read the can. You should sleep in a different room or stay off the floor for 24 hours. If you can love the wood’s natural color, skipping stain saves you a whole day.
Sealing with Poly
Pour a line of polyurethane along the wall (with the grain). Use your lambswool applicator or T-bar to “snowplow” the liquid across the floor.
- Don’t overwork it: Spread it and leave it.
- Plan your exit: Don’t paint yourself into a corner. Make sure you end at the doorway!
Apply 2-3 coats. Water-based poly dries fast—often in 4-6 hours. This means you can apply a coat in the morning and another in the afternoon.
Living in the House Tip: Apply the final coat in the evening before bed. Turn on your exhaust fans, close the door, and go to sleep. By morning, it will be dry enough for socks (no shoes!).
Room-by-Room Strategy
The logistical puzzle of how to refinish floors while living in a house is solved by phasing. Do not try to do the whole house at once unless you like sleeping in your car.
Here is a strategic order of operations:
The “Spare” Rooms (Guest Room, Office) Start here to practice your technique. If you make a mistake, it’s better to do it under the guest bed than in the middle of the living room.
- Disruption: Low.
- Timeline: Days 1-3.
The Bedrooms. Do these one at a time. Move the mattress into the living room for a few nights—think of it as a “camping adventure” for the kids.
- Disruption: Medium.
- Timeline: Days 4-7.
The Hallways and Living Areas. This is the hardest part. You effectively cut off the flow through the house. Do this over a weekend when you can be out of the house as much as possible.
- Disruption: High.
- Timeline: Days 8-14.
The Kitchen Save this for last. It’s the hub of the home. You will need to set up a temporary kitchenette in the dining room or order takeout for a few days.
Here is a checklist for your timeline:
Room TypeEst. DaysDisruption LevelStrategy
Guest/Office 1-3 Low Perfect for learning the tools.
Bedrooms 4-7 Medium Rotate sleeping arrangements.
Main/Hall 8-14 High Requires strict “no walk” zones.
Common Mistakes and Fixes
Even with the best plans, things can go sideways. Here are common pitfalls for DIYers in occupied homes and how to avoid them.
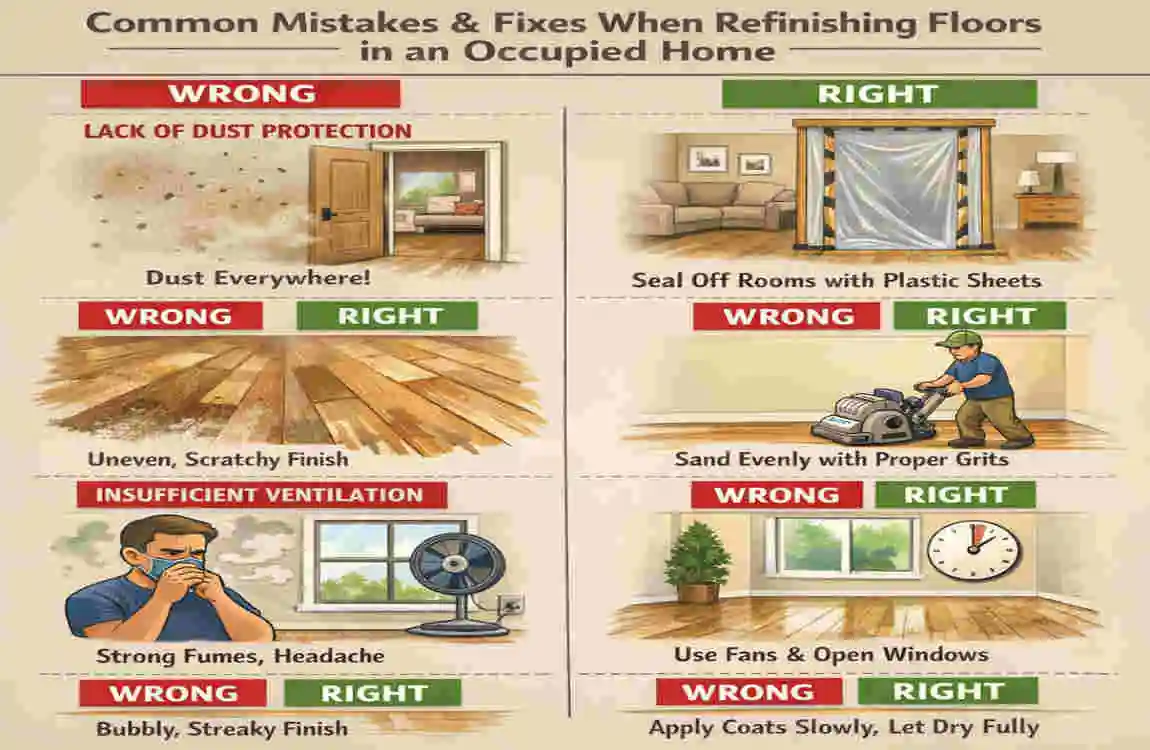
- Skipping the Dust Barriers:
- The Mistake: Thinking “I’ll just close the door.”
- The Consequence: A fine layer of dust covers your toothbrush and kitchen counters.
- The Fix: Use extra plastic and tape. If you think you have enough tape, use more.
- Rushing Dry Times:
- The Mistake: Walking on the floor too soon because you need to get to the fridge.
- The Consequence: Sock prints are permanently embedded in the finish.
- The Fix: Use a humidity meter. If it’s humid, it takes longer. Wait until it is non-tacky to the touch.
- Uneven Sanding (The “Divot”):
- The Mistake: Pausing the machine in one spot.
- The Consequence: A visible dip in the floor.
- The Fix: Practice on a piece of plywood first. Always keep the sander moving.
Cost Breakdown and Savings
Let’s look at the numbers. This is usually the part that convinces people to pick up the sander.
For a typical 400-square-foot living room and hallway:
ItemDIY Cost (Approx.)
Tool Rentals (Sander, Edger, Buffer) $400
Sandpaper & Pads $100
Stain & Polyurethane $150
Plastic, Tape, Safety Gear $50
Total DIY Cost $700
Professional Cost $3,000+
Your Savings: Approximately $2,300.
That is enough to buy a new sofa for your beautiful new floors! Plus, refinished hardwood floors are a massive ROI (Return on Investment), boosting your home value by 5-10%.
FAQs
Can I refinish one room at a time while living in the house? Yes, absolutely. This is the best method for occupied homes. Just ensure you seal the doorway completely with plastic to prevent dust migration.
How long do I have to stay off the new floors? With water-based polyurethane, you can usually walk on it with socks after 4-6 hours. Wait 24 hours for light furniture and 72 hours before putting down heavy area rugs or allowing dogs back in.
What is the best finish for kids and pets? High-traffic water-based polyurethane is ideal. It is harder than an oil-based finish and doesn’t yellow. Look for “commercial grade” or “traffic” formulas for extra durability against dog claws.
Will the dust ruin my electronics? It can if you aren’t careful. Cover TVs and computers with plastic, even if they are in a different room. Fine dust travels.