Have you ever stopped to think about the environmental impact of the home you live in? As climate concerns continue to rise, more and more people are looking for sustainable, earth-friendly ways to put a roof over their heads. If you want to take action and drastically reduce your environmental impact, learning how to build a mud house might be the most empowering project you ever take on.
In fact, building a home out of earth can reduce your carbon footprint by an astonishing 90% compared to traditional concrete construction. That is a massive win for the planet! But the benefits do not stop there.
Welcome to the ultimate DIY guide on building your very own mud house. Whether you are looking to create a quiet backyard retreat, a fully functional off-grid home, or a sustainable sanctuary, this guide has you covered. Mud houses are not only incredible for the environment, but they are also highly cost-effective, often coming in at under $50 per square foot.
The Incredible Benefits of Mud Houses

If you are going to invest your time and energy into learning how to build a mud house, you need to know exactly what makes these structures so special. The advantages go far beyond just saving a few dollars. Let’s explore why mud houses are making such a massive comeback in the modern eco-conscious world.
Slashing Emissions with Local Soil
When you build a conventional house, trucks burn thousands of gallons of diesel fuel transporting heavy steel, concrete, and lumber across the country to your site. With a mud house, your primary building material is literally right beneath your feet.
By using the local soil found on your own property, you completely slash transportation emissions and delivery costs. You dig up the earth, mix it on-site, and build your walls. It is the purest form of local sourcing, making your construction process incredibly gentle on the environment.
Superior Thermal Mass for Natural Cooling
Have you ever noticed how a basement stays wonderfully cool even on the hottest summer afternoon? Mud houses operate on that exact same principle. Earth is a dense material with excellent thermal mass. This means it absorbs heat slowly during the hot day and releases it slowly during the cool night.
If you live in a region with scorching summers, like Punjab, a mud house can keep your interior temperatures naturally 10 to 15 degrees Celsius cooler than the outside air. You can easily stay comfortable without relying heavily on energy-draining air conditioning systems. It is nature’s perfect climate control!
Fully Biodegradable and Renewable Living
Think about what happens to an abandoned concrete building. It crumbles into an ugly, toxic mess that pollutes the land for centuries. Mud houses offer a beautiful contrast.
Because you build them from soil, sand, straw, and water, they are entirely biodegradable. If you ever decide to tear down a mud house, the materials return to the earth without leaving a trace of pollution. This closed-loop lifecycle makes earth-building the greenest, most renewable option for anyone pursuing a truly sustainable lifestyle.
Essential Materials Needed for Your Mud House
One of the greatest joys of learning how to build a mud house is the simplicity of the materials. You do not need to navigate complex hardware store aisles or buy toxic chemicals. You need a few natural ingredients and some basic tools.
The Core Ingredients
To create a strong, durable mud mixture (often called cob or adobe), you need a specific recipe. Here is what you will gather:
- Clay-Rich Soil: You need soil that contains about 30% to 50% clay. The clay acts as the natural glue that holds your bricks together.
- Sand: Sand provides the structural backbone. Without sand, your clay will shrink and crack as it dries.
- Straw: You will mix in about 5% to 10% straw. Think of straw as nature’s fibreglass or rebar. It binds the wet mud together and gives the bricks incredible tensile strength so they do not snap under pressure.
Important Reinforcements
To make your mud house durable against weather and natural disasters, you need a few extra items:
- Bamboo: This fast-growing, highly renewable wood is incredibly flexible and strong. You will use it within the walls and roof to provide earthquake resistance.
- Wire Mesh: You will use this primarily in the foundation to add structural integrity where the house meets the ground.
- Lime Plaster: Unprotected mud will eventually wash away in heavy rain. Lime plaster is a natural, breathable coating that waterproofs your exterior walls while letting moisture escape.
Basic Tools and Budgeting
You do not need heavy machinery to build your dream eco-home. Your basic toolkit will consist of sturdy shovels, wooden moulds for your bricks, heavy-duty tarps, and a couple of wheelbarrows. You can easily purchase this entire starter kit for under $200.
Smart Site Selection for Your Mud House
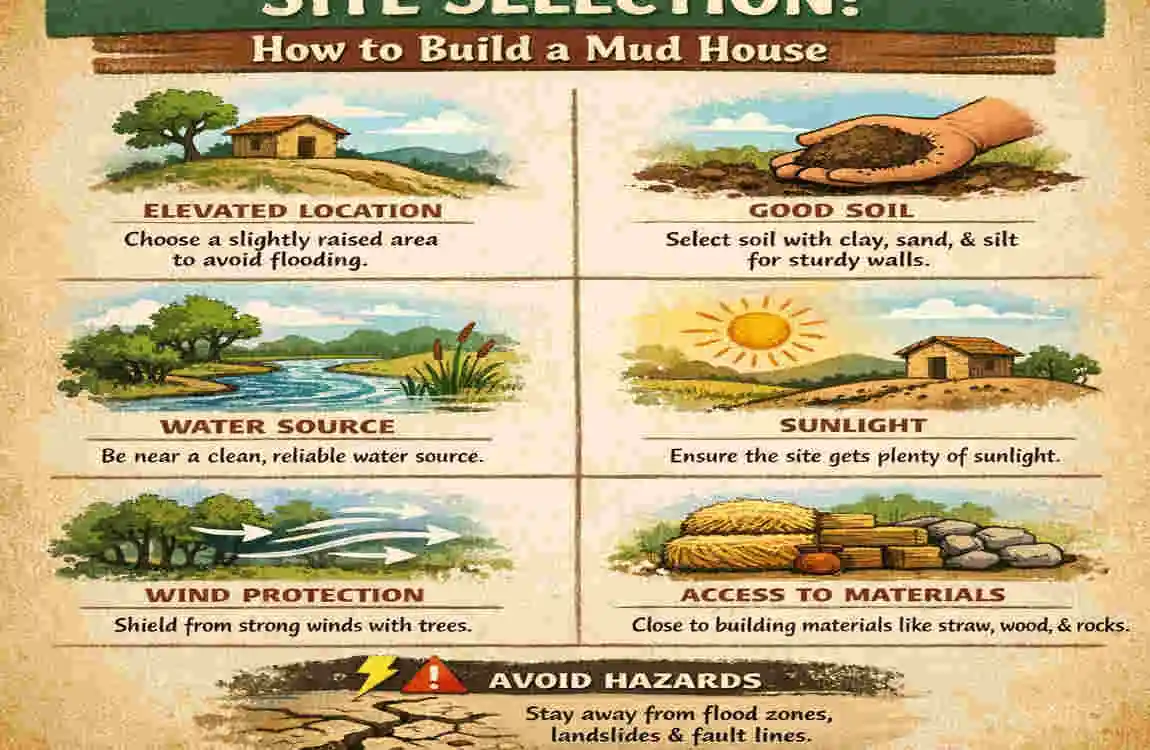
Before you mix a single batch of mud, you need to decide exactly where your house will sit. Site selection is a critical step in learning how to build a mud house that lasts a lifetime.
Elevation and Drainage
Water is the natural enemy of a mud house. Therefore, you must choose an elevated piece of land that drains exceptionally well. Avoid the bottom of hills or natural valleys where rainwater pools.
If you are building in an area prone to heavy monsoons, like the rainy regions of Punjab, good drainage is not just helpful—it is vital for the Survival of your home. You want gravity to pull water away from your foundation instantly.
Passive Solar Orientation
You can harness the power of the sun to heat and cool your house naturally by orienting it correctly. If you live in the Northern Hemisphere, face the longest side of your house (and the majority of your windows) to the South.
This allows the low winter sun to shine into your home and warm up your thermal mass walls. In the summer, when the sun is high in the sky, a simple roof overhang will block the harsh rays, keeping the house deep in the shade and naturally cool.
Seismic Safety Checks
If you live in an earthquake-prone area, your site selection needs a seismic check. Always choose flat, stable ground. Avoid building your mud house on loose, sandy soils or on slopes greater than 15 degrees. Flat, compact earth ensures your foundation remains solid when the ground starts to shake.
Making Perfect Mud Bricks
Now comes the fun part! The foundation of learning how to build a mud house lies in making excellent, sturdy bricks. Get ready to roll up your sleeves and get your hands dirty.
Mixing the Magic Ratio
The standard recipe for strong mud bricks is a 4:2:1 ratio. That means four parts soil, two parts sand, and one part straw.
You will combine these dry ingredients on a large tarp or in a shallow pit. Slowly add water while mixing everything together. The goal is to achieve the consistency of thick, chunky peanut butter. It should hold its shape when you squeeze a handful, but it should not be so wet that water drips through your fingers.
The Moulding Process
Once your mix is ready, grab your wooden moulds. A standard mould size is 12 inches long, 6 inches wide, and 4 inches deep.
Place the mould on flat ground, grab a big clump of your wet mud mix, and slam it down into the mould. Push it firmly into the corners to ensure there are no air pockets. Scrape a flat board across the top to level the brick, and then carefully pull the wooden mould straight up. You have just made your first brick!
Drying and Curing
You cannot use wet bricks to build walls. You need to let them dry slowly under a shaded canopy for 2 to 4 weeks. Why shade? If you bake them directly in the hot sun, the outside dries too fast while the inside stays wet, leading to deep structural cracks.
Turn the bricks on their sides after a few days to ensure even airflow. For a cozy 500-square-foot home, you can expect to yield about 1000+ bricks from this process.
Stabilising for Durability
If you want to make your bricks exceptionally durable, you can stabilise the mixture by adding about 5% hydrated lime to your mud mix before moulding. The lime reacts with the clay to create a pseudo-cement that holds up beautifully to moisture.
Common Mistake to Avoid: Never skip the straw! Beginners often leave out the straw because it makes the mixing process harder. Without straw, your bricks possess zero tensile strength and will easily crack under the heavy weight of the roof.
Pouring a Solid Foundation
A wise builder once said that a mud house needs “a good pair of boots and a good hat.” The boots are your foundation. Learning how to build a mud house correctly means keeping the raw mud far away from the damp ground.
Digging the Trench
Start by marking out the footprint of your home. Dig a trench along the perimeter that is at least 2 feet deep. This gets you below the soft topsoil and down to a firm, compact base.
Laying the Concrete or Stone Base
Because mud walls are incredibly heavy, your foundation needs to support a massive load. In wet areas, build a base of stone or concrete that is two bricks wide. You want to weave wire mesh into this base layer to tie the whole perimeter together, preventing the foundation from pulling apart over time.
Creating a Seismic Centre
If you live in a seismic zone, you must pour a reinforced concrete centre within the foundation trench. This acts as a rigid spine for your home. When the earth shifts, the reinforced foundation moves as one solid unit, drastically reducing the chances of settling cracks creeping up your beautiful walls.
Curing and Elevation
Let your foundation cure completely for at least 7 days before you begin laying bricks.
The most important part of this step is ensuring your stone or concrete foundation extends 1 to 2 feet above the ground level. This elevation (your house’s “boots”) ensures that rain splashing off the ground or minor flooding will hit hard stone, rather than dissolving your bottom layer of mud bricks.
Building the Mud Walls
With your foundation set, it is time to see your home rise from the ground. Building the walls is an incredibly rewarding part of learning how to build a mud house.
The Running Bond Pattern
You will stack your dried mud bricks just like a professional mason stacks standard bricks. Use a running bond pattern, where you stagger the vertical joints of each row.
Think of how Lego pieces interlock like a jigsaw puzzle. By staggering the joints, the weight is distributed evenly across the wall, giving your house immense load-bearing strength.
Applying the Mud Mortar
You do not use cement mortar between mud bricks. Cement is too rigid and will actually crack the softer mud. Instead, you make a mud slurry mortar. Mix soil and sand at a 1:3 ratio, add water until it resembles thick yogurt, and slather it between your brick courses. The mud mortar bonds perfectly with the mud bricks, drying into one monolithic structure.
Bamboo Reinforcements for Earthquakes
As you build the walls higher, you must integrate your seismic defences. Every three courses (rows) of bricks, lay down long strips of split bamboo horizontally along the mortar line.
This bamboo grid acts like a flexible net inside your walls. If an earthquake strikes, the bamboo prevents the mud blocks from shaking apart and collapsing. It is a brilliant, low-cost way to ensure safety.
Tapering for Stability
Plan to build your walls about 8 to 10 feet high. For maximum stability, you should taper the walls. Start with a thick base—perhaps 18 inches wide at the bottom—and gradually taper the width as you move up, ending at about 6 inches wide at the top.
This lowers the centre of gravity of your walls, making them virtually impossible to tip over. Furthermore, incorporating plus-shaped room designs or intersecting interior walls boosts your home’s structural rigidity and promotes excellent cross-ventilation.
Crafting the Roof and Openings
Your walls are up, and your home is taking shape! Now you need to protect those walls with a “good hat”—a strong, overhanging roof.
Framing the Roof
You want to keep your roof as lightweight as possible to minimise top-heavy stress during an earthquake. Build a sturdy frame using whole bamboo poles or sustainably harvested wood.
Securely attach the rafters to the top of your mud walls. For the roof covering, you can use traditional thatch, metal sheeting, or mud-plastered rafters, depending on your budget and climate.
Sloping for Rain Runoff
Water must exit your roof quickly. Ensure your roof features at least a 30-degree slope to promote rapid rain runoff. Crucially, build a deep overhang that extends 2 to 3 feet past the exterior walls. This overhang acts like an umbrella, preventing driving rain from washing away your mud plaster.
Designing Arched Doors and Windows
When planning how to build a mud house, you have to think about airflow. Aim to dedicate 10% to 20% of your total wall area to windows and doors to allow for a cooling cross-breeze.
Instead of flat, square window frames, try building arched openings! Arches are structurally superior in earth building because they distribute the heavy weight of the mud above them down to the sides, removing the need for expensive, heavy lintels.
Flexible Earthquake Ties
When attaching your roof frame to the mud walls, do not use rigid steel bolts. Use flexible bamboo ties or strong natural ropes. During a tremor, you want the roof to have a slight amount of “give.” If it is bolted down too tightly with steel, the rigid shaking forces will tear the top of your mud walls completely off. Flexibility saves structures!
Advanced Earthquake-Proofing Techniques
Safety should always be your top priority. If you are learning how to build a mud house in an active seismic zone, pay close attention to these advanced strengthening techniques.
Boosting Shear Strength
Earthquakes destroy houses through shear forces—lateral shaking that tears walls side to side. By combining your deep, reinforced foundations with the horizontal bamboo grids we discussed earlier, you can increase your wall’s shear strength by a massive 50%. The mud provides the compressive strength to hold the roof up, while the bamboo provides the tensile strength to resist the shaking.
Uniformity and Lightness
Keep your architectural design simple. Uniform, symmetrical walls distribute earthquake stresses evenly. If you have one massive wall and one flimsy wall with too many windows, the twisting forces will destroy the weaker side. Pair symmetrical walls with a highly lightweight roof to minimise the dangerous swaying effect at the top of the house.
Retrofitting Old Structures
Do you already have an older mud house? You can still protect it! Modern engineers recommend retrofitting old structures by wrapping the exterior in polypropylene loops or heavy-duty wire mesh, then plastering over it. This creates a hidden, high-tension net around the house.
These exact tested designs and retrofitting techniques have allowed simple mud structures to survive massive 7.0 magnitude quakes in high-risk seismic zones!
Finishing Touches and Long-Term Maintenance
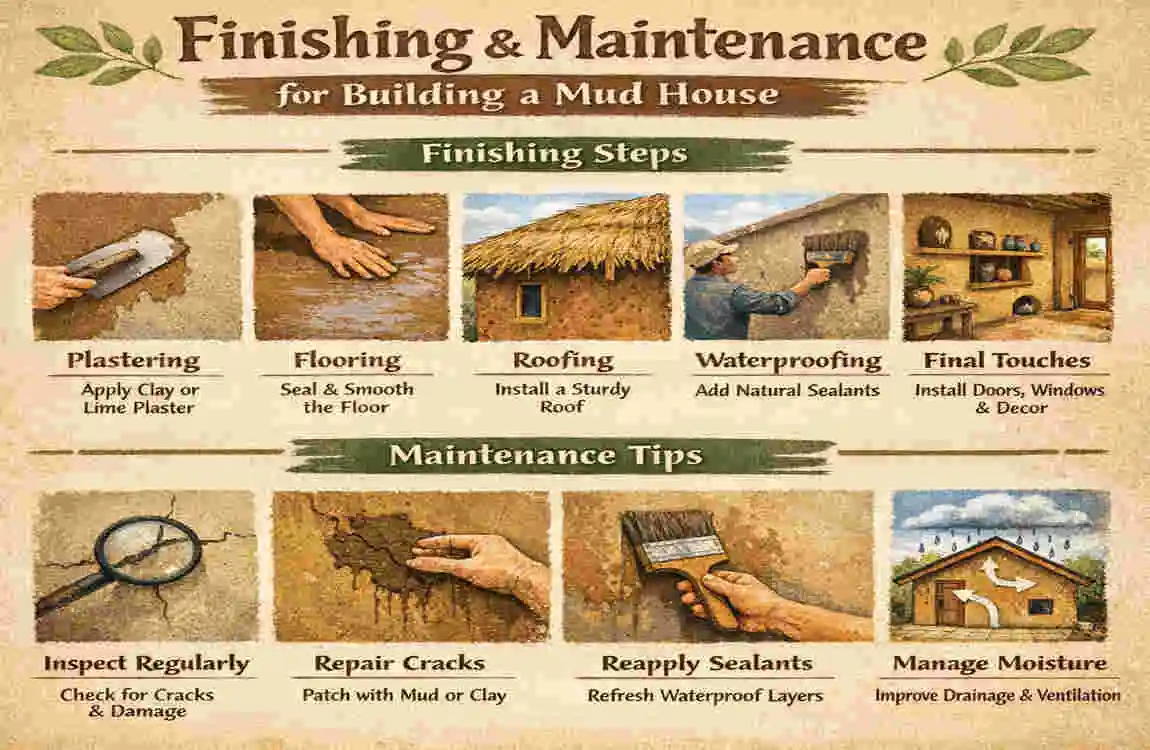
Your house is built, but it is not quite finished. To make your home beautiful and weather-proof, you need to master the art of natural plastering.
The Magic of Lime-Mud Plaster
Do not leave your raw mud bricks exposed to the elements. You must protect them by applying a breathable lime-mud plaster. Mix fine sifted earth, sand, and hydrated lime. Apply this mixture in three thin coats.
The lime chemically sets to form a hard, water-resistant limestone shell. Because it breathes, any moisture that gets trapped inside your walls can easily evaporate outward, preventing dangerous mould growth.
Natural Aesthetics
You do not need toxic chemical paints to make your house look stunning. You can mix natural mineral pigments directly into your final coat of plaster to achieve beautiful, earthy tones like warm terracotta, soft ochre, or pale yellow.
Easy Annual Maintenance
Learning how to build a mud house also means learning how to maintain one. Every year, preferably after the rainy season, walk around your home and look for minor plaster cracks. Rub a little wet mud and lime into the cracks to seal them back up.
Make sure to protect the base of your walls by maintaining a thick layer of gravel around the exterior foundation to prevent rain from splashing up. With these simple maintenance routines, your mud house will easily boast a lifespan of 50+ years!
Common Mistakes and Pro Tips for Success
Even with the best intentions, first-time builders often run into a few predictable hurdles. Keep these essential tips in mind to ensure your project goes off without a hitch.
Beware the Thin Foundation
The most devastating mistake you can make is pouring a thin, shallow foundation, especially if you live in a region that sees heavy rain. Never underestimate water. If you are in doubt, double the depth of your foundation trench. It is better to over-engineer your base than to watch your walls slowly sink and crack.
Know Your Limits: DIY vs. Hiring Labour
If you are building a small garden shed or a tiny meditation room, tackling the project completely solo is a fantastic, rewarding experience. However, if you are planning a full-sized family home, mixing thousands of bricks by hand will quickly break your back.
Do not hesitate to hire local labourers for the heavy mixing and heavy lifting phases. You act as the project manager, ensuring the quality of the mix, while preserving your physical energy for the precision work of wall building.
Watch and Learn
Before you dig your first hole, spend time educating yourself. Watch detailed video tutorials from experienced builders. Seeing the texture of the mud and the rhythm of the work visually is incredibly helpful when learning how to build a mud house from scratch.
Frequently Asked Questions (FAQs)
How long does it take to build a mud house? If you have a couple of friends helping out and decent weather, a highly motivated DIY team can complete a small mud house in about 30 to 60 days. The longest wait time is simply allowing your thousands of mud bricks to cure in the shade before you start stacking walls fully.
Is a mud house really earthquake-proof? Yes, but only if you design it correctly! A pile of unreinforced mud bricks will collapse. However, when you integrate a reinforced concrete foundation, horizontal bamboo grids, and flexible roof ties, your home gains immense shear strength, allowing it to withstand major seismic activity safely.
What is the average cost of a mud house in Pakistan? For a spacious 1000-square-foot home built with local labour and standard natural materials, you can expect to spend between PKR 2 Million and 5 Million, depending on how elaborate your roof and interior finishings are.
Can I build a mud house in an urban area like Lahore? Absolutely! You will need to check with local zoning boards and secure the proper building permits. In urban environments, many builders opt for hybrid designs—using concrete frames for city code compliance, but filling the walls with eco-friendly mud blocks for maximum insulation and sustainability.