If you have ever dreamed of building a home that feels natural, affordable, and deeply connected to the land, learning how to make a cob house is a great place to start.
| Step | What You Do | Key Points |
|---|---|---|
| Plan & Design | Choose location, size, layout, and orientation of the house. | Check local building codes, plan for drainage, sun, wind, and access. |
| Prepare Site & Foundation | Clear the site, level the ground, and build a stone, rubble trench, or concrete foundation. | Foundation must be above ground level, stable, and well‑drained to keep cob dry. |
| Mix Cob | Combine clay soil, sand, water, and straw and mix (by feet or mixer) until cohesive. | Typical cob is about 1 part clay to 2–3 parts sand with straw for tensile strength. |
| Build Walls | Lay cob in “lifts” (layers), compress by hand/foot, and let it stiffen before adding more. | Build thick walls, leave openings for doors/windows, and add lintels over openings. |
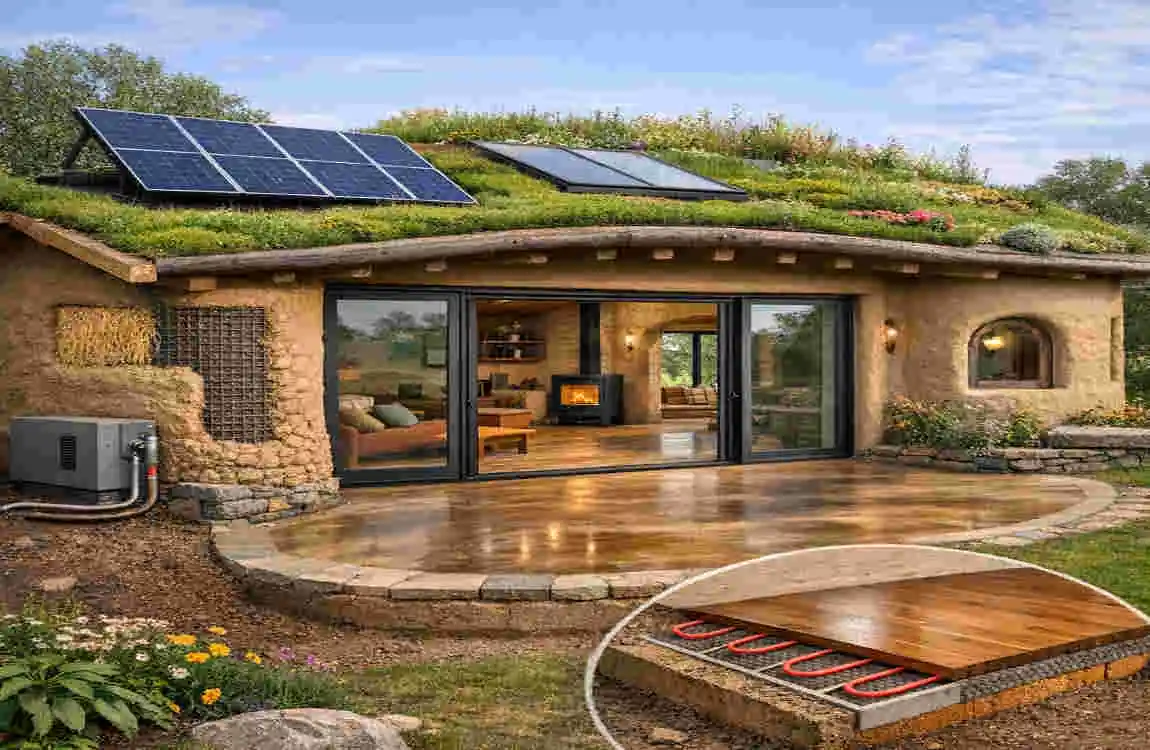
| Add Roof Structure | Install beams/rafters and build a roof (metal, tiles, thatch, etc.). | Roof should have good overhangs to protect walls from rain. |
| Floors & Interior | Create earthen or other floors and shape niches, shelves, and built‑in furniture in cob. | Earthen floors often use compacted subfloor, insulation layer, and clay finish. |
| Plaster & Finish | Apply earthen or lime plasters to protect walls, then add natural paints if desired. | Breathable plasters help manage moisture and extend wall life. |
Cob houses are becoming popular again because people want simpler and more sustainable ways to build. These homes use earth-based materials, making them eco-friendly, low-cost, and often very beautiful. They also hold heat well, which can help create a comfortable indoor space in many climates.
What Is a Cob House?
Definition of Cob Construction
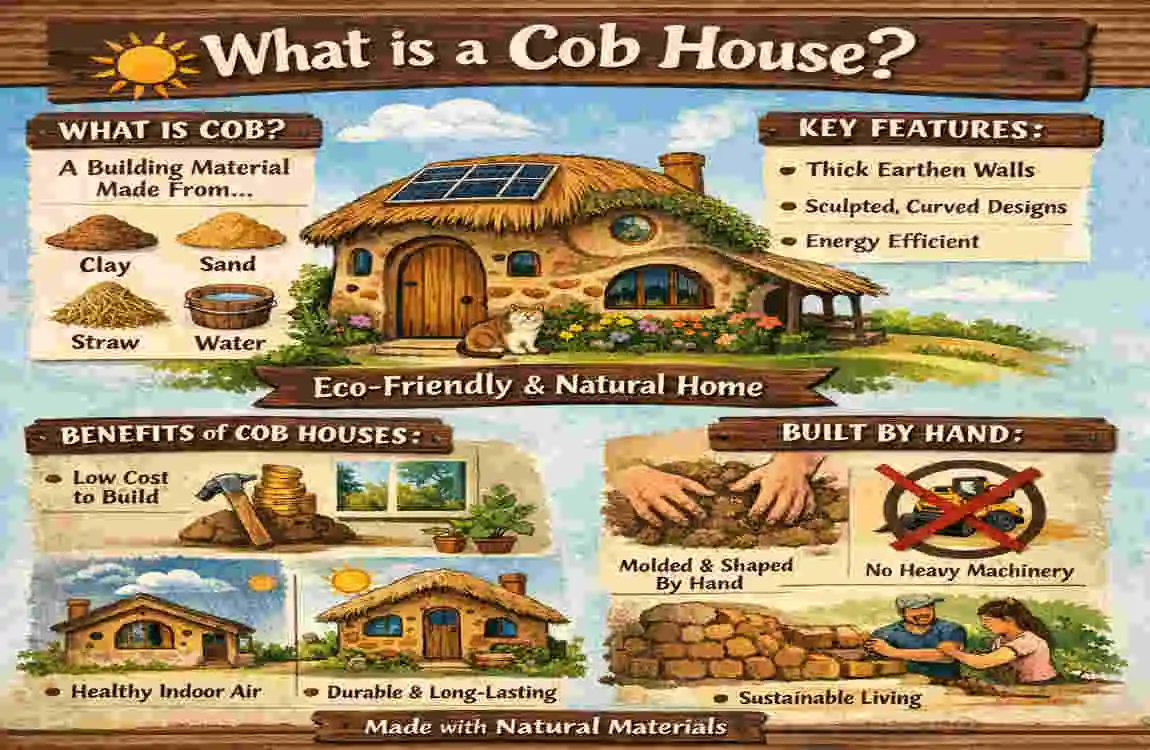
Cob is a natural building material made from clay, sand, straw, and water. These ingredients are mixed until they form a thick, moldable material. Builders then shape it by hand into walls.
Unlike brick or concrete homes, cob houses do not need forms, molds, or heavy machinery. The material is simple, but the results can be strong and long-lasting when built correctly.
History of Cob Homes
Cob has been used for a very long time. It appeared in many regions, including England, Africa, and the Middle East. People used local soil and plant fibers to create homes that matched their environment.
This old building style still matters today because it shows that simple materials can make durable homes.
Benefits of Cob Houses
Cob homes offer several clear advantages:
- Eco-friendly and biodegradable
- Affordable compared to many modern building methods
- Fire-resistant when built properly
- Great thermal mass, which helps regulate indoor temperature
- Creative design freedom for curves, niches, and natural shapes
Potential Drawbacks
Cob is not perfect for every project. It can be labor-intensive, and the walls take time to dry. In some places, local building codes may also create challenges. That is why planning matters so much.
Is Building a Cob House Legal?
Before you begin, check the rules in your area. This step is important and should not be skipped.
Local Building Codes and Permits
Building rules vary from one place to another. Some areas welcome alternative housing, while others have stricter limits. Contact your local building office before you start.
Zoning Requirements
Zoning laws may affect where you can build. Rural areas often offer greater flexibility, while urban areas may impose more restrictions.
Engineering and Safety Approvals
Some projects may require inspections or engineering approval, especially if you live in an area with earthquakes, heavy rain, or strong winds. Safety should always come first.
Insurance Challenges
Some insurance companies may not fully understand cob homes. They may treat them as alternative structures, so it is smart to ask questions early.
Materials Needed to Make a Cob House
Essential Cob Ingredients
To make cob, you need:
- Clay soil
- Sharp sand
- Straw
- Water
The right mix is very important. Too much clay can cause cracking. Too much sand can weaken the walls.
Additional Building Materials
You will also need:
- Gravel or stones for the foundation
- Wood for roof framing
- Lime or clay plaster for finishing
- Doors and windows
- Fasteners and supports for structural work
Tools Required
Basic tools include:
- Shovels
- Wheelbarrows
- Buckets
- Tarps
- Measuring tape
- Level tools
How to Test Soil for Cob
A simple jar test can help you check your soil. Mix soil with water in a jar, shake it, and let it settle. You can then see how much sand, silt, and clay you have.
A good cob mix usually has a balanced amount of clay and sand. If the soil is too clay-heavy, add sand. If it is too sandy, add more clay-rich soil.
Choosing the Right Location
Importance of Drainage
Cob walls do not like standing water. Pick a site with good drainage and avoid flood-prone areas. This is one of the most important parts of cob house foundation planning.
Sunlight and Orientation
If possible, place your home where it can get good sunlight. South-facing windows can help warm the home naturally in cooler months.
Access to Materials
A site near your materials can save time and money. Local soil, straw, and stone reduce hauling costs and keep the project more sustainable.
Soil Stability
Your house needs strong ground support. Soft or unstable soil may create settling problems later.
Designing Your Cob House
Decide on House Size
Start with a size that fits your budget, space, and labor. A tiny cob house is easier for beginners, while a larger family home takes more time and help.
Create a Floor plan
Simple floor plans work best. Open layouts are common in cob homes because they make the space feel larger and easier to build.
Window and Door Placement
Place windows where you want light and airflow. Doors and windows should also work with the wall shape and roof design.
Roof Design Considerations
A cob house needs a roof with wide overhangs. This helps protect the walls from rain and moisture.
Energy-Efficient Design Tips
Use thick walls, strategically placed windows, and natural sunlight to improve comfort. Cob’s thermal mass helps keep temperatures more stable inside.
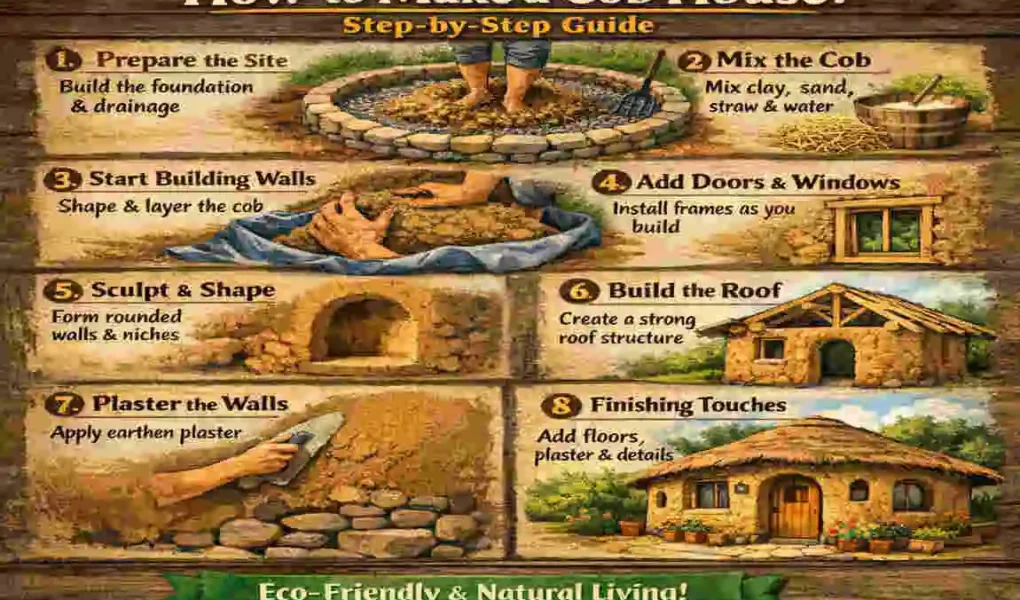
Step-by-Step Guide on How to Make a Cob House
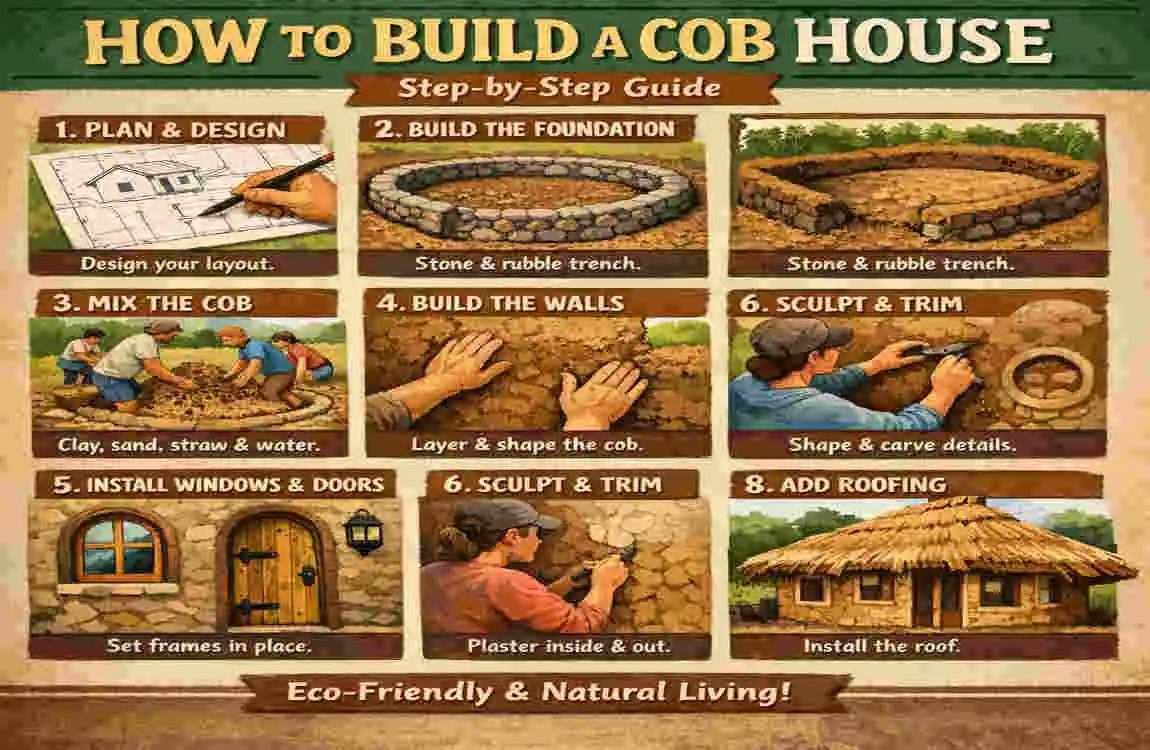
Prepare the Site
Clear the ground of plants, rocks, and debris. Then level the area so the foundation can sit evenly.
Build the Foundation
A cob house should sit on a raised foundation. This keeps the walls away from ground moisture.
Common options include:
- Gravel trench foundations
- Stone foundations
- Rubble trench bases
The goal is simple: keep water out and support the weight above.
Mix the Cob
Mix clay, sand, straw, and water until the material feels thick and firm. Many builders use their feet to mix it on a tarp, though mechanical mixing can also work.
A good mix should feel like stiff dough. It should hold its shape without being too wet.
Start Building the Walls
Build the walls in layers. Let each layer firm up before adding more. This helps the structure stay stable.
For most homes, cob walls are often 18 to 24 inches thick. This gives the house strength and helps with insulation.
Let the Walls Dry
Drying takes time. Weather, wall thickness, and climate all affect the process. Do not rush this step, because trapped moisture can cause cracking.
install Doors and Windows
Use wooden frames for doors and windows. These frames should be placed carefully so the wall can support them properly.
Build the Roof
A strong roof is essential. The roof should extend well beyond the walls to protect them from rain. This is one of the best ways to help a cob home last longer.
Apply Plaster and Finishing
Plaster helps protect the walls and gives them a smooth finish. Lime plaster is often used because it breathes well and offers good protection. Clay plaster can also be used in interior spaces.
Add Flooring and Interior Features
Many cob homes use earthen floors or other natural flooring. You can also build shelves, benches, and curved niches into the walls for a warm, handmade look.
How Much Does It Cost to Make a Cob House?
The cost depends on the size of the home, local materials, and how much labor you do yourself.
Average Cost Breakdown
Item Possible Cost Area
Foundation Gravel, stone, trench work
Roof Framing, sheeting, overhangs
Windows and doors , frames, glass, and hardware
Utilities : plumbing, wiring, heating
Finishes : plaster, flooring, paint
Ways to Save Money
You can save by using:
- Local soil and straw
- Recycled windows and wood
- DIY labor
- Simple designs
- Small house plans
Cob can be affordable, but only if you plan carefully.
Common Mistakes to Avoid
Using Incorrect Soil Ratios
Too much clay causes cracks. Too much sand makes weak walls. Test the soil before building.
Poor Drainage Planning
If water reaches the base of the walls, damage can happen fast. Good drainage is a must.
Skipping Roof Overhangs
A short roof can leave walls open to rain. Large eaves help protect the home.
Rushing the Drying Process
Drying takes patience. If you move too quickly, the walls may crack or weaken.
Ignoring Local Building Codes
Legal problems can delay or stop your project. Always check the rules first.
Best Climate for Cob Houses
Cob works best in dry or temperate climates. It can still work in wet or cold areas, but it needs more protection.
In rainy places, you will need excellent drainage, high foundations, and strong plaster. In cold climates, extra insulation may help. In hot climates, cob can be especially comfortable because it keeps indoor temperatures more stable.
Maintenance Tips for Cob Houses
Cob homes can last a long time, but they need care.
Inspect for Water Damage Regularly
Look for cracks, soft spots, or signs of moisture. Fix small problems early.
Reapply Plaster When Needed
Plaster wears down over time, especially in outdoor conditions. Recoat it when needed to protect the walls.
Roof Maintenance
Keep gutters clean and check for leaks. The roof is your first defense against water.
Foundation Protection
Make sure the ground around the house drains well year-round.
Are Cob Houses Safe and Durable?
Yes, cob houses can be very durable when built well. Some have lasted for centuries.
They are also fire-resistant because the material is mostly earth and straw. Properly built cob homes can also resist pests, since the walls are solid and dense.
In earthquake-prone areas, extra reinforcement may be needed. A good design and proper engineering make a big difference.
Pros and Cons of Building a Cob House
Pros Cons
Eco-friendly Labor intensive
Affordable materials , long drying time
Beautiful natural design Permit challenges
Energy efficient . Requires maintenance
Fire-resistant, weather-sensitive during construction
FAQ
What is the best soil for making cob?
Soil with a balanced mix of clay and sand works best.
How thick should cob house walls be?
Most cob walls are about 18 to 24 inches thick.
Can you build a cob house by yourself?
Yes, but larger homes are easier with extra help.
Are cob houses waterproof?
Cob itself is not waterproof, so good roofing and plaster are important.
How long do cob houses last?
With proper care, they can last hundreds of years.
Do cob houses need insulation?
In colder climates, extra insulation may help.
Is a cob house cheaper than a regular house?
Usually, yes, especially if you use local materials and do the labor yourself.
Can cob houses have electricity and plumbing?
Yes, modern utilities can be added.
What roof works best for a cob house?
A roof with large overhangs is best for protecting the walls.
How long does it take for cob walls to dry?
Drying can take weeks or even months, depending on weather conditions.