Have you ever stepped into your shower only to be greeted by weak water pressure, an annoying drip, or a fixture that looks like it belongs in a different decade? You’re not alone. A well-installed shower setup does more than just deliver water. It shapes your daily routine, improves your bathroom’s appearance, and even boosts your home’s value.
Learning how to install shower home plumbing fixtures is one of the most rewarding home improvement skills you can pick up. Whether you want to swap out an old showerhead or upgrade to a modern shower system, proper installation prevents leaks, saves water, and keeps your bathroom running smoothly.
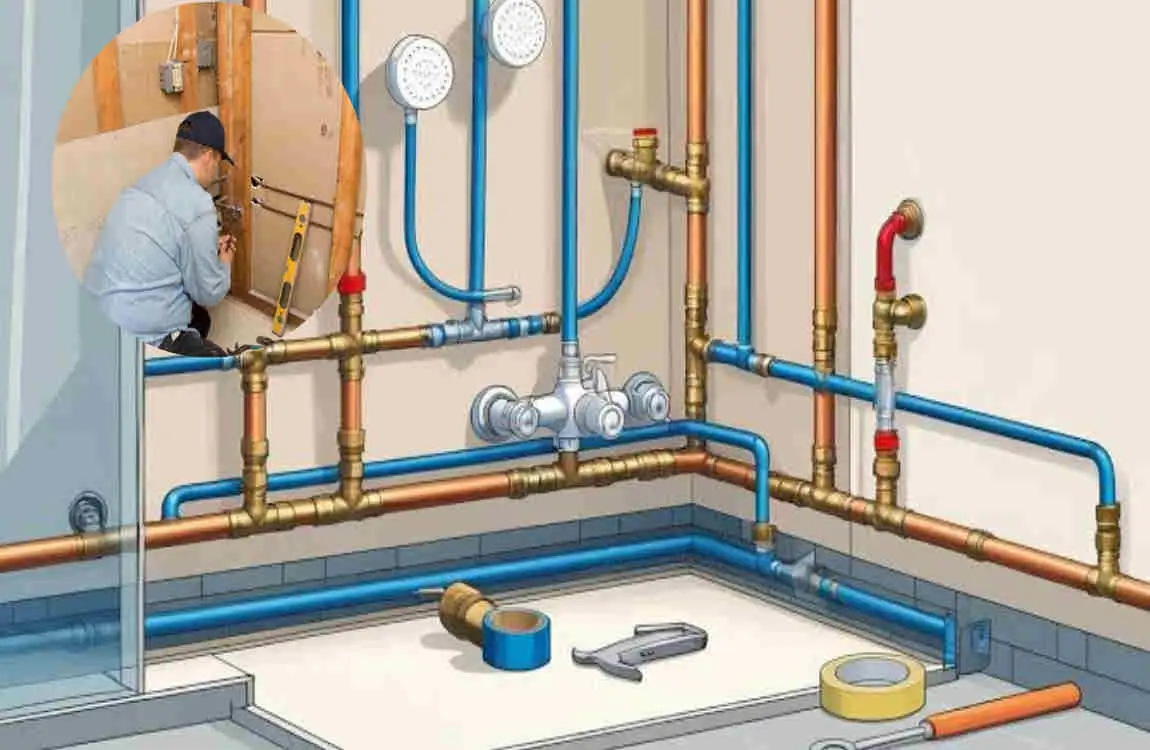
Understanding Shower Home Plumbing Fixtures
Before you grab your tools, it helps to understand what you’re actually working with. Knowing the parts makes the whole process far less intimidating.
What Are Shower Plumbing Fixtures?
Shower plumbing fixtures are the visible and hidden components that control and deliver water in your shower. Each part plays a specific role, and they all work together to give you that perfect stream of water.
Here are the most common ones:
- Showerheads – The part that sprays water onto you. They come in fixed, handheld, and rainfall styles.
- Shower valves – Hidden behind the wall, these control water flow and temperature.
- Shower handles – The knobs or levers you turn to adjust water.
- Shower arms – The curved pipe that connects the showerhead to the wall.
- Tub spouts – Found in combined tub-shower setups, they direct water into the tub.
- Trim kits – The decorative plates and covers that give your shower a finished look.
Why Proper Shower Fixture Installation Matters
You might wonder why installation quality matters so much. After all, water is water, right? Not quite.
A properly installed fixture prevents leaks and water damage, which can save you thousands in repair costs. It also improves water pressure, so you enjoy a stronger, more satisfying shower. On top of that, a clean installation enhances your bathroom’s appearance and helps save water and energy by reducing waste.
In short, doing it right the first time pays off for years to come.
Types of Shower Fixtures Available
You have plenty of options when choosing new fixtures. Here’s a quick rundown:
- Standard shower fixtures – Simple, affordable, and reliable for everyday use.
- Handheld shower systems – Flexible hoses that make cleaning and bathing easier.
- Rain shower fixtures – Large heads that mimic gentle rainfall for a spa-like feel.
- Thermostatic shower systems – Maintain a steady water temperature automatically.
- Smart shower fixtures – Digital controls that let you customize temperature and flow.
Pick the one that matches your budget, style, and comfort needs.
Tools and Materials Needed to Install Shower Plumbing Fixtures
Preparation is half the battle. Before you start, gather everything you need, so you’re not running to the store mid-project. Here’s a handy checklist to keep you organized.
ToolsMaterials
Adjustable wrench New shower fixture
Screwdriver Plumber’s tape
Pipe wrench Silicone sealant
Allen key Replacement washers
Level Cleaning cloth
Drill (if needed) Mounting hardware
Having these items ready makes the job faster and far less frustrating.
Safety Equipment Before Starting
Safety should always come first, even for small projects. Water and slippery surfaces can create hazards, so take a few precautions before you dive in.
Make sure you have:
- Safety glasses to protect your eyes from debris.
- Gloves to keep your hands safe and improve grip.
- Proper ventilation if you’re using sealants or adhesives.
- A plan to turn off the water supply before touching any fixtures.
These simple steps keep you comfortable and injury-free throughout the process.
Preparing Your Bathroom Before Installation
Good preparation sets you up for success. Rushing into installation without prepping can lead to messy mistakes. Let’s get your bathroom ready.
Turn Off the Water Supply
This is the most important first step, and skipping it can cause a soggy disaster. Water under pressure will spray everywhere the moment you loosen a connection.
Start by locating the main shutoff valve, usually found in your basement, garage, or near your water meter. Turn it off completely. Next, drain any remaining water from the pipes by opening the shower valve and letting it run until it stops. Finally, check that the water flow has fully stopped before you begin removing anything.
Remove Existing Shower Fixtures
Once the water is off, you can safely remove your old fixtures. Take your time and work carefully.
- Remove the old showerhead by twisting it counterclockwise. Use a wrench if it’s stuck.
- Take off the handles and trim plates by unscrewing them gently.
- Disconnect the old components one by one, keeping track of how they fit together.
- Clean the pipe connections to remove old tape, grime, and mineral buildup.
A clean surface helps your new fixtures seal properly.
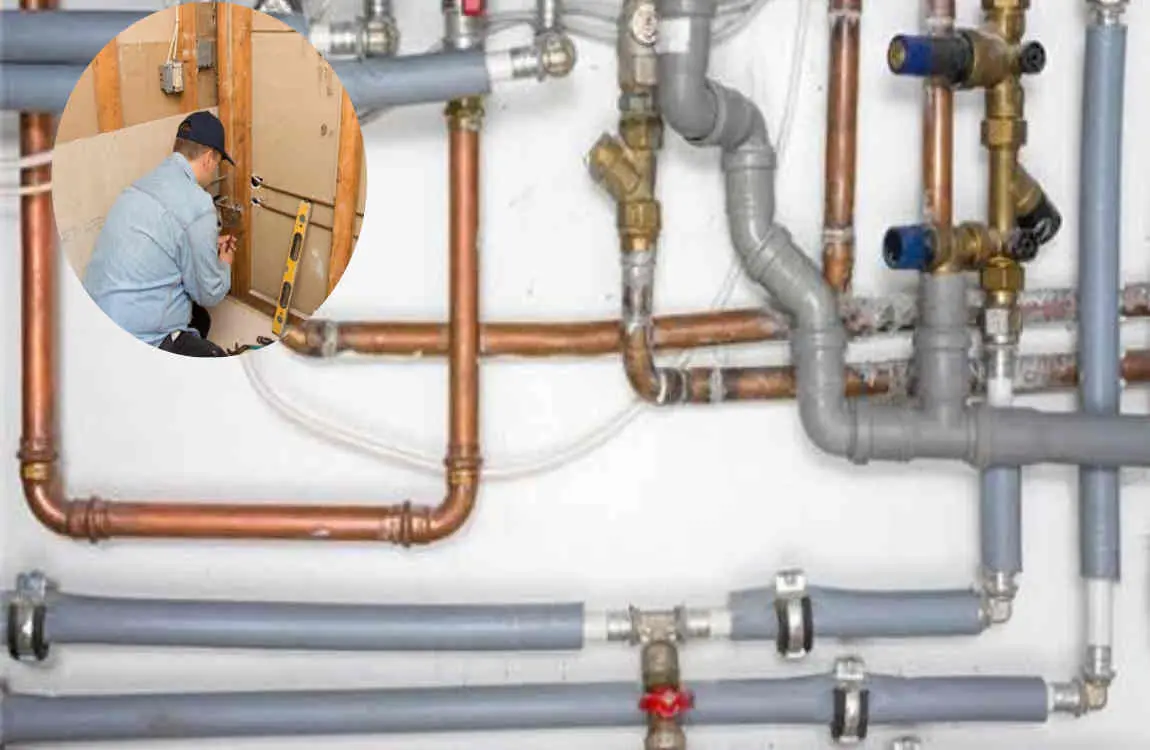
Inspect Existing Plumbing Connections
Before installing anything new, take a moment to inspect what’s behind the wall. This quick check can save you from future headaches.
Look closely at the pipe condition to make sure everything is solid. Check for corrosion, which weakens pipes over time. Search for signs of leaks, such as water stains or moisture. Finally, confirm you have the correct pipe sizing to match your new fixtures. If anything looks damaged, it may be time to call a professional.
Step-by-Step Guide: How to Install Shower Home Plumbing Fixtures
Now for the main event. This is where all your preparation pays off. Follow these steps carefully, and you’ll have a working shower in no time. Understanding how to install shower home plumbing fixtures comes down to patience and attention to detail.
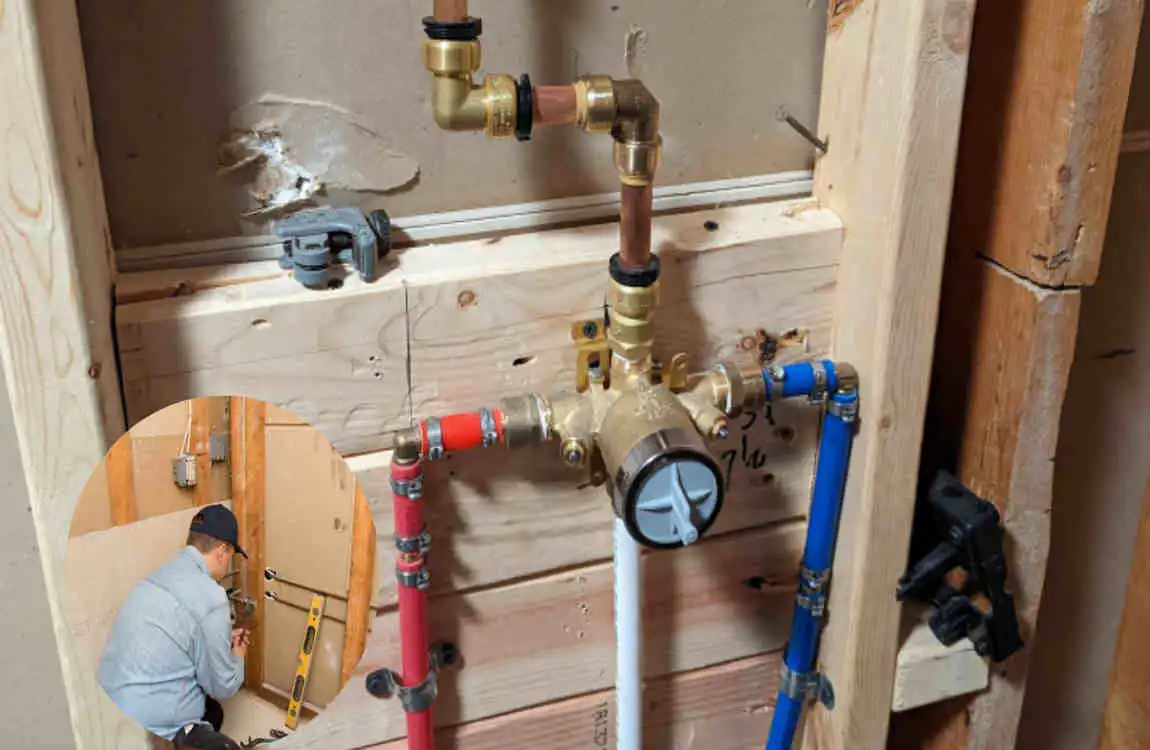
Install the Shower Valve
The shower valve is the heart of your system, so getting it right matters. Start by positioning the valve correctly inside the wall opening. Make sure it faces the right direction, as most valves have markings for “up” and “hot/cold.”
Next, connect the hot and cold water lines to their matching ports. Hot goes on the left, cold on the right, in most standard setups. Then secure the valve inside the wall using the mounting brackets. Finally, double-check the alignment so it sits flush and level. A crooked valve leads to crooked handles later.
Attach the Shower Arm
With the valve in place, you can move on to the shower arm. This part is quick but requires a careful touch.
Begin by applying plumber’s tape to the threads of the arm. Wrap it clockwise a few times for a tight seal. Then screw the shower arm into the fitting by hand, turning until it feels snug. Tighten it carefully with a wrench, but here’s the key: avoid over-tightening. Too much force can crack the fitting or strip the threads.
Install the Showerhead
Now comes the fun part: the showerhead. This is where your shower starts to take shape.
First, add thread seal tape to the shower arm threads. This step prevents annoying drips. Next, attach the showerhead by screwing it onto the arm. Tighten by hand first to get a good seal, then use a wrench with a cloth to protect the finish. Once it’s on, test for leaks by briefly turning the water on later.
Install Shower Handle and Trim Plate
The trim plate and handle give your shower that polished, finished look. Let’s put them in place.
Start by mounting the trim plate over the valve, making sure it sits evenly against the wall. Then install the screws to hold it securely. Next, attach the handle according to your fixture’s instructions, often using an Allen key or screwdriver. Finally, check the movement by turning the handle to confirm it operates smoothly.
Apply Sealant Around Fixtures
Sealant is your best friend when it comes to keeping water where it belongs. This step protects your walls from hidden moisture.
Figure out where silicone is needed, typically around the trim plate and any wall openings. Apply a thin, even bead to prevent water penetration behind the wall. Smooth it out with a wet finger to create a clean finish. Let it cure fully before using the shower.
Test the New Shower Installation
You’re almost done. The final step is testing everything to make sure it all works perfectly.
Run through this checklist:
- Turn the water supply back on slowly.
- Check for leaks around every connection point.
- Test temperature control by adjusting the handle.
- Check water pressure to confirm a strong, steady flow.
If everything holds up, congratulations. You’ve successfully installed your shower fixtures.
Common Mistakes When Installing Shower Plumbing Fixtures
Even experienced DIYers slip up sometimes. Knowing these common mistakes helps you avoid them entirely.
Not Turning Off the Water Supply
This is the number one mistake, and it’s a big one. Forgetting to shut off the water can lead to flooding the moment you disconnect a fixture. That flooding causes water damage to floors, walls, and ceilings. It also creates unsafe working conditions, making surfaces slippery and dangerous. Always turn off the water first, no exceptions.
Using Too Much Force on Connections
We get it, you want everything tight and secure. But cranking too hard causes real problems. Over-tightening leads to damaged threads that no longer seal properly. It can also cause cracked fittings, which are expensive to replace. Worst of all, it often results in future leaks down the road. Snug is enough, so ease off the muscle.
Skipping Plumber’s Tape
That little roll of tape does a lot of heavy lifting. Skipping it is a costly shortcut. Plumber’s tape creates a watertight seal on threaded connections. Without it, you’ll likely deal with dripping connections that waste water and drive you crazy. Always wrap those threads before assembly.
Incorrect Shower Valve Placement
Placing the valve wrong throws off your entire setup. A misplaced valve leads to poor water control, making it hard to get the temperature just right. It also causes difficulty using handles, since they may sit at odd angles. And fixing it later means expensive repairs, often involving opening the wall again. Measure twice and install once.
Professional Tips for Successful Shower Fixture Installation
Want to work like a pro? These expert tips will help you get better results every time.
- Always read the manufacturer’s instructions. Every fixture is a little different, and the manual saves you guesswork.
- Choose high-quality fixtures. Cheaper isn’t always better, and quality parts last longer.
- Check local plumbing codes. Some areas have specific rules you’ll want to follow.
- Test everything before sealing walls. Once the wall is closed, fixing mistakes gets tricky and costly.
- Replace old washers and seals. These small parts prevent leaks and cost almost nothing.
Following these tips gives you a smoother experience and a longer-lasting result.
How Much Does Shower Fixture Installation Cost?
Cost is often the first question homeowners ask. The answer depends on several factors, from the fixtures you choose to whether you hire help. Let’s break it down.
Installation Type Average Cost Factors
DIY installation Tools and fixture cost
Basic fixture replacement Labor + materials
New shower plumbing Higher labor cost
Luxury shower system Advanced installation
If you handle a DIY installation, your main expenses are the tools and the fixture itself. A basic fixture replacement by a pro adds labor to materials. New shower plumbing costs more because it involves extra work behind the walls. And a luxury shower system requires advanced skills, which raises the price.
So when should you hire a plumber? If your project involves moving pipes, installing complex systems, or you simply don’t feel comfortable, professional help is well worth the investment.
When Should You Hire a Professional Plumber?
DIY is great for simple jobs, but some situations call for an expert. Knowing your limits keeps you safe and saves money in the long run.
Consider hiring a professional plumber when you need to:
- Move plumbing lines to a new location.
- Install a shower in a new spot where none existed before.
- Fix hidden leaks buried inside walls or floors.
- Replace damaged pipes that are corroded or broken.
- Handle complex valve installations that require special skills.
If your project checks any of these boxes, don’t hesitate to call in a pro. It’s better to spend a little now than face major repairs later.
Maintenance Tips After Installing Shower Fixtures
Your job isn’t quite over once the fixtures are in. A little ongoing care keeps everything working like new for years.
Here’s how to maintain your shower:
- Clean the showerhead regularly to keep water flowing freely.
- Check for leaks every few months to catch problems early.
- Remove mineral buildup using vinegar or a descaling solution.
- Inspect seals to make sure they haven’t cracked or worn out.
- Maintain water pressure by clearing any clogs in the showerhead.
These small habits go a long way toward protecting your investment.
FAQ Section
Can I install shower plumbing fixtures myself?
Yes, basic fixture replacements like showerheads and handles can often be done by homeowners with simple tools. More complex plumbing work may require a professional.
How long does it take to install shower fixtures?
A simple shower fixture replacement may take 30 minutes to a few hours, while new plumbing installation can take much longer.
Do I need plumber’s tape for shower fixtures?
Yes. Plumber’s tape helps create a tight seal on threaded connections and reduces the chance of leaks.
Why is my new shower fixture leaking?
Common causes include loose connections, improper sealing, damaged washers, or incorrect installation.
Can I replace my showerhead without turning off the water?
It is recommended to turn off the water supply before replacing fixtures to avoid unexpected water flow.
| Step | How to Install Shower Home Plumbing Fixtures | Key Details |
|---|---|---|
| Turn Off Water Supply | Shut off the main water valve before starting the installation. | Prevents leaks and water damage during work. |
| Prepare the Shower Area | Remove old fixtures and clean the installation area. | Check pipes, walls, and connections for damage. |
| 3Install Shower Valve | Mount the shower mixing valve inside the wall according to manufacturer instructions. | Ensures proper hot and cold water control. |
| Connect Water Supply Pipes | Attach hot and cold water lines to the shower valve. | Use proper fittings and seal connections to prevent leaks. |
| 5Install Shower Arm and Head | Attach the shower arm to the pipe outlet and secure the showerhead. | Apply plumber’s tape to threaded connections. |
| Install Handles and Trim Plates | Fix the handles, knobs, and decorative covers. | Make sure everything is aligned and tightly fitted. |
| Connect Drain Assembly | Install the shower drain and connect it to the drainage pipe. | Proper sealing prevents water leaks and odors. |
| Test for Leaks | Turn the water supply back on and check all connections. | Tighten fittings if leaks appear. |