It starts as a small, discolored spot on your siding. You ignore it for a few months. Then, after a heavy monsoon season or a harsh winter, you poke it with a screwdriver, and the tool sinks right in like it’s piercing a wet sponge. Panic sets in.
You are not alone in this frustration. Statistics show that nearly 80% of homes in humid regions—from the damp corners of the U.S. South to the monsoon-battered neighborhoods of Lahore—face wood rot issues at some point. If left ignored, what starts as a cosmetic blemish can turn into a structural nightmare, costing upwards of PKR 100,000 to 500,000 to fix professionally.
How to replace rotted wood on the exterior of the house? It is a straightforward process: Identify the scope of the damage, remove the infected wood, treat the area, and install fresh, weather-resistant lumber. By following this step-by-step DIY guide, you can save 50% to 70% compared to hiring a professional crew.
Understanding Wood Rot: Causes and Spotting Damage
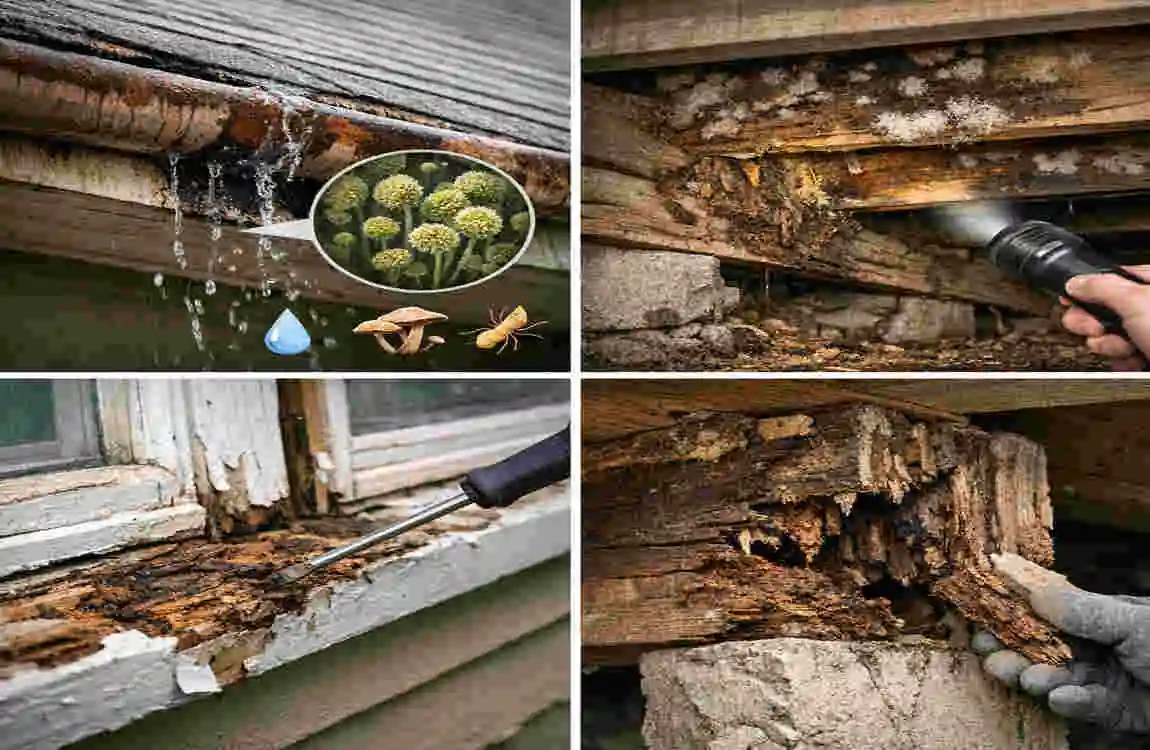
Before you pick up a hammer, you need to understand your enemy. Wood rot isn’t just “old wood.” It is a biological process caused by fungi that eat away at the timber’s cellulose.
The Root Causes
In simple terms, rot needs four things to survive: oxygen, warmth, a food source (the wood), and—most importantly—moisture.
In places with high humidity or heavy rainfall, water seeps into cracks in the paint. Once the wood gets wet and stays wet, fungi take hold. This is often exacerbated by:
- Poor Ventilation: If your siding can’t breathe, moisture gets trapped behind it.
- Insects: Termites and carpenter ants often follow rot because soft wood is easier to chew.
- Lack of Maintenance: Peeling paint acts like an open door for water.
The Inspection Checklist
How do you know if you have a problem? Grab a flashlight and a flathead screwdriver and walk around your house. Look for:
- Discoloration: Dark streaks or white, powdery patches.
- Texture Changes: Wood that looks shrunken or has “alligator skin” cracking.
- The “Poke” Test: Press your screwdriver gently against the wood. If it feels spongy or dents easily, you have rot.
Visual Guide: Stages of Wood Rot
Here is a quick reference table to help you decide how bad the damage is:
StageSymptomsRecommended Action
Early Stage: Slight discoloration; paint peeling; wood is still hard. Sand it down, apply wood hardener, and repaint.
Advanced Stage Wood is soft to the touch; visible cracks; pieces may flake off. Cut out and replace the affected section immediately.
Severe Stage: Structural sagging, deep holes, and fungus mushrooms growing. Call a professional. This may affect load-bearing beams.
Tools and Materials for Replacing Rotted Wood
You cannot do a good job with bad tools. To replace rotted wood on the exterior of your house effectively, you need a specific toolkit. The goal is to remove the bad wood surgically without damaging the surrounding good wood.
If you are in Pakistan, you can source most of these items from hardware hubs like Hall Road in Lahore or your local hardware store.
Essential Toolkit Breakdown
CategoryItems NeededEstimated Cost (PKR)
Removal Tools: Pry bar, claw hammer, utility knife, oscillating multi-tool (highly recommended). 5,000 – 15,000
Cutting Tools: circular saw, or miter saw, tape measure, pencil. Owned or Rented
Materials: Pressure-treated lumber (or PVC trim), wood hardener, epoxy wood filler, exterior screws. 10,000 – 30,000
Finishing Exterior caulk, primer, exterior paint, and sandpaper (80 and 120 grit). 5,000 – 10,000
Safety Gear: N95 Respirator, safety goggles, heavy-duty gloves. 2,000
A Note on Materials
Do not use standard white pine for exterior repairs. It will rot again in two years. Instead, look for pressure-treated lumber (often greenish in color) or cedar, which is naturally rot-resistant. For trim work, many pros are switching to PVC (plastic) trim, which never rots, ever.
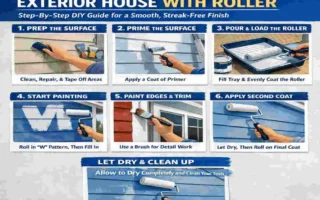
Step-by-Step Guide: How to Replace Rotted Wood on the Exterior of the House
Now, let’s get to work. This is your roadmap to a rot-free home.
Preparation and Safety
Inspect and Clean: Start by power washing the area if possible, or scrubbing it with a stiff brush. You want to remove dirt, mildew, and loose paint so you can see exactly where the rot ends and the good wood begins.
Weather Check: Check the forecast! You do not want to open up your wall the day before a storm. Ideally, you want 2-3 days of dry weather to allow primers and caulks to cure properly.
Set Up Barriers: If you are working on the second story, ensure your ladder is stable. Lay down a drop cloth below your work area to catch nails and rotted wood chips—this makes cleanup easier and protects your lawn.
Phase 2: The Removal Process
Score the Paint: Use your utility knife to cut the paint seal around the piece of wood you plan to remove. If you skip this, prying off the old wood might peel the paint off the good siding next to it.
Surgical Removal: This is where the oscillating multi-tool shines. Plunge the blade into the wood about 2 inches past the visible rot. You want to cut into healthy wood to ensure you get all the fungus. If you don’t have a multi-tool, a sharp chisel and hammer work, but it takes longer.
Pry It Out: Use your pry bar to leverage the rotted piece out. Be gentle. You don’t want to crack the siding or damage the house wrap (the paper layer behind the siding).
Clean the Cavity: Once the wood is gone, you will see the framing underneath. Use a wire brush to clean out debris.
- Pro Tip: Mix a 50% bleach and 50% water solution in a spray bottle. Spray the cavity to kill any remaining mold spores. Let it dry completely.
Cutting and Fitting New Wood
]Measure Twice: Measure the hole you just created. Do not assume it is a perfect square. Measure the top, bottom, left, and right sides.
]Cut Your Replacement: Transfer your measurements to your new pressure-treated lumber. When cutting, aim to make the piece about 1/8 inch smaller than the hole. Why? Wood expands. If you fit it too tightly, it might buckle when the humidity rises.
]Treat the Edges: This is the secret step most DIYers miss. Coat the cut ends of your new wood (and the cut ends of the old wood on the house) with a liquid wood hardener. This seals the grain and prevents water from wicking in at the point where the two pieces meet.
Installation and Securing
Apply Adhesive: Apply a heavy bead of construction adhesive (like Liquid Nails) to the back of your new piece of wood. This acts as a secondary anchor and helps seal out moisture.
Fasten It: Press the wood into the cavity. Secure it using galvanized casing nails or exterior-grade deck screws.
- Crucial: Countersink the heads (drive them slightly below the surface of the wood) so you can cover them with filler later.
Fill the Gaps: Now you have a gap between the old wood and the new wood. Mix up a batch of two-part wood epoxy. This stuff is like clay. Press it into the gaps and over the nail holes. It bonds stronger than wood and is waterproof.
Finishing Touches
1. Sand Smooth: Once the epoxy cures (usually 30 minutes to an hour), sand it down flush with the wood. Start with 80-grit paper to knock down high spots, then finish with 120-grit for a smooth surface.
2. Prime and Paint: Apply a high-quality oil-based primer to the bare wood and epoxy. Latex primer is okay, but oil-based penetrates deeper. Once dry, apply two coats of exterior latex paint that matches your home.
Common Areas: Quick Tips
- Window Sills: These rot often because water sits on them. When replacing, ensure the new sill slopes slightly away from the window to shed water.
- Door Frames: The bottom 6 inches usually rot first. You can use a “Dutchman patch” (replacing just the bottom section) rather than replacing the whole 7-foot frame.
Advanced Tips for Specific Areas
Some parts of your house are trickier than others. Here is how to handle the complex spots.
Soffits and Fascia
The fascia is the board behind your gutter, and the soffit is the underside of the roof overhang. These areas rot because of clogged gutters.
- The Fix: Before replacing the wood, fix the gutter! When installing new soffits, consider installing ventilation strips. This increases airflow into your attic, keeping the wood dry and your house cooler in the summer.
Hard-to-Reach Spots
If the rot is on a second-story dormer, safety is your priority.
- Scaffolding: If you are uncomfortable on a ladder, rent scaffolding. It provides a stable platform to work from.
- Harness Up: If you are on the roof, wear a safety harness. No repair is worth a fall.
The Composite Upgrade
If you are tired of doing this every few years, consider switching to a different material entirely. Cellular PVC trim looks exactly like wood when painted, but is plastic. It costs about 30% more upfront but will last a lifetime. It is perfect for brick molds around doors and water table trim near the ground.
Prevention: Stop Rotted Wood from Returning
You have fixed the rot. Now, let’s make sure it never comes back.
The Power of Caulk
Water is sneaky. Use a high-quality, paintable exterior caulk to seal every seam where wood meets wood, wood meets brick, or wood meets glass.
- Checklist: Check your caulking once a year. If it is cracked or peeling, scrape it out and redo it.
Water Management
Keep water away from your house.
- Gutters: Clean them twice a year.
- Grading: Ensure the dirt around your foundation slopes away from the house.
- Sprinklers: Adjust your lawn sprinklers so they aren’t blasting your siding every morning.
The “Monsoon Barrier” Local Tip
For regions with intense monsoon rains, such as Pakistan, consider installing drip cap flashing above windows and doors. This is an L-shaped piece of metal that sits on top of the trim and slides under the siding. It acts like a mini umbrella, directing water away from the sensitive wood joints.
Cost Breakdown and When to Call a Pro
Is it worth doing yourself? Let’s look at the numbers.
The DIY Savings
- Tools: PKR 15,000 (one-time investment).
- Materials: PKR 10,000.
- Total DIY Cost: PKR 25,000.
The Professional Cost
- Labor and Materials: A contractor will charge for time, travel, and expertise. For a similar job, expect to pay between PKR 80,000 and 150,000.
When to Wave the White Flag
While saving money is great, some jobs are too dangerous or complex for DIY. Call a pro if:
- Structural Rot: If you remove a piece of siding and the wall studs underneath are black and crumbly, stop. This is a structural issue.
- Roof Rot: Walking on a rotted roof is deadly.
- Extensive Damage: If the rot wraps around the entire house, it’s a massive project that requires a crew.
Need a professional opinion? If you are unsure about the extent of the damage, book our inspection service today. We can tell you if it’s a DIY fix or a job for the experts.
Mistakes to Avoid When Replacing Rotted Wood
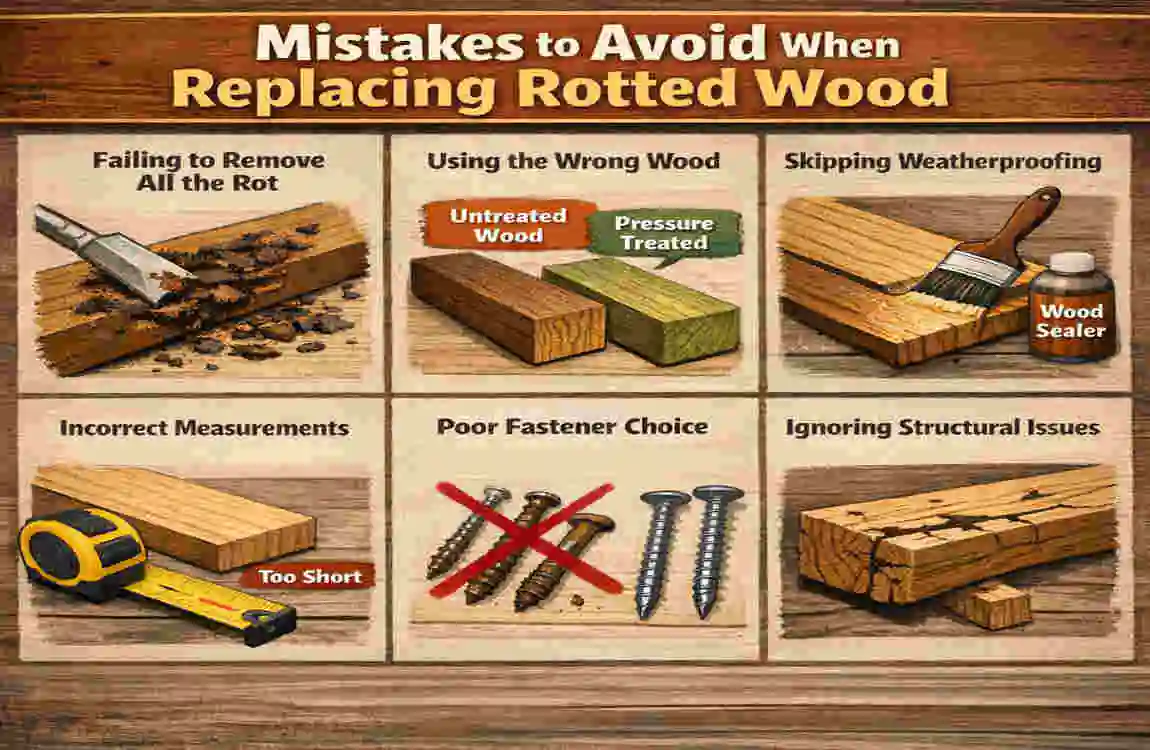
- Trapping Moisture: Never paint over damp wood. If you washed the area, let it dry for at least 48 hours before priming. If you seal moisture in, the rot will explode from the inside out.
- Using Indoor Wood: Never use untreated pine or interior trim for the exterior. It lacks the chemicals needed to resist rot and bugs.
- Skipping the Primer: Paint alone is not enough. Primer is the glue that holds the paint in place and the shield that protects the wood.
Frequently Asked Questions (FAQs)
How to replace rotted wood on the exterior of the house siding without removing the whole board? You don’t always need to replace the full plank. You can perform a “Dutchman repair.” Cut out the rotted section with an oscillating tool, making angled cuts (like a trapezoid) so the new piece locks in place. Cut a replacement piece of wood to fit perfectly, glue it with construction adhesive, and screw it in. Use epoxy filler to hide the seams, then sand and paint.
What is the best wood to use for exterior rot repair? The best option is Pressure-Treated Lumber, which is infused with chemicals to resist rot and insects. For a more Premium, natural option, Cedar or Redwood is excellent, as they have natural oils that repel water. However, for trim, PVC (cellular polyvinyl chloride) is the superior choice as it is completely rot-proof.
Can I use wood filler on rotted wood? Only if the rot is very minor (less than 15% of the wood). If you choose this route, you must use a wood hardener first to solidify the soft fibers. Then, use a two-part epoxy wood filler (not standard interior putty). For any rot deeper than an inch or covering a large area, replacement is the only permanent solution.
How do I match the new wood texture to the old wood? If your old house has a wood grain texture and your new board is smooth, you can trick the eye. Apply a thick layer of primer. While it is wet, use a coarse brush or a graining tool to drag lines through it, mimicking the wood grain. Once painted, the difference will be barely noticeable.
Is dry rot different from wet rot? Yes. Wet rot occurs when timber has a high moisture content (around 50%) and feels spongy. Dry rot is more dangerous; it can spread through masonry and dry timber with a moisture content as low as 20%. Dry rot often appears as cracked, brittle cubes and may have a fungal growth resembling cotton wool. Both require removing the source of moisture and replacing the wood.