
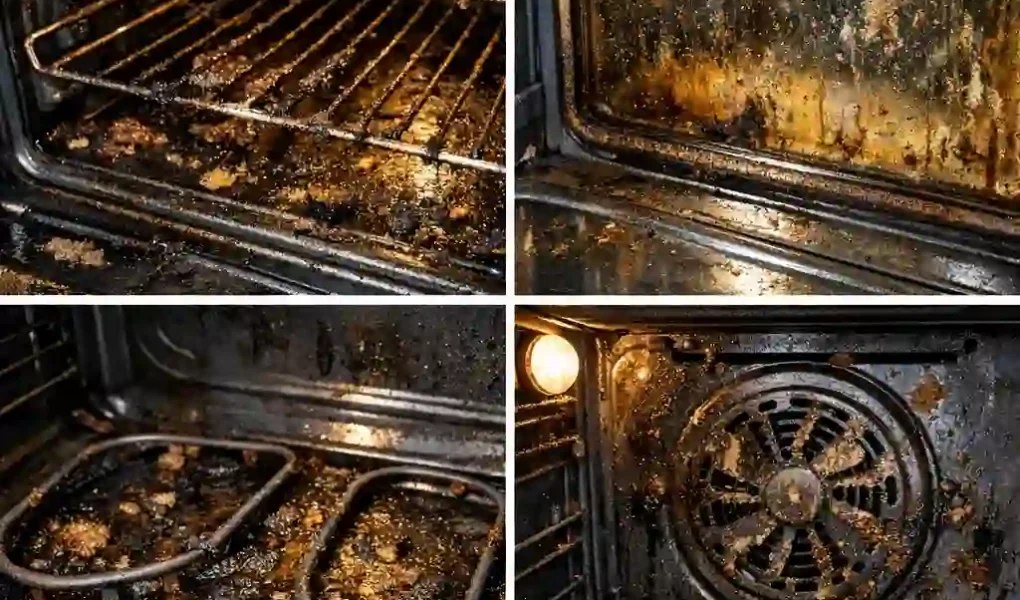
We all love a Sunday roast with bubbling gravy and perfectly crisp roast potatoes. However, the aftermath that’s cooling inside your cooker can look like a chemistry experiment gone horribly wrong.
Facing this spectacular mess is easily the most dreaded chore in any British household. But to conquer the fear, you simply need to understand which parts are the hardest to tackle and how to clean them.
So, grab your rubber gloves and prepare to make your appliance shine like new again.
Oven Door
The door is usually the first thing people tackle, mostly because it’s the part everyone can see. Unfortunately, it’s also where grease loves to settle between the glass panels.
That double-glazed design keeps heat in beautifully, but it also traps splatters where your cloth can’t reach. Getting inside often means removing the panel entirely, which is fiddly at the best of times.
A paste of baking soda and water left to sit for twenty minutes usually loosens the grease nicely. Just don’t rush the glass. A few extra minutes of patience are much easier to live with than a permanent scratch.
Wipe from the edges inward once the paste has done its work, and check the corners twice. Grease has a habit of hiding exactly where you’ve just finished cleaning.
Handles and hinges deserve a quick going-over, too. They’re touched constantly, yet they’re often the last thing anyone remembers to wipe down properly.
Oven Racks
Racks look simple enough to clean, right up until you notice the baked-on residue clinging to every bar as though it has no intention of leaving.
The trick is giving them plenty of room to soak, such as a bathtub lined with towels, rather than scrubbing dry metal until your arm gives up. Hot water, washing-up liquid, and a bit of patience do most of the heavy lifting.
Leave them overnight if you can. By morning, the grime should lift away with barely any effort, saving your arms from another round of scrubbing.
Some people also add a dryer sheet to the soaking water to help loosen stubborn, baked-on grime. While results can vary, many swear by this simple trick.
Once dried, run a hand along each rack before sliding it back in. Any leftover grit will only bake straight back on come the next roast dinner.
Oven Interior Walls
No part of the oven sees more wear than the interior walls and base. Years of drips and spills carbonise into a coating that seems determined to outlast ordinary cleaning sprays.
Commercial oven cleaners can cut through stubborn grease effectively, but the fumes can be brutal in a small kitchen without decent ventilation.
You can try a gentler cleaning route, like adding a thick layer of baking soda paste and leaving it overnight, then scraping it away with a plastic spatula.
Whatever method you choose, patience matters more than elbow grease here. Rushing through just means you’ll have to do it all again next month.
Corners and the base tend to hold onto the worst of it, particularly right under the heating element. A flexible scraper reaches into those tight spots better than any sponge ever will.
Open a window while you work, regardless of which product you’ve reached for. Even the milder cleaning products can leave a faint smell hanging around your kitchen for hours.
Oven Burners
If your oven has a grill or gas burners, expect them to collect a special kind of stubborn char. Food debris gets trapped in the grooves and practically fossilises there.
Removing the burner caps and soaking them in warm, soapy water works wonders, though a soft-bristled brush helps dislodge anything wedged into the smaller gaps. Only soak removable burner caps, and keep any electrical components dry.
Dry everything thoroughly before refitting. A damp burner and a hot oven are not a combination anyone wants to explain to their landlord.
Oven Fan
The oven fan keeps heat moving evenly throughout the cavity, but it also picks up a steady coating of grease over time. The fan blades and the surrounding cavity end up coated in a fine, sticky film.
This area often gets skipped because it’s tucked at the back and slightly awkward to reach. A long-handled brush or a scrunched cloth on a skewer usually does the trick.
Switch the oven off and let it cool completely before you start. Cleaning a warm fan compartment is a quick way to discover just how hot ‘still warm’ really is.
Wipe each blade individually rather than swiping across the whole assembly at once. It takes longer, admittedly, but it avoids pushing grease deeper into the housing instead of removing it.
A build-up here can also affect how evenly your oven cooks, so a clean fan does more than tidy the appliance. It helps your Yorkshire puddings rise the way they’re supposed to.
Oven Seals and Gaskets
It’s easy to overlook the rubber seal around the oven door until it starts collecting grease and crumbs. Despite its modest appearance, it plays an important role in keeping heat inside the oven.
Use a damp cloth with a splash of vinegar to clean grease and crumbs from the folds. Make sure to avoid abrasive cleaners, as they can damage the seal and reduce your oven’s efficiency.
If years of buildup have left the seal beyond saving, check your local council’s recycling guidance before disposing of it, as accepted materials vary between recycling centres.
By this point, some households simply decide the whole job is better left to someone else entirely. If you’re looking for oven cleaning, Croydon-based operations tend to know their way around every model out there.
From vintage gas cookers to the latest fan-assisted builds, booking one in saves an entire weekend.
How Often Should You Clean Each Part?
After all that scrubbing, soaking, and questioning whoever invented ovens, a few parts stand out as the true champions of stubbornness. The good news is that regular cleaning can stop them from reaching that point in the first place. As a general guide:
- Oven Door. Wipe down the glass and handles every month to prevent grease from building up. Clean between the glass panels as needed.
- Oven Racks. Deep-clean every 2–3 months, or sooner if you notice heavy burnt-on residue.
- Oven Interior. Give the walls and base a thorough clean every 2–3 months, especially after frequent roasting or baking.
- Oven Heating Elements. Check every few months and gently remove loose debris once the oven has cooled. Avoid excessive scrubbing.
- Grill and Gas Burners. Clean after heavy use to prevent food residue from hardening and becoming difficult to remove.
- Oven Fan. Clean every 6–12 months to keep grease from affecting airflow and cooking performance.
- Oven Seals and Gaskets. Wipe them down monthly to remove grease and check for signs of wear or damage.
Conclusion
There you have it: the full rundown of every corner your oven uses to test your patience. Tackle them one at a time, and even the worst offenders won’t stand a chance. Then you can get back to enjoying your cooking instead of dreading the clean-up.