Learning how to do plumbing in a house can save you time, money, and stress. Many homeowners face small plumbing problems that do not always need a plumber right away. A dripping faucet, a clogged sink, a running toilet, or a loose pipe joint are all common issues that a beginner can often handle with the right steps.
Basic plumbing skills also help you feel more confident when something goes wrong. Instead of waiting for help during an emergency, you can shut off water, make a temporary fix, and protect your home from damage. That peace of mind matters.
Understanding the Basics of House Plumbing
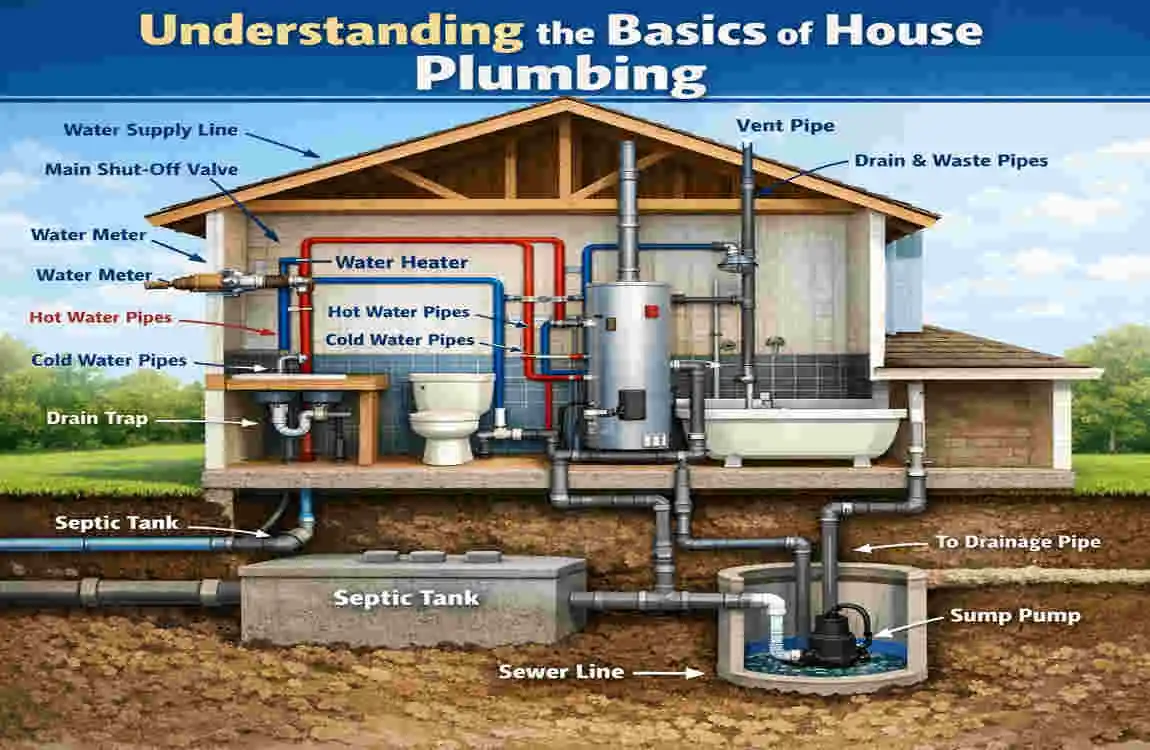
What Is a Residential Plumbing System?
A residential plumbing system has three main parts:
- Water supply system: brings clean water into the house
- Drain-waste-vent system: carries wastewater out and helps air move through the pipes
- Fixtures and appliances: sinks, toilets, showers, dishwashers, and washing machines
Together, these parts keep water moving in the right direction.
How Water Moves Through a House
Water enters through the main line and spreads through smaller pipes to different rooms. Cold water goes straight to fixtures, while hot water passes through the water heater first.
Water pressure matters too. If pressure is too low, faucets may trickle. If it is too high, pipes and fixtures can wear out faster.
Common Plumbing Materials Used in Homes
Material Best For Main Benefit Main Drawback
PVC Drain lines Cheap and easy to use Not for hot water
Copper Water supply lines Strong and long-lasting More expensive
PEX Supply lines Flexible and beginner-friendly Needs proper fittings
Galvanized steel Older homes Durable at first Can rust over time
Essential Plumbing Terms Beginners Should Know
A few terms come up often in plumbing installation guides:
- Shut-off valve: turns water off to one fixture or the whole house
- Trap: curved pipe under sinks that blocks sewer gases
- Vent stack: helps air move through drain pipes
- Drain line: carries wastewater away
- Pipe fitting: joins two or more pipes together
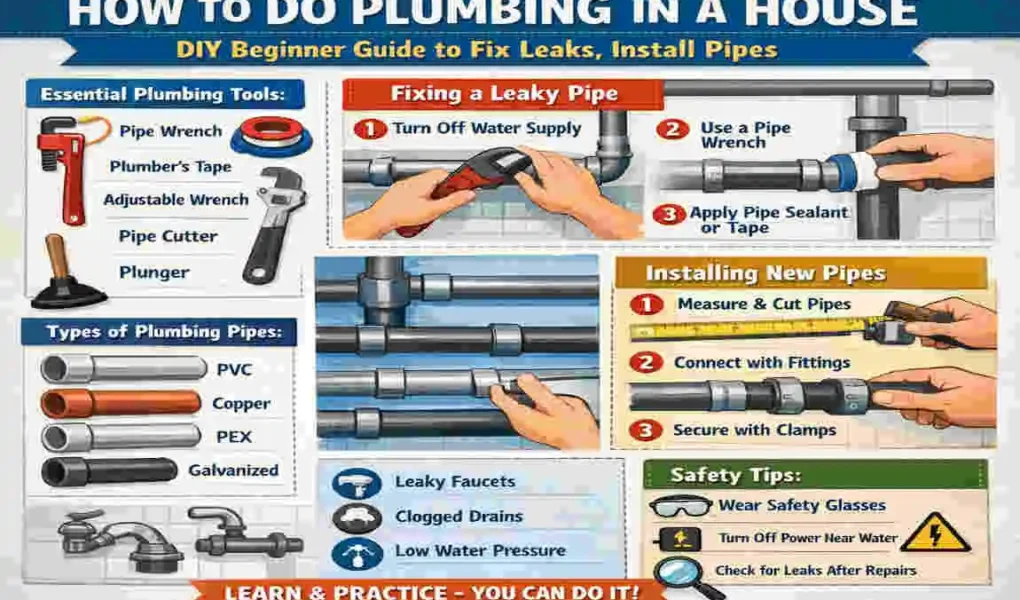
Tools You Need for DIY House Plumbing
Basic Plumbing Tools for Beginners
You do not need a huge toolbox to begin. Start with a few simple tools:
- Pipe wrench
- Adjustable wrench
- Basin wrench
- Pipe cutter
- Plunger
- Plumber’s tape
These tools handle many common home plumbing repair jobs.
Safety Equipment You Should Use
Safety matters just as much as the repair itself. Keep these items nearby:
- Safety gloves
- Eye protection
- Knee pads
- Dust mask
Beginner Plumbing Tool Checklist
ToolWhy You Need It
Adjustable wrench Tighten or loosen fittings
Plunger Clear simple clogs
Plumber’s tape Seal threaded joints
Pipe cutter Cut pipe cleanly
Gloves Protect your hands
Safety Tips Before Doing Plumbing Work
Turn Off the Water Supply First
Always shut off the water before you open a pipe or remove a fixture. Use the main shut-off valve if needed. For smaller jobs, a fixture shut-off valve may be enough.
Understand Local Plumbing Codes
Some plumbing work needs a permit or inspection. This often applies to bigger pipe changes, bathroom remodels, or work inside walls. Local rules help keep your home safe.
Avoid Common DIY Plumbing Mistakes
Beginners often make the same mistakes:
- Over-tightening fittings
- Mixing pipe materials the wrong way
- Ignoring small leaks
A small drip can turn into water damage if you wait too long.
Know When to Call a Professional Plumber
Call a plumber if you face:
- Sewer line trouble
- Major pipe replacement
- Gas line work
These jobs are not good beginner projects.
How to Fix Common Plumbing Leaks in a House
How to Identify Plumbing Leaks
Look for warning signs such as:
- Water stains
- Mold or mildew
- Higher water bills
- Low water pressure
If you spot these early, you can often prevent more serious damage.
Fixing a Leaky Faucet
A leaky faucet is one of the easiest repairs for beginners.
Steps:
- Shut off the water
- Remove the handle
- Replace the cartridge or washer
- Put the faucet back together
If the faucet still leaks, the problem may be deeper inside the valve.
Repairing a Leaking Pipe Joint
A loose joint may only need plumber’s tape or pipe sealant. If the fitting is cracked, replace it. Do not force damaged parts back into place.
How to Repair a Running Toilet
A running toilet usually has a simple cause:
- Replace the flapper
- Adjust the float
- Check the fill valve
This fix can save a lot of water over time.
Temporary Leak Fixes for Emergencies
If you need a quick fix, use:
- Pipe repair clamps
- Epoxy putty
- Waterproof tape
These are temporary solutions, not permanent repairs.
How to Install Plumbing Pipes in a House

Planning Your Plumbing Layout
Good planning makes the job much easier. Before cutting anything, map out:
- Where each fixture will go
- How long each pipe run should be
- Whether water pressure will stay strong
A clear layout helps you avoid waste and mistakes.
Choosing the Right Pipes
For most beginners, PEX is often the easiest to work with. PVC is good for drains, and copper is strong but harder to install.
- PEX: flexible and simple
- PVC: low cost and easy to cut
- Copper: durable but needs more skill
How to Cut and Connect Pipes
PVC Pipe Installation
Measure the pipe, cut it cleanly, then use primer and cement to join the pieces. Work fast once the cement is applied.
Copper Pipe Installation
Copper pipes need cleaning and soldering. This takes more practice and careful heat control.
PEX Pipe Installation
PEX often uses crimp fittings or push-fit connectors. Many beginners like it because it is fast and forgiving.
Installing Water Supply Lines
Supply lines usually connect to:
- Kitchen sinks
- Bathroom fixtures
- Washing machines
Make sure each connection is tight, but do not overtighten. After installation, test for leaks before closing walls or cabinets.
Testing New Plumbing Installations
Always test new work with water pressure. Check every joint carefully. If you see moisture, fix it right away before using the system normally.
How to Unclog Drains and Toilets
Common Causes of Drain Clogs
Most clogs come from:
- Hair buildup
- Grease
- Soap residue
- Foreign objects
How to Use a Plunger Properly
Use the right plunger for the job. A sink plunger and a toilet plunger are shaped differently. Push and pull firmly to build pressure and clear the blockage.
Using a Plumbing Snake for Tough Clogs
A plumbing snake works well when a plunger is not enough. Feed it slowly into the drain, then twist to break up the clog.
Natural Drain Cleaning Solutions
For light buildup, try:
- Baking soda and vinegar
- Hot water flushing
These can help with minor clogs, but they will not fix every blockage.
What Not to Put Down Drains
Avoid:
- Grease
- Coffee grounds
- Flushable wipes
These are common causes of repeated clogs.
Beginner Guide to Installing Bathroom Plumbing
Installing a Bathroom Sink
A bathroom sink needs three main connections:
- Drain assembly
- Water supply lines
- P-trap setup
Make sure the trap is installed correctly so sewer smells do not return to the room.
How to Install a Toilet
Basic steps:
- Remove the old toilet
- Place the wax ring
- Set and secure the toilet base
- Connect the water line
After that, test the flush and check the floor around the base for leaks.
Shower and Bathtub Plumbing Basics
Showers and tubs need proper drainage, a mixing valve, and good waterproofing. These projects are more complex than a sink or toilet, so take your time and follow the layout carefully.
Beginner Guide to Kitchen Plumbing Installation
Installing a Kitchen Sink
A kitchen sink installation includes the sink mount, drain lines, and faucet setup. Check alignment before tightening everything down.
Connecting a Dishwasher
A dishwasher needs a drain hose and a water supply line. Make sure the hose loops properly to help prevent backflow.
Garbage Disposal Installation Basics
A garbage disposal also needs electrical care. Mount it securely, connect the drain, and confirm all seals are tight before use.
Plumbing Maintenance Tips for Homeowners
Regular Plumbing Inspections
Check under sinks and around exposed pipes often. Small drips are easier to fix than water damage.
Preventing Frozen Pipes
In cold weather, use pipe insulation and keep vulnerable areas warm. Frozen pipes can crack and burst.
Water Heater Maintenance
Flush sediment from the tank when needed and keep the temperature at a safe setting. This helps the heater work better and last longer.
How to Extend the Life of Your Plumbing System
- Avoid harsh chemicals
- Fix leaks quickly
- Keep water pressure in a safe range
These simple habits protect your plumbing for years.
DIY Plumbing Mistakes Beginners Should Avoid
Using the Wrong Pipe Size
Wrong sizing can affect water flow and pressure.
Forgetting Pipe Supports
Pipes need support to prevent sagging or movement.
Improper Drain Slope
Drains need the right slope to move wastewater properly.
Ignoring Ventilation Requirements
Vents help drains work correctly. Skipping them can cause slow drainage and bad smells.
Skipping Leak Testing
Never assume a new joint is fine. Test every repair before finishing the job.
Cost of DIY Plumbing vs Hiring a Professional
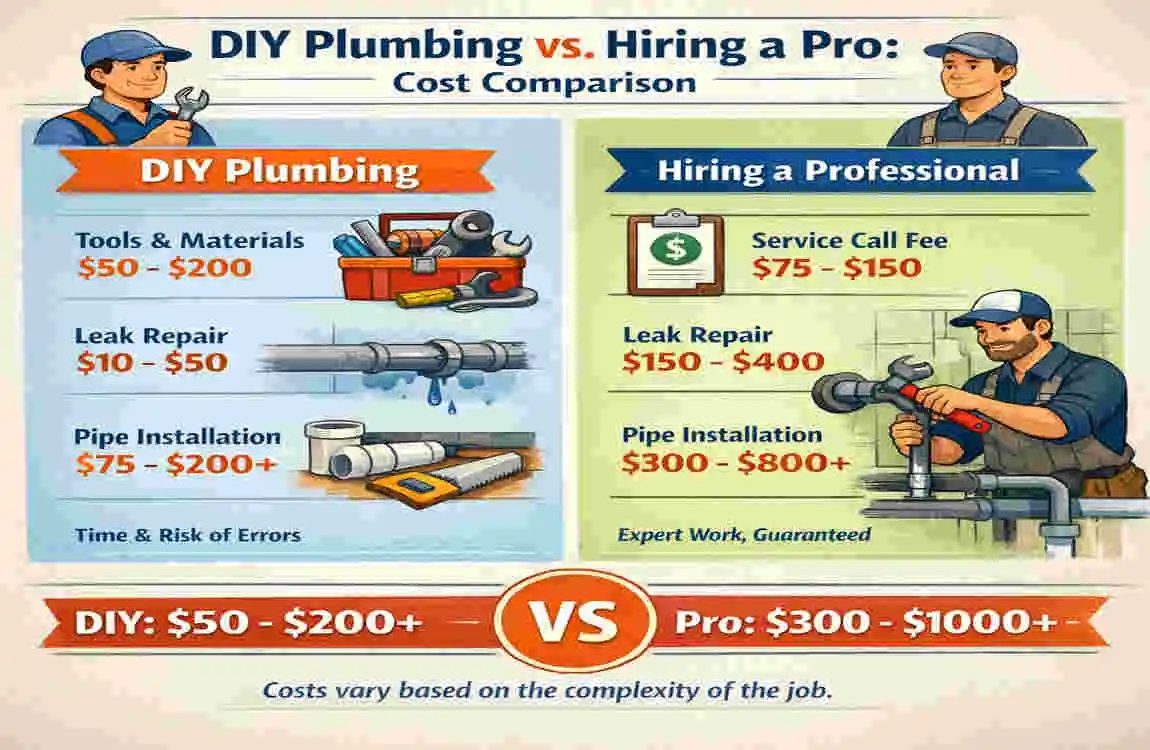
DIY plumbing usually costs less because you pay mostly for tools and parts. Minor repairs and fixture swaps are often good DIY jobs. But for major remodels, hidden pipe problems, or code-heavy work, hiring a plumber may save money in the long run.
Frequently Asked Questions About How to Do Plumbing in a House
Can beginners do plumbing work themselves?
Yes, beginners can handle many small tasks, such as fixing leaks, unclogging drains, and replacing simple fixtures.
What is the easiest plumbing repair for beginners?
A running toilet or a leaky faucet is often the easiest place to start.
Is PEX easier to install than copper?
Yes, PEX is usually easier because it is flexible and needs fewer difficult steps.
How do I temporarily stop a pipe leak?
Use a repair clamp, epoxy putty, or waterproof tape until a proper repair can be made.
Do I need a permit for home plumbing work?
Sometimes yes. It depends on your local rules and the size of the job.
How long does it take to install plumbing in a house?
A small fixture repair may take under an hour, while a full installation can take much longer.