Plumbing venting might not be the most glamorous topic, but it’s a critical part of your home’s infrastructure. Without proper venting, your drainage system can become a breeding ground for problems like sewer gas buildup or inefficient water flow. The fundamentals include exploring different vent types, troubleshooting common issues, and picking up some expert tips along the way. By the end of you’ll feel confident about maintaining a healthy plumbing system that keeps your home plumbing and comfortable.
Understanding Home Plumbing Venting Basics

Let’s start with the basics. Plumbing venting is a system of pipes that allows air to flow into and out of your home’s drainage system. Think of it as the “lungs” of your plumbing—it helps maintain balance and prevents issues when water flows through your drains. Without proper venting, your system can’t work efficiently, leading to various plumbing problems. So, why is this so important when learning how to properly vent home plumbing? Venting ensures that air pressure stays balanced as water moves through your pipes. Without it, you’d get trapped air, which slows down drainage or even causes backups. Additionally, vents help release harmful sewer gases outside your home, rather than allowing them to linger indoors.
How Does Venting Work?
Here’s a simple way to picture it: when you flush a toilet or drain a sink, water rushes down the pipes. This creates a vacuum or suction effect. If there’s no vent to let air in, that suction can pull water out of nearby traps those U-shaped pipes under bathroom sinks, letting sewer gases sneak into your home. Vents prevent this by allowing air to enter the system, balancing the pressure. Vents are usually connected to your main drain lines and extend up through your roof. They act as an escape route for air and gases while ensuring water flows smoothly.
The Connection Between Vents, Drains, and Traps
Let me break this down further. Every fixture in your home—like sinks, bathroom toilets, and showers—has a drain connected to a trap. Traps hold a small amount of water to prevent sewer gases from backing up into the pipes. But for traps to work, vents are essential. They maintain the pressure balance so that the water in the trap doesn’t get sucked out. In short, vents, drains, and traps work as a team. If one part fails, the whole system suffers. That’s why understanding how to properly vent home plumbing starts with knowing how these pieces fit together.
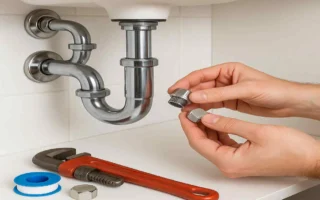
Materials Used for Vent Pipes
Vent pipes are typically made from durable materials, such as PVC (a type of plastic) or ABS (a different kind of plastic), although older homes may have been constructed with cast iron or galvanized steel. PVC is the go-to choice today because it’s lightweight, affordable, and resistant to corrosion. These materials ensure your vents last for years without needing constant repairs. Have you checked the vents in your home lately? Knowing what they’re made of can give you a clue about their age and condition. Let’s keep this in mind as we proceed to the various types of vents and their respective roles home plumbing.
Types of Plumbing Vents and Their Functions

Let’s start with the big player—the main vent, often referred to as the stack vent. This is the primary pipe that runs vertically through your home, usually from the basement to the roof. It connects to your main drain line and serves as the central airway for your entire plumbing system. Every home needs at least one stack vent to ensure proper airflow. The stack vent’s job is to release sewer gases safely outside and allow air to enter the system. Without it, pressure imbalances would wreak havoc on your plumbing system, including your drains. It’s like the main highway for air in your plumbing network.
Branch Vents: Supporting the Main System
Next up are branch vents. These are smaller pipes that connect individual fixtures or groups of fixtures to the main vent stack. For example, the sink and toilet in your bathroom might share a branch vent that ties into the main stack. They help balance pressure in specific areas of your home design.
Branch vents are super important for homes with multiple bathrooms or floors. They ensure that every drain receives the air it needs to function properly. Without them, you might notice slow drainage in one area while another works fine.
Circuit Vents: Handling Multiple Fixtures
Ever heard of circuit vents? These are used when multiple fixtures are connected to a single drain line, such as in a row of sinks or toilets. Instead of giving each plumbing fixture its own vent, a circuit vent serves the whole group. It’s an efficient way to save space and materials. However, circuit vents must be installed carefully to meet local building codes. They’re not allowed everywhere, so check your area’s rules before planning one.
Air Admittance Valves (AAVs): A Modern Alternative
Here’s a cool option for tight spaces: air admittance valves, also known as AAVs. These are small devices that allow air to enter the system without requiring a traditional vent copper pipe to the roof. They’re often used in remodels or additions where running a full vent pipe isn’t practical. While AAVs are handy, they’re not a full replacement for traditional vents in most cases. They can fail over time and aren’t allowed by code in some areas. So, weigh the pros and cons before using them.
Relief Vents and Vent Stacks: Extra Support
Lastly, let’s touch on relief vents and additional vent stacks. Relief vents help balance pressure in larger systems, especially in multi-story homes. Extra vent stacks may be added for complex layouts to ensure every part of the system receives sufficient air. Each type of vent has its own strengths and limits. For instance, while AAVs save space, they don’t handle large systems well. Traditional vents, on the other hand, are reliable but require more effort during pipes installation. Which type do you think best suits your home?
How to Properly Vent Home Plumbing: Step-by-Step Guide

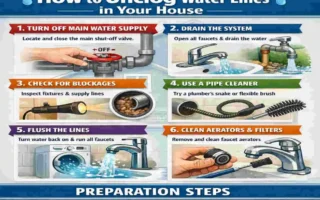
Now that we’ve covered the basics, let’s get into the nitty-gritty of how to properly vent home plumbing. The first step is planning. Before you grab a saw or pipe, take a good look at your home’s layout. How many fixtures do you have? How big is your house? These factors decide how complex your vent system needs to be. Don’t skip checking local building codes. Every area has rules about vent placement, size, and materials. Failing to address these can result in fines or failed inspections. Grab a pencil and sketch out your plumbing work—trust me, it’ll save you headaches later.
Sizing Vent Pipes: Get the Diameter Right
Size matters when it comes to vent plumbing pipes. If they’re too small, they won’t handle the airflow your system needs. Too big, and you’re wasting materials. Most homes use 1.5-inch or 2-inch pipes for branch vents and 3-inch or 4-inch pipes for main stacks. Your local code will often specify the minimum size based on the number of fixtures. What size to use? Look up a “vent pipe sizing chart” or ask a plumber for assistance. Getting this right ensures water flows smoothly without pressure issues.
Best Placement for Vent Pipes
Where you place your vents is just as important as their size. Vents should be as close as possible to the fixtures they serve—usually within a few feet. This maintains air pressure balance precisely where it’s needed. For main stacks, they should run straight up through the roof, avoiding sharp bends that could trap debris. Also, make sure vents don’t end near windows or air intakes. You don’t want sewer gases wafting into your home improvement. Placement is key to both function and safety.
Installation Tips for a Flawless Setup
Ready to install? Let’s break it down into manageable steps. First, gather your tools—pipe cutters, fittings, solvent cement for PVC, and a level to ensure straight lines. Safety gear, such as gloves and goggles, is also a must.
- Cutting and Connecting Pipes: Measure twice, cut once. Use a pipe cutter to achieve clean edges, then join the pieces with fittings and cement (for PVC). Ensure every connection is secure to prevent leaks.
- Securing Through Walls or Roofs: When running vents through walls or the roof, use proper flashing and seals to prevent water damage. Vents should extend at least 6 inches above the roofline to avoid blockages from snow or debris.
- Double-Check Angles: Keep vent pipes as vertical as possible. Slants or bends can trap moisture or debris, leading to clogs.
Take your time with this. Rushing can lead to misaligned pipes or weak connections, which can be difficult to fix later.
Compliance with Local Codes and Permits
I can’t stress this enough—always follow local building codes. Some areas require permits for plumbing work, including vent installations. Contact your local house building department to confirm the necessary requirements. Failing an inspection because you skipped this step is a costly mistake. Not sure where to start? Many municipalities post their codes online. Give them a quick read or consult a plumber to stay on the right side of the law.
Troubleshooting Common Plumbing Vent Problems
Even with the best setup, venting issues can creep up. How do you know if your vents aren’t working right? Listen for gurgling sounds when you flush or drain water—that’s a classic sign of poor airflow. Slow drainage is another red flag, as is the smell of sewer gas in your home. If you notice any of these, don’t ignore them. They’re your plumbing tips crying for help. Let’s determine how to identify and resolve these issues.
Inspecting Vents for Blockages or Damage
Start with a visual check. Head to your roof (safely, of course) and look at the vent openings. Are they blocked by leaves, bird nests, or snow? Clear away any debris with a gloved hand or a small brush. Also, check for cracks or damage in the pipe itself—weather can take a toll over time.
Simple Fixes for Minor Issues
For minor blockages, a plumbing snake or a garden hose can work wonders. Feed the snake into the vent pipe from the roof to dislodge small clogs. If that doesn’t work, a gentle blast of water from a hose might do the trick—just be careful not to overdo it, as excessive pressure can damage pipes. If the issue persists, it might be deeper in the system. That’s when tools like inspection cameras come in handy. They let you see inside the pipes without tearing anything apart.
When to Call a Professional

Some problems are beyond a quick DIY fix. If you’ve cleared visible blockages but still smell sewer gas or hear gurgling, there may be a hidden issue, such as a cracked pipe or improper pipes installation. Don’t hesitate to call a plumber in these cases—they’ve got the skills and gear to diagnose tricky problems. Have you dealt with stubborn vent issues before? I’d love to hear how you handled them! For now, let’s focus on keeping your vents in top shape with regular maintenance.