Tired of that old bathroom vanity taking up space and making the room feel dated? Good news: you can give your bathroom a fresh new look without tearing apart the walls. In many homes, the plumbing is already in a workable spot, which makes a vanity swap much easier than people expect.
If you have been wondering how to install vanity over home plumbing, this guide is for you. I’ll walk you through the process in simple language, step by step, so you can feel confident from start to finish. You do not need to be a master plumber to handle a basic vanity replacement. You just need good measurements, the right tools, and a clear plan.
| Step | Description | Tools & Tips |
|---|---|---|
| Prepare the Space | Clear the area, turn off water supply, and remove old vanity if needed. Measure space for new vanity (standard widths: 24-60 inches). | Level, tape measure, screwdriver. Tip: Ensure 30-36 inches clearance for doors/drawers. |
| Assemble the Vanity | Follow manufacturer instructions to build cabinet. Attach doors and drawers. | Allen wrench, screwdriver. Tip: Pre-drill holes to avoid wood splitting—ideal for DIY beginners. |
| Position & Level | Slide into place, use shims for leveling, and secure to wall studs. | Shims, drill, level. Tip: Anchor to studs for stability; check with bubble level on all sides. |
| Install Sink & Faucet | Mount sink (undermount/top-mount), connect faucet, and seal edges with silicone. | Plumber’s putty, silicone caulk. Tip: Tighten drain from below; test for leaks before full use. |
| Connect Plumbing | Attach supply lines and drain pipe. Turn water on slowly to check connections. | Wrench, PEX lines or flex hoses. Tip: Use thread seal tape on fittings; common for bathroom upgrades. |
| Final Touches | Caulk gaps, install backsplash if desired, and clean up. | Caulk gun, rag. Tip: Opt for moisture-resistant sealant in humid climates like Pakistan summers. |
Why Install a Vanity Over Existing Home Plumbing?

A bathroom vanity replacement can look like a big job, but in many cases, it is one of the easiest ways to update a bathroom. The main reason is simple: you may already have the plumbing in the right place.
It saves time and avoids major demo
When you install a vanity over existing plumbing, you often skip the hardest part of bathroom renovation: opening the wall and moving the pipes. That means less mess, less labor, and less stress.
Instead of cutting into drywall and rerouting drain lines, you can work with what is already there. If the new vanity fits the existing rough-in, the process becomes much smoother.
It can save real money
Plumbing changes can get expensive fast. Even small adjustments may require additional fittings, labour, and patching. If your plumbing is already close to where it needs to be, you can save a meaningful amount by keeping it in place.
For many homeowners, a DIY vanity installation guide like this one can save a few hundred dollars compared to hiring out the entire job. And if the job is simple, the savings can be even better.
It works well for standard bathroom layouts
Most bathrooms have a fairly standard vanity rough-in. That usually means the drain and supply lines are already located in a spot that works with common vanity cabinets.
A retrofit installation works best when:
- The plumbing lines are centered or close to centered
- The vanity cabinet has enough clearance for the pipes
- The rough-in dimensions match the cabinet depth and sink layout
- The flooring and wall are in decent shape
If those pieces line up, installing a bathroom vanity over existing plumbing is very doable for a careful homeowner.
It gives you a faster bathroom update
Maybe you do not want a full remodel. Maybe you just want the bathroom to look cleaner, more modern, and more organized. A new vanity can do that quickly.
You can change the colour, style, storage, and even the countertop without reworking the whole room. That is why so many homeowners look for an easy vanity install for homeowners rather than a full renovation.
Tools and Materials You’ll Need
Before you start, gather everything in one place. Nothing slows a project down like having to stop and run to the store in the middle of installation.
Essential tools
You do not need a huge toolbox, but you do need the basics:
- Tape measure
- Pencil or marker
- Level
- Drill and drill bits
- Screwdriver
- Adjustable wrench
- Pipe wrench, if needed
- Utility knife
- Caulk gun
- Stud finder
- Bucket and towel
- Safety glasses
- Work gloves
These tools will help you measure, position, secure, and finish the vanity safely and neatly.
Materials and parts
You will also need the right materials for the actual installation:
- Vanity cabinet
- Countertop, if separate from the cabinet
- Sink, if not already built into the top
- Faucet
- Drain assembly
- P-trap parts
- Supply lines
- Plumber’s putty
- Silicone caulk
- Screws for wall mounting
- Shims
- Wall anchors, if needed
If your current plumbing is in good shape, you may only need a few fittings and connectors. If parts are old or worn, replace them now rather than wait for a leak later.
A quick shopping mindset
It helps to think in terms of function first. Pick quality where it matters most: the faucet, drain pieces, and supply lines. A vanity can look beautiful, but if the plumbing parts are weak, you will deal with leaks and headaches later.
A practical vanity plumbing rough-in setup starts with reliable parts and a cabinet that fits your room. Do not overcomplicate it. Choose materials that match your bathroom size, style, and budget.
Preparing for Vanity Installation
Good preparation is what makes this project feel easy. The more you check now, the fewer surprises you will face later.
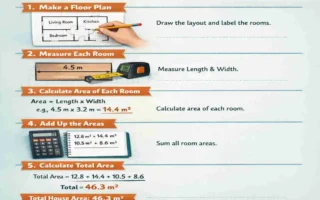
Measure everything carefully
This is the most important step before you install anything. Measure the width, height, and depth of the old vanity area. Then measure the rough-in plumbing location.
Pay close attention to:
- Centerline of the drain
- Height of the drain pipe from the floor
- Placement of the hot and cold supply lines
- Depth of the vanity cabinet
- Distance from the wall to the front of the vanity
- Height of the countertop and sink
If the new vanity is deeper than the old one, make sure the pipes still have room behind or inside the cabinet. If the cabinet is smaller, you may need to adjust your plan so the plumbing lines are hidden but still accessible.
Check the rough-in before you buy
A lot of homeowners ask how to install vanity over home plumbing, but the real answer starts before installation day. You need to know whether the existing rough-in will work with the new cabinet.
Most standard vanity rough-ins fit common cabinet layouts, but not all bathrooms are standard. Older homes especially can have odd pipe placements. If your drain pipe sits too low, too high, or too far off center, you may need a small adjustment.
Remove the old vanity safely
Turn off the water before you disconnect anything. Then place a bucket under the trap and loosen the plumbing parts carefully. If the existing vanity is caulked to the wall, use a utility knife to cut the seal.
Work slowly so you do not damage the wall, floor, or plumbing. If the old vanity is glued, warped, or heavy, get help lifting it out. Protect your back and avoid forcing it.
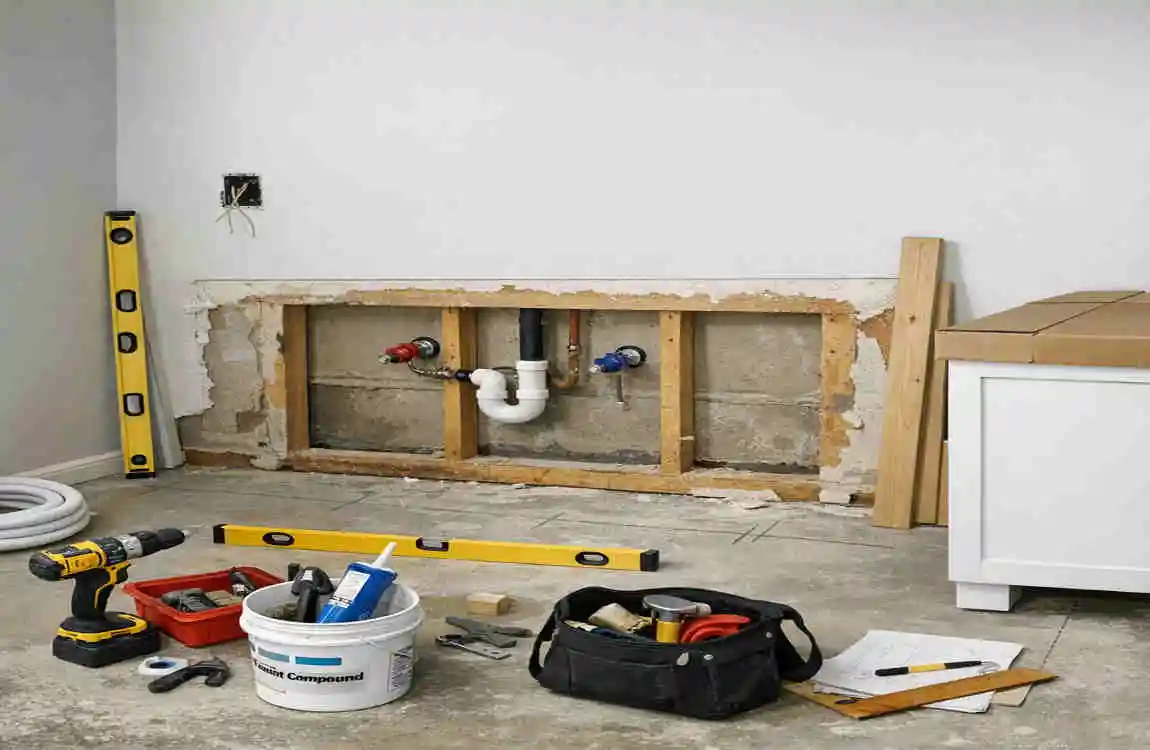
Inspect the plumbing and the room
Once the old vanity is out, take a close look at the area. This is your chance to catch issues before the new vanity goes in.
Look for:
- Water damage on the wall or floor
- Corrosion around pipe joints
- Loose shutoff valves
- Mold or mildew
- Uneven flooring
- Cracked caulk or damaged drywall
If you find a major leak, rotted wood, or a badly placed pipe, it may be smarter to pause and call a plumber. A clean, stable base makes the rest of the job much easier.
Prep the wall and floor
Patch holes, remove old caulk, and clean up dust or debris. If the floor is uneven, you may need shims later when you set the vanity. If the wall is rough or damaged, smooth it out now so the cabinet sits flat.
A solid, level surface matters because the vanity needs to rest evenly and line up with the plumbing cutouts.
Vanity size and rough-in checklist
Here is a simple table to help you compare common vanity sizes and what to check before installation:
Vanity Size Typical Use What to Check Before Install
24 inches Small powder room Drain alignment, wall clearance, sink depth
30 inches Small-to-medium bathroom Centerline fit, cabinet depth, supply line access
36 inches Standard full bath Floor level, pipe height, stud placement
48 inches Medium shared bathroom Extra support, wider countertop, plumbing alignment
60 inches Large bathroom Wall support, spacing for double sink if used
This table is not a strict rule, but it gives you a good starting point. Always compare the cabinet dimensions with your actual plumbing before you buy.
Step-by-Step Guide: How to Install Vanity Over Home Plumbing
This is the heart of the project. Follow each step carefully, and do not rush. A clean vanity install is all about fit, level, and secure plumbing connections.
Position and level the vanity
Start by placing the vanity where it will go. Do a dry fit first. This means setting the cabinet in place without fastening it yet.
Find the centerline
Mark the centre of the drain on the wall or the floor, if needed. This gives you a reference point so you can line the vanity up correctly. If the cabinet has a sink centered over the drain, this step becomes even more important.
Check for fit around the plumbing
Look at how the drain and supply lines enter the cabinet area. Make sure there is enough space for them without crushing or bending the pipes.
If the back panel of the vanity blocks the plumbing, you may need to trim a small access opening. Do this carefully. Measure twice, cut once.
Use shims to level the cabinet
Few floors are perfectly level. That is normal. Use shims under the vanity to fill low spots and level the cabinet.
A level cabinet is important because:
- The countertop will sit better
- The doors and drawers will open more smoothly
- The sink will drain correctly
- The vanity will look professionally installed
Once it is level, secure the vanity to wall studs with screws. If you cannot hit a stud in every ideal spot, use proper anchors where needed, but studs are always better.
Connect to existing plumbing
This is the part most homeowners worry about, but it is usually very manageable if you have measured correctly.
Dry-fit the drain first
Before tightening anything, test how the drain lines up with the vanity sink opening and the P-trap. The goal is a clean, stress-free path from the sink drain to the wall drain, without awkward bends.
If the drain is off by a small amount, you may be able to use slightly different fittings to make it work. Flexible connections can help, but do not force a pipe into place.
Adjust the supply lines
Supply lines for the faucet should reach comfortably without stretching. If they are too short, replace them with longer flexible hoses. That is often easier than trying to rig a complicated workaround.
Keep these points in mind:
- Hot and cold lines should not cross awkwardly
- Hoses should have a gentle curve, not a tight bend
- Connections should be hand-tight first, then snugged carefully
- Do not over-tighten fittings, or you may damage the seals
Align the drain and P-trap
The drain connection is usually where the most patience is needed. The P-trap must be installed so that water flows properly and sewer gases are kept out of the room.
If the existing pipe is slightly off, use the proper connectors to bridge the gap. Avoid stacking too many parts together just to make things fit. A neat setup is safer and easier to maintain.
When you need to cut an access opening
Sometimes the vanity’s back panel blocks the pipe area. In that case, mark the pipe locations and cut a clean access hole.
Here is the simplest way to do it:
- Measure the locations of the pipes from the wall.
- Mark those measurements on the back panel.
- Cut a hole large enough for the pipe and fittings.
- Test-fit the cabinet again.
- Trim only if needed.
A careful cut looks much better than a rushed one. You want the plumbing to fit, but you also want the cabinet to look finished.
Check for stress in the pipes
Once everything is aligned, check that no pipe is being pushed sideways, pulled downward, or twisted into an unnatural shape. Pipes should sit naturally. If they are under stress, leaks often happen later.
This is one of the biggest reasons to learn how to install vanity over home plumbing the right way. The setup should look clean and feel relaxed, not forced.
Install the countertop and backsplash
If your vanity comes with a separate countertop, now is the time to set it in place.
Set the top carefully
Before placing the countertop, make sure the cabinet is level and secure. Then apply adhesive if the manufacturer recommends it.
Lower the top slowly and check that it sits evenly on the cabinet. If the sink is already attached to the countertop, be extra careful not to chip the edges.
Seal around the edges
Use silicone caulk along the back edge where the countertop meets the wall. This helps keep water out of the gap and protects the wall from moisture damage.
Apply the caulk in a neat line. Smooth it with a damp finger or caulk tool for a clean finish. A neat seal may seem like a small detail, but it makes a big difference in how the vanity looks and performs.
Make sure the plumbing cutouts fit
Check that the faucet hole, sink opening, and drain opening all line up correctly. If something is off by a little, stop and correct it before tightening everything down.
Once the top is fixed in place, your vanity begins to look complete.
Final touches and testing
Now comes the part where everything gets checked.
Reconnect the plumbing
Attach the faucet supply lines, drain assembly, and P-trap components. Tighten each connection carefully, but do not crank too hard. Over-tightening can damage washers and cause leaks.
Before turning on the water, look at every joint one more time. Make sure the fittings are seated correctly and nothing is crooked.
Apply caulk where needed
Seal the gap between the vanity and wall, and around the countertop edges if necessary. This keeps water from seeping behind the cabinet.
A small bead of caulk also gives the installation a finished look. It makes the project appear clean and intentional instead of patchy.
Test for leaks
Turn the water back on slowly. Let it run for a minute, then check every connection with a dry paper towel or cloth.
Watch for:
- Drips under the sink
- Moisture around the shutoff valves
- Leaks at the P-trap
- Water pooling near the base of the cabinet
If you see a leak, shut off the water and fix the issue before moving on. Most problems are minor and come from a loose fitting or a bad seal.
Reinstall doors, drawers, and hardware
Once the plumbing is leak-free, reinstall the vanity doors, drawers, and handles, if removed during setup. Check that everything opens and closes smoothly.
This is the point where the room really starts to feel finished.
Finishing up
You have done the hard part. Now it is time for the final details that make the bathroom look polished.
Clean the workspace
Wipe down the vanity, sweep up dust, and remove extra caulk or debris. A clean finish makes the whole project feel more complete.
Add simple style upgrades
If you want to go a little further, consider small touches like:
- A new mirror
- Updated lighting
- Matching towel bars
- A faucet in a finish that matches the cabinet hardware
These details can make your bathroom feel far more updated without adding much extra work.
Give the plumbing one last check
After a few hours or even the next day, look under the sink again. Sometimes a tiny leak only shows up later. A quick check can save you from damage down the road.
If you handle the setup well, you can master DIY vanity installation over home plumbing without needing a full remodel.
Common Mistakes to Avoid When Installing a Vanity Over Home Plumbing
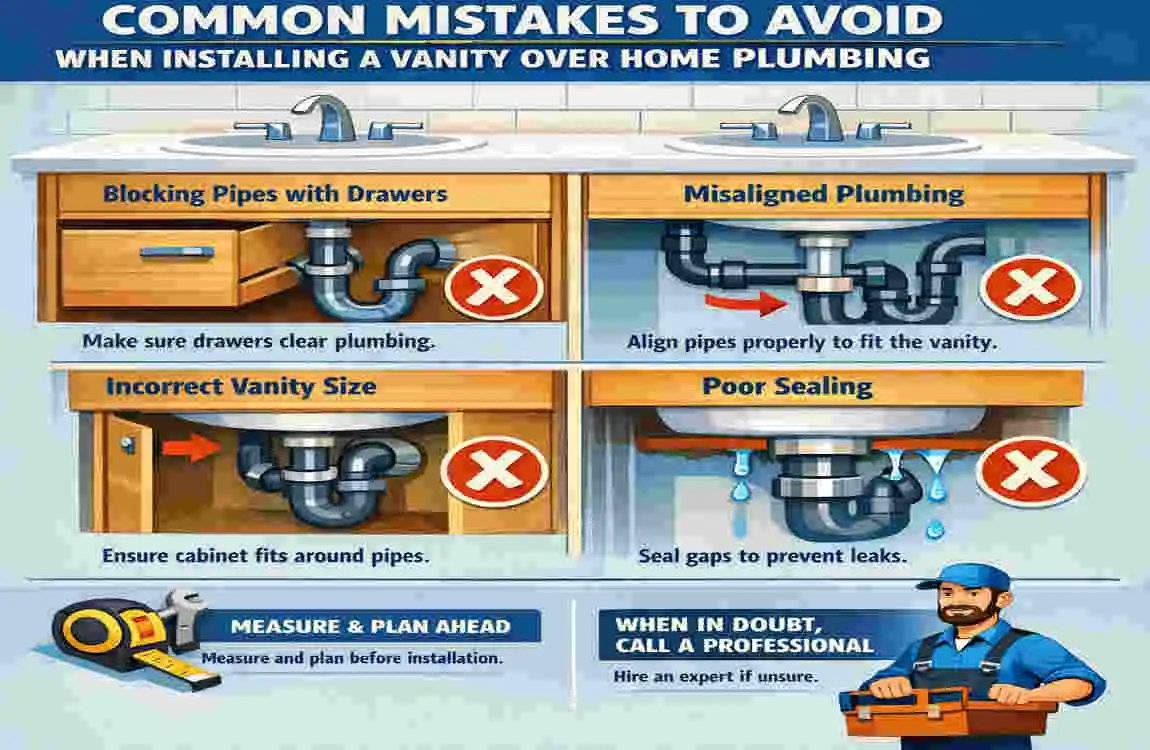
Even a simple project can go wrong if you rush. The good news is that most mistakes are easy to avoid once you know what to look for.
Measuring only once
A wrong measurement can ruin the fit. If the vanity is too deep, too wide, or too short, the plumbing may not align.
Fix: Measure the cabinet, the wall space, and the plumbing rough-in multiple times before buying or cutting anything.
Ignoring wall studs
A vanity that is not anchored well can shift over time, especially if the countertop is heavy.
Fix: Find the studs and secure the cabinet properly. Use anchors only where needed.
Forcing plumbing connections
Pipes should fit together naturally. If you have to force them, something is off.
Fix: Recheck alignment and use the correct fittings instead of pressure.
Skipping caulk
Water is sneaky. It finds gaps and slips behind cabinets fast.
Fix: Seal the wall-to-vanity and countertop edges with silicone caulk.
Not testing for leaks
A connection may look fine but still drip once the water is on.
Fix: Run water and inspect every joint carefully before declaring the job done.
Quick troubleshooting table
Problem Likely Cause Simple Fix
Vanity won’t sit flat Uneven floor Add shims and re-level
Drain does not line up Rough-in mismatch Use correct fittings or adjust cabinet opening
Supply lines are too short Old hoses or wrong size Replace with longer flexible lines
Water leaks under sink Loose or damaged fitting Tighten carefully or replace seal
Vanity shifts after install Weak wall attachment Fasten into studs properly
These issues are common, and they usually have simple solutions. The key is to stay calm, check your work, and fix small problems before they become big ones.
FAQs: How to Install Vanity Over Home Plumbing
Here are some common questions homeowners ask when planning a vanity install.
Can I install a vanity over old plumbing?
Yes, in many cases you can. If the existing drain and supply lines are in a good spot, you may be able to install the new vanity without moving the pipes.
What if my rough-in does not match the new vanity?
You have a few options. You can choose a different vanity size, adjust the cabinet back panel, or make small plumbing changes if needed. If the mismatch is major, a plumber may need to help.
How long does a vanity installation usually take?
A simple project can take a few hours if the plumbing lines up well. If you need to trim the cabinet, replace fittings, or fix damage, it may take longer.
Can I install a floating vanity over existing plumbing?
Yes, but floating vanities need strong wall support. You also need to ensure the plumbing lines are positioned to fit the open space below the cabinet.
Do I need a plumber for this project?
Not always. If the plumbing is already in good shape and the job is a straightforward replacement, many homeowners can handle it. If you find leaks, rotted wood, or major pipe alignment problems, call a licensed plumber.
What is the most important part of the install?
The most important part is proper measurement and alignment. If the vanity fits the space and the plumbing lines up, the rest of the job becomes much easier.