Roofing is a crucial aspect of home construction and maintenance, yet it often goes unnoticed until a problem arises. One of the key elements of a durable roof is the correct depth of roofing nails. Understanding how far house roofing nails should penetrate is essential for ensuring your roof’s longevity and protecting your home from potential damage.
Why does proper penetration matter? When nails are driven to the correct depth, they provide a secure fastening that helps prevent leaks and structural issues. Conversely, improper nail depth can lead to serious problems, including insecure shingles and eventual water infiltration.
Basics of Roofing Nails
What Are Roofing Nails?
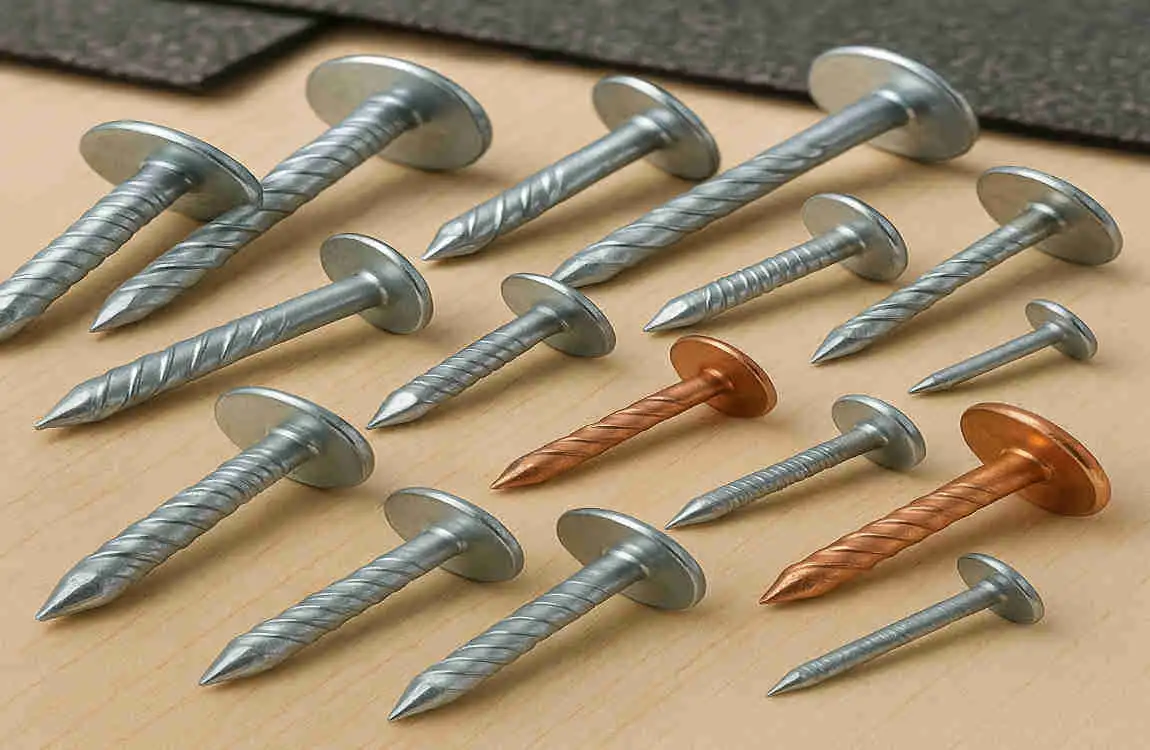
Roofing nails are specialized fasteners explicitly designed for securing roofing materials. Unlike regular nails, they are crafted to withstand the unique challenges posed by weather and structural movement. Their design, materials, and dimensions play a pivotal role in their performance.
Common Types of Roofing Nails
There are several types of roofing nails, each serving a specific purpose:
- Smooth Shank Nails: These are the most basic type, characterized by a smooth shaft that facilitates easy penetration. However, they have limited holding power.
- Ring Shank Nails: These nails have small rings along the shaft, providing increased grip and reducing the risk of pull-out.
- Square Cap Nails: Designed for use with specific types of roofing materials, these nails feature a wider head that offers better coverage and support.
Standard Sizes and Materials
Roofing nails come in various sizes and gauges. The most common lengths range from 1 inch to 2 inches, with a gauge of 12 being the standard minimum.
- Materials: Most roofing nails are made from hot-dipped galvanized steel, which offers excellent corrosion resistance. This is crucial for durability, especially in harsh weather conditions.
Importance of Nail Size and Material
Choosing the right size and material for roofing nails is essential for ensuring a secure installation. The wrong choices can lead to premature failure and costly repairs.
Nail Type Common Lengths Uses
Smooth Shank 1″, 1.25″ Basic roofing applications
Ring Shank 1.5″, 2″ High-wind areas, increased pull-out resistance
Square Cap 1.5″, 2″ For specific roofing materials requiring a larger head
Understanding Roofing Nail Depth: What Does It Mean?

Definition of Roofing Nail Penetration Depth
Roofing nail penetration depth refers to the depth to which nails should be driven into the roof structure. This depth is critical for achieving a secure and effective roofing system.
Why Nail Depth Matters
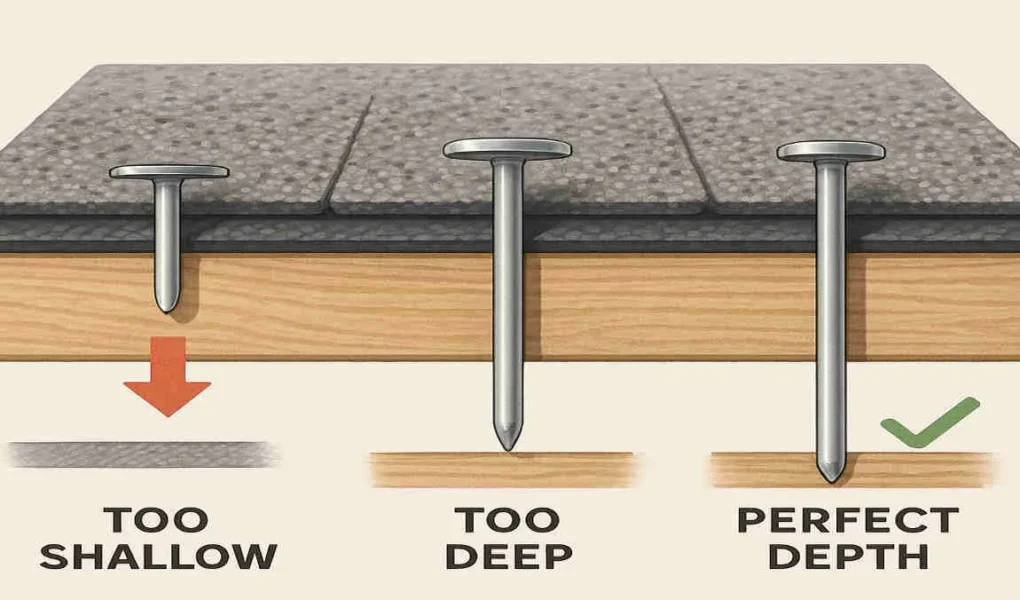
Proper nail depth directly impacts the quality of the roofing installation. Insufficient penetration can result in insecure fastenings, leading to a higher risk of nail pull-out and water infiltration. On the other hand, nails driven too deeply can cause damage to the roof decking, potentially weakening the overall structure.
Effects of Incorrect Nail Depth
- Too Shallow: This can compromise the fastening strength, making shingles prone to lifting and increasing the likelihood of leaks.
- Too Deep: Over-penetration can damage the roof decking, creating weak spots that may lead to structural issues down the line.
How Far Should House Roofing Nails Penetrate?
Building Codes and Industry Standards
Understanding the minimum penetration requirements set by building codes is essential. According to the International Building Code, roofing nails should penetrate at least ¾ inch into the roof sheathing. This standard ensures a secure attachment to the underlying structure.
Considerations Based on Roofing Material Thickness
The thickness of the roofing material plays a significant role in determining the appropriate nail length:
- Asphalt Shingles: Typically, nails should penetrate ¾ inch into solid wood or plywood sheathing. This ensures a firm hold.
- Thicker Shingles: If using thicker shingles or multiple layers, longer nails (30-35 mm or more) may be necessary to ensure proper penetration into the decking.
Measuring and Determining Proper Nail Depth
Measuring nail depth on-site is straightforward. Use a ruler or measuring tape to ensure that nails are driven to the appropriate depth. Always double-check the manufacturer’s guidelines for specific requirements based on the materials you are using.
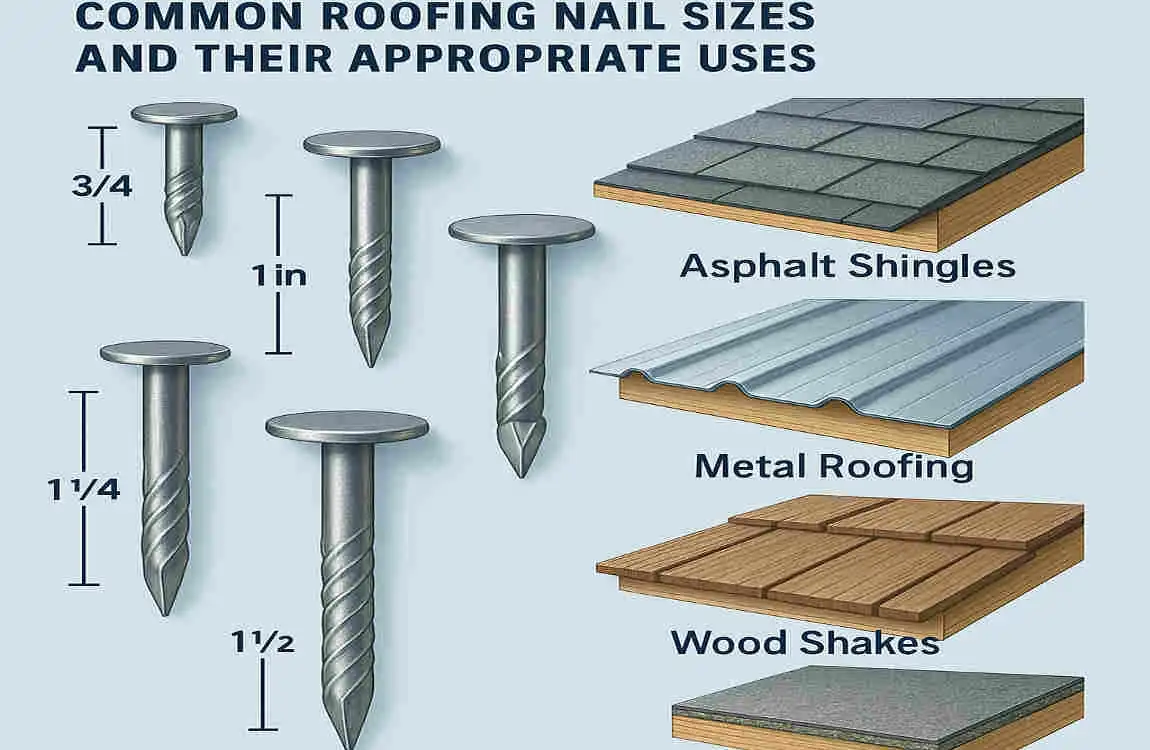
Common Roofing Nail Sizes and Their Appropriate Uses
Nail Gauge Explained
The gauge of a nail is a measure of its thickness. Most building codes require a minimum of 12-gauge nails, but thicker options (10 or 11 gauge) are available for added strength.
Nail Length Categories
Roofing nails come in various lengths, each suited for different applications:
- 1 inch: Light roofing materials or single-layer applications.
- 1¼ inch: Standard use for most roofing jobs.
- 1½ inch: Commonly used for thicker shingles.
- 1¾ inch: Designed for specialized applications or additional layers.
- 2 inches: Used in heavy-duty applications or thicker roofing systems.
Risks of Incorrect Nail Size
Using nails that are too short can lead to inadequate fastening, while overly long nails may damage the roof decking. It’s vital to match the nail size to both the roof sheathing and shingle thickness for optimal performance.
The Role of Nail Head Size and Shape
The size and shape of the nail head also contribute to holding power. Button or square heads provide better coverage and help distribute the load, ensuring a more secure installation.
Step-by-Step Guide: How to Properly Nail Your Roof
Tools Required for Correct Roofing Nailing
Before starting your roofing project, gather the following tools:
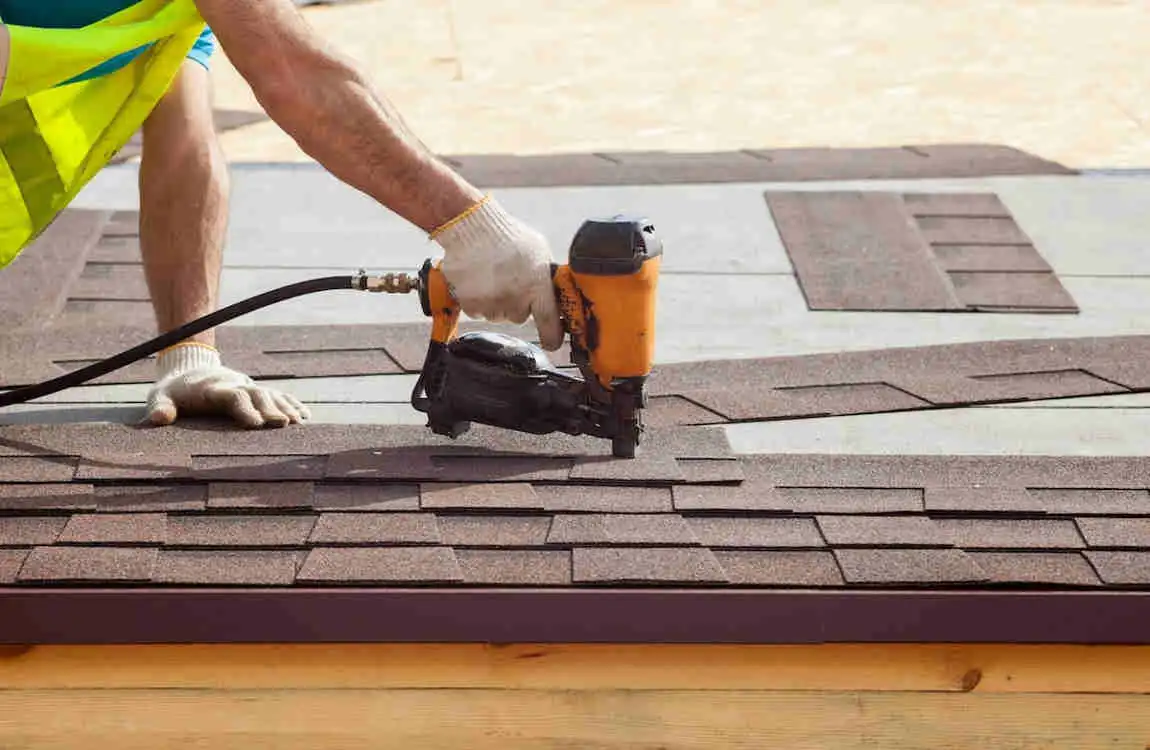
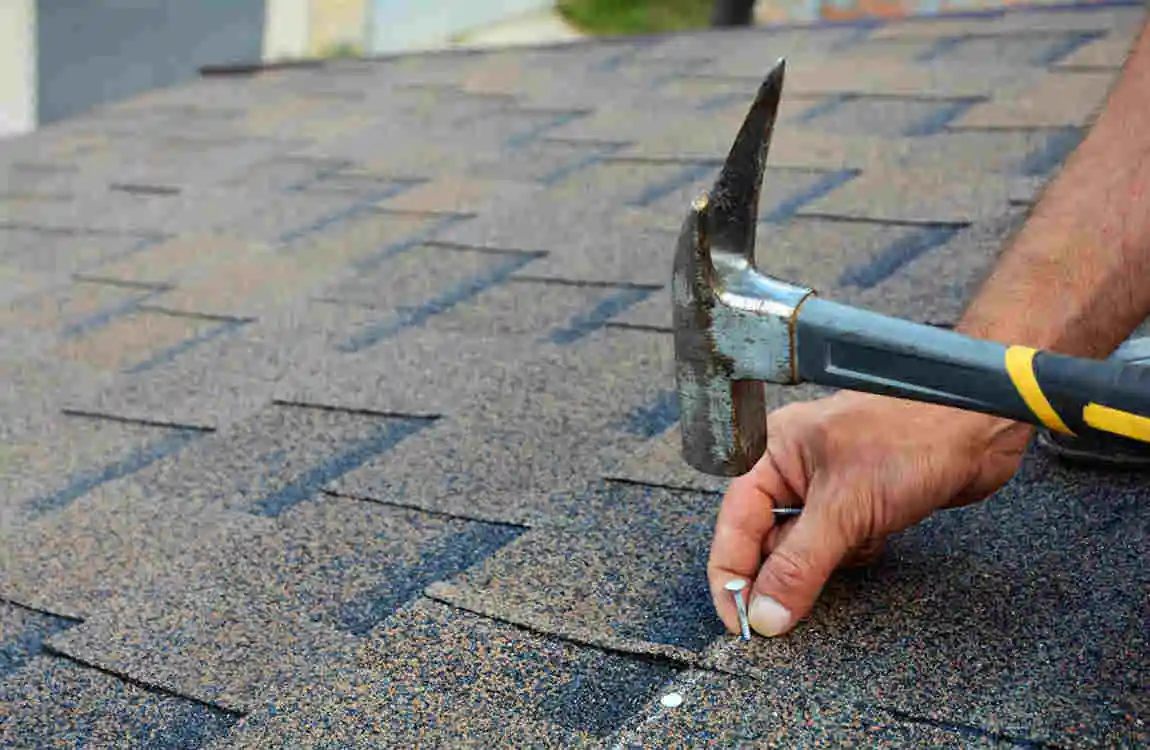
- Hammer or nail gun
- Measuring tape
- Roofing nails
- Safety gear (gloves, goggles)
Stepwise Instructions
- Prepare the Area: Ensure the roof surface is clean and dry.
- Measure Nail Depth: Use a measuring tape to determine the appropriate nail length based on your roofing material.
- Position the Nails: Place nails according to the manufacturer’s guidelines, typically along the edges of shingles.
- Drive the Nails: Use a hammer or nail gun to drive nails until they are flush with the shingle surface. Be careful not to overdrive or underdrive.
- Check for Proper Penetration: After nailing, inspect to ensure nails have penetrated at least ¾ inch into the deck.
Tips for Avoiding Common Mistakes
- Avoid Over-Driving: This can damage shingles and lead to leaks.
- Nail Positioning: Proper placement ensures optimal hold and prevents water intrusion.
- Choose Corrosion-Resistant Nails: This is especially important for roofs exposed to harsh weather conditions.
Number of Nails Per Shingle
Typically, each shingle should have at least four to six nails, depending on local codes and the type of shingle being used. This number helps maintain the overall integrity of the roof.
Consequences of Improper Roofing Nail Penetration

Structural Risks
Incorrect nail penetration can lead to various issues:
- Nail Pull-Out: Inadequate depth can cause nails to pull out, resulting in loose shingles and an increased risk of leaks.
- Water Leaks: Poorly secured shingles allow water to infiltrate, compromising the roof’s integrity.
Damage to Roof Decking
Overly long nails can puncture through the decking, creating weak points that may lead to structural failure. This can result in expensive repairs and increased maintenance costs.
Effects on Home Insulation
Improper nail installation not only affects the roof but can also impact insulation. Water leaks can lead to mold growth and decreased energy efficiency.
Impact on Warranty and Insurance Claims
Many roofing warranties require adherence to specific installation guidelines, including the depth of nail penetration. Failure to comply may void your warranty, which could affect your ability to make claims for repairs.
Tips for Homeowners: Checking and Maintaining Proper Nail Depth
Inspecting Nail Penetration
Homeowners can check nail penetration during or after installation by visually inspecting the shingles and ensuring that nails are flush with the surface. If nails are visible or protruding, they may need to be adjusted.
When to Call a Professional Roofer
If you’re unsure about the nail depth or if your roof shows signs of damage, it’s best to consult a professional roofing contractor. They can assess the situation and provide expert advice.
Regular Roof Maintenance Tips
To prevent nail-related issues, homeowners should:
- Schedule regular roof inspections.
- Clear debris off the roof to prevent moisture buildup.
- Replace damaged shingles promptly to maintain a secure roof.
Signs of Improper Installation
Watch for signs like loose shingles, water stains on the interior ceiling, or visible nails. These may indicate that further inspection or repair is necessary.
Frequently Asked Questions About Roofing Nail Penetration
How far should roofing nails penetrate the roofing deck?
Roofing nails should penetrate the roof deck by at least 3/4 of an inch or completely through the deck. If the roof deck is less than 3/4-inch thick, the nail should extend slightly beyond the underside of the deck.
This ensures that the nails provide a strong hold and prevent shingles from coming loose over time.
Why is proper nail penetration important?
Proper nail penetration is critical for the durability and performance of your roof. Here’s why:
- Secure Shingles: Nails that don’t penetrate deeply enough won’t hold shingles securely in place, increasing the risk of them being blown off during strong winds.
- Prevent Water Damage: Poorly nailed shingles can lift or curl, allowing water to seep underneath, which may lead to leaks or rot.
- Adherence to Building Codes: Most building codes and roofing manufacturers specify nail penetration requirements for warranty and safety purposes.
- Longevity: Properly nailed shingles are less likely to loosen over time, increasing the lifespan of your roof.
What happens if nails don’t penetrate far enough?
If roofing nails don’t penetrate the roof deck sufficiently, several issues can arise:
- Shingles May Loosen or Blow Off: Insufficient penetration reduces the holding power of the nails, especially during high winds or extreme weather.
- Water Leaks: Loosely attached shingles can allow water to seep under the roof, leading to leaks and structural damage.
- Voided Warranty: Many roofing material warranties are void if improper nail installation is detected.
Can roofing nails penetrate too far?
Yes, over-penetration can also cause problems. If roofing nails are driven too deeply, they may:
- Damage the Shingles: Excessive force can crack or tear shingles, reducing their effectiveness.
- Weaken the Hold: Overdriven nails can lose their grip in the roof deck, making the shingles more susceptible to lifting.
- Compromise the Deck: Nails that penetrate too far may weaken the roof deck, especially if it’s made of thinner material.
What type of roofing nails should I use?
The type of roofing nails you use plays a significant role in achieving proper penetration. Consider the following:
- Length: Roofing nails should be long enough to penetrate at least 3/4 of an inch into the roof deck or completely through thinner decks. Common lengths range from 1 inch to 2 inches, depending on the materials being installed.
- Material: Use galvanized or stainless steel nails to prevent rust and corrosion. Aluminum nails may be used in some regions but are less durable.
- Head Size: Roofing nails typically have a larger head (3/8 inch minimum) to provide better holding power for shingles.
How do I ensure proper nail penetration?
Follow these tips to ensure roofing nails are installed correctly:
- Choose the Right Nail Length: Consider the thickness of your shingles, underlayment, and roof deck when selecting nail length.
- Proper Nailing Technique: Drive the nails straight and flush with the shingle surface. Avoid angling the nails, as this can reduce penetration and holding power.
- Use Appropriate Pressure: If using a nail gun, adjust the pressure to avoid underdriving or overdriving the nails.
- Check for Manufacturer Guidelines: Follow the specific nailing requirements provided by the shingle manufacturer to ensure compliance with warranties.
What should I do if the roof deck is thinner than 3/4 of an inch?
If your roof deck is thinner than 3/4 of an inch (such as when using 1/2-inch plywood), roofing nails should penetrate completely through the deck and extend slightly beyond the underside.
This ensures the nails have enough hold, even in thinner materials. However, if you’re concerned about the nails protruding, consider using screws or consulting a roofing professional.
How do I know if nails are penetrating correctly?
You can check nail penetration by inspecting the underside of the roof deck:
- Proper Penetration: The tip of the nail should be visible, extending slightly beyond the underside of the deck.
- Improper Penetration: If the nail doesn’t reach the underside or barely penetrates, it’s not properly installed.
For thicker roof decks, ensure the nail penetrates at least 3/4 of an inch into the wood.