Have you ever wondered, “Why is the paint in my bathroom peeling?” You’re not alone! Bathroom paint peeling is a frustrating problem that many homeowners face. Not only does it ruin the look of your bathroom, but it can also indicate underlying issues that need immediate attention.
What Does Bathroom Paint Peeling Look Like?
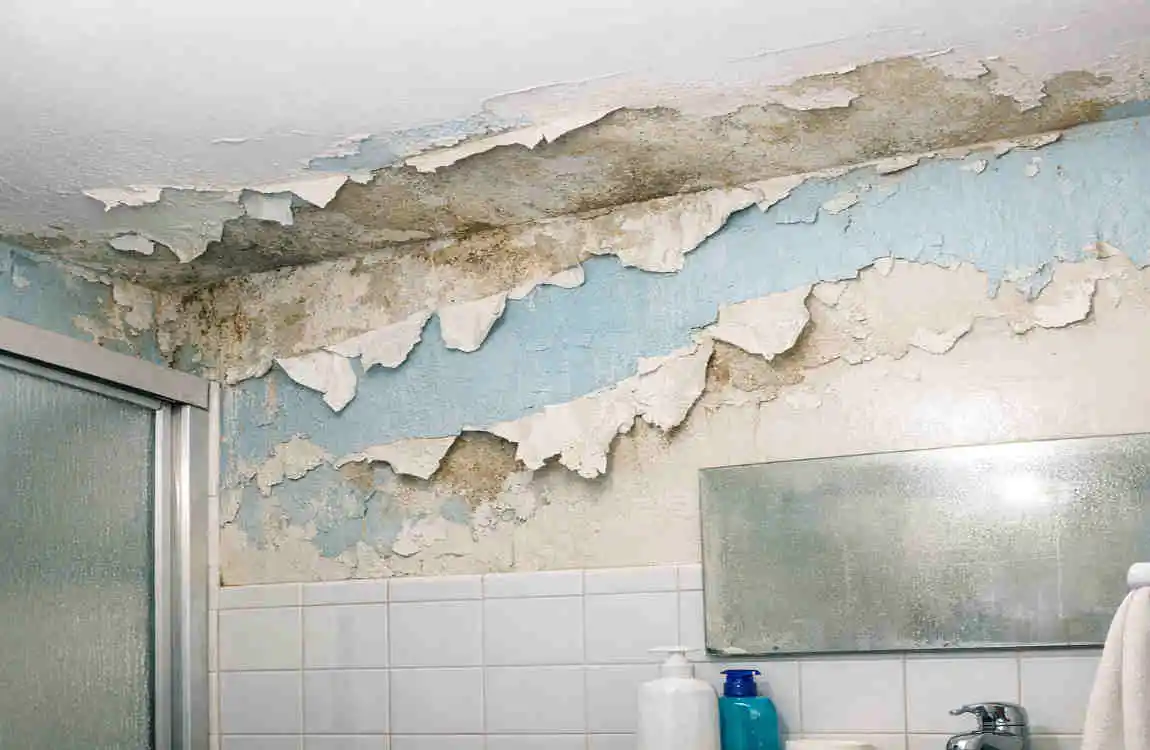
When bathroom paint begins to peel, it usually shows certain unmistakable signs. Let’s paint a vivid picture for you:
Visual Description
- Cracks and Bubbles: The paint surface may develop tiny cracks or bubbles, which gradually worsen over time.
- Flaking and Chips: Paint starts to flake away in small pieces, leaving uneven patches on the wall.
- Falling Paint Chips: You might notice small paint chips accumulating on the floor or in the sink.
Why It’s a Problem
Peeling paint is more than just an eyesore. It can expose the underlying wall to moisture, mould, and mildew, which can lead to further damage. Moisture seeping into walls can weaken the structure, cause stains, and even pose health hazards if mould develops.
Imagine walking into a bathroom with walls a patchwork of peeling paint – not the most inviting sight, right? Let’s now uncover the root causes of this issue.
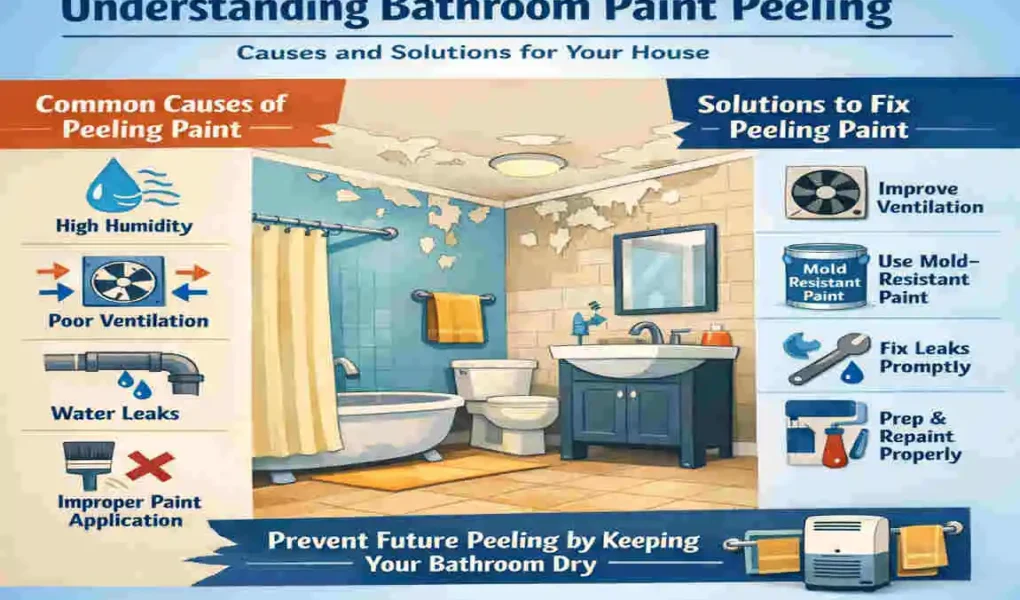
Why Is the Paint in My Bathroom Peeling?
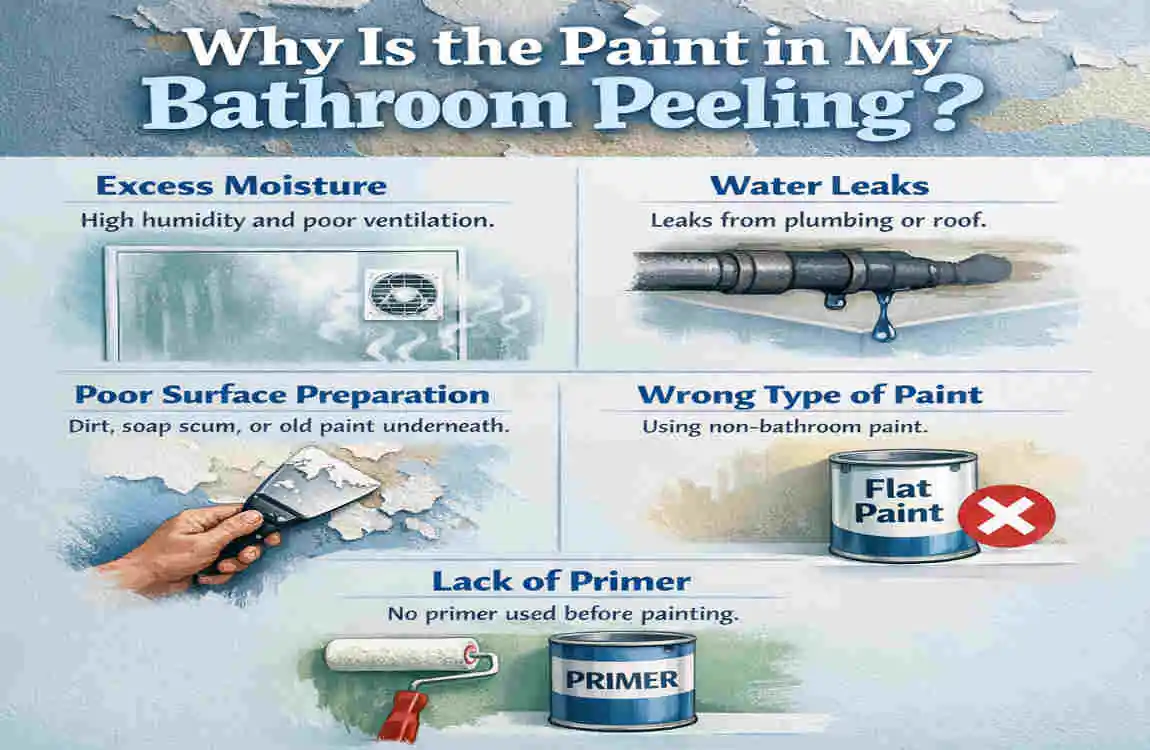
The question, “Why is the paint in my bathroom peeling?” often comes down to a mix of environmental factors, poor preparation, or both. Let’s explore the most common causes in detail.
Excess Humidity and Moisture
Bathrooms are naturally humid spaces. Every time you take a hot shower, steam and water droplets settle on the walls. Over time, this moisture weakens the paint’s adhesive properties, causing it to peel.
- Poor Ventilation: Without proper ventilation (e.g., an exhaust fan or open windows), humidity has nowhere to escape, increasing the likelihood of peeling paint.
Poor Paint Selection
Using the wrong type of paint for your bathroom is another common culprit. Regular interior paints are not designed to withstand the high levels of moisture present in bathrooms.
- Moisture-Resistant Paints: Bathroom-specific paints, such as those labelled “moisture-resistant” or “mildew-resistant,” are essential for durability.
- Finish Matters: Paint finishes like semi-gloss or satin are better suited for bathrooms, as they are more moisture-resistant than matte finishes.
Inadequate Surface Preparation
Skipping essential prep steps before painting can lead to peeling. Walls that are not cleaned, dried, or primed properly create a poor foundation for paint to adhere to.
- Dust and Grease: Dirt and grime can act as a barrier between the paint and the wall, weakening adhesion.
- No Primer: Primer is crucial for sealing the surface and creating a stable base for the paint.
Water Leaks
Hidden leaks from pipes, ceilings, or fixtures can saturate walls, leading to peeling paint.
- Signs of Leaks: Look for water stains, damp patches, or wall discolouration, which may indicate a leak.
Mould and Mildew Growth
Bathrooms are the perfect breeding ground for mould and mildew because of their damp environment. Mould not only weakens paint but can also spread, causing further damage.
Old or Low-Quality Paint
If your bathroom was painted with low-quality paint or if the paint job is old and worn out, peeling is inevitable. Cheaper paints often lack the durability required for high-moisture spaces.
How to Fix Peeling Paint in the Bathroom
If your bathroom walls are already peeling, don’t worry! Here’s a step-by-step guide to repairing the damage and restoring your walls.
Step-by-Step Guide to Repair Peeling Paint
Assess the Damage
Examine the extent of the peeling. Is it confined to a small area, or is it widespread? This will help you decide whether a quick touch-up or a full repainting is necessary.
Remove the Peeling Paint
Use a scraper or putty knife to carefully remove all loose or flaking paint. Be gentle to avoid damaging the underlying surface.
Clean and Disinfect the Walls
Wash the walls with a mild detergent solution to remove dirt, grease, and mildew. For mould, use a mixture of water and bleach. Allow the walls to dry completely.
Repair the Surface
- Fill any cracks or holes with a patching compound.
- Sand the surface to create a smooth, even finish.
Prime the Wall
Apply a moisture-resistant primer to seal the surface and improve paint adhesion.
Repaint with Bathroom-Specific Paint
Use a high-quality, moisture-resistant paint and apply at least two coats for durability.
Allow Proper Drying Time
Follow the manufacturer’s instructions for drying and curing. Proper drying is essential for a long-lasting finish.
Essential Tools and Materials
Here’s a handy list of what you’ll need:
Tools Materials
Paint scraper Moisture-resistant primer
Sandpaper Bathroom-specific paint
Paintbrushes/Rollers Patching compound
Cleaning cloth , mild detergent/bleach
When to Call a Professional
If the damage is severe, involves hidden water leaks, or extensive mould growth, it’s best to call a professional. Experts can address the root cause and ensure a long-lasting repair.
How to Prevent Bathroom Paint from Peeling
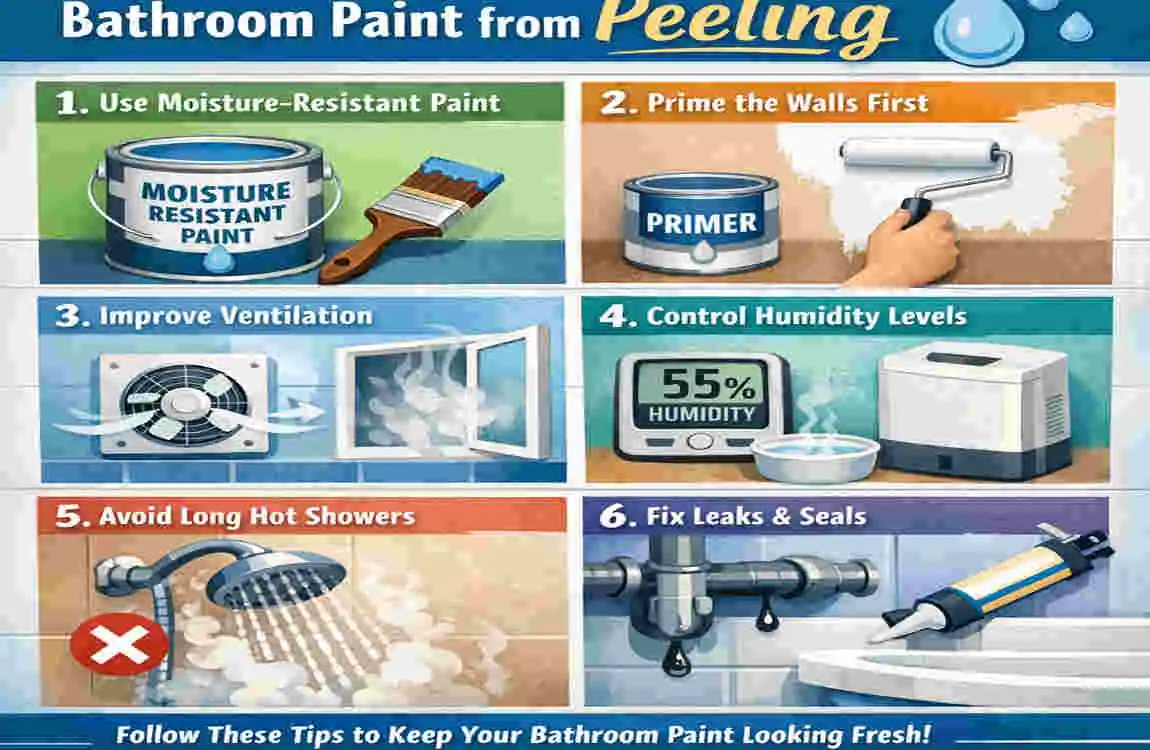
Prevention is always better than a cure! Here are some practical tips to keep your bathroom paint in top shape:
Improve Bathroom Ventilation
- Install or upgrade an exhaust fan to reduce humidity levels.
- Open windows or use dehumidifiers after showers to allow moisture to escape.
Choose the Right Paint
- Use moisture-resistant or mildew-resistant paints specifically designed for bathrooms.
- Opt for finishes such as semi-gloss or satin, which are better suited to humid environments.
Proper Surface Preparation
- Clean and dry walls thoroughly before painting.
- Apply a high-quality primer to seal the surface.
Address Water Leaks Promptly
- Regularly inspect plumbing fixtures, ceilings, and walls for signs of leaks.
- Fix any leaks immediately to prevent moisture buildup.
Regular Maintenance Tips
- Clean walls regularly to prevent mould and mildew buildup.
- Touch up areas showing signs of wear before they worsen.
Frequently Asked Questions (FAQs)
Why is the paint in my bathroom peeling despite using quality paint?
Poor ventilation or hidden water leaks could be the reason. Even the best paint won’t hold up if the underlying issues aren’t resolved.
Can I use regular paint for my bathroom?
No, regular paint isn’t designed for high-moisture areas. Always use moisture-resistant or bathroom-specific paints.
How often should I repaint my bathroom?
On average, repaint your bathroom every 3-5 years, depending on usage and paint type.
Is peeling paint a sign of mould?
Yes, peeling paint can indicate mould growth, especially in damp areas like bathrooms.
| Causes | Description | Solutions |
|---|---|---|
| Excess Humidity & Poor Ventilation | Moisture from showers weakens paint adhesion | Improve ventilation, install exhaust fans |
| Poor Paint Selection | Using non-moisture-resistant paint | Use bathroom-specific, mildew-resistant paint |
| Inadequate Surface Preparation | Dirty or unprimed surfaces before painting | Clean, dry, and prime walls properly |
| Water Leaks | Hidden leaks saturate walls | Fix plumbing leaks promptly |
| Mold and Mildew Growth | Moisture encourages mold under paint | Clean mold, use mold-resistant primer and paint |
| Low-Quality or Old Paint | Paint lacks durability in moist environments | Choose high-quality, durable bathroom paint |