Imagine pulling into your driveway after a long day. You look up at your home, expecting to feel that familiar sense of pride, but instead, you notice the grey film of dirt on the vinyl, the green streaks of algae near the foundation, and the dullness that has taken over your once-vibrant exterior. It happens to the best of us. Over time, nature takes its toll on our homes. But here is the good news: you don’t need to spend thousands on new siding or expensive renovations to fix it.
Pressure washing house siding is a DIY-friendly project that can completely transform your home’s look in a single afternoon. It is one of the most satisfying home improvement tasks you can tackle. Not only does it instantly boost your curb appeal, but it also protects your investment. Real estate experts often note that a clean exterior can increase a home’s perceived value by up to 5-10%. That is a massive return on investment for a weekend project!
However, we know what you might be thinking. You have heard the horror stories of stripped paint, gouged wood, and water forced behind panels, leading to mould. These are valid concerns. If you are wondering how to pressure wash house siding without causing damage, you have come to the right place.
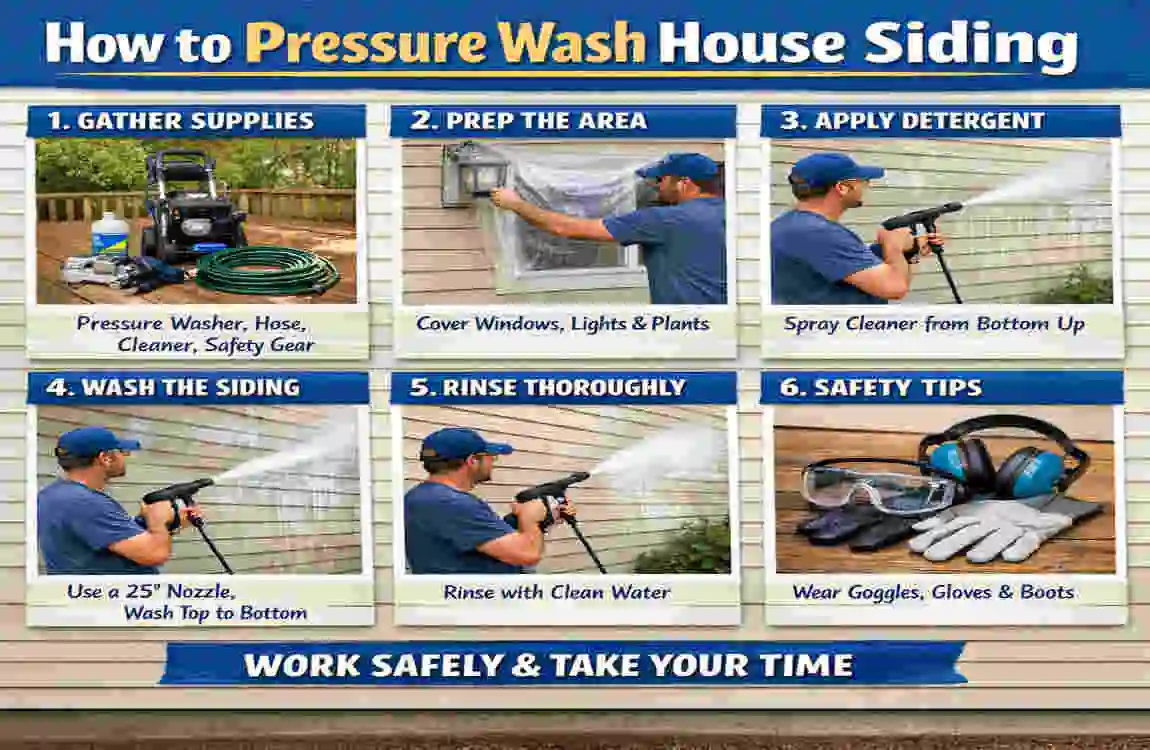
Tools and Materials Needed
Before you even touch a cle hose, gather the right gear. Attempting this job with underpowered equipment will leave you frustrated, while using overpowered equipment can destroy your siding. Success starts with preparation.
Below is a breakdown of the essential items you will need. If you don’t own a pressure washer, don’t worry. You can rent a high-quality machine from your local hardware store for $40 to $100 per day, making it a budget-friendly option for annual cleaning.
ItemPurposeRecommended Specs
Pressure Washer: The main engine for cleaning. 1300-3000 PSI (Electric is usually sufficient for siding; gas offers more mobility).
Nozzles/Tips: control the fan width and spray force. 25-40° tips (Green or White) are safest for siding. Avoid the Red (0°) tip!
Cleaning Solution: Breaks down mould, mildew, and grime chemically. Use a house-safe detergent or a specialised vinegar/soap mix.
Safety Gear (PPE) protects your body from high-pressure injuries and chemical exposure: safety goggles, heavy-duty gloves, and non-slip, closed-toe shoes.
The Extension Wand helps you reach the second story without a ladder. 12-25 ft telescoping wand. This is safer than standing on a ladder.
Garden Hose Connects the water supply to the machine. Ensure it is free of kinks and long enough to circle the house.
Scrub Brush Agitating stubborn stains before rinsing. A long-handled, soft-bristle brush works best.
A Note on Pressure Washers
For most homeowners, a gas-powered washer is powerful, but an electric pressure washer is often the unsung hero for siding. They are generally quieter, lighter, and provide a consistent PSI (Pounds per Square Inch) that is less likely to damage softer materials, such as wood or older vinyl.
Preparation Steps
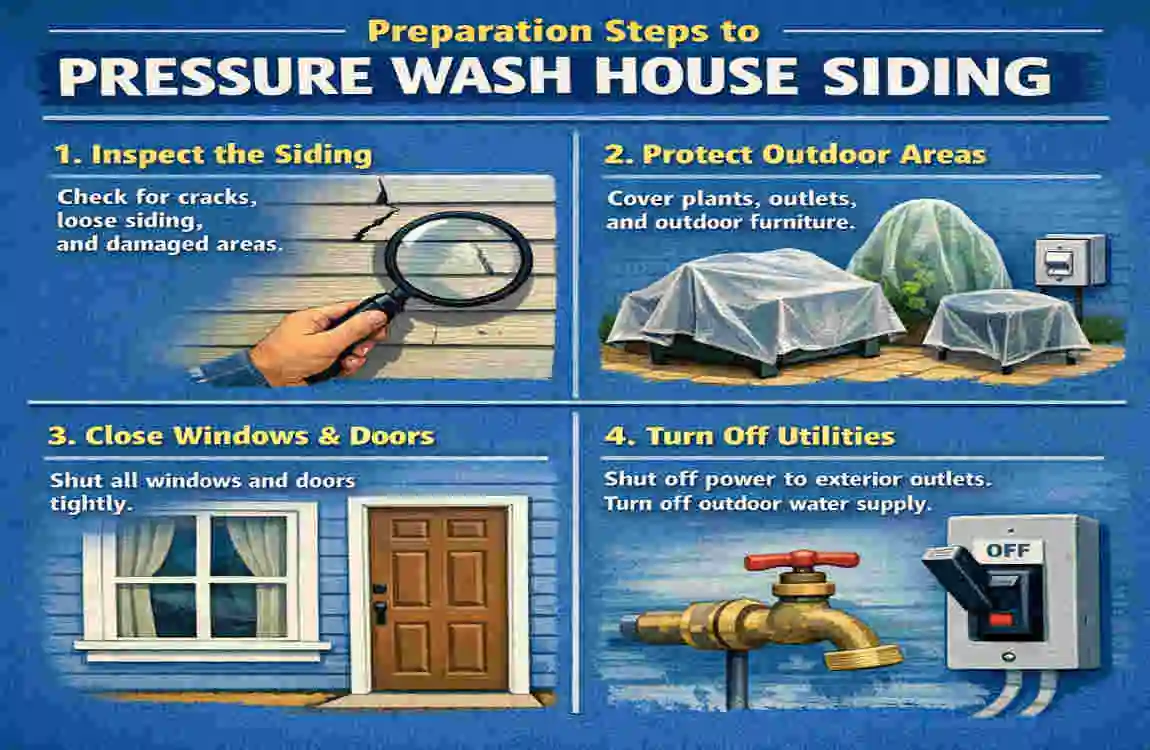
You can fire up the engine and start blasting away dirt immediately. Please, resist that urge! Proper preparation is 80% of the job. Taking the time to prep your house and surroundings prevents accidents and ensures a much more thorough clean.
Assess Your Siding Type
Not all siding is created equal. The material of your home dictates the pressure you can safely use.
- Vinyl Siding: This is the most forgiving material and the most common. It can withstand pressures up to 2500-3000 PSI if the panels are sturdy. However, vinyl overlaps, meaning you have to be careful about spray direction to avoid forcing water underneath the planks.
- Wood and Aluminum: These materials require a gentler touch. You should cap your pressure at roughly 1200-1500 PSI. Wood is particularly soft; if you use too much pressure, you will “fur” the wood, gouging out fibres and ruining the finish. Aluminium dents easily, so keep your distance.
- Brick and Stucco: These are porous materials. While they are hard, high pressure can blow out mortar joints or chip stucco. Use a medium pressure setting and rely more on your detergent to do the heavy lifting.
Safety Precautions
Pressure washers look like fun water guns, but they are serious power tools. The stream of water is strong enough to cut through skin and cause injection injuries, which are medical emergencies.
- Wear your PPE: Always wear goggles. Debris, spiders, and paint chips will come flying off the wall.
- Check the Weather: Pick a calm, dry day. Pressure washing in the wind creates “blowback,” which can spray dirty, soapy water onto you.
- Electrical Safety: Be mindful of outdoor outlets, light fixtures, and meters. Cover them with plastic sheeting and painter’s tape to keep them dry.
Prep the Area
Your landscaping needs protection, too. Cleaning solutions, even “eco-friendly” ones, can stress your plants.
- Clear the Zone: Move patio furniture, potted plants, and grills away from the house.
- Water Your Plants: This is a pro secret. Before you spray any soap, thoroughly soak the grass and bushes around your foundation with a regular garden hose. When plants are already saturated with fresh water, they can’t absorb the chemical runoff as easily.
- Pre-treat Stains: If you see heavy black mould or green algae patches, spot-treat them with a specialised cleaner and a scrub brush before you start the main wash.
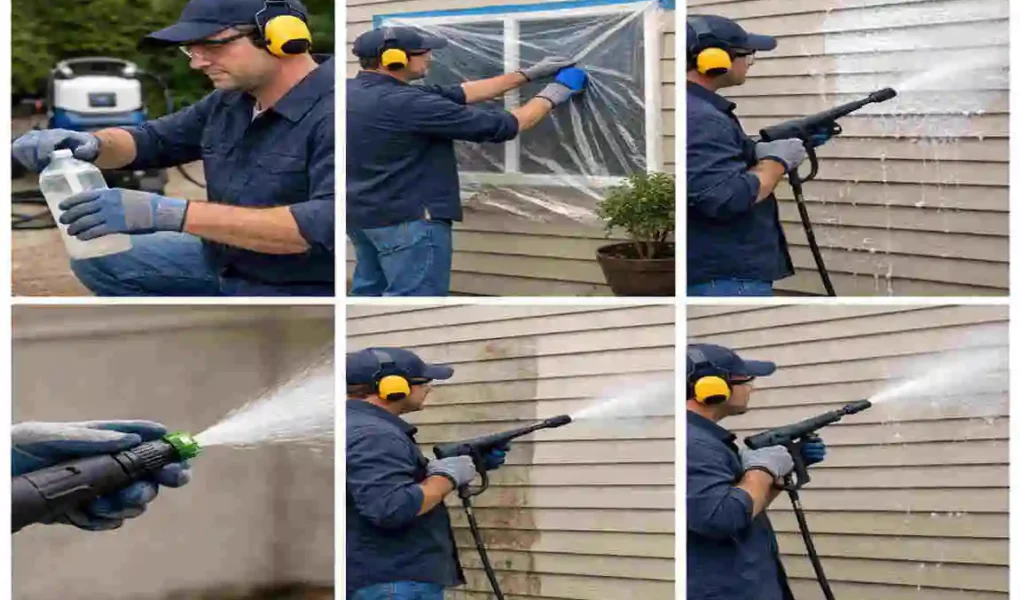
Step-by-Step Pressure Washing Guide
Now that you are prepped and protected, it is time to get to work. Follow this detailed guide on how to pressure wash house siding to ensure you get that professional-grade finish without the risks.
Set Up Equipment
Start by connecting your garden hose to the pressure washer inlet. Make sure the connection is tight to prevent air leaks. Next, attach your high-pressure hose and the spray gun.
Before you turn the machine on, turn on the water spigot and squeeze the trigger on the gun. This “purges” the air from the system. You want a steady stream of water flowing before you start the engine or motor.
Select the Right Tip: Start with the least aggressive nozzle, usually the 40-degree white tip or the black soap tip. Test the pressure at an inconspicuous spot, such as the bottom corner of the house near the back. Start about 3 feet away and slowly move closer. If the paint stays on and the dirt comes off, you have found your sweet spot.
Apply Detergent
Water alone usually isn’t enough to remove years of oxidised film and pollution. You need a cleaning agent to loosen that bond.
- Switch to the Black Tip: Most pressure washers have a dedicated “soap nozzle” (usually black) that reduces pressure. High pressure will not draw soap from the tank.
- The Bottom-Up Rule: This is critical. Apply the detergent from the bottom of the wall, moving upward.
- Why? If you spray soap from the top down, it runs down the dirty wall in rivulets. When you rinse later, those rivulets often leave permanent, unsightly clean streaks. Applying from the bottom up ensures even coverage.
- Let It Dwell: Allow the soap to sit on the siding for 5 to 10 minutes. You want it to break down the grime, but do not let it dry. If it starts to dry, mist it slightly with fresh water.
Rinse Thoroughly
Once the soap has done its work, it is time to blast the dirt away.
- Switch Nozzles: Change to your rinsing tip—usually the green (25-degree) or white (40-degree) nozzle.
- The Top-Down Rule: Unlike soaping, you must rinse from the top down. Gravity is your best friend here. It will help carry the dirt and suds down the wall and onto the ground.
- Technique: Hold the wand with both hands for stability. Maintain a distance of 12 to 18 inches from the surface. Use long, smooth, sweeping strokes.
- Think of it like spray painting; you want consistent movement.
- Spray at a downward angle. Never spray upward into the laps of vinyl siding. If you spray up, you drive water behind the cladding, which can rot your home’s sheathing and cause mould in your insulation.
Work in small sections, roughly 3 to 5 feet wide. Rinse one section completely before moving to the next to ensure you don’t miss spots.
Tackle Stubborn Spots
Sometimes, a general rinse isn’t enough for areas with heavy algae buildup (usually the north side of the house) or caked-on mud.
If you encounter a tough spot, you can move the wand slightly closer—perhaps 6 to 8 inches—but be extremely careful. Do not linger in one spot for too long.
- For Vinyl: You can increase pressure slightly, up to 2000 PSI if needed, but keep the wand moving.
- The Brush Method: For the absolute worst stains, it is safer to put the wand down and use a siding brush. Scrub the area manually with a little more detergent, then rinse with the pressure washer. This mechanical agitation removes dirt that water pressure alone simply cannot, without risking damage to the siding surface.
Final Inspection and Dry
Once you have circled the entire house, do a final walk-around. Look for any spots you might have missed—commonly under window sills or near the eaves.
- The Rinse Down: Take a moment to spray down your driveway, deck, and walkways where dirty water might have pooled. Rinse the leaves of your plants one last time with fresh water (low pressure) to dilute any remaining soap.
- Drying Time: Let your home air dry for 24 to 48 hours. If you are planning to paint your house after washing, this drying period is non-negotiable. Painting over damp wood or siding will cause the new paint to bubble and peel almost immediately.
Common Mistakes to Avoid
Even with the best intentions, DIYers often make a few classic mistakes. Being aware of these pitfalls will save you time, money, and heartache.
Using Too Much Pressure This is the number one “homeowner fail.” More pressure does not always equal cleaner. It usually equals damage. If you use a concentrated red tip (0-degree) on vinyl, you can literally slice through the plastic like a laser beam. On wood, you will leave permanent etch marks that look like scribbles. Always start low.
Spraying Upward We mentioned this earlier, but it bears repeating. Siding is designed like a roof; it sheds water downward. It is not designed to be waterproof from the bottom up. Spraying upward forces water into the wall cavity. This hidden moisture is a silent killer for homes, leading to rot that you won’t see until it’s too late.
Skipping the Test Patch. Every house is different. Maybe your paint is older than you think, or your vinyl has become brittle in the sun. If you don’t test a small, hidden area first, your “test” might end up being a giant strip of peeled paint right by your front door.
Ignoring Heights Trying to balance on a ladder while fighting the “kickback” of a pressure washer gun is incredibly dangerous. It is a leading cause of ER visits for DIYers. If you have a two-story home, invest in or rent a telescoping extension wand. Keep your feet on the ground.
MistakeThe Fix
Over-pressurising. Always start with the lowest pressure setting (around 1300 PSI) and the widest fan tip (40° White).
Upward Spraying: Keep the wand angled downward at all times. Use a ladder or extension wand to get above the cleaning area so you can spray down.
No pre-rinse. Always soak the surface and surrounding plants with a standard garden hose before applying chemicals.
Using Bleach: Avoid straight bleach. It kills plants and can damage vinyl UV coatings. Use a dedicated siding cleaner.
Safety and Maintenance Tips
Your house looks brand new, and you are feeling accomplished. Let’s make sure you stay safe and keep your home looking this way for as long as possible.
Preventing Injuries:
- The Shoes Matter: You will be walking on wet, soapy concrete or grass. Slips and falls are common. Wear shoes with heavy treads—no flip-flops!
- Firm Grip: A pressure washer gun has recoil. Hold it firmly with both hands to prevent it from flying back and hitting you or damaging a window.
- Hearing Protection: Gas pressure washers are loud. Wear earplugs to protect your hearing during the long wash process.
Maintenance for Longevity:
- Post-Wash Protectant: Consider applying a “surface protector” or wax (often available as an attachment for pressure washers) after cleaning. This creates a barrier that makes it harder for algae and dirt to stick in the future.
- Quarterly Inspections: Walk around your house once a season. If you see a small green spot forming, scrub it off with a hand brush and a spray bottle of vinegar water immediately. It is much easier to clean a spot than a whole house.
- Frequency: Most homes need a full pressure wash once a year. If you live in a very humid climate or have many trees (which drop sap and pollen), you might need to do it twice a year.
DIY vs Professional Service
We have covered a lot, and you might be weighing the pros and cons. Is it worth doing it yourself?
The DIY Case: If you have a one-story home, are physically fit, and enjoy working outside, DIY is a great option. You can save roughly $200 to $500 in labour costs. Plus, you have the satisfaction of maintaining your own property. The equipment rental is affordable, and the learning curve is manageable if you follow this guide.
The Professional Case: However, there are times when calling a pro is the smarter move.
- Multi-Story Homes: If you have a tall two or three-story home, the risk of falling increases significantly. Pros have lifts, long-range nozzles, and safety harnesses.
- Delicate Surfaces: If your home is historic, has old stucco, or brittle lead paint, a professional “soft wash” service is safer. They use high-volume, low-pressure systems that DIY machines can’t replicate.
- Time: Washing a whole house is a workout. It can take a full day or weekend. If your time is scarce, a pro team can finish the job in a few hours.
If you are unsure, remember that the cost of hiring a pro is often less than the cost of repairing damaged siding or a hospital bill from a ladder fall.
Frequently Asked Questions (FAQs)
How many PSI should I use to pressure wash house siding? For vinyl siding, the sweet spot is generally between 1300 and 2500 PSI. For softer materials like wood (cedar or pine), you should stay closer to 1200-1500 PSI. Always err on the side of lower pressure to avoid damage.
Can I pressure wash in the rain? Technically, yes, you can get the house wet while it is raining. However, it is not recommended. Rain makes ladders, decks, and grass slippery, increasing the risk of injury. Plus, it is harder to see if you have fully rinsed the soap away when rain is falling on the walls.
What is the best time of year to pressure wash? The ideal seasons are late spring or early fall. In spring, you are clearing away winter grime and pollen. In the fall, you are prepping the home for winter. Avoid freezing temperatures (water expands and cracks siding) and the scorching heat of mid-summer (soap dries too fast).