Louvered doors look stylish, but they can be tricky to sand. Unlike flat doors, they have narrow slats, tight corners, and angled edges that collect dust and old paint. That makes the job slower and more detailed.
| Key Tips | ||
|---|---|---|
| Remove door & clean | Take door off hinges; wash with TSP to remove dust/grime | |
| Sand surface | Use 120–150 grit sandpaper; just rough up the surface (no need to bare wood) | |
| Detail sand louvers | Use a detail sander (e.g., Ryobi corded) or sanding sponge for slat edges/crevices | |
| Sand clamped method | Clamp scrap in U-shape to hold slats steady while sanding for even finish | |
| Wipe & prime | Remove all dust; apply high-quality primer (Ultra Grip for plastic frames) | |
| Paint/finish | Use a sprayer for best results; brush works if sprayer unavailable |
If you are sanding louvred closet doors or painting them for a fresh new look, proper sanding is essential. It helps the new paint or stain stick better and gives you a smoother, cleaner finish. Without good sanding, you may end up with peeling paint, rough patches, or uneven color.
What Are Louvered Doors?
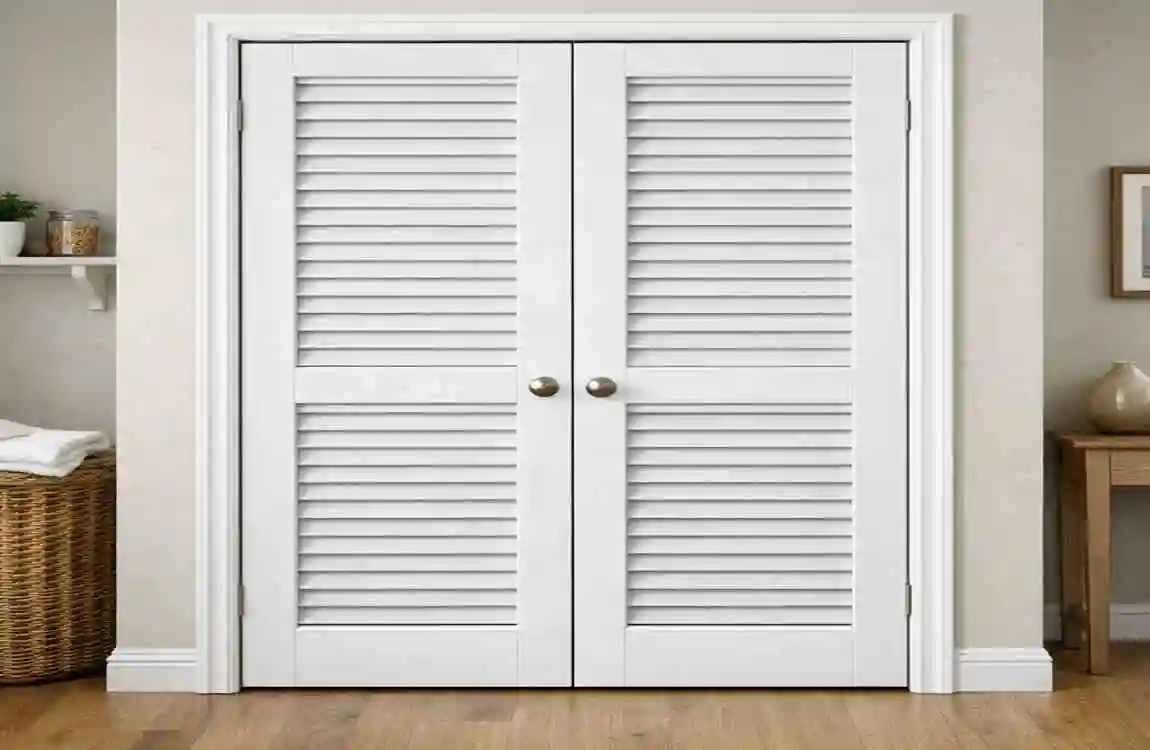
Louvred doors have angled slats that allow air to pass through. They are common in closets, laundry rooms, and spaces that need ventilation. Their design is practical, but it also makes them harder to work on than flat doors.
Common Types of Louvered Doors
You will often see louvered doors in these forms:
- Closet doors
- Bi-fold louvered doors
- Plantation-style doors
- Interior ventilation doors
Why Sanding Louvered Doors Is Challenging
The biggest problem is access. The slats are narrow, so sanding between them takes patience. The angled shape also makes it easy to miss spots or sand too much on the edges. Paint and dust often get trapped in corners, which is why sanding slatted doors takes more care than sanding a plain surface.
Tools and Materials Needed to Sand Louvered Doors
Before you begin, gather the right supplies. Good tools make the work faster and help protect the door from damage.
Essential Sanding Tools
You will want a mix of hand tools and power tools:
- Sandpaper in 80, 120, 180, and 220 grit
- A sanding sponge
- Detail sanding tools
- A detail sander
- An oscillating multi-tool for tight spaces
Cleaning Supplies
Clean surfaces sand better. Have these ready:
- Vacuum with brush attachment
- Tack cloth
- Mild soap and water
- Microfiber cloths
Safety Equipment
Dust can be messy and irritating, so protect yourself:
- Dust mask
- Safety goggles
- Gloves
- Hearing protection if using power tools
Best Sandpaper Grit for Louvered Doors
The grit you choose depends on the door’s condition.
Grit Best Use Result
80–100 Removing old paint Fast stripping
120–180 Smoothing the surface Better blending
220 Final sanding Paint-ready finish
For most jobs, a mix of medium and fine grit works best.
Preparing Louvered Doors Before Sanding
Good prep makes the sanding process easier and cleaner. Do not rush this part.
Remove the Door Properly
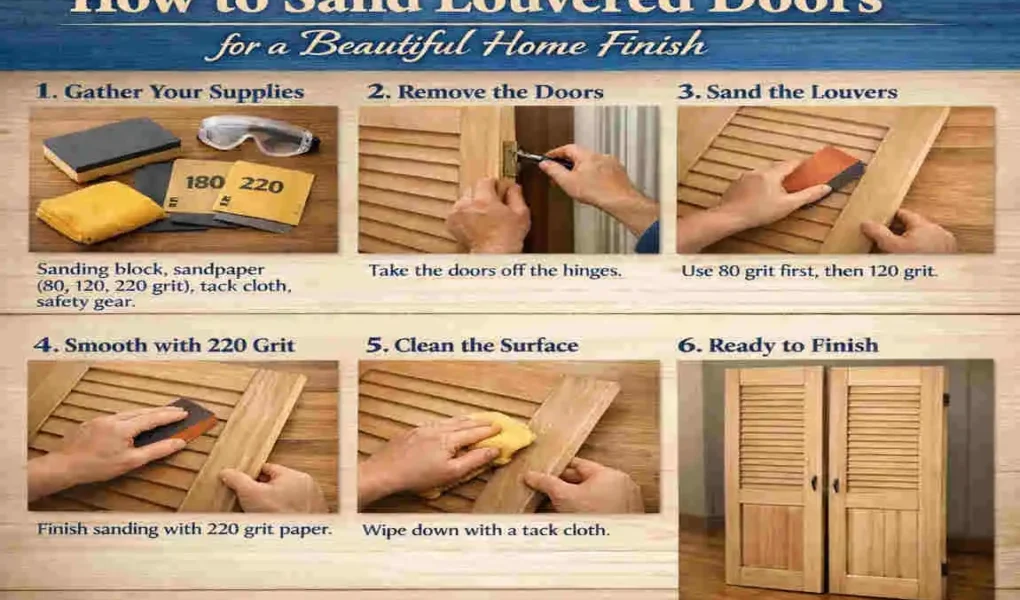
Take the door off the hinges if possible. This gives you better access and helps prevent missing spots. Label any hardware so reinstallation is simple. Set the door on a stable work surface with enough room to move around it.
Clean the Door Thoroughly
Before sanding, remove dirt, grease, and dust. Vacuum between the slats, then wipe the surface with a damp microfiber cloth. Let the door dry fully before you begin.
Inspect for Damage
Look closely for:
- Cracks
- Loose louvers
- Water damage
- Old paint chips
If you find damage, repair it before sanding. That will improve the final result.
Protect Surrounding Areas
Use drop cloths under the work area. If the door stays in place, mask nearby walls and floors. Good ventilation also helps reduce dust buildup.
How to Sand Louvered Doors Step by Step
This is the main part of the process. The goal is to remove old finish, smooth the wood, and prepare the surface for paint or stain.
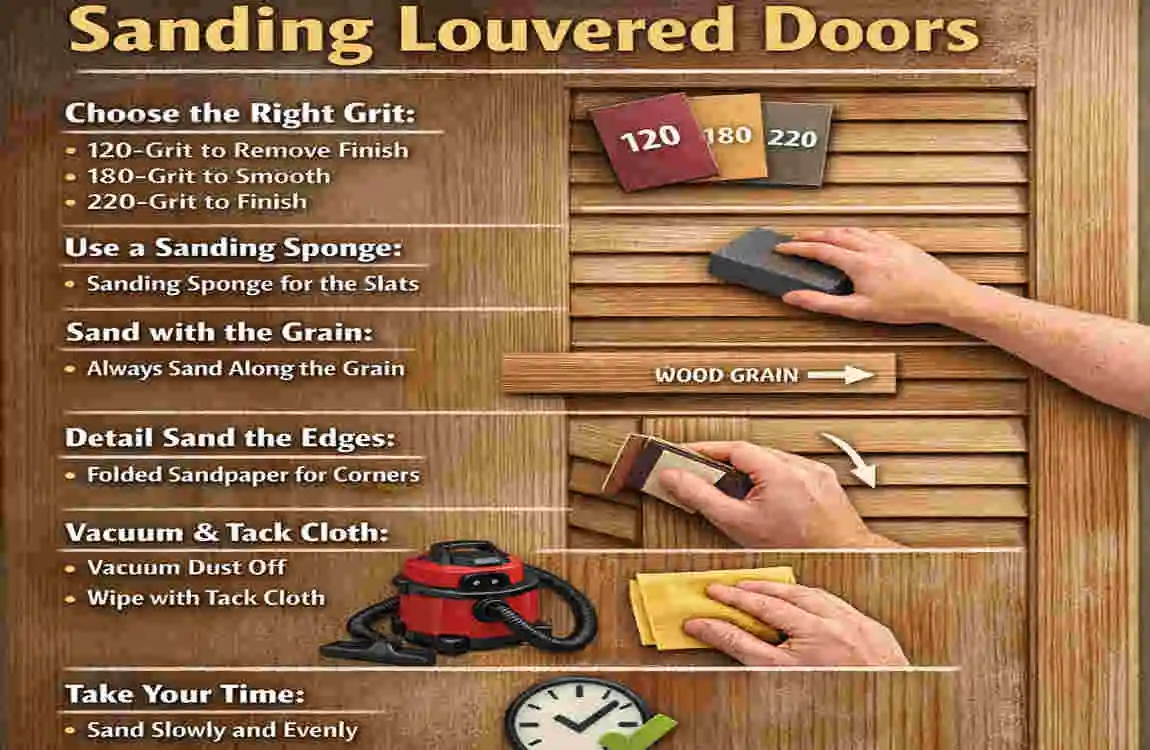
Start With Coarse Sandpaper
Begin with 80–100 grit if the door has old paint or a rough finish. Use light pressure. Do not press too hard, especially on the thin slats. Always move with the wood grain when possible.
This first pass removes loose coating and levels the surface. If the door is only lightly worn, you may start with 120 grit instead.
Sand Between the Louvers
This is the hardest part of sanding louvred doors. A sanding sponge or folded sandpaper works well in tight spaces. Wrap the paper around a thin tool if needed.
Take your time around corners. The goal is to clean the edges without rounding them off. If you sand too much here, the louvers can lose their clean shape.
Use a Detail Sander for Faster Results
A detail sander is very useful on this type of project. It fits better into narrow spaces than a regular sander and saves time on larger doors.
If you are new to power tools, keep the pressure light and let the tool do the work. Move slowly and avoid staying in one spot for too long.
Smooth the Entire Surface
Once the rough finish is gone, switch to 120–180 grit. This stage evens out scratches from the first sanding. It also blends the louvers and frame so the door looks more uniform.
At this point, the surface should start to feel smoother to the touch. If you still see deep marks, go over those areas again before moving on.
Final Fine Sanding
Use 220-grit for the final sanding pass. This gives the door a paint-ready or stain-ready finish. Lightly sand the full surface one more time, then check for rough spots by hand.
This is also a good moment to inspect the louvers under strong light. Small flaws are easier to fix now than after painting.
Clean the Door After Sanding
Dust removal is just as important as sanding. Vacuum every slat, then wipe the door with a tack cloth. This removes fine particles that can ruin the final finish.
If you plan to paint or stain soon, make sure the surface is completely clean and dry.
Best Techniques for Sanding Different Louvered Door Materials
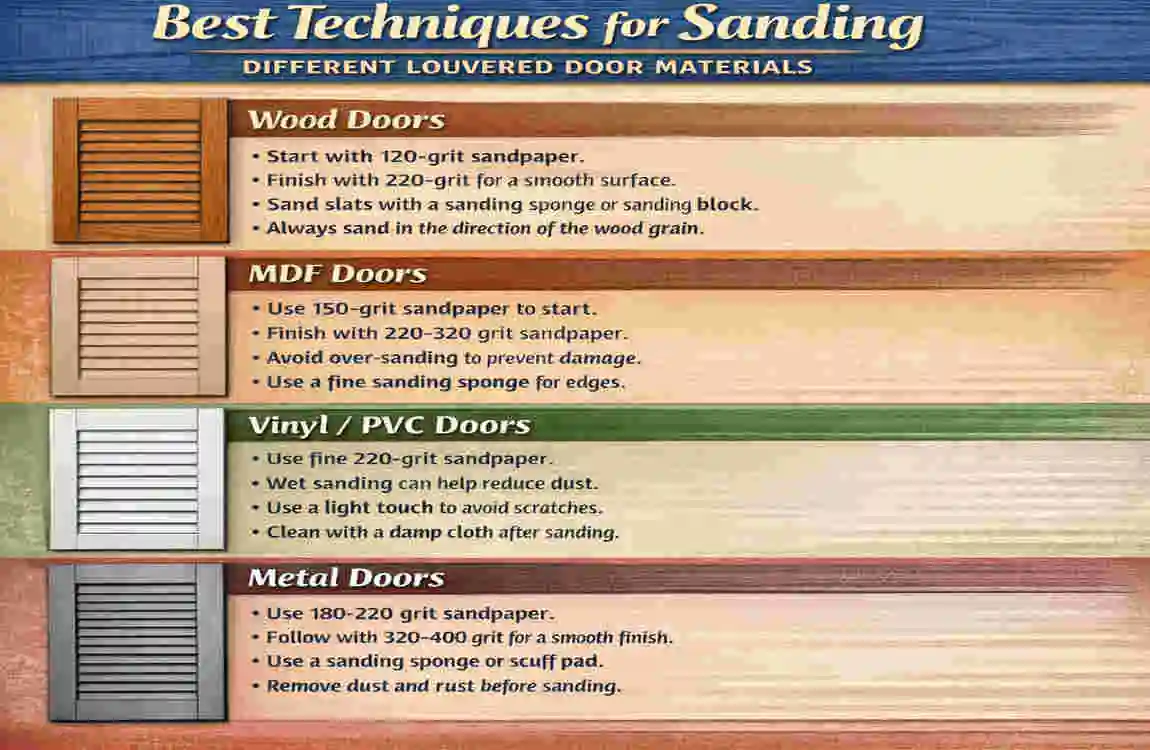
Not every louvered door is made the same way. The material changes how you should sand it.
Sanding Wooden Louvered Doors
Solid wood can handle a little more sanding, but avoid deep scratches. Follow the grain and keep your strokes even. Wood doors are the best choice for staining because they show natural detail well.
Sanding MDF or Composite Doors
These doors need a gentle touch. Too much pressure can damage the surface or cause swelling if moisture gets in. Use fine grit and avoid soaking the door during cleaning.
Sanding Previously Painted Doors
Old paint often flakes in layers. Remove loose pieces first, then sand the remaining surface smooth. If you suspect old lead paint, take proper safety precautions before sanding.
Sanding Stained Louvered Doors
If you want to re-stain the door, sand just enough to remove the old finish and open the grain. Do not over-sand, or you may change the look of the wood.
Common Mistakes to Avoid When Sanding Louvered Doors
A few simple mistakes can ruin an otherwise good project.
Using the Wrong Sandpaper Grit
Too coarse can damage the slats. Too fine can waste time and not remove old finish well enough. Start medium if you are unsure.
Oversanding Delicate Louvers
The thin sections can wear down quickly. Keep your hand light and check your progress often.
Skipping Dust Removal
Dust left behind can cause a rough, bumpy finish. It also makes stain absorb unevenly.
Rushing the Process
Louvered doors need patience. When you rush, you miss corners, leave scratches, and end up with uneven results.
Hand Sanding vs Power Sanding Louvered Doors
Both methods work. The best one depends on your project.
MethodBest ForProsCons
Hand Sanding Small jobs, delicate doors Better control, safer on slats Slower
Power Sanding Larger jobs, heavy paint removal Faster, less tiring Higher risk of over-sanding
Which Method Is Best?
If the door is delicate or the design is very narrow, hand sanding is often safer. If you are working on several doors or stripping heavy paint, a detail sander can save time. The best way to sand louvred doors is often a mix of both methods.
How to Paint or Stain Louvered Doors After Sanding
Once sanding is done, the finishing stage begins. This is where the door really starts to look new again.
Priming the Door Properly
If you are painting, use a primer that matches the door material. Spray primer gives even coverage in tight spaces, while brush primer gives more control. Apply thin coats for the best result.
Painting Techniques
Spray painting works well for louvers because it reaches the corners easily. If you brush-paint, use light strokes and avoid loading too much paint on the brush. Drips can build up fast on slats.
Staining Techniques
When staining, apply the stain evenly and wipe away extra product before it dries. This helps preserve the wood grain and prevents blotchy spots. After staining, seal the surface with a clear finish.
Drying and Curing Tips
Let the door dry in a clean, well-ventilated space. Follow the product’s drying time, but keep in mind that full curing may take longer. Reinstall the door only after the finish feels fully set.
Expert Tips for a Professional Finish
Here are a few simple tips that can make a big difference:
- Use sanding sponges for curved areas
- Work in good lighting
- Sand with the grain
- Test paint or stain first
- Use spray finish for smoother results
These small steps help you get a cleaner, more polished look.
Frequently Asked Questions
What is the easiest way to sand louvered doors?
The easiest way is to combine hand sanding with a detail sander. Use sanding sponges on the tight slats, then finish with fine-grit paper.
Can you use an electric sander on louvered doors?
Yes, but use it carefully. A detail sander works better than a large random orbital sander because it fits into narrow areas more easily.
Which grit of sandpaper is best for louvred doors?
Start with 80–100 grit for heavy paint removal, move to 120–180 grit for smoothing, and finish with 220 grit.
Should I remove louvered doors before sanding?
Yes, if possible. Removing the door gives you more control and makes sanding easier and cleaner.
How long does it take to sand louvered doors?
It depends on the size, condition, and number of doors. A single door may take a few hours if you sand carefully.
Is it better to spray-paint louvred doors?
Yes, spray painting usually gives a smoother, more even finish on louvres because it can reach into the narrow spaces more easily.
How do you clean sanding dust from louvers?
Use a vacuum with a brush attachment first, then wipe with a tack cloth or microfiber cloth. This removes fine dust from the slats.