If your hardwood floors are scratched, dull, or full of old water marks, you already know how much they can affect the feel of your home. Floors take up a huge part of the room, so when they look tired, the whole house can feel older than it really is. Many homeowners look at those worn boards and think the only fix is a costly professional job or a full move-out while the work gets done.
The good news is that you do not have to leave your house to refinish your floors. With modern dust-free methods, careful planning, and the right tools, you can bring tired hardwood back to life while still living in the home. That is exactly why how to refinish floors while living in house has become such a popular search. People want a practical answer that saves money, protects indoor air quality, and fits real family life.
This kind of project makes sense for many reasons. First, it can save a lot of money compared to hiring a full-service crew. Professional floor refinishing typically runs between $3 and $8 per square foot, and that adds up quickly in a medium- or large-sized home. A DIY approach can cost much less if you rent the right tools and use the right products. Second, dust-free refinishing is healthier. Traditional sanding can create a cloud of fine dust that gets into vents, furniture, clothes, and lungs. Third, the timeline can be surprisingly manageable. In many homes, the job can be completed in three to six days, especially if you work in sections and use quick-drying finishes.
| Step | Duration | Key Tips for Dust-Free Living |
|---|---|---|
| Prep & Clear Room | 1 day | Seal vents/doors; relocate family temporarily if needed |
| Sanding (3 grits) | 1-2 days | Use backpack vac + HEPA filters; no home vacating required |
| Repairs & Stain | 1 day | Fill gouges; tack cloth wipe-down essential |
| Seal & Cure | 2-3 days | Water-based finishes minimize fumes; light use after 24h |
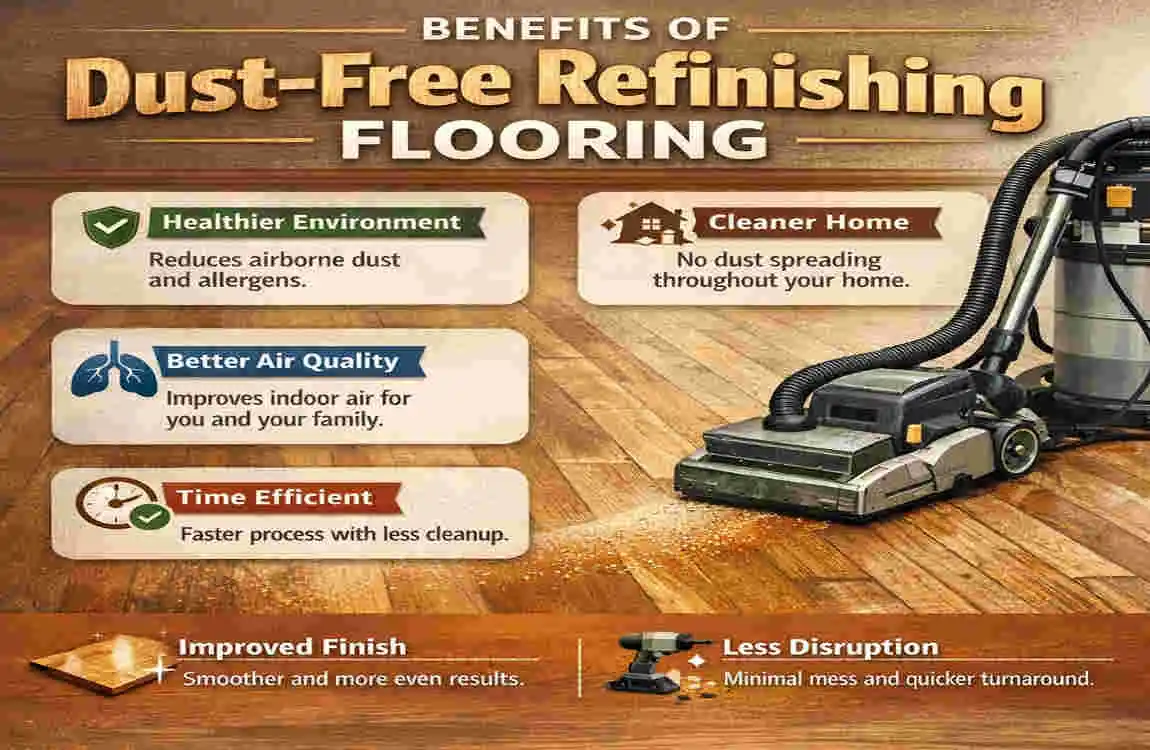
Benefits of Dust-Free Refinishing
Less mess, less stress
One of the biggest reasons people choose dust-free hardwood refinishing is simple: it keeps the mess under control. Traditional sanding creates fine dust that spreads fast. It gets into drawers, on shelves, in nearby rooms, and even in places you would never expect. Dust-free systems reduce airborne particles by using sealed sanding equipment and HEPA vacuums that capture dust before it can float around your home.
That means less cleanup, less worry, and less disruption to daily life.
You can stay in your home
Another major benefit is that you do not need to move out. That matters a lot if you have children, pets, work-from-home needs, or just a busy schedule. When you use dust-free methods and work room by room, you can keep part of the house usable while the floors are being refinished.
This is one of the main reasons people search for refinish hardwood without moving out. They want the upgrade but do not want hotel bills, storage fees, or the headache of a temporary relocation.
Better for your health
Traditional floor sanding can be rough on families with allergies, asthma, or small children. Fine dust can linger in the air and settle into soft surfaces. Dust-free refinishing helps reduce that risk. It is also a better choice for homes with pets, since pets often lie close to the floor and breathe more dust than we realize.
If you choose low-VOC, water-based finishes, you also reduce strong odors and improve indoor air quality. That makes the whole project easier to live with.
A smart investment
Fresh hardwood floors can completely change the way a home feels. They make rooms look cleaner, brighter, and more cared for. That matters when you are trying to protect or increase home value. In many markets, refinished floors can add 3% to 5% to a home’s value, especially when the finish looks modern and well maintained.
So yes, this project is about appearance. But it is also about comfort, health, and long-term value.
Is It Feasible? Pros vs. Cons
Before you jump in, it helps to be honest about what this project can and cannot do. Dust-free refinishing is very doable in a lived-in home. However, it still takes planning, patience, and a little physical effort.
Pros
- You can stay home during most of the work.
- Dust is far easier to control than with older sanding methods.
- DIY costs can be much lower than hiring a pro.
- It works well room by room, so your house does not have to shut down all at once.
- Water-based finishes dry faster, which helps keep the project moving.
Cons
- Drying time still matters. You cannot rush it.
- The tools can be loud, especially during sanding.
- Mistakes can show up fast, especially if you sand unevenly.
- Large homes take more planning and more rental time.
- Strong fumes may still be present, even with low-VOC products.
Pros vs. Cons Table
Aspect Pros Cons Mitigation
Time 3–6 days total; room-by-room doable Drying times (24–48 hrs/coat) limit access Schedule around weekends; use fast-dry finishes
Cost DIY: $1–3/sq ft (tool rentals $100–300/day) Tool rentals add up for large homes Rent from a local home center; buy reusable safety gear
Disruption Dust-free = more livable house Fumes and noise can still be intense Seal rooms, ventilate, and plan work hours carefully
Skill Level Beginner-friendly with guidance Sanding errors can gouge wood Practice on scrap and work slowly
Durability 10–20 years lifespan with care Less robust than some pro systems Apply multiple poly coats and choose quality finish
The short answer is this: yes, it is feasible for many homeowners. The key is not rushing and not treating it like a simple paint job. Hardwood refinishing is a real process, but it becomes very manageable when you break it into steps.
Essential Tools and Materials
To do this job well, you need the right tools. That does not mean you need the most expensive gear, but you do need reliable equipment that helps control dust and creates a smooth finish.
Must-have tools
Dustless floor sander
A dustless orbital sander or similar dust-controlled floor sander is the heart of the project. Brands like Bona or Festool are often preferred because they work with HEPA-filtered dust-collection systems. If you are renting, ask specifically for a model built for dust collection, not just a standard sander with a bag.
Edge sander
The main floor sander cannot reach tight corners, edges, or the space near baseboards. That is where the edge sander comes in. It helps you blend the corners into the main floor so the finish looks even.
Shop vac with HEPA filter
A shop vacuum with a HEPA filter is essential. You will use it before sanding, during sanding, and again during cleanup. The better your vacuum system, the cleaner your home stays.
Plastic sheeting and painter’s tape
These help you seal off the work area. They are not optional if you want a dust-free result in a lived-in house. Use them to cover doors, vents, and openings to nearby rooms.
Materials list
Sanding discs
Use sanding discs in several grit levels, usually starting around 36 grit and working up to 150 grit. Make sure the discs are compatible with your sander.
Water-based polyurethane
This is a popular choice for homeowners because it dries faster, smells less harsh, and gives a clean modern look. It is also a good fit for homes where people are staying inside during the project.
Wood filler and stain
Wood filler helps cover nail holes, scratches, and small gaps. Staining is optional, depending on whether you want to change the wood’s color or keep its natural tone.
Tack cloths
These help collect fine dust after sanding and before finishing. They may seem small, but they matter a lot.
Safety gear
Do not skip this part. You need:
- N95 or better respirator
- Eye protection
- Ear protection
- Knee pads
- Work gloves
Budget table for a 500 sq ft floor
Item Cost Notes
Sander Rental (3 days) $250 Dust collection system included
Supplies (discs, poly, filler) $150 Low-VOC options are better for living in house
Safety Gear $80 Reusable respirator is worth it
Total $480 Vs. pro: $2000+
That budget can change based on where you live, the size of the job, and the finish you choose. In a city like Lahore, local rental shops may price equipment differently, so it is always smart to compare a few options before you begin.
Rental tip
If you are searching for 2026 models, ask about dustless sanding systems, HEPA filtration, and low-noise floor sanders. Not every rental machine is created equal. A better machine can save you time, reduce mess, and make the whole project easier on your body.
For related reading on your site, you could reference a post like Best Dustless Sanders 2026.
Preparation Steps
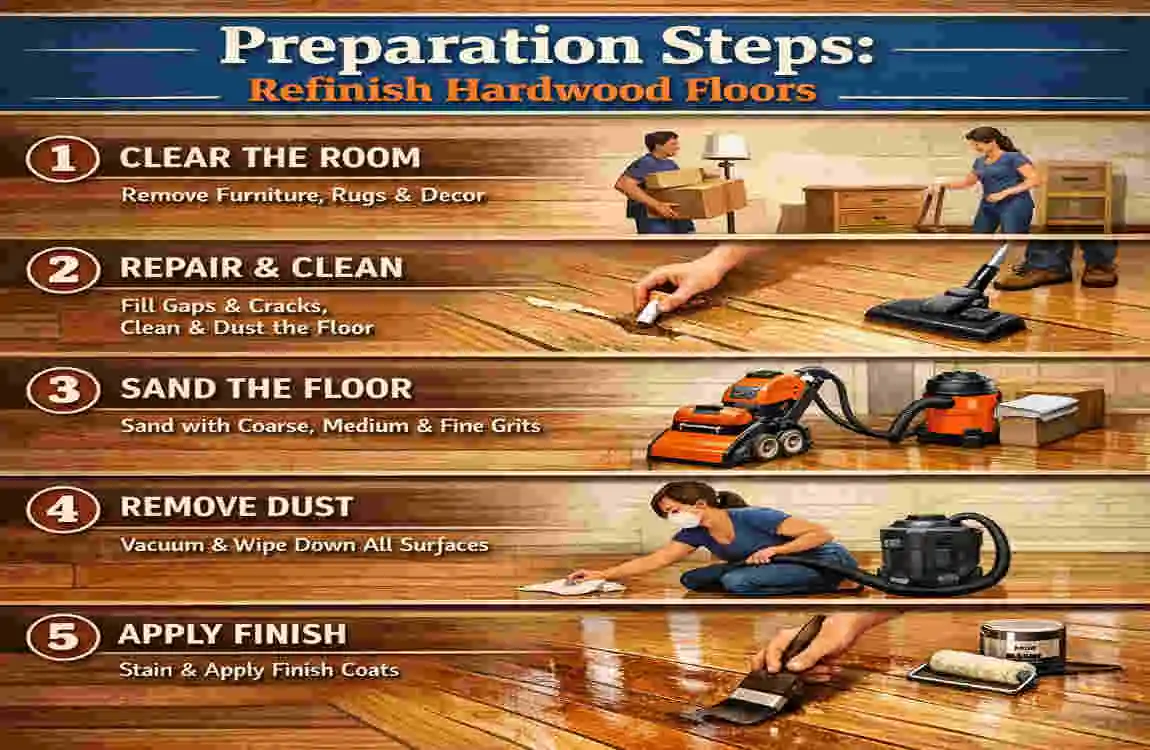
Preparation is where many DIY projects succeed or fail. Good prep makes the sanding easier, the finish cleaner, and the living experience much more manageable.
Check the floor type
Start by making sure your floor is solid hardwood, not a thin engineered surface that cannot withstand sanding. If the top layer is too thin, you may end up damaging the floor rather than improving it. A moisture test is also important. Try to keep moisture levels under 12%.
Clear the room
Move furniture out if possible. If not, place it in the center of the room and cover it carefully with plastic and drop cloths. Remove rugs, curtains near the floor, wall decor, and anything fragile that could catch dust.
Seal off the work area
Use painter’s tape and plastic sheeting to block doors, vents, and openings. If you live in a larger house, create a barrier between the work zone and the rest of the home. This is one of the most important steps for DIY floor sanding without dust because even a small opening can let fine particles escape.
Clean the floor well
Vacuum thoroughly first. Then clean the floor with a wood-safe cleaner or a TSP substitute if it’s greasy or especially dirty. Do not leave wax, dirt, or old product on the floor. Sanding over dirt only pushes the problem around.
Build a realistic timeline
For a typical project, your timeline may look like this:
- Day 1: Sanding
- Day 2: Staining, if needed
- Days 3–5: Applying finish coats
- Day 6: Light use and careful re-entry
If you have pets or children, plan. It may help to arrange a temporary space for them during the loudest or strongest-fume stages.
Work in sections
A smart way to keep the house usable is to work in 200 sq ft sections. That keeps at least part of the home accessible. It also helps you stay organized and reduces the chance of rushing.
Preparation may not feel exciting, but it saves you from bigger problems later. Take your time here.
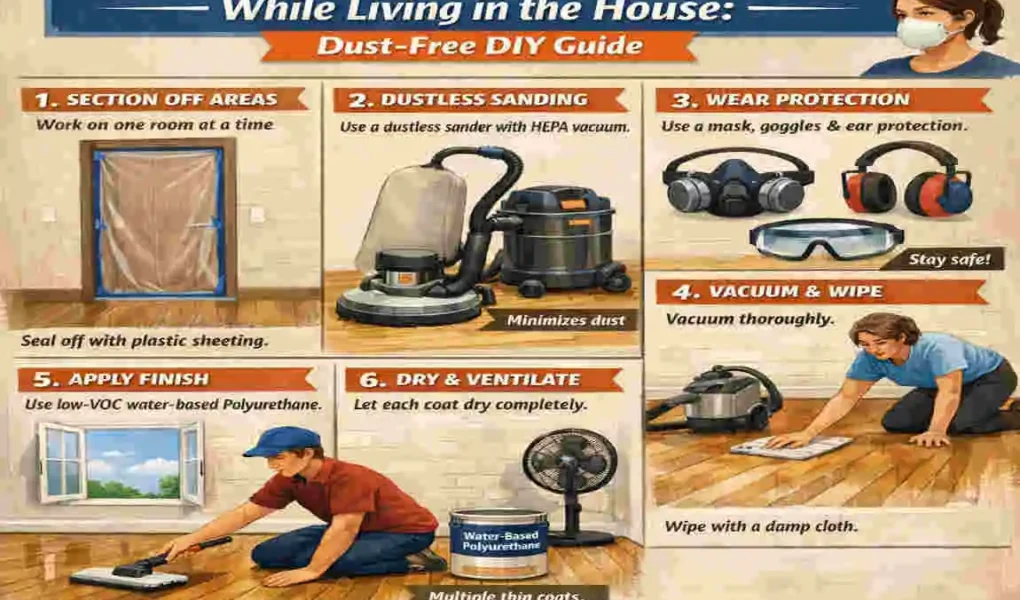
Step-by-Step Dust-Free DIY Process
This is the heart of the project. Each step matters, and the order matters too. If you do one part poorly, it can affect the rest of the floor.
Sanding
Sanding removes the old finish and levels the surface so the new stain or polyurethane can bond properly.
Start with the right grit
Begin with a rougher grit, usually 36 grit, if the floor has old finish, scratches, or uneven spots. Then gradually move to 60, 80, and finally 120 or 150 grit, depending on the condition of the wood and the finish you want.
Do not jump too quickly to a fine grit. If you do, you may leave the old coating behind or fail to smooth the floor enough.
Use steady, overlapping passes
Move the sander slowly and evenly. Each pass should overlap the previous one by about 50%. This helps prevent striping and visible lines. Keep the machine moving. If you stop in one place, you may create a dip.
Work with the grain where possible
Different sanders behave differently, but in general, you want to follow the natural direction of the wood as much as possible. This helps the floor look smoother and more natural when the job is done.
Vacuum as you go
Dust-free does not mean dust never appears. It means you control it far better. Vacuum after each pass, not just at the end. This keeps the surface cleaner and helps you spot areas that still need attention.
Handle edges separately
The main floor sander cannot reach every edge. Use the edge sander carefully around baseboards and corners. Blend those areas into the rest of the floor so they do not stand out later.
Avoid common sanding mistakes
Do not hold the machine in one place. Do not rush over rough patches. Do not skip the vacuum step. And do not assume every section needs the same pressure. Older or softer boards may need a lighter touch.
Sanding marks the start of the floor’s transformation. It is also where patience matters most.
Final dust removal
After sanding, the floor must be extremely clean before you move on. Even tiny dust particles can affect stain absorption and finish quality.
Vacuum carefully
Use your HEPA vacuum on the entire floor, including corners and trim edges. Vacuum more than once if needed. Run the vacuum slowly so it has time to pick up fine particles.
Use a tack cloth
A tack cloth can help catch the last bits of dust. Use it gently across the surface. Do not press too hard. You want to lift fine dust, not smear it around.
Finish with a light buff
A light pass with 220-grit screen or buffer can help create a smooth surface for finishing. This is especially useful if you see small fibers or tiny scratches after sanding.
When refinishing floors in a house, this cleaning step is critical. A clean floor means less mess in the air and a better final look.
Staining, if desired
Staining is optional. Some homeowners prefer the wood’s natural color. Others want a darker, richer tone. If you choose to stain, test first.
Test the color
Always test stain in a small hidden area or on a sample board. Floor color can look different in daylight, evening light, and under indoor bulbs. What looks warm on a sample may look much darker on the actual floor.
Apply evenly
Use a lambswool applicator, staining pad, or other approved method. Work in controlled sections to prevent the stain from drying unevenly. Wipe off extra stain according to the product instructions.
Keep your strokes consistent
Uneven strokes can lead to blotches or streaks. Work in a smooth, even pattern and do not let any section dry too much before blending with the next.
Allow proper drying time
Most stains need several hours to dry, sometimes longer depending on the weather and the product. In humid conditions, drying can take more time. Lahore summers, for example, can be warm and humid enough to slow the process, so always check the room conditions before you start.
Sealing and finishing
This step protects the wood and gives the floor its final shine.
Choose water-based polyurethane
Water-based poly is a strong choice for lived-in homes because it dries faster and usually has lower odor than oil-based products. It also tends to keep the wood looking lighter and more natural.
Apply thin coats
Use 2 to 3 thin coats, not one thick one. Thick coats can bubble, take longer to dry, and look uneven. Thin coats level out better and cure more reliably.
Lightly sand between coats
After each coat dries, lightly sand with 220-grit material or a fine screen. This helps the next coat bond and smooths tiny raised fibers. Then vacuum and tack again before applying the next coat.
Respect recoat times
Many water-based finishes allow recoating after about 2 hours, but always read the product instructions. Do not rely only on the clock. Temperature, humidity, and airflow all affect drying.
Give the floor time to cure
Even if the floor feels dry to the touch, it is not fully cured yet. Full cure can take 3 to 7 days or more. During this time, avoid heavy furniture and wear only soft socks or go barefoot.
A freshly finished floor may look ready sooner than it really is. Be patient. That patience protects your hard work.
Cleanup and cure
Once the final coat is on, carefully remove the plastic sheeting and tape. Try not to shake dust loose into the air.
Air out the space
Open windows when weather permits and use fans to circulate air throughout the room. This is especially helpful for removing odors from stain or finish. If humidity is high, keep air moving but do not let moisture build up.
Re-enter with care
Walk lightly for the first several days. Use socks instead of shoes. Avoid sliding furniture or dragging boxes across the floor.
Protect the finish
Place felt pads under furniture only after the finish has cured enough. Avoid steam mops, wet mops, and harsh cleaners.
Visual timeline overview
Here is a simple way to picture the project:
DayTaskAccess
Day 1 Sanding and vacuuming Limited access to work zone
Day 2 Staining, if needed Keep pets and kids away
Day 3 First coat of finish Light foot traffic only
Day 4 Second coat Limited use
Day 5 Third coat or touch-ups Caution needed
Day 6–7 Cure period Gentle use, no heavy furniture
That timeline may be shorter or longer depending on your floor size, humidity, and product choice. The key is to follow the floor’s pace, not your impatience.
Safety While Living in House
Even dust-free projects need smart safety habits. Living in the house during refinishing means you have to think not just about the floor, but about the air, noise, and daily movement around the work zone.
Ventilate the space
Open windows if the weather allows. Use fans to move air out of the room and into the outside air. Be careful in very humid weather, though, because too much moisture can slow drying and affect the finish.
Wear protection
Always use a respirator when sanding or applying finish. Wear eye protection to keep dust and splashes out of your eyes. Ear protection is also important because sanders can be loud, often in the 80-100 dB range.
Manage fumes
Low-VOC products are a smart choice when people are still living in the home. If the smell feels too strong, consider sleeping in another part of the house or staying elsewhere during the strongest odor period.
Create a kid and pet zone
Children and pets should stay out of the work area. Set up barriers, closed doors, or a temporary safe room far from the project. Even dust-free systems are not zero-impact, and a curious pet can easily walk through wet finish.
Keep emergency items nearby
If you are using any oil-based product, keep a fire extinguisher nearby and follow all product safety instructions. Read the labels carefully and store materials away from heat sources.
Safety is not the glamorous part of the project, but it is one of the most important. A little caution protects your health and your result.
Common Mistakes and Fixes
Even careful DIYers make mistakes. The good news is that many of them are easy to correct if you catch them early.
Uneven sanding
Problem: One area looks smoother or lighter than another.
Fix: Keep your passes overlapping by about 50% and move at a steady speed. If needed, go back and blend the area with a lighter grit.
Dust escaping into other rooms
Problem: Fine particles appear outside the work zone.
Fix: Double-tape seams, seal vents more carefully, and check for gaps around doors and baseboards.
Bubbles in the finish
Problem: The final coat has tiny bubbles or foam marks.
Fix: Apply thinner coats and stir gently instead of shaking the product. Shaking introduces air.
Rushing dry time
Problem: The floor feels dry, but it marks easily or appears cloudy.
Fix: Use a humidity checker or weather app, and give the floor more time. Dry to the touch is not the same as fully cured.
Stain blotching
Problem: Some parts absorb more stain than others.
Fix: Prep the wood evenly, test ahead of time, and wipe excess consistently. Uneven sanding can also cause blotching.
The floor will teach you a lot as you work. If something looks off, stop and correct it before moving on.
Living Tips During the Project
A floor refinishing project changes the rhythm of the whole house. The better you plan daily life, the easier it is to stay calm and organized.
Rotate rooms
If you are working room by room, start with the spaces you use least often. Leave the kitchen or main hallway until last so you do not block your most important daily routes too early.
Create a temporary storage plan
Move valuables, electronics, and fragile items into one safe room. Keep that room sealed and dust-free. It will help you feel more settled even while the project is underway.
Simplify meals and chores
For a few days, keep meals simple. Use one part of the house for cooking and another for storage if possible. Try to handle laundry and cleaning before the project begins so you are not juggling too many tasks at once.
Think about pets
If your pets are sensitive to noise or smell, a short stay with family or a boarding option may be kinder for everyone. It also makes the project smoother and safer.
Keep expectations realistic
A refinishing project is temporary. The house may feel a little off for several days, but the result lasts for years. That mindset makes the inconvenience easier to handle.
Cost vs. Pro Services

One of the biggest reasons people choose the DIY route is cost. And yes, the savings can be significant.
DIY savings
If you handle the project yourself, you may save 60% to 80% compared to hiring a full-service professional team. That can mean thousands of dollars saved on a medium-sized home.
Typical DIY costs
For a 500 sq ft area, you might spend around $480 in rentals, supplies, and safety gear, though costs vary. Larger homes obviously cost more because they require more time, more finish, and possibly longer rentals.
When to hire a pro
You should consider professional help if:
- The area is larger than 1,000 sq ft
- The floor has intricate patterns like herringbone or parquet
- The wood is badly damaged
- You do not have time to manage the project
- You want a highly polished result with less personal labor
A pro is also worth considering if the home has multiple levels, complex transitions, or older floors that need careful handling.
Simple rule of thumb
If the floor is straightforward and you are comfortable doing hands-on work, DIY can be a smart choice. If the project is complex or the stakes are very high, bringing in a professional may save stress and mistakes.
Maintenance After Refinishing
Once the job is done, keeping the floor beautiful is much easier than refinishing it again too soon.
Daily and weekly care
Sweep or vacuum regularly to keep grit off the surface. Tiny dirt particles can act like sandpaper under shoes, so routine cleaning matters more than many people think.
Avoid steam mops
Steam and hardwood are not a good match. Steam can push moisture into the wood, damaging the finish over time. Stick to products made for hardwood floors.
Use gentle cleaners
Choose cleaners made for finished wood floors. Avoid anything too harsh or too wet. A lightly damp mop is usually enough for normal cleaning.
Protect high-traffic areas
Use rugs in entryways and place felt pads under furniture legs. These small steps reduce wear and help the finish last longer.
Plan for the future
Most refinished hardwood floors need refreshing every 5 to 10 years, depending on traffic, kids, pets, and how well they are maintained. The better you care for it, the longer it lasts.
For more home care ideas, your site could also reference a post like Hardwood Floor Maintenance Tips.
FAQs
Can I refinish floors while living in house?
Yes, you can. The best way is to use a dust-free refinishing method, seal off the work area, and plan your project in sections. This keeps the home livable while reducing mess.
How long do I need to stay out of the room?
That depends on the product and the project’s stage. You may not need to leave the whole house, but you should avoid the work area during sanding, staining, and while coats are drying. Limit traffic until the finish has cured enough for normal use.
What is the best finish for a high-traffic floor?
A water-based polyurethane is a strong choice for many homes because it dries faster, smells less, and works well in lived-in spaces. For higher durability, choose a premium product designed for heavy use.
Is dust-free sanding really dust-free?
No system is truly zero-dust, but dust-free hardwood refinishing can reduce airborne dust dramatically compared to traditional sanding. When combined with good sealing and vacuuming, it makes a huge difference.
Can I do this in a humid climate?
Yes, but you must plan for longer drying times. In humid places, finishes can take longer to set. Use fans and ventilation, and follow a realistic schedule so the floor has enough time to cure properly.
What if my floor is engineered wood?
That depends on the thickness of the top layer. Some engineered floors can be refinished, but others cannot. If the veneer is too thin, sanding may damage it. Always check before you begin.