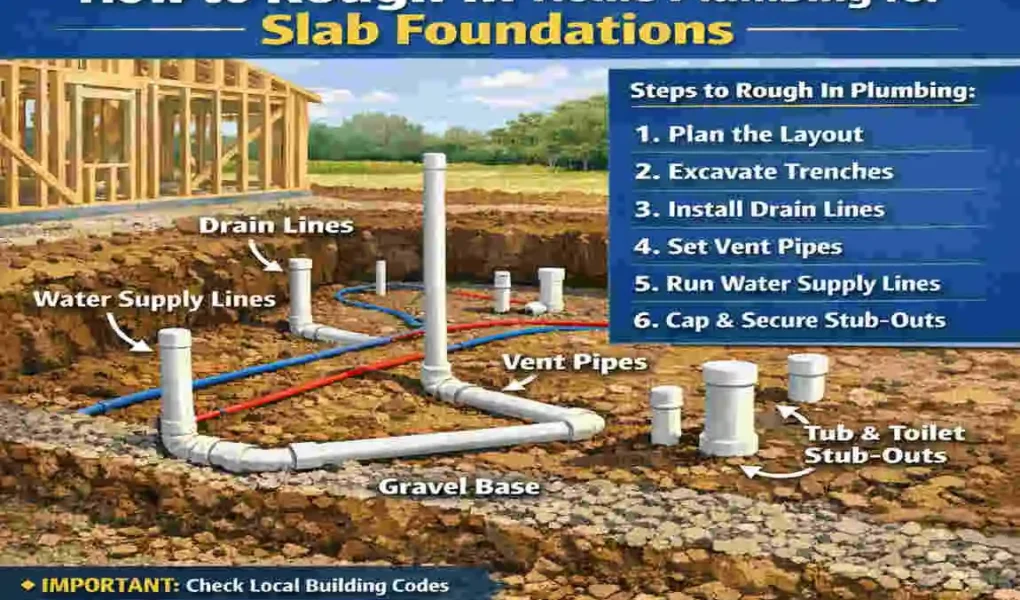
Roughing in home plumbing for slab foundations is one of those jobs where careful planning pays off in a big way. Once the concrete is poured, the pipes hidden under the slab are no longer easy to reach. That means any mistake in layout, slope, or placement can turn into a costly problem later.
If you are learning how to rough in home plumbing for slab, the most important thing to understand is this: the slab stage locks everything in place. Drains, vents, and water lines must all be set before the concrete goes down. After that, changes become much harder and much more expensive.
| Step | Description | Key Tips |
|---|---|---|
| Plan Layout | Mark fixture locations (toilets, sinks, showers) on the slab area using blueprints; coordinate with foundation plans. | Check local Lahore building codes for pipe sizes (e.g., 3-4″ for toilets, 1.5-2″ for sinks); use 1/4″ per foot slope for drains. |
| Dig Trenches | Excavate trenches in gravel base (12-18″ deep) from fixtures to main sewer line; keep trenches narrow to save concrete. | Use laser level for precise sloping; bed pipes on sand to prevent settling. |
| Install DWV Pipes | Lay PVC/ABS pipes (e.g., 3″ toilet drains, 2″ vents) with elbows, tees, and cleanouts; glue joints securely. | Include cleanout tees every 50-100 ft; stub up pipes 4-6″ above slab for fixture connections. |
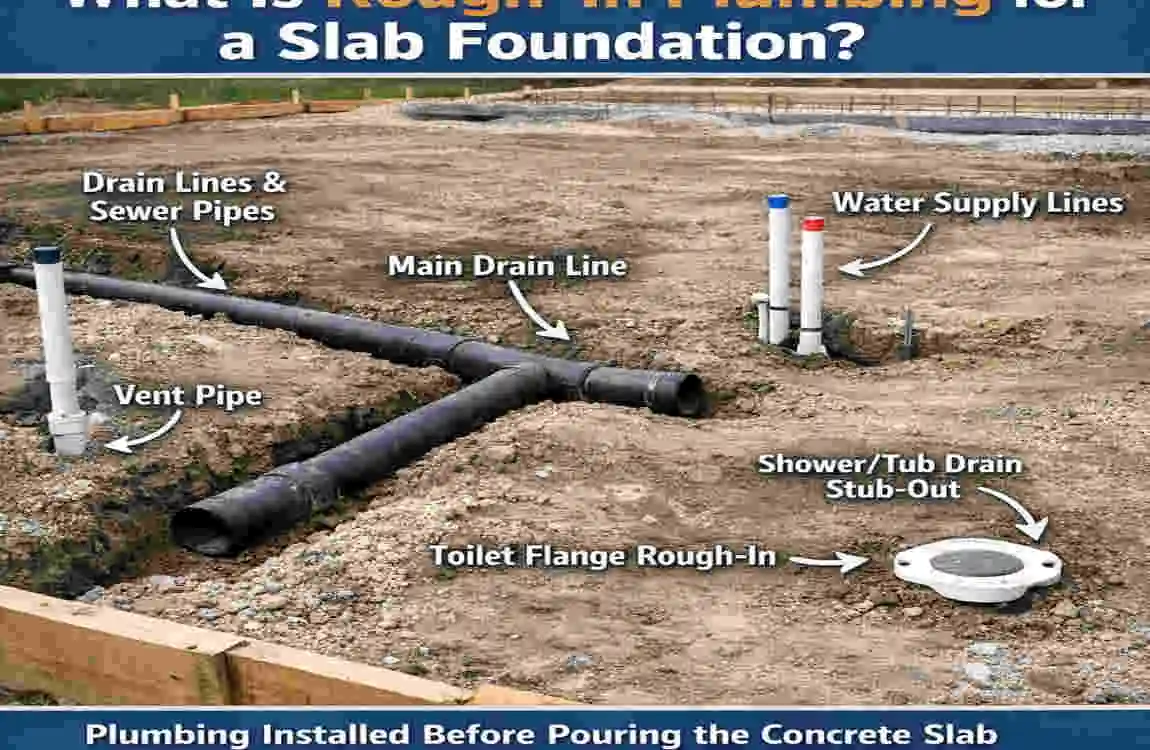
What Is Rough-In Plumbing for a Slab Foundation?
A simple definition
Rough-in plumbing is the part of the job where the plumbing lines are installed in their basic, hidden form. Think of it as the skeleton of the system. It sets the path for how water enters the home and how waste leaves it.
For a slab foundation, the rough-in work often happens before or during foundation prep. The pipes are laid out in trenches or sleeves so they can pass beneath the concrete safely.
Rough-in, top-out, and finish plumbing
It helps to understand the three main phases of plumbing work. They are different, and each one has its own role.
Plumbing StageWhat HappensWhere It Usually GoesMain Purpose
Rough-in Pipes are laid out before walls and fixtures are finished Under the slab, inside walls, or in framing spaces Prepare the system and place lines in the right locations
Top-out Pipes are run up through walls and ceilings Wall cavities, ceilings, attic spaces Connect plumbing to future fixture points
Finish Fixtures and final trim are installed Sinks, tubs, toilets, faucets, appliances Make the system fully usable
For a slab home, rough-in is the stage that matters most before the concrete is poured. If the layout is right here, the rest of the job becomes much easier.
Which pipes go under the slab
In a typical slab foundation home, these items may be located under or through the slab:
- Drain lines that carry wastewater away
- Main sewer connections or septic connections
- Supply lines in some designs, depending on code and layout
- Sleeves that protect pipes where they pass through concrete
Which pipes stay above the slab
Not every plumbing line belongs under the foundation. In many homes, some water supply lines are routed through walls, ceilings, or attic spaces instead. This can make repairs easier later and reduce the amount of pipe buried in concrete.
The goal is simple: place each line where it works best, follows code, and stays protected.
Why Planning Matters Before You Start
The floor plan controls the plumbing plan
Plumbing in a slab home does not happen in isolation. It must match the floor plan exactly. Every sink, toilet, tub, shower, laundry box, and water heater connection needs a clear place in the layout.
If the plumbing plan does not match the home design, fixture rough-ins can end up in the wrong spot. That creates delays, extra labor, and sometimes a full rework.
Fixture placement affects pipe routing
The location of each fixture changes how the pipes must run. A bathroom placed far from the main line may need longer drain runs. A kitchen located in the center of the home may require careful routing to keep lines compact and efficient.
This is why builders and plumbers spend time studying the floor plan before digging begins. Smart placement saves space and helps the plumbing work properly.
Coordination between the builder, plumber, and concrete crew
A slab home works best when everyone stays on the same page. The plumber needs to know where walls, beams, and footings will go. The concrete crew needs to know where the pipes are so they do not shift during the pour. The builder needs to keep the whole schedule moving.
When these teams coordinate well, the job is smoother and cleaner. When they do not, small confusion can turn into big delays.
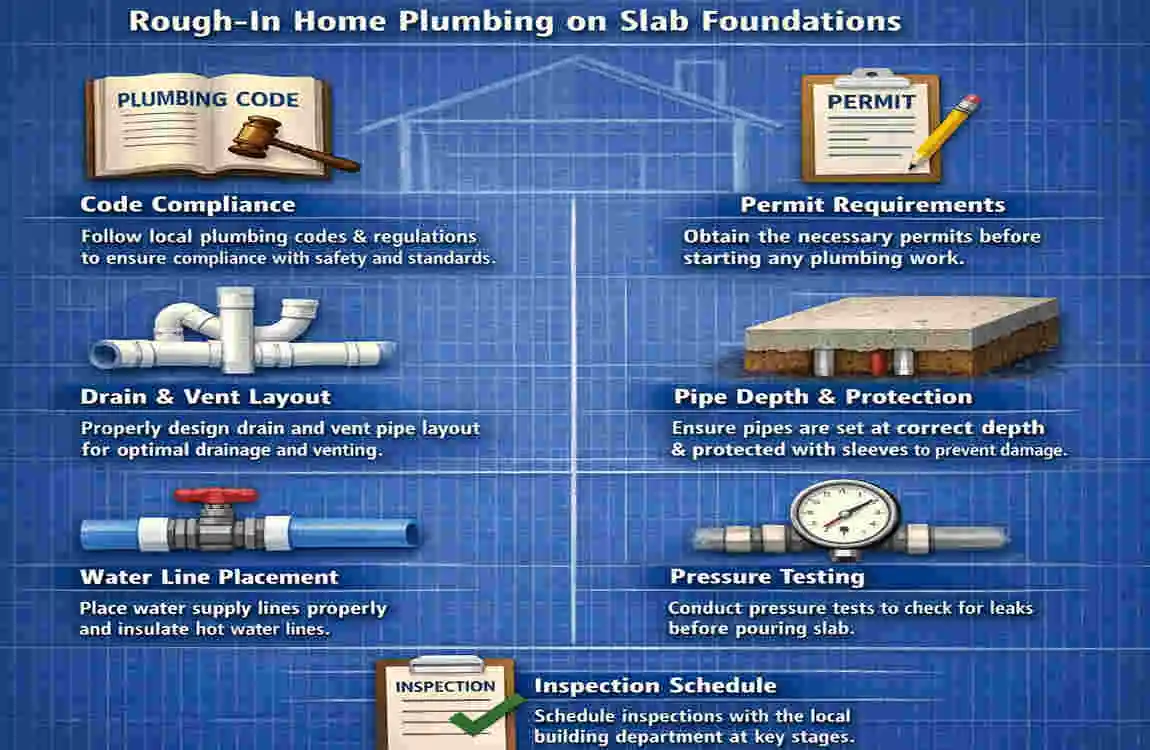
Local codes and permits matter
Before you start any slab plumbing rough-in, check the local plumbing code and permit rules. The rules may cover pipe size, slope, venting, burial depth, testing, and inspection steps.
Do not assume one city’s rules are the same as another’s. Local code always comes first. Even a well-planned layout must still meet the official standards for the area.
Slab plumbing versus crawl space plumbing
It also helps to compare slab homes with crawl space homes. In a crawl space house, the plumbing is often easier to reach later. In a slab home, many lines are buried in or below concrete, so every decision matters more.
That means slab foundation plumbing rough-in demands more care at the start. You get fewer chances to fix things once the slab is poured.
Tools and Materials Needed
Common tools for slab plumbing rough-in
Before work begins, gather the tools that help you measure, cut, mark, and install the plumbing correctly. A basic setup often includes:
- Measuring tape
- Marking paint or chalk
- Layout string and stakes
- Shovel and trenching tools
- Level or laser level
- Pipe cutter
- Saw for pipe cutting
- Marker or pencil
- Test plugs and pressure test tools
Common materials used in under slab plumbing
The exact materials depend on the job and local code, but these are commonly used:
- PVC or ABS drain pipe
- PEX water supply lines
- Fittings and couplings
- Cleanouts
- Pipe supports or straps
- Gravel or sand bedding
- Sleeves or conduit for pipe protection
- Pipe adhesive or solvent cement where required
Why pipe type matters
Not every pipe is right for every job. Drain lines, supply lines, and vent lines each serve different purposes. The pipe you choose must match the system and the local rules.
For example, drain lines need to handle wastewater and maintain proper slope. Supply lines need to carry clean water under pressure. That is why material choice is not just a detail. It is part of making the whole system work safely and reliably.
Match the materials to local requirements
Some areas prefer PVC for drains. Others allow ABS. Some projects use PEX for water supply lines, while others use different approved materials. The right choice depends on code, climate, and the builder’s design.
Before you buy or install anything, make sure the materials match the approved plan.
Review the Plumbing plan
Read the blueprint carefully
The plumbing plan shows where each part of the system should go. If you are working from a blueprint, take time to understand it before any digging starts. You want to know where the fixtures are, where the main lines run, and where the vent paths begin.
Do not rush this step. A few extra minutes here can prevent hours of correction later.
Identify all fixture locations
Look for the planned locations of:
- Toilets
- Sinks
- Showers
- Tubs
- Laundry connections
- Utility sinks
- Water heater lines
- Main sewer or septic connections
Each fixture has a rough-in location. Even a small shift in measurement can cause problems later when the fixture is installed.
Map the drain, vent, and supply routes
The plan should show how waste leaves the house, how air moves through the vent system, and how clean water reaches each fixture. You want to understand the full path, not just the visible ends.
This is the moment to ask questions if anything looks unclear. Once the concrete work begins, there is no easy way to move pipes around.
Double-check before any digging starts
Before you trench or mark the site, check the plan twice. Then check it again. Confirm the distances, alignments, and fixture centers. Confirm the line sizes and pipe routes. Confirm where the cleanouts and access points should go.
If the plan and the site do not match, stop and correct the issue before work continues.
Mark Fixture and Pipe Locations
Transfer the floor plan to the site
Now it is time to move the drawing from paper to the ground. This is where careful measuring makes all the difference. Use stakes, string, chalk, or marking paint to show where the main walls and fixture points will be.
The layout must be accurate because the slab will follow these marks. If the marks are off, the plumbing will be off too.
Mark every major fixture point
You need to mark the planned locations for all important rough-ins clearly. That includes toilets, sinks, tubs, showers, laundry boxes, and the water heater area.
It also helps to mark the centerline of walls and the edge of future openings. These reference points make it easier to keep the plumbing aligned with the structure.
Why small measurement errors matter
A small marking mistake can turn into a major alignment issue. A toilet flange that ends up a few inches off can affect how the fixture fits. A sink line placed in the wrong wall bay can create conflicts with framing.
In slab work, accuracy is not optional. It is the foundation of the foundation.
Keep the site easy to read
Good marking makes the rest of the job easier for everyone. The plumber, inspector, and concrete crew should all be able to look at the site and understand the layout quickly.
Clear markings reduce confusion and help the whole team work from the same plan.
Trench the Slab Area and install the Under-Slab Plumbing
Dig trenches for drain and supply lines
Once the layout is marked, the next step is trenching. Trenches are dug where the pipes will run so the lines can sit at the right depth and stay protected beneath the slab.
The trench work must support the pipe without leaving it hanging or uneven. The goal is a stable path that keeps the pipes in the right position during backfilling and pouring.
Keep the trench depth and slope correct
Drain lines need slope so wastewater can move by gravity. If the slope is too flat, waste may not flow well. If it is too steep, liquids can outrun solids and create problems. The exact slope depends on code and pipe size, so always follow the approved standard for your area.
Supply lines, on the other hand, do not depend on slope the same way drains do. They need proper protection, clean routing, and secure placement.
Avoid unnecessary bends and joints
Under-slab plumbing should stay as simple as possible. Every sharp bend, extra joint, or awkward turn adds another possible weak point. Simple runs are usually better than crowded ones.
When a pipe path can be made smoother and more direct, it often performs better and is easier to inspect.
Use stable bedding under the pipes
Pipes should not sit directly on rough soil or sharp debris. A bed of sand or fine gravel helps support the pipe evenly. It also helps protect it from settling or damage.
Compact, stable bedding makes the whole under-slab plumbing layout stronger and more reliable.
This is not a full engineering drawing, but it shows the basic idea. The pipes must move in the right direction, stay protected, and connect to the right points.
Install drain lines under the slab
Drain lines carry wastewater away from the fixtures to the sewer or septic system. This part of the under slab plumbing layout must be done carefully because the drains are hidden after the pour.
Each fixture should connect to the drain system in the right place. Toilets need correct flange positioning. Showers and tubs need proper trap placement. Sinks need the correct drain height and vent connection.
Keep the drain slope consistent
A steady slope helps wastewater flow smoothly. This is one of the most important parts of slab drain line installation. If the pipe sags or dips, waste can pool in low spots.
That can lead to slow drainage, odors, or clogs later. A good slope keeps the line moving the way it should.
Add cleanouts where needed
Cleanouts give you access if the line ever needs service. These access points are very helpful because they let a plumber clear blockages without tearing into the slab.
In many cases, cleanouts are a smart part of the rough-in plan. They are small details now, but they can save a lot of trouble later.
Secure the pipe so it does not move
Before backfilling or pouring concrete, the drain lines must stay in place. Pipes should not shift when workers walk near them or when material is placed around them.
Use proper supports and backfill carefully so the system remains aligned. A pipe that moves out of position can create a hidden problem that only shows up after the slab is finished.
Install water supply lines
Water supply lines carry fresh water to fixtures and appliances. In a slab home, these lines may be routed under the slab, in walls, or in other protected spaces depending on the design and code.
The goal is to get clean water to the right places without risking damage from the concrete or future settling.
Decide whether lines run under the slab or elsewhere
Some homes route more supply lines through walls or attic areas to make maintenance easier. Others may place certain lines under the slab to match the structure. There is no one-size-fits-all answer.
What matters is that the lines are protected, accessible where possible, and approved by code.
Protect lines with sleeves or conduit
If a water line passes through concrete or another hard material, it often needs protection. A sleeve or conduit can help reduce wear and provide space for movement.
This matters because concrete can be unforgiving. A protected line is less likely to be damaged by pressure, friction, or shifting material.
Pressure test before the slab pour
Before the concrete goes down, the plumbing supply lines should be pressure tested. This checks for leaks and weak points while the pipes are still visible and accessible.
If a leak shows up now, it can be fixed before it becomes a buried problem. That is exactly why testing is such a valuable step.
Venting considerations
Why vents are important
Vents are not just extra pipes. They help the whole drainage system work properly by balancing air pressure. Without vents, water can drain poorly and traps can lose their water seal.
That water seal is important because it blocks sewer gases from coming back into the home.
How vents relate to slab plumbing
Some vent lines may begin near the slab and continue upward through walls or other framing areas. The exact route depends on the design and local code.
Even if vents do not all travel under the slab, they still connect directly to the rough-in layout. They are part of the same system and must be planned carefully.
Follow code spacing and routing rules
Venting has rules about distance, height, and connection points. Those rules help keep the plumbing system balanced and safe. Since these details vary by location, always follow the approved plumbing code for the project.
Set sleeves and penetrations
Why sleeves protect the pipe
A sleeve gives a pipe room to pass through a wall, footing, or slab edge without rubbing directly against the concrete. This helps reduce damage and makes movement easier when needed.
In simple terms, a sleeve acts like a protective tunnel for the pipe.
Plan all penetrations in advance
A penetration is any spot where a pipe passes through a barrier. These spots should be planned early, not left to chance. If a pipe passes through the wrong area, it can interfere with the slab, wall framing, or future finishes.
This is especially important near walls, footings, or expansion joints.
Leave room for future access
Good planning also looks ahead. If a line may need future service or replacement, the layout should allow for it as much as possible. A well-placed sleeve can make a future repair much easier.
This is one more reason careful planning matters so much in slab foundation plumbing rough-in.
Test the System Before Pouring Concrete
Pressure test supply lines
Pressure testing checks whether the supply lines hold water pressure without leaking. If the system loses pressure, there may be a loose fitting, damaged pipe, or hidden problem that needs attention.
This test is one of the best ways to catch issues before the slab covers everything.
Test drain lines for leaks and slope problems
Drain systems should also be tested. This may involve filling or checking lines in a way that shows whether water moves properly and whether any leaks appear.
You want to catch problems like loose joints, poor slope, or blocked runs now, not after the slab is finished.
Inspection is usually required
In many places, an inspector must approve the rough-in before the slab pour can happen. That means the system must be visible, tested, and ready for review.
If the inspector finds a problem, it is far easier to fix it now than after concrete covers the work.
This is the last easy chance to correct mistakes
Once the slab is poured, the hidden plumbing becomes much harder to reach. That is why testing is such an important checkpoint. It is the final moment when corrections are still simple.
If anything feels uncertain, stop and resolve it before moving forward.
Backfill and Prepare the Base
Protect the pipes during backfilling
Backfill should be placed carefully around the pipes so they stay in position. Rough or careless backfilling can shift a pipe, damage a fitting, or change the slope of a drain line.
Take your time here. Protection matters more than speed.
Use sand or gravel bedding where needed
A proper bedding layer helps cradle the pipe and keep it supported evenly. Fine material around the pipe can reduce stress and help the line stay stable.
This is especially helpful under slab installations because the pipe will be buried under concrete and soil.
Compact the soil properly
Compacted soil reduces later settling. If the base settles unevenly after the slab is poured, the finished floor and plumbing can both suffer.
Good compaction helps create a stronger foundation for the slab and the pipes beneath it.
Level the slab base before concrete placement
Before the concrete crew arrives, the slab base should be smooth, stable, and ready for the pour. That includes checking pipe heights, confirming coverage, and making sure nothing is sticking up where it should not.
A clean base helps the slab go in evenly and reduces surprises during the pour.
Common Mistakes to Avoid
Pipe slope errors
One of the biggest mistakes is getting the slope wrong on drain lines. Too little slope can slow drainage. Too much slope can also create drainage problems. The line needs the right balance.
Misaligned fixture locations
If the rough-in points do not match the final fixture layout, the finished bathroom or kitchen may not line up properly. This can lead to awkward repairs or changes after the slab is already in place.
Ignoring local code requirements
Plumbing code is not optional. If the work does not meet code, the inspector may fail it, and the system may need changes before the project can continue.
Poor support under the slab
Pipes need stable support. If they rest on uneven soil or shift during work, they can end up out of alignment. That can cause hidden issues later.
Forgetting cleanouts or future access
It is easy to focus only on the pipes you can see now. But future access matters too. Cleanouts and service points make repairs much easier later.
Skipping inspection and testing
This is a serious mistake. If you skip testing before the pour, you risk burying a problem under concrete. That can turn a small fix into a major one.
Plumbing Code and Permit Considerations
Codes vary by location
Plumbing rules vary from place to place. Pipe sizes, venting methods, burial depth, test methods, and material types can all change depending on where you build.
That is why you should not copy a layout from another job without first checking local requirements.
Permits and inspections are often required
Most slab plumbing projects need a permit and inspection. This protects the homeowner and helps confirm that the system is safe and compliant.
If you are working on a new build or major project, make sure the paperwork is handled early. Do not wait until the last minute.
Some work may require a licensed professional
Even if you are comfortable with DIY planning, some parts of the job may need a licensed plumber. This is especially true when the job is large, complex, or tightly regulated.
A professional can help ensure the system passes inspection and works as it should.
Always verify before you start
The safest move is to verify the code and permit requirements before any physical work begins. That saves time, avoids rework, and keeps the project moving in the right direction.
When to Hire a Professional
Large or complex floor plans
If the home has multiple bathrooms, a large kitchen layout, laundry areas, and utility spaces, the plumbing design can get complicated fast—more fixtures mean more lines, more coordination, and more chances for error.
That is a good time to bring in a professional.
Septic systems add another layer
Homes with septic systems may require extra care because the drainage system must work with the tank and drain field. This is not the place to guess.
A plumber with slab and septic experience can help avoid expensive layout mistakes.
Professionals help with code compliance
One of the biggest benefits of hiring a plumber is the peace of mind it provides. They understand the local rules, know how inspectors think, and can spot issues before they become problems.
That can save you time and reduce stress during the build.
Professional layout can prevent costly corrections
The earlier a mistake is found, the easier it is to fix. A professional can help prevent those mistakes from happening in the first place. In slab work, that can make a huge difference.
FAQ
How deep should plumbing be under a slab?
The depth depends on the pipe type, local code, and the overall foundation design. Drain lines usually need enough depth for proper slope and coverage, while supply lines may follow different rules. Always confirm the required depth with local code or a licensed plumber.
Can you run water lines under a concrete slab?
Yes, water lines can run under a slab in some homes, but the layout must be carefully planned and protected. In some projects, supply lines are routed through walls or other spaces instead. The best choice depends on the design and code.
What pipe is best for slab foundation plumbing?
The best pipe depends on the job. PVC or ABS is commonly used for drain lines, while PEX is often used for supply lines. The final choice should match local code and the approved plumbing plan.
Do you need to pressure test before pouring a slab?
Yes, pressure testing is a very important step before the slab pour. It helps confirm that supply lines do not leak and that the system is ready to be covered.
Can a homeowner rough in plumbing for a slab foundation?
Some homeowners can help with planning or minor work, but slab rough-in plumbing is a serious job. Because mistakes are hard to repair after the pour, many people choose to work with a licensed plumber, especially for complex layouts or code-sensitive projects.