Imagine pulling up to your home after a long road trip in your RV. You’re tired, but excited to be back. The last thing you want to deal with is a messy, complicated sewer hookup. That’s where knowing how to connect the RV to the house sewer comes in handy. A proper connection isn’t just about convenience – it’s crucial for safety and sanitation too.
Understanding Your RV Sewer System
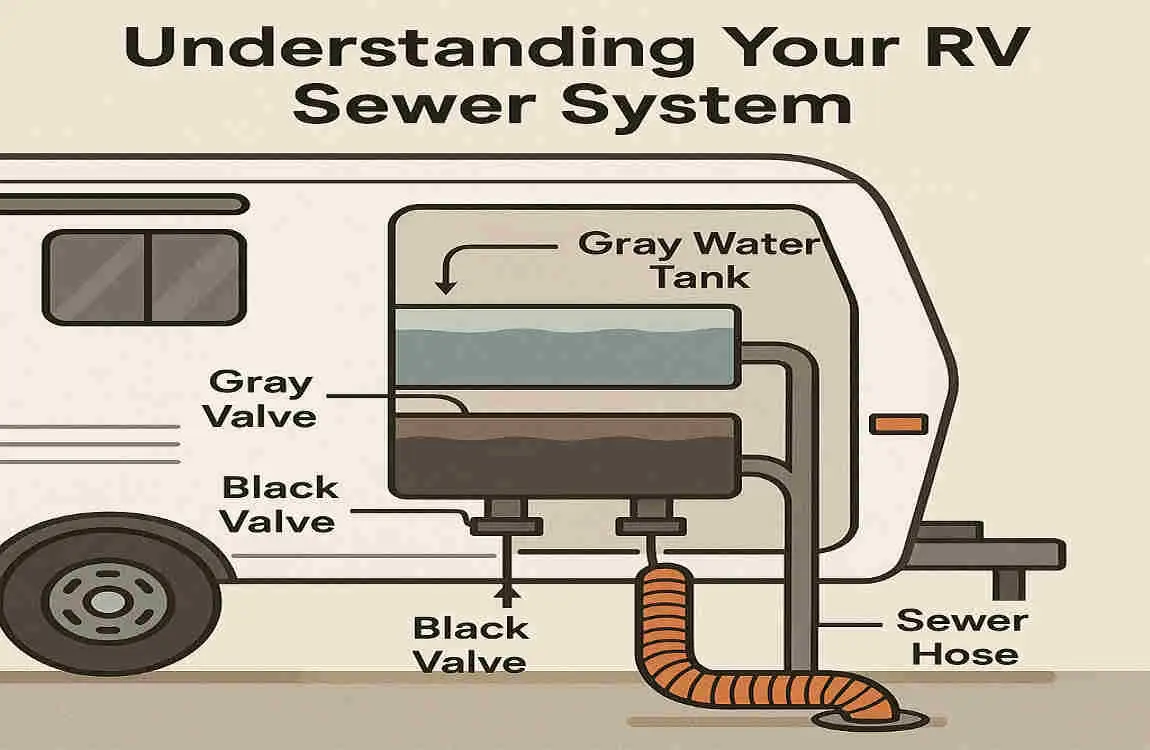
Before we dive into the nitty-gritty of connecting your RV to your house sewer, let’s take a moment to understand how your RV’s sewer system works. Your RV has two main waste tanks:
Black Tank
This is where all the waste from your toilet ends up. It’s called the black tank because of the dark color of the waste it holds. Keeping this tank properly emptied is crucial for hygiene and preventing clogs.
Gray Tank
The gray tank collects water from your shower and sinks. While it’s not as nasty as the black tank, you still need to empty it regularly to avoid odors and potential backups.
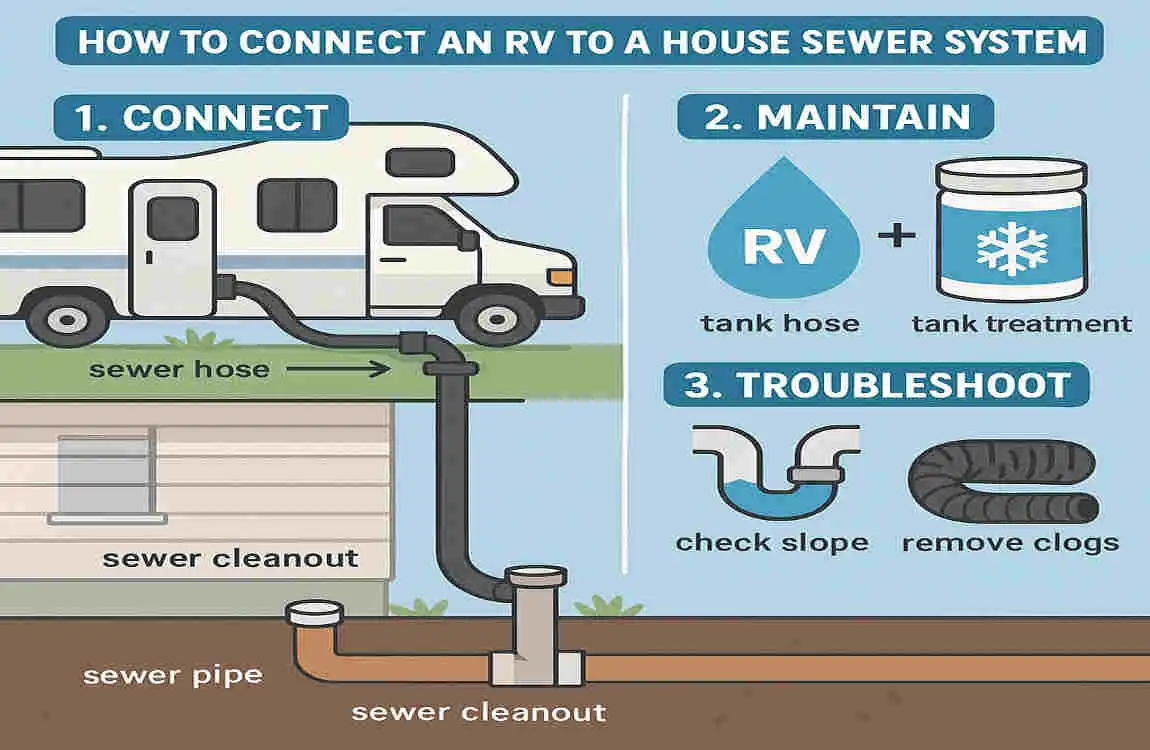
Properly emptying these tanks via a sewer connection is essential to maintaining a clean, functional RV. The basic components involved in an RV sewer hookup include the RV sewer hose, sewer hose elbow/fitting, and the connection point on your house.
Necessary Equipment for Connecting RV to House Sewer
To make the process of connecting your RV to your house sewer as smooth as possible, you’ll need a few key pieces of equipment:
- RV sewer hose: The central hose that carries waste from your RV to your house sewer.
- Sewer hose elbow/fitting: This connects your sewer hose to the house sewer inlet, ensuring a secure and leak-free connection.
- Gloves: Always wear gloves when handling sewer connections to protect your hands and maintain hygiene.
- Hose support: This helps maintain the proper slope and angle of your sewer hose, ensuring smooth drainage.
- Elbow connector: This may be necessary depending on the configuration of your house sewer inlet.
- Sewer pipe (if permanent installation): If you plan on setting up a permanent RV sewer connection at your home, you’ll need a sewer pipe to connect your RV to your house sewer system.
Some optional tools that can make the process even easier include:
- Sewer hose holder: This keeps your sewer hose organized and prevents it from getting damaged or dirty when not in use.
- Garden hose for cleaning: A garden hose can be handy for cleaning your sewer hose after use, ensuring it stays in good condition.
Locating and Preparing the House Sewer Connection
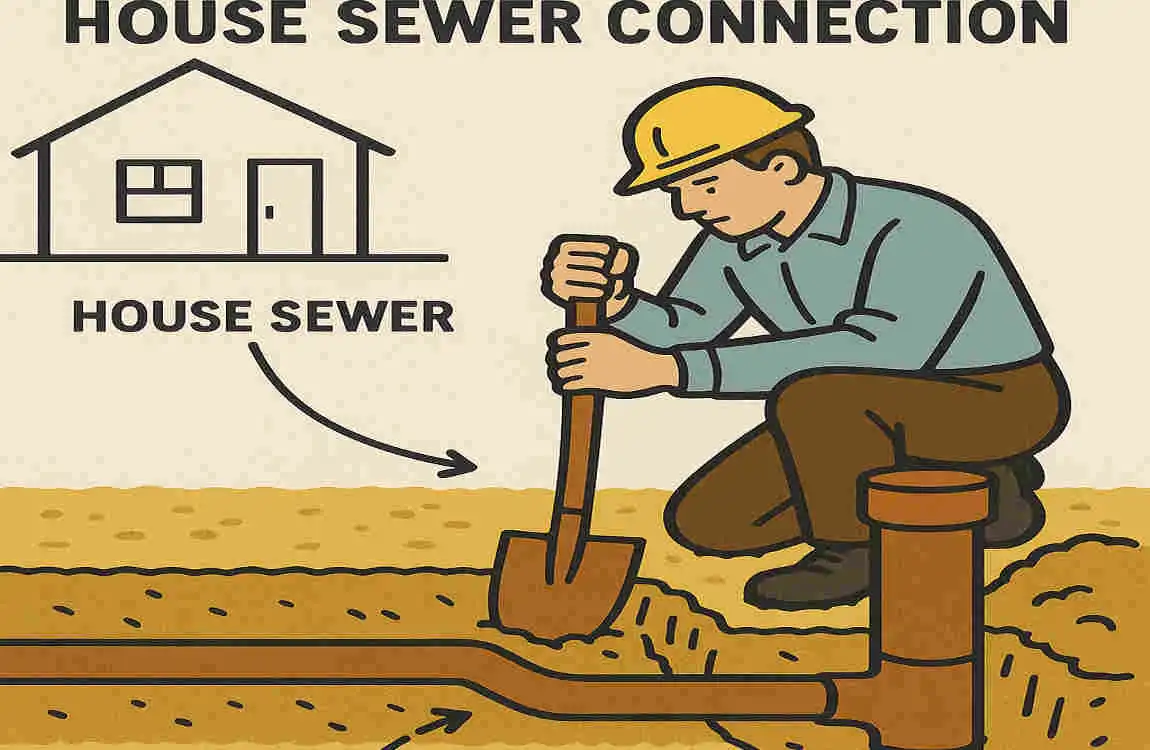
Before you connect your RV to your house sewer, locate the correct sewer cleanout or connection point on your house. This is usually a capped pipe that extends from your house’s sewer system. It’s often found near the foundation of your home, but the exact location can vary.
Once you’ve found the sewer connection point, take a moment to prepare for the hookup. Put on your gloves to protect your hands and check the area around the connection point for any signs of leaks or damage. If you notice any issues, it’s best to address them before proceeding with the hookup.
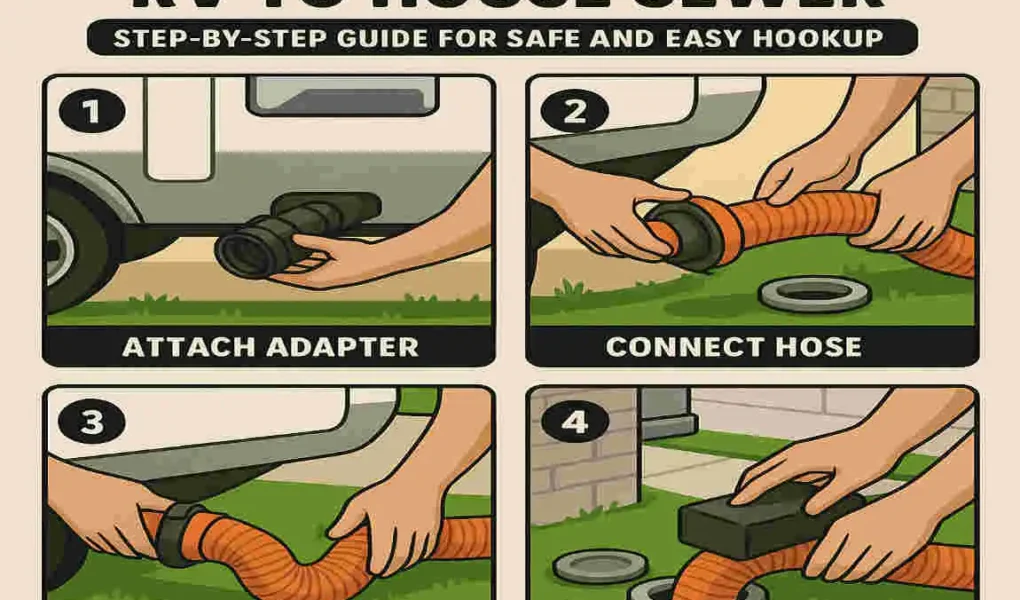
Step-by-Step Guide: How to Connect RV to House Sewer
Now that you’ve got your equipment ready and your house sewer connection located, it’s time to start the hookup process. Follow these steps carefully to ensure a safe and successful connection:
Close RV Waste Valves and Locate Sewer Inlet
Before you start connecting anything, make sure both your black and gray tank valves are closed. This prevents any accidental spills or leaks. Then locate the sewer inlet on your RV where you’ll attach the sewer hose.
Attach Bayonet-Style End of RV Sewer Hose Securely to RV Waste Valve
Attach the bayonet-style end of your RV sewer hose securely to the RV waste valve. Make sure it’s securely fastened to prevent leaks or disconnections during the process.
Run Sewer Hose to House Sewer Clean-Out or Connection Point with Proper Slope
Carefully run the sewer hose from your RV to the house sewer clean-out or connection point. Make sure the hose has a proper slope to allow for smooth drainage. You may need to use a sewer hose support to maintain the correct angle.
Connect the Elbow-Fitting End of the Sewer Hose to the House Sewer Inlet Securely
Once the sewer hose is in position, attach the elbow-fitting end of the hose to the house sewer inlet. Make sure it’s connected securely and check for any leaks before proceeding.
Use Sewer Hose Support if Necessary to Maintain Proper Drainage Angle
If you’re having trouble maintaining the proper drainage angle, use a sewer hose support to prop up the hose and keep it at the appropriate slope. This will help prevent clogs and ensure smooth flow.
Open Black Tank Valve First, Drain Completely, Then Close Valve
Now it’s time to start draining your tanks. Open the black tank valve first and let it drain completely. Once it’s empty, close the valve to prevent any air from entering the system.
Open Gray Tank Valve and Drain Completely, Then Close Valve
After the black tank is empty, open the gray tank valve and let it drain completely. The gray water will help flush out any remaining waste in the hose. Once it’s empty, close the valve.
Disconnect Hose from RV Side First, Cap Waste Valves Immediately
When you’re finished draining, disconnect the sewer hose from the RV side first. Immediately cap the waste valves to prevent any leaks or odors.
Clean Sewer Hose Thoroughly with Garden Hose Before Disconnecting from House Sewer
Before you disconnect the sewer hose from the house sewer, please take a moment to clean it thoroughly with a garden hose. This will help keep it in good condition and prevent any contamination. Once it’s clean, you can disconnect it from the house sewer and store it properly.
Tips for Safe and Easy RV Sewer Hookup

Now that you know the basic steps for connecting your RV to your house sewer, here are a few tips to make the process even safer and easier:
- Always wear gloves and sanitize your hands: Handling sewer connections can be messy, so always wear gloves and wash your hands thoroughly afterward.
- Check seals and connections to prevent leaks and odors: Before and after each hookup, check all seals and connections for any signs of leaks or wear. Addressing these issues early can prevent bigger problems down the road.
- Use sewer hose support tools to improve flow and extend hose longevity: A sewer hose support can help maintain the proper slope and angle of your hose, ensuring smooth drainage and preventing kinks or damage.
- Store sewer hose properly to avoid contamination: When not in use, store it in a clean, dry place to prevent contamination and extend its lifespan.
Common Mistakes to Avoid When Connecting an RV to a House Sewer
Even with the best intentions, it’s easy to make mistakes when connecting your RV to your house sewer. Here are a few common pitfalls to watch out for:
- Leaving valves open prematurely: Always make sure your waste valves are closed before starting the hookup process. Opening them too early can lead to spills and leaks.
- Connecting hose without checking for leaks or proper fit: Before you start draining your tanks, double-check that all connections are secure and leak-free. A loose connection can cause a big mess.
- Do not clean the sewer hose after use: Clean it thoroughly after each use. Failing to do so can lead to clogs, odors, and contamination.
- Improper slope causing backflow or blockages: Make sure your sewer hose has the proper slope to allow for smooth drainage. An improper angle can cause backflow or blockages in the system.
Maintenance and Troubleshooting
To keep your RV sewer hookup running smoothly, it’s essential to perform regular maintenance and address any issues that arise. Here are a few tips:
- Regular inspection of sewer hose and valves: Periodically check for wear or damage. Replace any worn-out parts to prevent leaks or clogs.
- How to fix minor leaks or replace worn-out fittings: If you notice a minor leak, you can fix it yourself with some basic tools and replacement parts. However, if the issue is more serious, it’s best to call a professional.
- When to call a professional plumber for house sewer connection issues: If you’re having trouble with your house sewer connection or if you notice any significant issues, don’t hesitate to call a professional plumber. They have the expertise and tools to address even the most complex problems.
Issue Solution
Minor leak in sewer hose: Tighten connections or replace worn-out fittings
Clogged sewer hose: Use a sewer hose cleaning tool or replace the hose
Damaged sewer valve. Replace the valve with a new one
House sewer connection issues: Call a professional plumber for assistance
How to Connect RV to House Sewer: FAQ
Can You Hook Up an RV to a House Sewer?
Yes, you can hook up your RV to a house sewer system. It’s a common practice among RV enthusiasts and homeowners alike. However, there are a few important things to keep in mind before you start the process .
What Are the Considerations for Connecting an RV to a House Sewer?
Before you connect your RV to your house sewer, consider the following:
- Location of the Sewer Cleanout: You’ll need to locate the sewer cleanout on your property. This is usually a PVC pipe sticking out of the ground near the septic tank with a screw cap sealing it shut .
- Type of Connection: You’ll need to decide whether to use a flexible sewer hose or a more permanent PVC pipe solution .
- Safety and Sanitation: Always wear gloves and take precautions to prevent leaks and contamination .
How Do You Connect an RV to a House Sewer?
Connecting your RV to your house sewer involves a few simple steps. Here’s how to do it:
Locate the Sewer Cleanout
Find the sewer cleanout on your property. It’s usually a PVC pipe sticking out of the ground near the septic tank with a screw cap sealing it shut .
Prepare Your RV Sewer Hose
Attach a flexible sewer hose to your RV’s sewer outlet, ensuring a secure fit with a threaded or clamp connection .
Connect the Hose to the Sewer Cleanout
Remove the screw cap from the sewer cleanout and attach the other end of the sewer hose to it. Make sure to maintain a downward slope for gravity flow .
Use Sewer Hose Supports
Use sewer hose supports to prevent sagging and leaks in the hose .
Test the Connection
Before using the connection, test it to ensure there are no leaks or issues. If everything looks good, you’re ready to start using your RV’s sewer system with your house sewer.