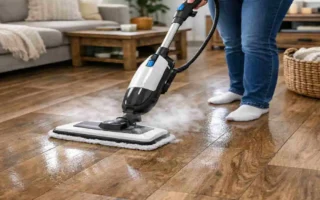
Kitchen floors take a lot of abuse every day. They deal with water spills, dropped food, heat, stains, and heavy foot traffic. That is why choosing the right flooring matters so much. You need something that looks good, feels comfortable, and can handle daily messes without wearing out too fast.
| Step | What To Do | Key Tips |
|---|---|---|
| 1 | Assess and measure the kitchen | Measure total floor area (add 10% for waste) and check that cabinets/appliances clear the finished floor height. |
| 2 | Choose suitable waterproof vinyl | Pick waterproof LVP/LVT rated for kitchens, with a thick wear layer and slip‑resistant texture. |
| 3 | Prepare the subfloor | Remove old coverings, clean thoroughly, and ensure the subfloor is dry, flat, and firmly fixed (no squeaks or flex). |
| 4 | Plan layout and expansion gaps | Snap a reference line, dry‑lay a few rows, and leave expansion gap (typically 5–10 mm) at walls and fixed cabinets. |
| 5 | Cut around cabinets and obstacles | Use templates or careful scribing around islands, toe‑kicks, pipes, and door frames; undercut trims if needed. |
| 6 | Install planks/tiles | Start along the longest straight wall, stagger end joints, and lock each piece tightly with tapping block if required. |
| 7 | Finish edges and transitions | Install waterproof baseboards/quarter-round, seal vulnerable edges with flexible sealant, and fit threshold strips at doorways. |
| 8 | Post-install care | Avoid heavy traffic for 24–48 hours if recommended, use felt pads under furniture, and clean with a damp mop (no harsh chemicals). |
This is where vinyl flooring becomes a smart choice. It is practical, stylish, and easy to maintain. Many homeowners now prefer it because it gives the look of wood or stone without the same cost or care issues. If you are looking for the best waterproof vinyl flooring for kitchens, this guide will help you understand what it is, why it works so well, and how to install it properly.
What Is Waterproof Vinyl Flooring?
Understanding Vinyl Flooring Basics
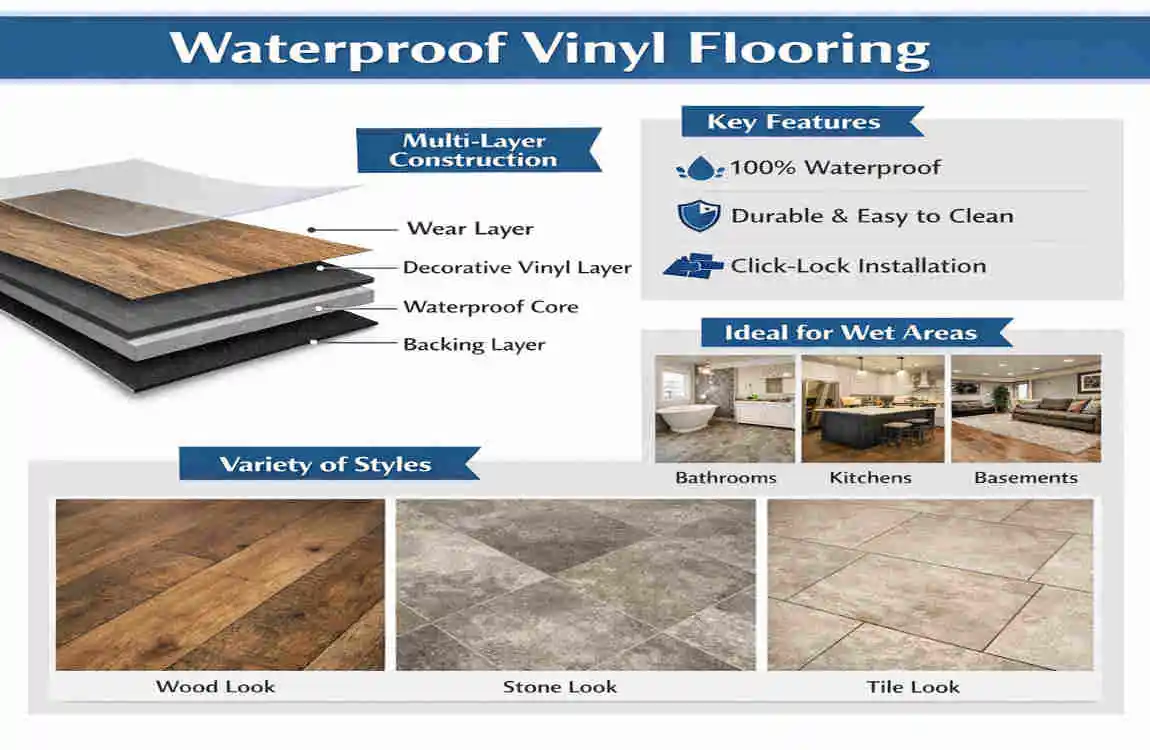
Waterproof vinyl flooring is made from multiple layers of strong synthetic materials. These layers are designed to resist moisture and daily wear. Most modern vinyl floors have a printed design layer, a protective top layer, and a rigid or flexible core underneath.
This structure makes it a good choice for kitchens because it can handle spills and cleaning without damage.
How Waterproof Vinyl Flooring Works
The main reason this flooring works so well is its moisture-resistant core and protective wear layer. The top layer helps protect against scratches, while the tight locking system or sealed surface helps block water from getting through.
That means it is much safer for kitchens than many traditional flooring materials.
Types of Vinyl Flooring
There are a few common types of vinyl flooring:
- Luxury Vinyl Plank (LVP): Looks like wood planks
- Luxury Vinyl Tile (LVT): Looks like stone or ceramic tile
- Sheet Vinyl Flooring: Comes in large sheets with fewer seams
Each type has its own strengths, but all can work well in a kitchen when chosen carefully.
Why Kitchens Need Waterproof Vinyl Flooring
Protection Against Water Spills
Kitchens are full of spills. Water from the sink, soup on the floor, or humidity from cooking can all damage the wrong flooring. Waterproof vinyl gives you peace of mind because it handles moisture much better.
Resistance to Stains and Scratches
Kitchens are busy spaces. Pots, pans, utensils, and chairs can leave marks on the floor. Vinyl flooring is designed to resist stains and scratches, helping it stay neat even in high-traffic areas.
Comfort and Safety Benefits
Unlike tile, vinyl feels softer underfoot. That makes it easier on your feet if you spend a lot of time cooking. It can also reduce noise and offer better slip resistance, which is helpful when the floor gets wet.
Benefits of Choosing the Best Waterproof Vinyl Flooring for Kitchens
Strong Water Resistance
This is the biggest benefit. Good vinyl flooring can handle spills and moisture without warping, swelling, or staining.
Easy Cleaning
Most vinyl floors only need sweeping and light mopping. You do not need heavy cleaners or special care.
Lower Cost
Compared with hardwood, stone, or ceramic tile, vinyl is usually more affordable. That makes it a good option if you want style without overspending.
Stylish Looks
Vinyl comes in many designs. You can find wood-look planks, stone-style tiles, and modern matte finishes. This makes it easy to match your kitchen cabinets and countertops.
Long-Lasting Performance
When installed correctly, the best waterproof vinyl flooring for kitchens can last for many years. It offers a strong blend of beauty, comfort, and durability.
Different Types of Waterproof Vinyl Flooring for Kitchen Houses
Type Best For Main Benefit Watch Out For
LVP Wood-look kitchens: Natural appearance. It can be more expensive than sheet vinyl
LVT Modern or elegant kitchens Tile-like style Needs careful installation
Sheet Vinyl Budget-friendly projects Fewer seams, good moisture protection Less Premium look
Rigid Core Vinyl (SPC/WPC) , Busy kitchens , Extra strength and stability , Costs more than basic vinyl
Luxury Vinyl Plank (LVP)
LVP is popular because it looks like real wood. It is easy to install and works well in both classic and modern kitchens.
Luxury Vinyl Tile (LVT)
LVT gives you the look of tile without the hard surface. It is a strong choice if you want a clean, polished kitchen style.
Sheet Vinyl Flooring
Sheet vinyl is cost-effective and useful when you want fewer seams. Since seams can let in moisture, this option can be a smart pick for kitchens.
Rigid Core Vinyl
Rigid-core products like SPC and WPC are designed for strength. They stay stable better than standard vinyl and are great for active kitchens.
How to Choose the Best Waterproof Vinyl Flooring for Kitchens
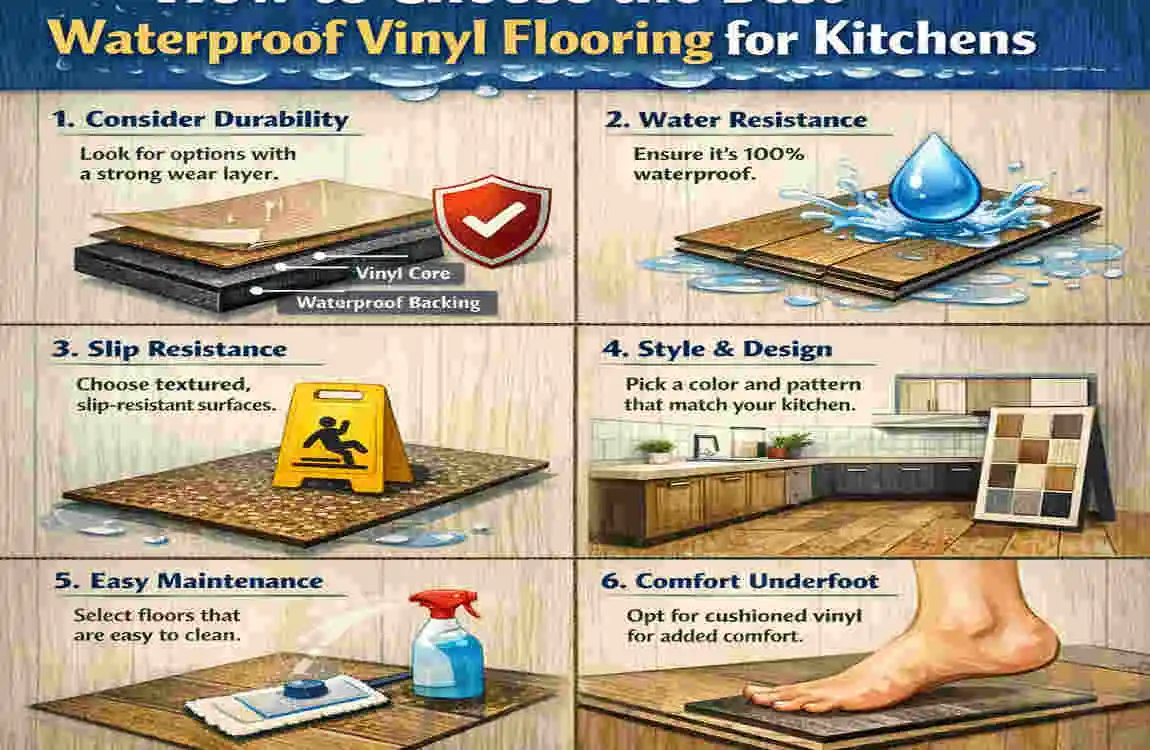
Check Wear Layer Thickness
The wear layer protects the floor from damage. A thicker wear layer usually means better durability. Common choices include 12 mil, 20 mil, and 28 mil. For kitchens, a thicker option is usually safer.
Think About Slip Resistance
A kitchen floor should not be too slippery. Look for vinyl that offers better grip, especially if your home has kids or older adults.
Compare Core Materials
SPC is very firm and durable. WPC feels softer underfoot. If your kitchen gets a lot of traffic, SPC may be the stronger choice.
Match the Design to Your Kitchen
Light floors can make a small kitchen feel open and bright. Dark floors can add a rich, bold look. Try to balance the flooring with the colours of your cabinets and countertop.
Set a Budget
You can find flooring at different price levels. Entry-level vinyl is good for simple updates, while Premium products offer better durability and style.
Check Warranty and Lifespan
A good warranty often shows that the product is made to last. This matters if you want durable vinyl flooring for kitchens that holds up over time.
Tools and Materials Needed Before Installation
Before you start, gather the basic tools:
- Tape measure
- Utility knife
- Rubber mallet
- Spacers
- Pull bar
- Level
- Chalk line
You may also need:
- Underlayment, if required
- Adhesive for glue-down vinyl
- Transition strips
- Your chosen waterproof vinyl planks or sheets
Preparing Your Kitchen Floor for Installation
Remove Old Flooring
Take out old tile, laminate, or carpet before starting. The new floor will only perform well if the base is clean and stable.
Clean the Subfloor
Remove dust, grease, and loose debris. Kitchens often have oil buildup, so cleaning matters a lot.
Check Moisture Levels
Moisture testing helps you avoid future problems. Even waterproof flooring needs a dry, sound base underneath.
Level Uneven Surfaces
Fill cracks and patch low spots. A smooth surface helps the flooring sit properly and last longer.
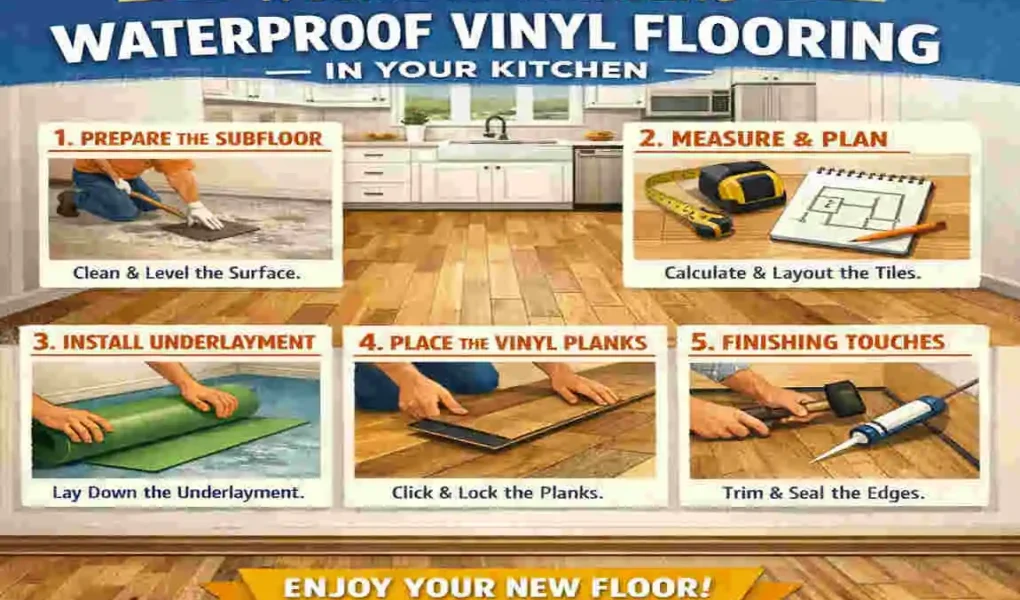
Step-by-Step Guide to Installing Waterproof Vinyl Flooring in Your Kitchen
Measure the Kitchen Space
Measure the room carefully and calculate the square footage. Add 5% to 10% extra for cuts and waste.
Acclimate the Flooring
Leave the planks or tiles in the kitchen for 24 to 48 hours. This helps them adjust to the room temperature.
plan the Layout
Decide where to begin and which direction the planks should run. Good planning helps the floor look balanced.
install Underlayment if Needed
Some floors need underlayment for comfort or noise control. Follow the product instructions.
Lay the First Row
Start along a straight wall and use spacers to leave a small expansion gap. This prevents buckling later.
Continue Installing Rows
Lock each plank into place carefully. Stagger the joints to make the floor look natural and stay strong.
Cut Around Cabinets and Appliances
Measure carefully around edges, corners, and built-ins. Small mistakes here can affect the final look.
install Transition Strips and Baseboards
These finish the edges and make the room look complete.
Final Inspection and Cleanup
Check the whole floor for loose joints or gaps. Then clean the surface gently and enjoy your new kitchen floor.
Common Installation Mistakes to Avoid
Skipping Subfloor Prep
This is one of the biggest mistakes. A poor base can lead to uneven flooring and long-term damage.
Ignoring Expansion Gaps
Vinyl needs a little room to expand. If you forget this step, the floor may lift or buckle.
Buying Too Little Flooring
Always buy extra material. It helps if you make a bad cut or need a future repair.
Using the Wrong Adhesive
If your flooring needs glue, use the right type. The wrong adhesive can weaken the installation.
Maintenance Tips After Installation
Daily Cleaning
Sweep often and use a microfiber mop when needed. This keeps dirt from scratching the surface.
Clean Spills Right Away
Even though the floor is waterproof, quick cleanup is still best. It helps keep the floor looking fresh.
Avoid Harsh Chemicals
Strong cleaners can damage the finish. Use gentle products made for vinyl floors.
Protect Against Furniture Damage
Add felt pads under chairs and tables. Rugs in busy areas can also reduce wear.
Waterproof Vinyl Flooring vs Other Kitchen Flooring Options
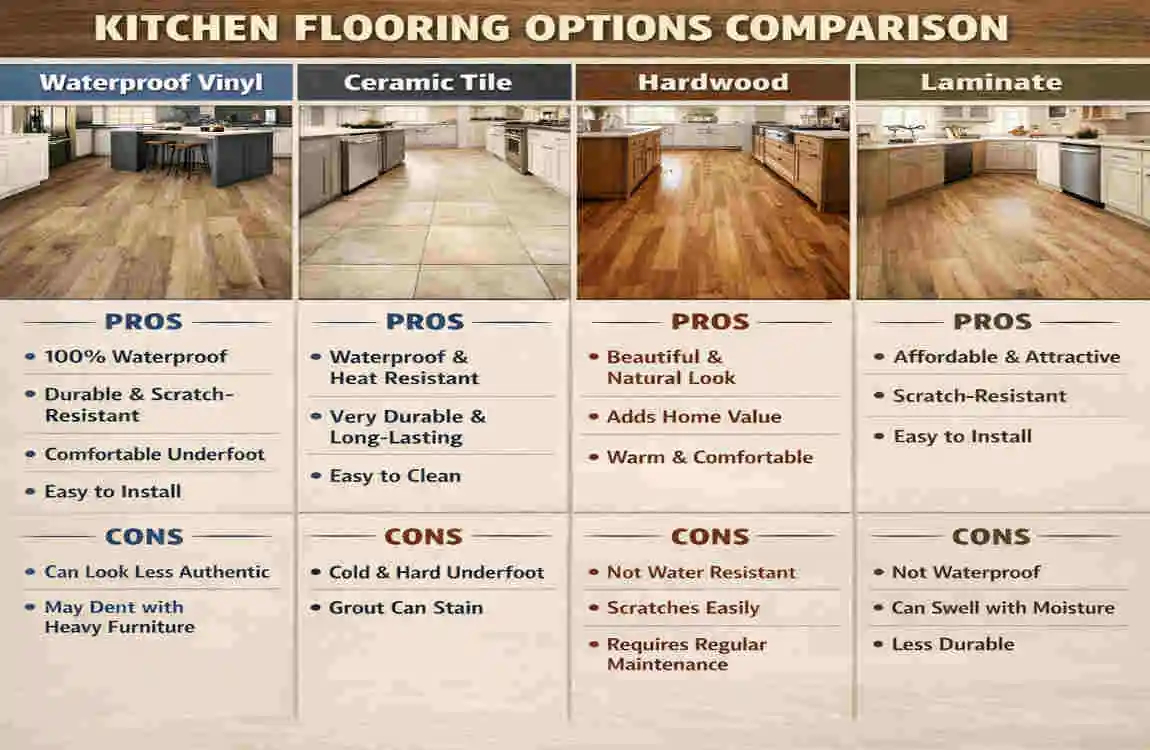
Flooring Type Waterproof? Comfort Cost Installation Difficulty
Vinyl Yes Good Low to medium Easy to medium
Hardwood No Good High Medium to hard
Laminate Limited Good Medium Medium
Ceramic Tile Yes Hard Medium to high Hard
Stone Yes Hard Very high Hard
Vinyl gives you a strong mix of comfort, style, and value. That is why many homeowners choose it over harder and more expensive options.
Cost of Installing Waterproof Vinyl Flooring in Kitchens
The total cost depends on several things. Material price, labour, underlayment, trims, and room size all affect the final amount. DIY work can lower labour costs, but professional installation may save time and reduce mistakes.
If your kitchen has many corners or custom cuts, the price may increase slightly. Still, vinyl remains one of the more affordable waterproof flooring choices.
Is DIY Installation Worth It?
DIY can be a smart move if you want to save money and you feel comfortable using tools. It also lets you work at your own pace.
But it is not the best choice for everyone. If your kitchen has uneven flooring, tricky edges, or a glue-down product, hiring a professional may be the safer option.
FAQ: Best Waterproof Vinyl Flooring for Kitchens
Is waterproof vinyl flooring good for kitchens?
Yes. Waterproof vinyl flooring is a practical kitchen choice because luxury vinyl plank is designed to handle regular exposure to water and help prevent warping and cracking. It also gives you a bit of flexibility underfoot, which many people like in busy kitchen spaces .
What is the best type of waterproof vinyl flooring for kitchens?
For most kitchens, luxury vinyl plank (LVP) and luxury vinyl tile (LVT) are both strong options. If you want extra strength for a busy kitchen, rigid-core vinyl such as SPC is a smart pick because it resists dents, scratches, and moisture well .
Is waterproof vinyl really different from water-resistant flooring?
Yes. Waterproof flooring is made to resist water completely, so it should not absorb moisture easily when exposed to spills or standing water. That is different from water-resistant products, which can handle some moisture but not the same level of protection .
Can I install waterproof vinyl flooring myself?
Yes, many waterproof vinyl floors are made with click-lock systems that are designed for easier DIY installation. With the right tools and good floor prep, you can install SPC, WPC, or vinyl plank flooring yourself .
How does waterproof vinyl hold up in a kitchen?
It performs well in everyday kitchen conditions. Some waterproof flooring materials, including vinyl, may expand or contract a little with temperature changes, but that is usually not a major issue in normal kitchen spaces . The material itself is also built not to swell, warp, or delaminate when exposed to moisture .
Which waterproof vinyl option is best for a busy kitchen?
If your kitchen gets a lot of foot traffic, rigid-core SPC vinyl is often a strong choice because it offers solid moisture protection and better resistance to dents and scratches . If you want a softer feel, LVP or LVT can still work very well .
What should I look for before buying?
Look for a floor that matches your kitchen needs, your design style, and your installation plan. The best choice usually depends on your lifestyle and the look you want to create .