Building a sturdy home starts with mastering how to frame a house’s floor—get it wrong, and your foundation wobbles. Literally.
Imagine walking across your living room and feeling the floor bounce like a trampoline, or hearing a groan from the wood every time you step near the sofa. That is the nightmare scenario of poor framing. The floor frame is the unsung hero of your house; it is the structural skeleton that bridges the gap between the cold, hard ground (or foundation) and the comfortable living space above.
Why Floor Framing Matters for Strong Home Foundations
You might be tempted to rush through the framing to get to the “fun” parts like putting up walls or choosing paint colors. But stop right there. Understanding why floor framing matters is the key to building with authority and confidence.
The Role of Load-Bearing
Think of your floor frame as a massive transfer station. It has one main job: to take the weight (load) from the walls, the roof, the furniture, and the people (that’s you!), and transfer it safely down to the foundation.
- Dead Load: The weight of the building materials themselves.
- Live Load: The weight of people, furniture, and anything that moves.
If you don’t frame correctly, gravity wins. The floor can sag, causing drywall to crack, doors to stick, and windows to shatter under pressure.
Ground Floor vs. Upper Stories
The technique for framing a floor in a house varies slightly depending on the level.
- Ground floors usually sit on pressure-treated sill plates that rest directly on concrete. They have to fight off moisture and rot.
- Upper stories (or second floors) rest on the walls of the floor below. They need to be rigid to prevent noise transfer and vibration.
The Consequences of Bad Framing
We briefly mentioned the “bounce,” but it gets worse. Improper framing can lead to catastrophic failure during heavy snow loads or high winds. It creates safety risks that can condemn a house.
Key Benefits of Proper Framing:
- Energy Efficiency: A tight frame allows for better insulation installation, keeping your heating bills down.
- Resale Value Boost: Inspectors closely examine floor structures. A solid report can boost resale value by 5-10%.
- Noise Reduction: A stiff floor doesn’t squeak or carry footstep sounds.
Essential Tools and Materials for Floor Framing
You cannot build a masterpiece with improper tools. When learning how to frame a floor for a house, having the right gear on hand saves you hours of frustration.
The Tool Kit
Here is a breakdown of what you need. Do not skimp on the measuring tools; accuracy is everything here.
CategoryMust-HavesPro Tip
Measuring 25-foot Tape measure, Laser Level, and chalk line. Calibrate your laser level before starting; even a 1/8″ error throws off the whole house.
Cutting Circular Saw, Miter Saw, and Reciprocating Saw. Use a 7-1/4″ framing blade for cutting joists cleanly. Keep a spare blade handy.
Fastening Framing Hammer (22oz), Drill/Driver, Joist Hangers. A Pneumatic Framing Nailer will speed up your workflow by 30% or more.
Safety Hard Hat, Heavy-Duty Gloves, Dust Mask, Eye Protection. Ensure your gear is OSHA-compliant. Splinters and flying nails are real risks.
The Materials List
To frame a standard floor, you will need to order specific lumber.
- Lumber: You will typically use 2×10 or 2×12 lumber for the joists. For the rim boards (the perimeter), you need matching sizes. Crucial: If the wood touches concrete (like the sill plate), it MUST be pressure-treated to resist rot and termites.
- Engineered Wood (Optional): Many modern builders use I-joists (which look like the letter ‘I’). They are lighter, straighter, and can span longer distances than traditional wood.
- Hardware: You cannot just toenail everything. You need joist hangers, hurricane ties, and specific blocking.
- Fasteners: 16d (16-penny) nails for framing, 10d nails for hangers, and construction adhesive (Liquid Nails or similar) for the subfloor.
Cost Estimate: Expect to spend roughly $5-10 per square foot for materials on a 1,000 sq ft floor, depending on lumber prices in your area.
Floor Framing Basics: Understanding Joists, Beams, and Layout
Before we start swinging hammers, let’s get our vocabulary straight. If you don’t know the anatomy of a floor, you can’t build it.
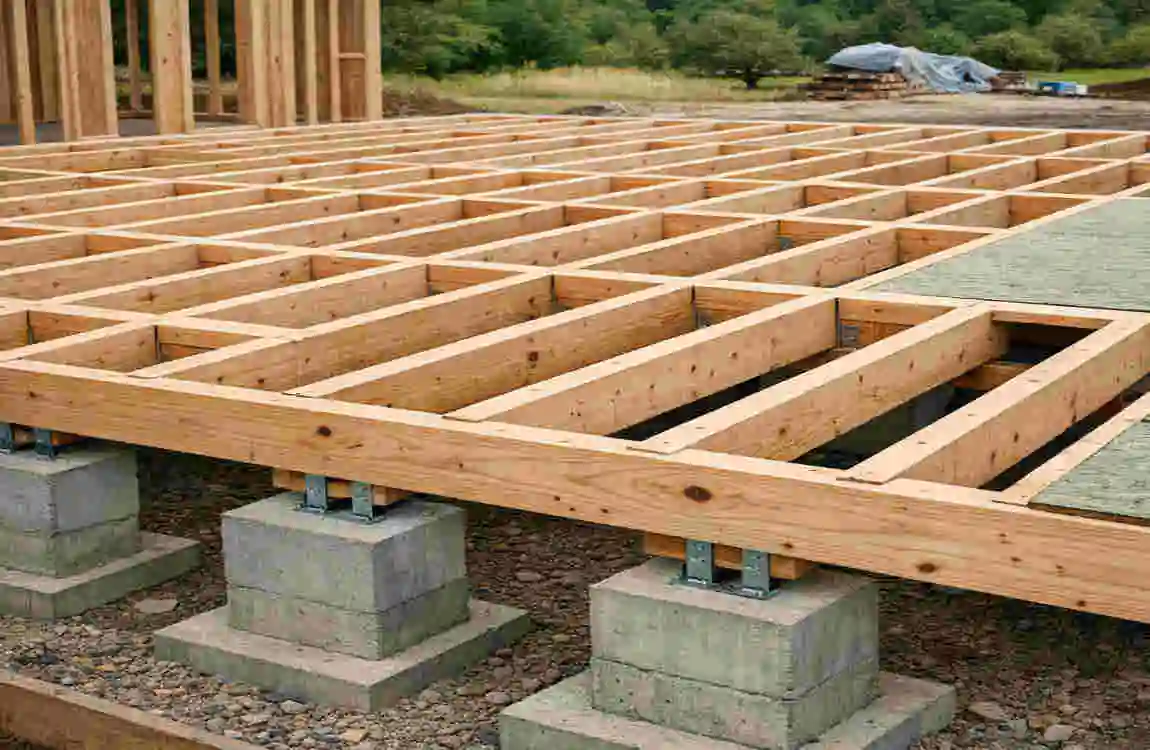
The Anatomy of a Floor Frame
- Sill Plate: The layer of wood that sits directly on top of the concrete foundation. It is the anchor.
- Rim Joist (or Band Board): The perimeter board that runs around the outside of the floor. It caps the ends of the floor joists.
- Floor Joists: The repetitive structural members that run parallel to each other. These do the heavy lifting.
- Subfloor: The plywood or OSB (Oriented Strand Board) sheets nailed on top of the joists. This is the platform you walk on.
- Beam/Girder: A thick, heavy support that runs down the center of the house to support joists that are too short to span the full width of the building.
Joist Specs and Spacing
This is where math meets muscle. Joist sizes usually range from 2×8 to 2×12. The depth of the joist determines how far it can span without sagging.
- IRC Codes: According to the International Residential Code (IRC), a 2×10 can span roughly 16 feet, depending on the wood species and grade.
- Spacing: You will place joists either 16 inches or 19.2 inches “On Center” (OC). This means the center of one joist is exactly 16 inches from the center of the next. Stick to 16″ OC for a stiffer, stronger floor.
Beam Types
- Solid Lumber: Multiple 2x10s or 2x12s nailed together.
- Engineered Beams (LVL): Laminated Veneer Lumber. These are incredibly strong and resist warping.
- Steel I-Beams: Used for very long spans, but require welding or special bolting plates.
Pro Tip: When figuring out how to frame a floor for a house on uneven ground, you must shim the sill plates first. Never try to cut the joists to match a wavy foundation; make the foundation level first!
Preparing Your Site: Pre-Framing Checklist
You are eager to build, but preparation prevents perspiration (and panic). Follow this checklist to ensure your site is ready for the wood.
Verify Foundation Levelness. Grab your laser level. You need to check the top of the concrete foundation walls. The standard tolerance is usually 1/4″ per 10 feet. If you have high spots, you might need to grind the concrete. If you have low spots, you will need to use steel shims or non-shrink grout.
Check Local Building Codes. Every region is different. If you live in a hurricane zone, you need specific tie-downs. If you are in California, you need seismic retrofitting. Check your local codes regarding spans and fastener schedules.
Mark Your Layout Use a chalk line to snap the location of your sill plates on the foundation. Ensure the corners are perfectly square. We will discuss the “3-4-5 method” in the step-by-step section, but accuracy is vital here.
Clear and Dry Clean the top of the foundation. Remove any rocks, dirt, or concrete splatter. Also, check your lumber. Using a moisture meter, ensure your wood has a moisture content (MC) of less than 19%. If you build with wet wood, it will shrink as it dries, leading to twisted walls and squeaky floors later.
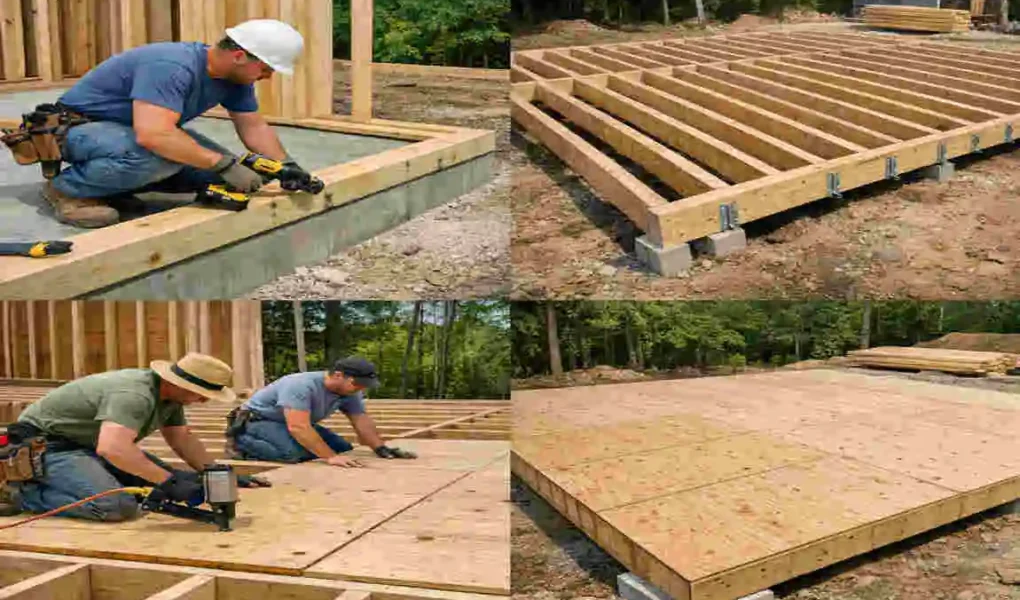
Step-by-Step Guide: How to Frame a Floor for a House
This is the core of our guide. We are going to break down how to frame a house floor into actionable, detailed steps.
Install Sill Plates and Anchor Bolts
The sill plate is the interface between wood and concrete.
- Lay down the Sill Sealer: This is a foam gasket that unrolls like a carpet. Place it on top of the concrete foundation. It stops moisture from wicking up into the wood and seals air gaps.
- Mark for Bolts: Lay your pressure-treated 2×6 or 2×8 sill plates on top of the bolt foundation bolts. Tap them with a hammer to indent the bolt locations.
- Drill and Install: Drill holes where the indents are. Place the sill plate over the bolts.
- Fasten: Put a washer and nut on each anchor bolt and tighten them down.
- Bolt Placement: Typically, bolts should be within 12 inches of a corner and spaced 6 feet On Center (OC) max.
Lay Out and Install Rim Joists and Band Boards
Now we create the outer box of the floor.
- Cut to Length: Measure the length of your foundation walls. Cut your rim joist material (usually the same depth as your floor joists, e.g., 2×10) to fit.
- Square the Corners: This is critical. Use the 3-4-5 method. Measure 3 feet along one wall, 4 feet along the other. The diagonal distance between those points should be exactly 5 feet. If it is, your corner is square.
- Fasten: Set the rim joists on top of the sill plates, flush with the outside edge. Toenail them into the sill plate using 16d nails (or use metal clips if required by code).
Frame Floor Beams and Supports
If your house is wider than the length of your lumber (which it likely is), you need a central beam.
- Install Post Bases: If you have support columns in a basement or crawlspace, ensure the bases are secured to the footings.
- Set the Beam: Lift your beam (whether it is an LVL or steel beam) onto the pockets in the foundation walls and the support posts.
- Secure It: Ensure the beam is level. It must be perfectly flush with the sill plates so the joists sit flat across the entire span.
Span Table Reference: Use this quick reference to understand what you are working with (values vary by wood species):
Joist SizeMax Span (16″ OC spacing)
2×8 12′ 9.”
2×10 16′ 5.”
2×12 19′ 11.”
Install Floor Joists
Now we fill in the box. This is the repetitive part of how to frame a floor for a house.
- Mark the Layout: Hook your tape measure on the end of the rim joist. Mark every 16 inches. Put an “X” to the side of the line where the joist will sit. Do this on both the rim joist and the center beam so they align perfectly.
- The “Crown Up” Rule: Pick up a board and look down the edge (like aiming a rifle). You will see a slight curve. This is the “crown.” Always install the crown facing UP. As the floor gets loaded with weight, gravity will push the curve straight. If you install it crown down, the floor will sag immediately.
- Cut and Place: Cut your joists to length. Place them on your layout marks.
- Fasten: Nail through the rim joist into the end of the floor joist with three 16d nails. At the other end (resting on the beam), toenail it into the beam or lap the joists if they pass over the beam.
- Install Hangers: For added strength (and code compliance), install metal joist hangers where the joist meets the beam or rim board. Use 10d x 1.5″ nails, filling every single hole in the hanger.
Common Pitfall: If you find a warped piece of lumber that twists to the left or right, use a clamp to force it straight while you nail it. Don’t let it sit twisted!
Add Blocking, Sheathing, and Subfloor
You have a skeleton; now you need muscle and skin.
- Install Blocking: These are small pieces of joist material cut to fit between the long joists. They go in the middle of the span. Blocking prevents the joists from twisting or rolling over. It also stiffens the floor significantly.
- Apply Adhesive: This is the secret to a silent floor. Squeeze a thick bead of heavy-duty subfloor adhesive along the top of every single joist. Do not skip this!
- Lay the Subfloor: Lay down your sheets of plywood or OSB (usually 5/8″ or 3/4″ thick).
- Stagger Seams: Lay them like bricks. The seams of the sheets should not line up perfectly across the floor.
- Leave a Gap: Leave a tiny 1/8″ gap between sheets (roughly the width of a nail) to allow for expansion. Ideally, use tongue-and-groove sheets that lock together.
- Screw It Down: While the glue is wet, drive screws or ring-shank nails every 6 inches along the edges and every 12 inches in the field (the middle of the sheet).
Inspect and Finalize
Before you call it a day:
- Level Check: Walk the floor. Does it feel solid?
- Visual Scan: Did you miss any hangnails? Is the blocking tight?
- Clean Up: Sweep the sawdust. A clean site is a safe site.
Common Mistakes in Floor Framing and How to Avoid Them
Even professionals mess up how to frame a floor for a house sometimes. Here is what to watch out for to avoid their errors.
- Uneven Joists (The Sag):
- The Problem: Using lumber with inconsistent heights or ignoring the “crown.”
- The Fix: Always sight your boards. If a board is crowned down, it creates a dip. If one is 1/4″ taller than its neighbor, you get a hump in the floor. Planning the high spots down before subflooring is easier than fixing it later.
- Improper Spacing (The Bounce):
- The Problem: Trying to save money by spacing joists at 24″ OC when the span requires 16″ OC.
- The Fix: Stick to 16″ OC. The small cost saving on lumber isn’t worth a bouncy floor that rattles your china cabinet.
- No Blocking (The Twist):
- The Problem: Skipping the mid-span blocking or bridging.
- The Fix: Lumber naturally wants to twist as it dries. Blocking locks it in place. Install blocking for any span over 8 feet.
- Squeaky Floors:
- The Problem: Failing to use construction adhesive between the joist and the subfloor.
- The Fix: Glue it, screw it, and do not rely on nails alone. Nails can pull out over time; screws and glue are forever.
Cost Breakdown and Timeline for Framing a Floor
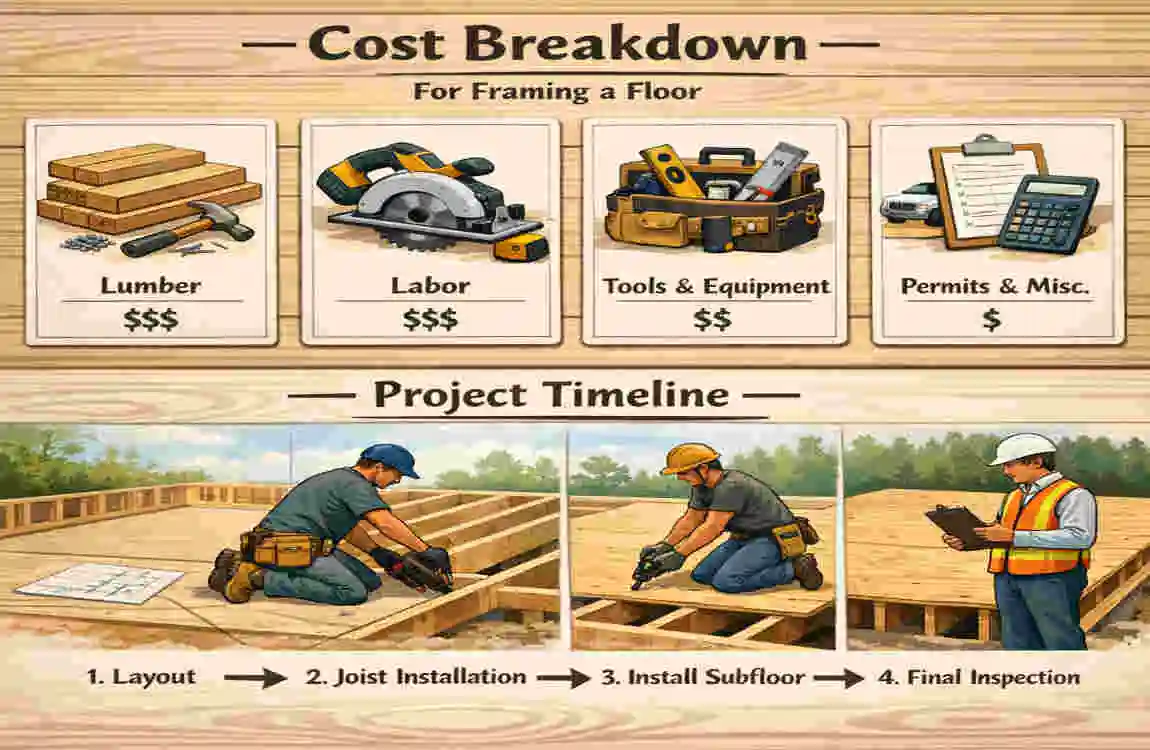
Budgeting is part of the job. Here is what you can expect financially and time-wise when you tackle this project.
The Financials. For a standard 1,000 sq ft floor, the total cost typically ranges from $3,000 to $8,000.
- Materials (60%): Lumber, subfloor, hangers, nails, and glue.
- Labor (40%): If you hire a crew. If you DIY, you save this chunk (but pay in sweat).
The Timeline
- Pro Crew: A professional team of 3 can frame and sheath a 1,000 sq ft floor in 1 to 2 days.
- DIY Pros: If you and a buddy are doing this, expect it to take 2 to 5 days. Framing is physically demanding work; pacing yourself is important to maintain accuracy.
FAQs: How to Frame a Floor for a House
Have you got questions? We’ve got answers.
What is the standard floor joist spacing when framing a house floor? The industry standard is 16 inches on center (OC). This provides an excellent balance of strength and material efficiency. However, for very long spans or heavy load requirements (like a room with a hot tub or a large kitchen island), builders might tighten the spacing to 12 inches OC or use deeper joists.
Can I frame a floor over a crawl space? Absolutely. In fact, this is very common. The process for framing a floor for a house over a crawl space is identical to that of a basement, but you must ensure proper ventilation and a moisture barrier on the dirt floor of the crawl space to prevent the wood from rotting from below.
How much does it cost to frame a house floor? While it varies by region, you should budget between $3 and $8 per square foot for materials. If you are hiring labor, double that number. Remember, engineered I-joists will cost more upfront than standard dimensional lumber (2x10s), but can save on labor because they are straighter and easier to install.