Learning how to frame a house’s floor is one of the most important steps in residential construction. A floor frame does more than hold up flooring. It supports the entire structure above it, helps keep the house stable, and provides a solid base for walls and rooms.
If the floor framing is weak, uneven, or poorly planned, problems can show up later. You may see bouncing floors, cracked finishes, squeaks, or even structural issues. That is why floor framing deserves careful attention from the start.
| Element | Description | Typical Materials | Common Spacing |
|---|---|---|---|
| Sill plate | Timber anchored to foundation to transfer loads from frame to foundation | Pressure-treated lumber (2×4, 2×6) | Sill bolts 4–6 ft; continuous along wall |
| Rim (band) joist | Perimeter member tying joists to the rim, resists racking | Dimensional lumber (2×8–2×12) or engineered rim | Matches joist spacing (see joists) |
| Floor joists | Main horizontal members supporting floor loads | Dimensional lumber (2×8–2×12), LVL, or I-joists | 12″, 16″, or 24″ O.C. depending on load/size |
| Joist hangers | Metal connectors that support joist ends at beams or ledger | Galvanized steel hangers | Installed at every joist or per manufacturer |
| Ledger board | Attaches joists to existing structure (decks, additions) | Pressure-treated lumber | Fasteners per code (lag bolts/structural screws) |
| Subfloor | Sheathing that distributes loads to joists and forms floor surface | OSB or plywood (3/4″ typical) | Stagger seams; adhesive + mechanical fasteners |
Many homeowners and builders run into the same challenges. They deal with uneven foundations, confusing plans, wrong joist spacing, or material choices that do not fit the load. The good news is that the process becomes much easier when you understand the basics.
What Is Floor Framing in House Construction?
Definition of Floor Framing
Floor framing is the structural system that supports the floor of a house. It sits on the foundation and carries the weight of everything above it. This includes people, furniture, interior walls, and in some cases, heavy fixtures and appliances.
In simple terms, floor framing is the hidden support system under your floor surface. It is the framework that gives the house strength and shape.
Why Floor Framing Matters
Floor framing matters because it handles weight and keeps the structure balanced. A well-built frame spreads loads evenly across the foundation. That helps prevent sagging, shifting, and long-term damage.
It also improves comfort. When the frame is strong and properly spaced, the floor feels solid underfoot. That means fewer squeaks, less bounce, and better performance over time.
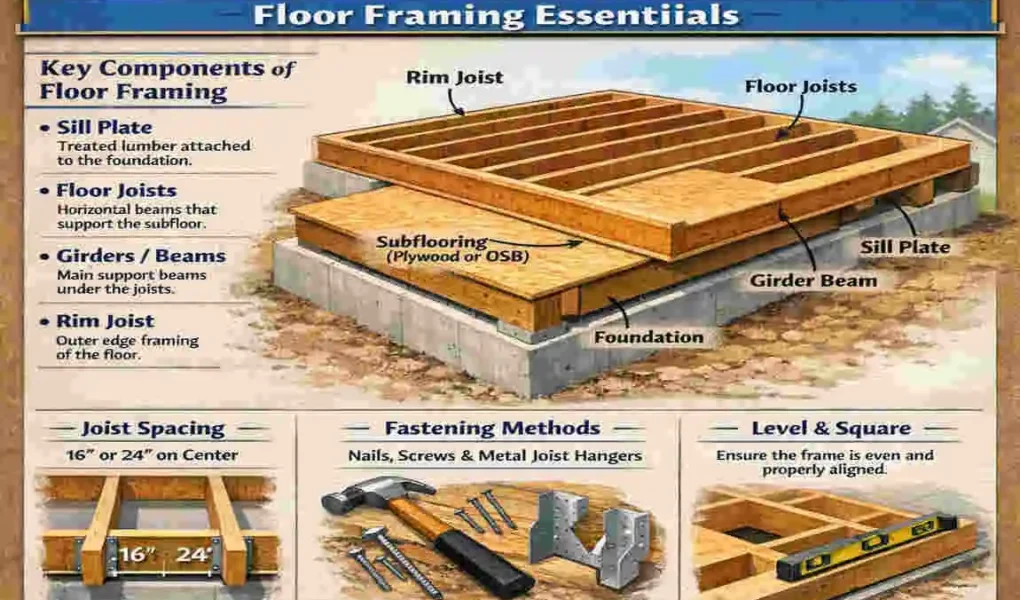
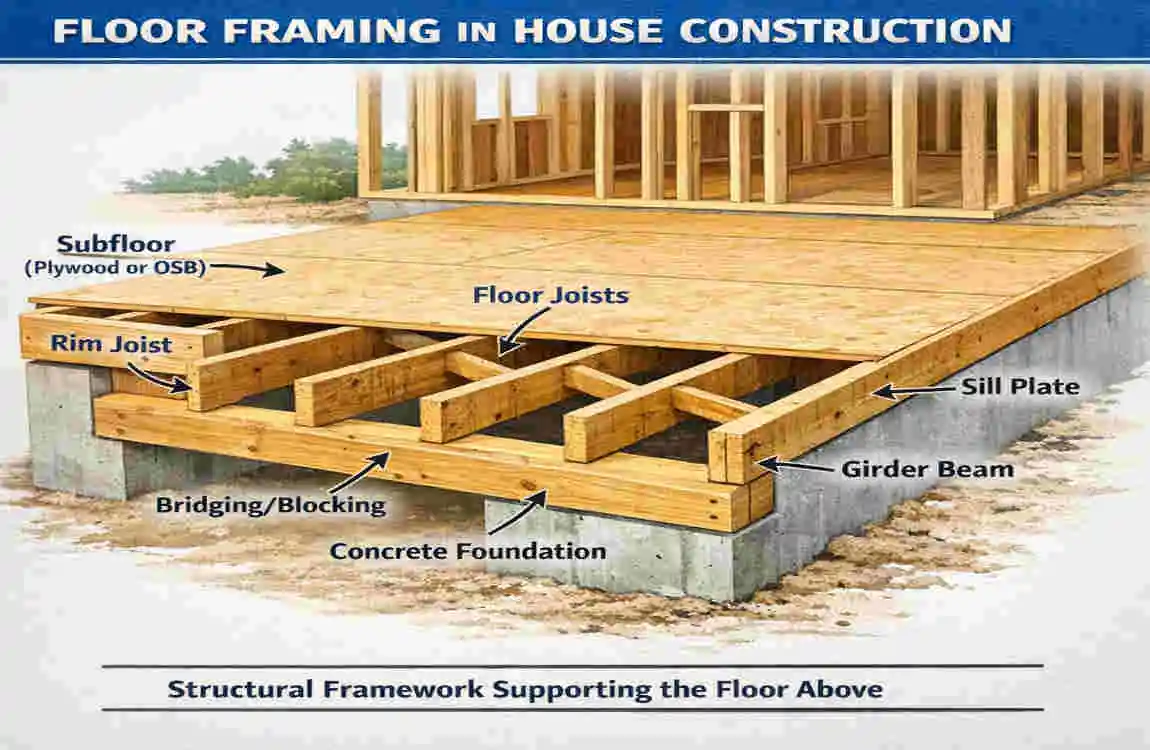
Components of a Floor Framing System
A typical floor framing system includes:
- Sill plates
- Rim joists
- Floor joists
- Beams or girders
- Subfloor panels
Each part has a job. Together, they form the base of the house and prepare it for wall framing and finishing work.
Understanding Floor Framing Plans Before You Begin
Reading Construction Blueprints
Before you start framing, you need to understand the plan. Blueprints show the layout, measurements, span lengths, and support points. They tell you where the joists go and how the framing connects.
Look for the joist direction, spacing, and any openings for stairs, pipes, or vents. These details help you avoid costly mistakes later.
Local Building Codes and Regulations
Every area has building codes that guide floor construction. These rules cover joist size, spacing, fasteners, support methods, and inspections. Some projects also need permits before work begins.
Following code is not just about passing inspection. It also helps keep the structure safe and reliable.
Load-Bearing Considerations
Floor framing must support different types of loads.
- Dead loads are the permanent weight of the structure itself.
- Live loads include people, furniture, and movement.
- Point loads are concentrated weights in one small area.
Good planning helps you match the framing to the load it must carry. That is a key part of safe residential floor construction.
Essential Tools and Materials Needed to Frame a Floor
Required Framing Tools
To frame a house floor well, you need the right tools. The most common ones include:
- Circular saw
- Framing hammer
- Nail gun
- Tape measure
- Speed square
- Chalk line
- Level
These tools help you measure, cut, align, and fasten the frame with accuracy.
Common Materials Used
The material choice depends on the design and load requirements. Common floor framing materials include:
- Pressure-treated lumber for sill plates and moisture-prone areas
- Engineered wood joists for strong, stable support
- Plywood
- OSB subflooring
Pressure-treated lumber helps resist moisture and decay. Engineered joists are often chosen for long spans and consistent performance.
Safety Equipment
Safety should always come first. Use the following gear every time you work:
- Safety glasses
- Gloves
- Hearing protection
- Work boots
A floor framing project involves cutting, lifting, nailing, and working around heavy materials. Protective gear helps reduce injury and keeps the job moving safely.
How to Frame a Floor for a House: Step-by-Step Guide
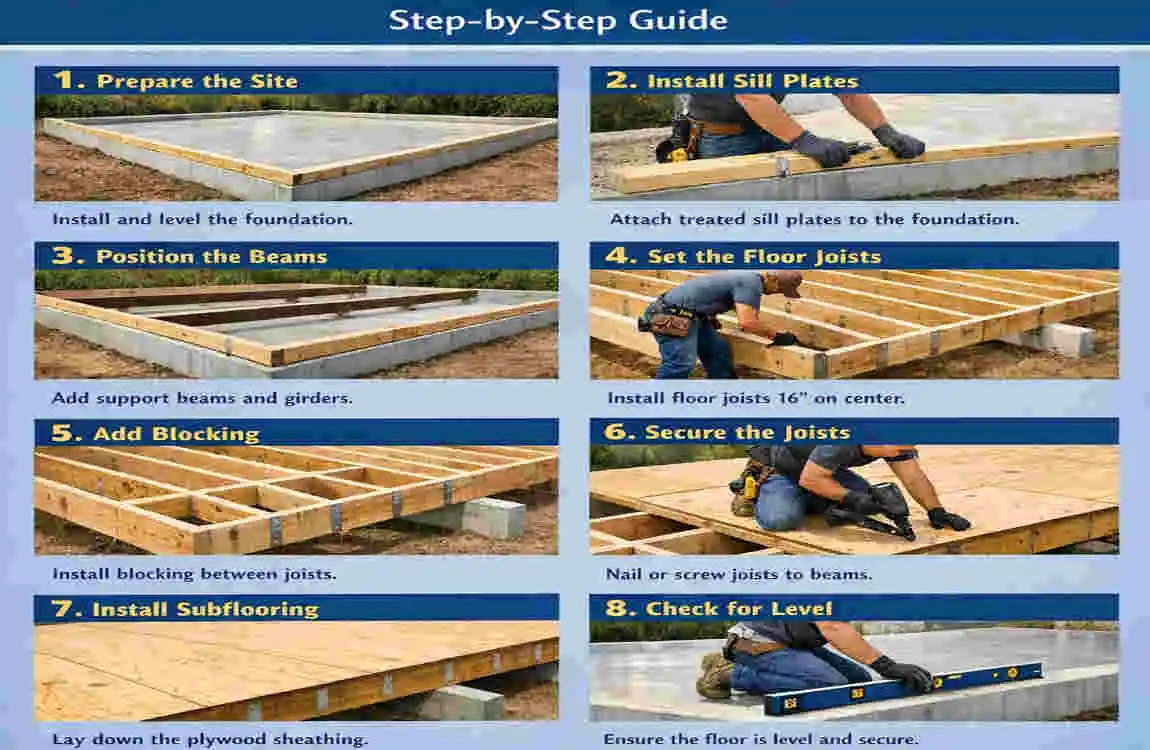
Prepare the Foundation
Start by checking the foundation size and layout. Measure it carefully to make sure it matches the plan. Even small errors here can affect the rest of the build.
Next, check that the surface is level. If the foundation is uneven, the floor may slope or twist. Mark the framing layout clearly so you know where each piece belongs.
This step sets the tone for the whole project. Take your time and verify every measurement.
Install Sill Plates
Sill plates sit atop the foundation and form the base for the framing above. Use pressure-treated lumber for this part because it resists moisture better.
Securely anchor the plates with bolts or approved fasteners. Make sure they line up properly with the foundation. Good alignment here helps the rest of the floor frame stay straight.
Install Beams and Girders
Beams and girders help carry heavy loads and support long spans. They are often placed where extra strength is needed.
Set them in the correct position according to the plan. Fasten them carefully and make sure they are supported properly underneath. If the beam is not placed well, the floor above may sag or bounce.
This is one of the most important parts of framing a house floor, especially in larger homes.
Attach Rim Joists
Rim joists run around the outside edge of the floor frame. They help tie the structure together and keep the joists in place.
Install them so they fit tightly against the joists. Check the corners for square alignment. If the rim joists are crooked, the rest of the frame can become difficult to correct.
SLay Out Floor Joist Positions
Now it is time to mark the joist locations. Standard spacing is often 12, 16, or 24 inches on centre. The exact spacing depends on the design and load requirements.
Use a tape measure and chalk line to mark the positions clearly. Accurate layout makes installation faster and helps keep the floor even.
Here is a simple spacing guide:
Joist Spacing Common Use Notes
12″ on center Heavy loads or stronger floor feel Uses more lumber
16″ on center Most common in homes Good balance of strength and cost
24″ on center Light-duty or engineered systems Must meet code and span limits
Install Floor Joists
Set each joist in place according to the marks you made. Make sure the crowns face the same direction if the lumber has a curve. That helps the floor stay more level.
Use joist hangers when needed for added support. Fasten each joist securely. Then check the alignment again to make sure the frame stays straight.
This step is where the floor gets its main strength. Careful installation pays off later with a quieter, firmer floor.
Add Blocking and Bridging
Blocking and bridging help keep joists from twisting or moving out of line. They also improve stability and reduce floor bounce.
Install them between joists where needed, especially in larger spans. This extra support makes the whole system feel stronger.
Install the Subfloor
The subfloor is the layer that sits on top of the joists. It creates the surface that will later support the finished flooring.
Plywood and OSB are both common choices. Fasten the panels well and leave small expansion gaps as needed. This helps the material move naturally with changes in moisture and temperature.
A good subfloor should feel solid and even. If you hear squeaks or feel movement, it may need more fastening or better support.
Inspect and Reinforce the Structure
Before moving on to wall framing, inspect the whole floor system. Look for gaps, weak connections, uneven joists, or poor fastening.
Fix small issues right away. It is much easier to correct the frame now than after the walls go up. A thorough inspection step helps protect the rest of the house under construction.
Common Floor Framing Layout Types
Platform Framing
Platform framing is the most common method in modern residential construction. Each floor is built as a separate platform. This makes the process simpler and safer for many builders.
It is popular because it is easy to understand and works well for most homes.
Balloon Framing
Balloon framing is an older method in which wall studs run continuously from the foundation to the roof. It was more commonly used in older homes.
It has some advantages, but it is less common today because it can be harder to build and may raise fire-safety concerns in certain designs.
Engineered Floor Systems
Engineered systems use products like I-joists and open-web trusses. These are designed for strength, consistency, and longer spans.
They are often used in modern homes because they can reduce movement and offer flexible layouts. They also work well when builders need precise performance.
Floor Joist Spacing and Sizing Guidelines
Standard Joist Sizes
The most common lumber sizes for floor joists are:
- 2×8
- 2×10
- 2×12
The right size depends on the span, load, and building code. Bigger spans usually need deeper joists.
Choosing the Correct Span
Span tables help you choose the right joist size for the distance it must cover. They also consider spacing and load.
Never guess on span. A joist that is too small can lead to sagging or failure over time. Always match the size to the job.
Factors Affecting Joist Selection
Several things affect joist selection:
- Building size
- Intended use of the space
- Load demands
- Local code requirements
A bedroom floor may need different support than a living room with heavy furniture. Always plan with the room’s full use in mind.
Common Mistakes to Avoid When Framing a Floor
Incorrect Joist Spacing
If joists are spaced too far apart, the floor may feel weak or springy. If they are too close together without need, the project may cost more than necessary.
Spacing must match the plan and building code.
Poor Fastening Techniques
Loose fasteners can cause squeaks, shifting, and reduced strength. Use the correct nails, screws, hangers, and connectors for the job.
Ignoring Moisture Protection
Moisture can damage lumber over time. Use treated wood where needed and protect the frame from water exposure during construction.
Uneven Foundation Surfaces
If the base is uneven, the whole floor frame may be off. Always check level before you install anything.
Skipping Building Code Requirements
Skipping code can lead to failed inspections, unsafe construction, and expensive rework. Follow the rules from the beginning.
Cost Considerations for Floor Framing a House
Lumber Costs
Lumber prices change with the market. Standard framing lumber is usually more affordable than engineered products, but prices vary by region and size.
Labor Expenses
Labor costs depend on project size, location, and complexity. A simple floor frame costs less to install than a larger one with special spans or openings.
Engineered Wood Pricing
Engineered joists often cost more upfront, but they may offer better performance and easier installation. In some projects, they can save time and reduce future issues.
Permit and Inspection Fees
Many areas require permits and inspections. These fees should be part of your budget from the start.
Budgeting Tips for Homeowners
Plan for extra costs. It is smart to set aside some money for waste, fasteners, corrections, and unexpected changes. That way, the project stays on track.
Benefits of Proper Floor Framing
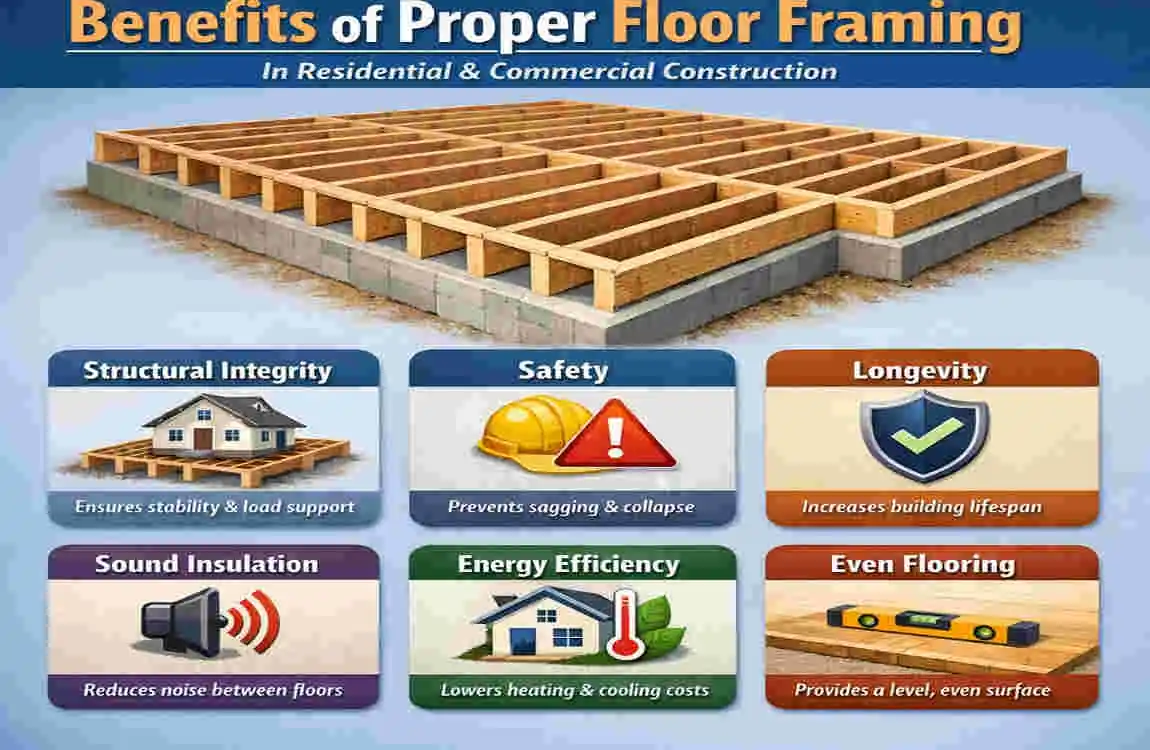
Enhanced Structural Strength
A properly framed floor gives the house a strong base. It supports loads more evenly and helps the entire structure stay stable.
Increased Property Value
Good construction adds value. Buyers and inspectors notice strong framing, solid floors, and careful work.
Improved Floor Performance
Proper framing reduces bounce, flex, and noise. That makes the home feel more comfortable and well built.
Reduced Maintenance Costs
When the floor frame is done right, you are less likely to face repairs later. That saves time and money.
Greater Long-Term Safety
Strong floor framing supports the safety of everyone in the home. It is one of the most important parts of building a lasting house.
Professional Tips for a Stronger and Longer-Lasting Floor System
Use Quality Materials
Cheap material may save money at first, but it can create problems later. Choose lumber and subfloor products that meet the job’s needs.
Follow Manufacturer Guidelines
If you use engineered products, follow the manufacturer’s instructions closely. These rules help you get the best performance from the material.
Protect Against Moisture
Keep framing materials dry during construction. Moisture protection helps prevent warping, swelling, and decay.
Double-Check Measurements
Measure twice before you cut. Accurate measurements help prevent waste and keep the whole floor square.
Schedule Professional Inspections
A professional inspection can catch issues early. That is especially helpful for larger or more complex projects.
FAQs
How do you frame a house floor step by step?
You start by preparing the foundation, then install sill plates, beams, rim joists, joists, blocking, and the subfloor. After that, inspect the frame for level, square, and strength.
What size lumber is used for floor framing?
Common sizes include 2×8, 2×10, and 2×12. The right size depends on span, load, and local code rules.
How far apart should floor joists be spaced?
Most floor joists are spaced 16 inches on centre, though some projects use 12 or 24 inches on centre, depending on the design.
What is the best material for a house subfloor?
Plywood and OSB are both common. Plywood is often chosen for its strength, while OSB is popular for cost and availability.
How much does it cost to frame a floor in a house?
Costs vary based on lumber prices, labor, engineered materials, and permit fees. The total can vary significantly depending on the home’s size and complexity.
Can I frame a house floor myself?
Yes, if you have the right tools, skills, and knowledge of building codes. For larger or more complex jobs, many homeowners hire a professional.
What is the difference between floor joists and beams?
Joists run across the floor and support the subfloor. Beams carry heavier loads and support the joists.
How long does floor framing take for a residential home?
The timeline depends on the home size, crew size, and framing method. A simple floor may take a few days, while a larger or custom project may take longer.