Have you ever looked at your current bathroom layout and thought, “This just isn’t working for me?” You are certainly not alone! A poorly placed bathroom sink can make your morning routine feel cramped and frustrating.
| Tip | Why it matters |
|---|---|
| Keep the new sink close to existing pipework | Reduces cost, disruption, and the amount of pipe rerouting needed . |
| Check trap arm length and fall | Poor slope or an overlong run can cause drainage and smell issues . |
| Allow space for the P-trap | Standard sink waste heights are often set around 17 to 20 inches, but always match the cabinet and basin specs . |
| Inspect wall structure before chasing pipes | Load-bearing walls need extra care, and structural advice may be needed . |
| Plan ventilation and waterproofing | Helps prevent damp, mould, and compliance problems in the finished bathroom . |
| Budget for a plumber and possible upgrades | Moving a sink can mean extra work on electrics, waterproofing, and fittings . |
Whether you are fitting a sleek new vanity unit, trying to squeeze in a bit more storage, or completely overhauling a tired space, a bathroom renovation in the UK often involves shifting things around.
Why Would You Need to Move Bathroom Sink Plumbing?
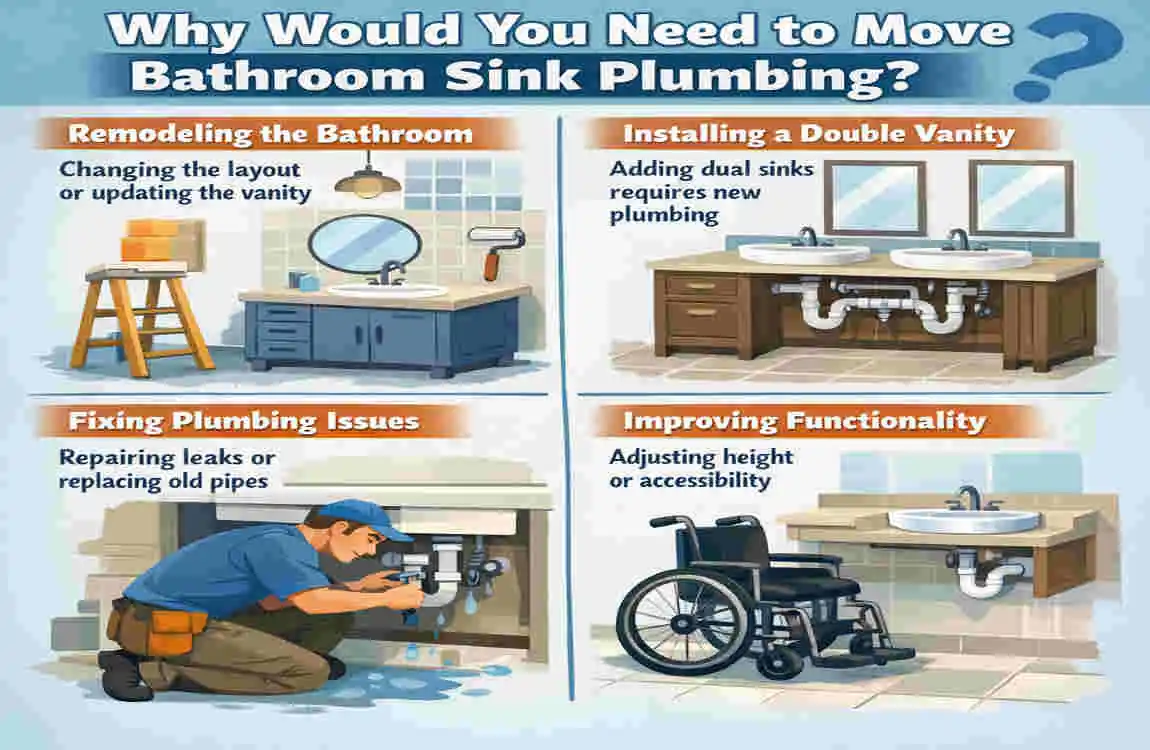
There are plenty of reasons why you might want to rip up the floorboards and shift your pipes. Let’s look at why so many UK homeowners take on this challenge.
Common Reasons Homeowners Relocate Bathroom Sinks
Most of the time, moving a sink is all about improving your daily life. Perhaps you are doing a full bathroom remodel and want a fresh layout.
Maybe you are installing one of those gorgeous, modern double-vanity units that require moving the sink waste pipe.
Other times, it is about creating more storage space in a tiny room, improving the bathroom’s overall flow, or making the space more accessible for elderly family members. Upgrading your layout can completely transform how your bathroom feels.
Challenges in Older UK Properties
If you live in a classic Victorian or terraced house, you already know that older UK properties come with their own set of quirks.
Relocating bathroom plumbing in these homes can be tricky. You might run into solid brick walls that make hiding pipes a nightmare.
Sometimes the original pipe positioning is just bizarre, or you have zero underfloor access due to solid concrete floors. These historic hurdles mean you will need a solid plan before you start pulling things apart.
Is It Worth Moving Bathroom Sink Plumbing?
You might be wondering whether the hassle is actually worth it. In most cases, yes!
While there are costs involved, the benefits usually outweigh them. A better bathroom layout dramatically improves your home’s functionality. Plus, a beautifully renovated bathroom is one of the best ways to increase your property value. If it makes your morning routine smoother, it is a win.
Understanding Bathroom Sink Plumbing Basics
Before you grab a spanner, you need to know what you are dealing with. Let’s look at the basic bathroom pipework hidden behind your walls.
Main Components of Sink Plumbing
Your sink relies on a few key parts to work properly. First, you have your water supply pipes, which bring fresh hot and cold water to your taps.
Next is the waste pipe, which carries the dirty water away. Underneath the sink, you will find the P-trap (or U-bend), a curved pipe that stops nasty sewer gases from entering your home.
You will also find isolation valves, which are brilliant little switches that let you turn off the water to the sink without shutting down the whole house. Finally, you have the drainage connections that link your sink to the main sewer line.
How Bathroom Plumbing Systems Work
Plumbing system basics are actually quite simple. Clean water flows in under pressure, giving you hot and cold water on demand.
Once the water goes down the plughole, it relies entirely on gravity. In the UK, sink drainage uses gravity, so your waste pipes must have a slight downward slope to carry the water away.
Proper ventilation is also crucial. Vents let air into the pipes so the water can flow smoothly without gurgling or creating vacuums.
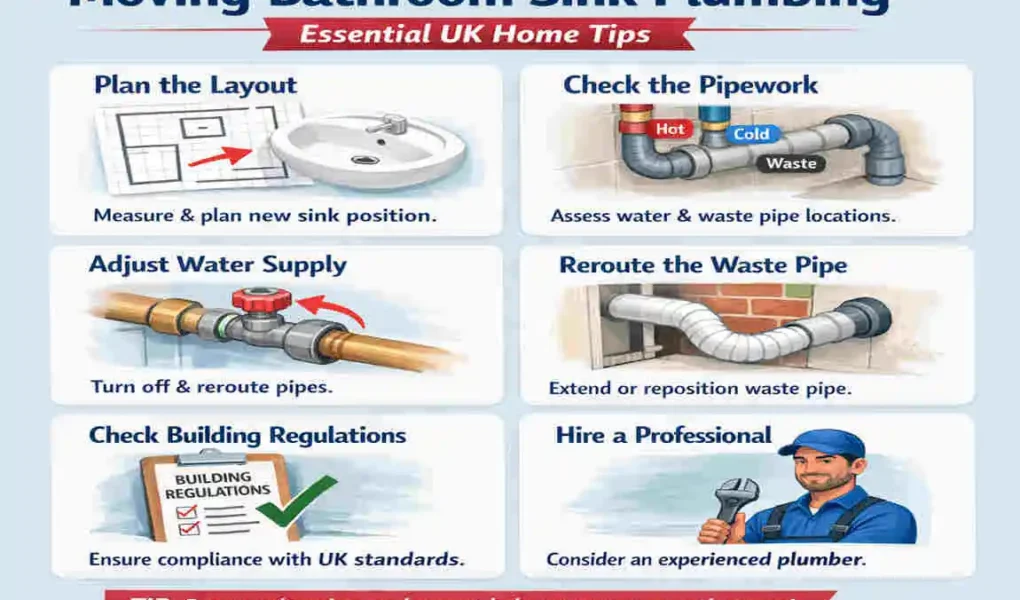
UK Plumbing Standards You Should Know
You cannot just run pipes wherever you fancy. In the UK, you must follow specific rules.
Building Regulations Part H covers drainage and waste disposal, ensuring your pipes are the right size and have the correct slope.
You also need to follow the Water Regulations UK, which keep your drinking water safe from contamination. Knowing the proper pipe sizing requirements (usually 15mm for supply and 32mm for basin waste) will save you from major headaches later.
Tools and Materials Needed to Move Bathroom Sink Plumbing
Having the right gear is half the battle. Here is what you need in your toolbox before you start.
Essential Plumbing Tools
You do not need a van full of tools, but a few specific items are a must.
- Pipe cutter: For clean, straight cuts on your pipes.
- Adjustable wrench: Essential for tightening nuts and fittings.
- Basin wrench: A lifesaver for reaching tight spaces right up under the sink.
- Spirit level: To ensure your waste pipes have the correct downward slope.
- PTFE tape: Often called plumber’s tape, this helps create a watertight seal on threaded joints.
Common Materials Required
Next, you will need the actual plumbing supplies to build your new system.
- PVC waste pipes: Usually 32mm for UK bathroom sinks.
- Compression fittings: These join pipes together securely without needing a blowtorch.
- Flexible tap connectors: These make linking your taps to the main supply incredibly easy.
- Copper or plastic pipes: For your hot and cold water supply.
- Pipe clips: Secure your pipes to the wall and prevent rattling.
Safety Equipment
Never skip safety! Plumbing can be messy and surprisingly dangerous if you aren’t careful.
- Gloves: To protect your hands from sharp pipe edges and grime.
- Eye protection: Crucial when cutting pipes or working above your head under a sink.
- Dust sheets: To protect your lovely bathroom floors from spills and scratches.
Pro Tip: Always invest in high-quality brass or top-tier plastic fittings. Cheaper materials might save you a few pounds today, but they are far more likely to leak and cost you a fortune in water damage repairs down the line!
Step-by-Step Guide on How to Move Bathroom Sink Plumbing
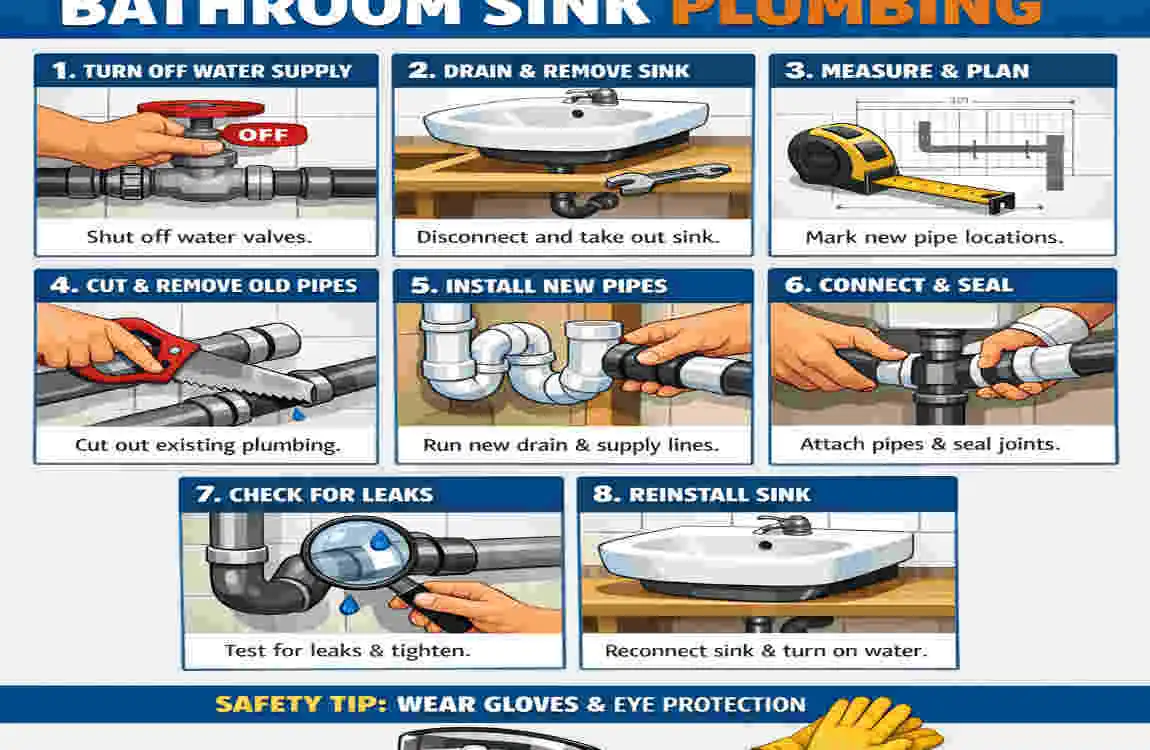
Are you ready to get your hands dirty? Follow these straightforward steps to safely relocate your sink.
Plan the New Sink Position
Never start ripping things out without a plan. Decide exactly where you want your new sink to go.
Measure the distances carefully from the old plumbing to the new spot. Check your wall and floor access to see how easily you can run the new pipes.
You need to identify where your existing hot, cold, and waste pipes are currently sitting. Knowing your starting point makes plotting the route much easier.
Turn Off the Water Supply
This is the most crucial step! Do not skip this, or you will flood your home.
Look under your current sink for isolation valves on the hot and cold pipes. Use a flathead screwdriver to turn the slot so it sits across the pipe—this shuts off the water.
If you do not have isolation valves, you will need to find your main stopcock and shut off the mains water to the whole house. Once off, turn on the taps to drain any remaining water safely into the basin.
Remove the Existing Sink and Pipework
Now it is time to dismantle the old setup. Lay down your dust sheets first.
Grab your adjustable wrench and gently disconnect the supply lines from the bottom of the taps. Have a bucket ready!
Next, loosen the nuts on the P-trap and pull the waste pipe away from the P-trap. Be careful, as the trap will be full of dirty water. Finally, unbolt the sink from the wall or lift the old vanity unit away, protecting the surrounding wall surfaces as you work.
Extend or Reroute Water Supply Pipes
To get water to your new sink, you need to extend the supply lines. You can choose traditional copper piping or modern push-fit plastic piping.
Plastic is generally much easier for DIY beginners. You will use compression fittings or push-fit joints to connect the new pipe to the old one.
Run the pipes along the wall or under the floorboards to the new location. Make sure you use pipe clips every 50cm to ensure proper pipe support and prevent noisy, rattling pipes.
Move the Waste Pipe Correctly
Moving the bathroom sink waste pipe is trickier because it relies on gravity.
You must maintain a proper fall angle. In the UK, the recommendation is a drop of roughly 18mm to 90mm for every metre of pipe. If it is too flat, the water won’t drain. If it is too steep, the water rushes away too quickly, leaving solid waste behind and causing drainage blockages.
Use a spirit level to check your slope constantly. Glue or tightly screw your PVC pipes together, ensuring a leak-proof path to the outside drain.
Install the Sink in Its New Position
With the pipes in place, you can finally put your new sink or vanity into position.
Secure it tightly to the wall using heavy-duty fixings. Once the sink is rock solid, attach your taps.
Use flexible tap connectors to link your hot and cold supply pipes to the bottom of the taps. Finally, attach your new P-trap to the sink’s plughole and connect it to your newly routed waste pipe.
Test the Plumbing System
You are almost done, but you need to check your work. Before boxing anything in, do a thorough leak check.
Turn the isolation valves (or mains water) back on very slowly. Check your supply joints for any drips. If everything is dry, turn the taps on full blast.
Watch the water pressure to make sure it is strong. Finally, look closely at the trap and waste pipe. Do a drainage flow inspection to ensure water drains quickly and that no moisture seeps from the joints.
Can You Move Bathroom Sink Plumbing Yourself?
This is the big question. Just because you can buy the tools does not always mean you should tackle the job alone. Let’s weigh your options.
DIY-Friendly Plumbing Tasks
If you are fairly handy, you can handle many parts of relocating a bathroom sink drain and supply yourself.
Replacing old flexible connectors, installing a new tap, or moving pipes short distances along an open wall are great DIY tasks. Building and installing standard vanity units is also a very manageable weekend project for an enthusiastic beginner.
When to Hire a Professional Plumber
Sometimes, it is best to step back and call the experts. If you need major pipe rerouting across the entire room, it is time to ring a pro.
Hidden pipework behind solid walls, jobs that require cutting through structural joists, or severe drainage complications are not for amateurs. A botched DIY job here can cause thousands of pounds in water damage.
Average Plumbing Labour Costs in the UK
If you decide to hire help, you should know what to expect financially.
Most independent UK plumbers charge between £40 and £60 per hour. For typical bathroom plumbing relocation costs, expect a half-day or full-day rate. Moving a sink a short distance might only take a few hours, while completely rerouting pipes under a concrete floor will take much longer and cost significantly more.
If you are curious about broader renovation expenses, checking out guides on bathroom renovation costs in the UK can help you budget accurately.
Common Problems When Moving Bathroom Sink Plumbing
Even with careful planning, things can go wrong. Watch out for these highly frustrating, yet common, plumbing hiccups.
Poor Drainage Slope
This is the number one mistake DIYers make. If your waste pipe does not have a sufficient downward angle, gravity cannot do its job.
This causes incredibly slow draining. Eventually, it leads to standing water, nasty hair, and soap scum buildup inside the pipe.
Pipe Leaks After Installation
Nothing ruins your day like a puddle under your brand-new sink.
Leaks usually occur due to loose fittings or improper sealing. If you forget to use PTFE tape on threaded joints or do not push a plastic pipe fully into its fitting, water will eventually leak out.
Water Pressure Problems
Have you noticed your water trickling out of the tap? Water pressure problems can occur if you have run your pipes too far.
Long pipe runs with too many sharp 90-degree bends can severely slow down the water flow. Another common culprit is kinked flexible connectors under the sink that strangle the water supply.
Limited Space Behind Vanity Units
Modern vanity units look amazing, but they are notorious for having zero space at the back.
This limited space makes standard pipework impossible. You often have to rely on compact pipe solutions or specially designed slim traps that sit neatly against the back wall, keeping the drawers fully functional.
Odours from Incorrect Waste Installation
If your bathroom suddenly smells like a sewer, you have a major issue.
These foul odours almost always come from an incorrectly installed waste system. Missing traps, or a P-trap that gets sucked dry due to poor pipework venting, will allow raw sewer gases to float straight up your plughole and into your home.
UK Building Regulations for Bathroom Plumbing
You might own your home, but the local council still has a say in how you alter it. It is vital to understand the red tape.
Do You Need Permission to Move Plumbing?
Usually, moving a sink a few feet does not require planning permission.
However, you must distinguish between minor and major works. If you are just extending existing pipes in the same room, you are generally fine. But if you are adding a completely new bathroom, changing the main soil stack, or making structural changes, building control approval absolutely applies.
Water Supply Regulations
The UK government is very strict about keeping drinking water safe.
You must adhere to backflow prevention rules. This simply means ensuring dirty basin water can never be sucked back into the clean mains supply. Furthermore, if you are running supply pipes under floors or near exterior walls, pipe insulation requirements mandate that you lag (wrap) them to prevent freezing in winter.
Waste Pipe and Drainage Rules
As mentioned earlier, waste management is heavily regulated.
Building control dictates the correct pipe gradients (the slope) to prevent blockages. They also enforce strict ventilation standards. Your drainage system must be properly vented to the outside air so that water flows away without creating pressure issues inside the pipes.
Trust-Building Tip: If you are ever in doubt about building regulations, hire a certified plumber (such as a WaterSafe approved contractor). They will ensure your moving sink plumbing complies with all legal requirements, giving you total peace of mind.
Best Tips for a Smooth Bathroom Sink Relocation Project
Want to avoid the stress? Keep these simple but highly effective tips in mind before you start your project.
Measure Everything Twice
It sounds like a cliché, but it is true! Measure your pipe lengths, vanity height, and wall clearances repeatedly.
Double-checking your maths helps you avoid alignment mistakes that are incredibly frustrating to fix once the pipes are glued together.
Choose Easy-Access Pipe Routes
Try not to bury your pipes in solid concrete or behind heavily tiled, immovable walls if you can help it.
Choose easy-access routes, like behind removable skirting boards or under easily lifted floorboards. This will dramatically reduce maintenance issues if you ever leak.
Use Modern Flexible Plumbing Connectors
Do not torture yourself trying to bend copper pipes into perfect shapes under a cramped sink.
Use modern flexible plumbing connectors (braided hoses). They bend easily, making for a much faster installation and significantly easier maintenance when changing taps later on.
Keep Future Repairs in Mind
Always plan for the worst-case scenario. Pipes will eventually need maintenance.
When building custom units or boxing in pipes, include hidden access panels. If you have a vanity unit, make sure there are removable vanity sections inside the cupboards so you can reach the P-trap without damaging the furniture.
Upgrade Old Pipework During Renovation
If you have the walls open, take a good look at your existing pipes.
If they are old, corroded, or made of outdated lead, replace them now. Upgrading old pipework during a renovation improves the reliability of your system and increases water efficiency. Do it now, and thank yourself later!
Cost Breakdown for Moving Bathroom Sink Plumbing in the UK
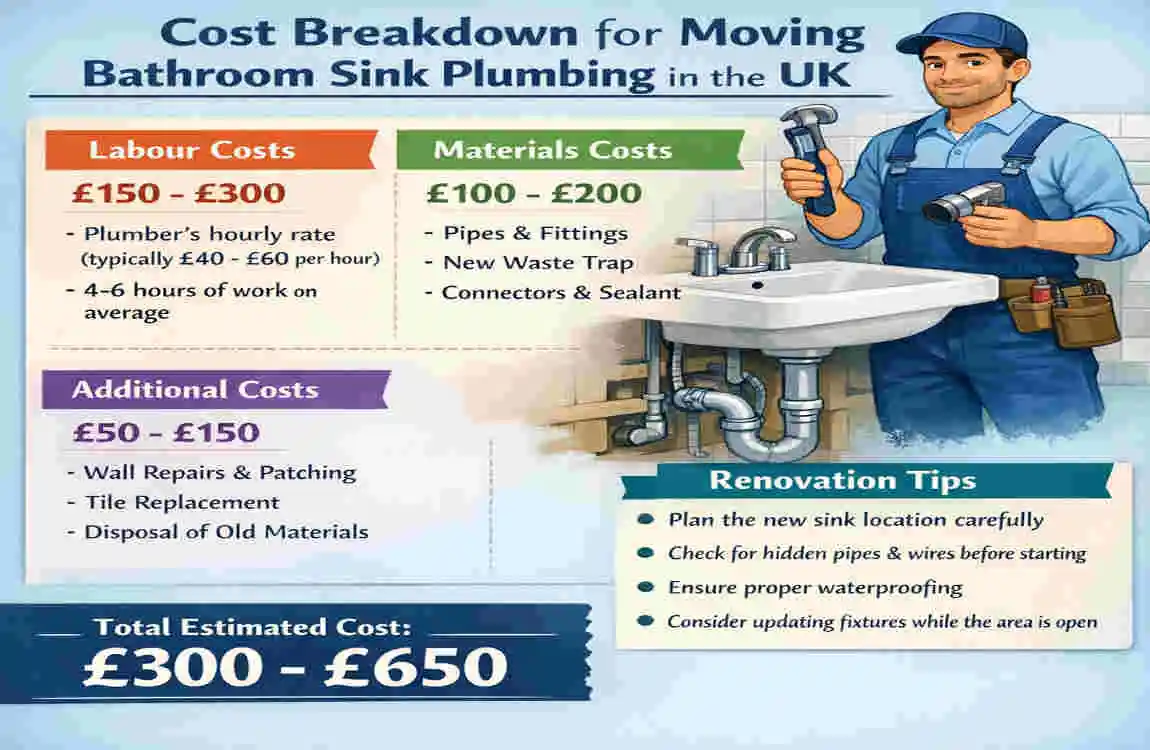
Budgeting is a major part of any home improvement project. Let’s look at exactly what you can expect to spend when relocating your sink.
DIY Costs
If you are doing the labour yourself, your only expenses are tools and materials. Here is a rough breakdown of what you might spend at your local DIY store:
ItemEstimated Cost
Pipes & fittings (Copper/plastic, joints, traps) £30 – £100
Tools (Cutters, wrenches, levels) £40 – £150
Sealants & accessories (PTFE tape, clips, silicone) £10 – £30
Professional Plumbing Costs
Prefer to put your feet up and let a pro handle the mess? Here is what professional plumbers typically charge for these services in the UK:
ServiceEstimated Cost
Minor sink relocation (Moving it a short distance) £150 – £350
Complex pipe rerouting (Under floors, through walls) £400 – £900
Full bathroom plumbing changes (Moving all fixtures) £1,000+
Factors Affecting Price
Why is there such a massive range in professional costs? Several factors dictate the final bill.
Pipe accessibility is huge; if the plumber has to dig up a concrete floor, the price skyrockets. The property age plays a role, as older homes often hide nasty surprises. The distance moved dictates material costs, and don’t forget to budget for the flooring and wall repairs required after the pipes are laid!
Mistakes to Avoid When Moving Bathroom Sink Plumbing
Even seasoned DIYers trip up sometimes. Make sure you avoid these absolute project-killers.
Ignoring Pipe Gradient Requirements
We cannot stress this enough: water will not flow uphill! If your waste pipe is completely flat or slopes back towards the sink, you will face constant, disgusting blockages. Always use a level.
Using Incorrect Pipe Sizes
Do not try to force a 40mm pipe fitting onto a 32mm pipe. Mismatched sizes will inevitably leak. Stick to the standard 15mm for supply and 32mm for basin waste in the UK.
Overtightening Compression Fittings
It is tempting to tighten nuts as hard as humanly possible, but this is a massive mistake. Overtightening crushes the inner washers and olive rings, actually causing leaks rather than preventing them. Tighten until snug, then give a final quarter-turn.
Forgetting Isolation Valves
If you do not install isolation valves on your new pipes, you will have to turn off the water to your entire house every time you want to change a tap washer. Spend the extra £5 and fit them.
Skipping Leak Testing
Never board up a wall or lay a floor over pipes without testing them first. Turn the water on, wrap dry tissue paper around the joints, and look for damp spots. Skipping this step is asking for a disaster.
Frequently Asked Questions About Moving Bathroom Sink Plumbing
Still have a few lingering questions? Here are the most common things UK homeowners ask when planning a bathroom layout change.
How difficult is it to relocate a bathroom sink’s plumbing?
It depends entirely on the distance to your home and its structure. Moving a sink a few feet along the same stud wall is a very manageable weekend job. Moving it across the room through solid brick walls or concrete floors is highly difficult and usually requires a professional.
Can I move a bathroom sink drain pipe myself?
Yes, you absolutely can, provided you are confident in your DIY skills. The most important thing to remember is maintaining the correct downward slope (the gradient) so that gravity can pull the wastewater away efficiently.
How far can a bathroom sink be moved from existing plumbing?
Technically, you can move a sink as far as you want. However, the further you move it, the harder it is to maintain the correct downward slope for the waste pipe without the pipe dipping below your floorboards or requiring a step up in the room.
Does moving sink plumbing require building approval in the UK?
For minor relocations within the same room, you typically do not need building approval. However, if you are adding new drainage that connects to the main soil stack outside, or creating a brand new bathroom in a different room, you will need to notify local building control.
What is the average cost to relocate a bathroom sink?
If you are doing it yourself, materials will cost between £40 and £130. If you hire a professional UK plumber for a straightforward relocation, expect to pay roughly £150-£350 for labour and materials combined.
Can flexible pipes be used permanently?
Yes! Modern braided flexible tap connectors are designed for permanent use and are standard in most new UK bathrooms. However, you should not use corrugated flexible waste pipes permanently, as the ridges trap hair and soap, leading to nasty blockages.