If you look at exposed plumbing in a basement, bathroom, or utility room, it can feel unfinished. That is why many homeowners choose painting plumbing pipes to improve the look of a space. It can make pipes blend with the room, match interior colors, and even add a small layer of protection against rust and moisture.
| Item | What to Know | Common Best Colors / Tips |
|---|---|---|
| Copper water pipes (inside) | Yes; clean, degrease, prime, then use satin or gloss paint; avoid heat‑sensitive oil paints on hot‑water lines. | White, cream, light gray, or matching wall color to blend in. |
| PVC / plastic pipes | Yes; clean, sand lightly, then prime and paint with a suitable topcoat. | White, light gray, or a color that hides the pipe (e.g., off‑white for bathroom). |
| Metal radiator / heating pipes | Use heat‑resistant or “radiator” paint to avoid yellowing or peeling from heat. | White, cream, or metallic gray in living areas; avoid dark colors if heat is a concern. |
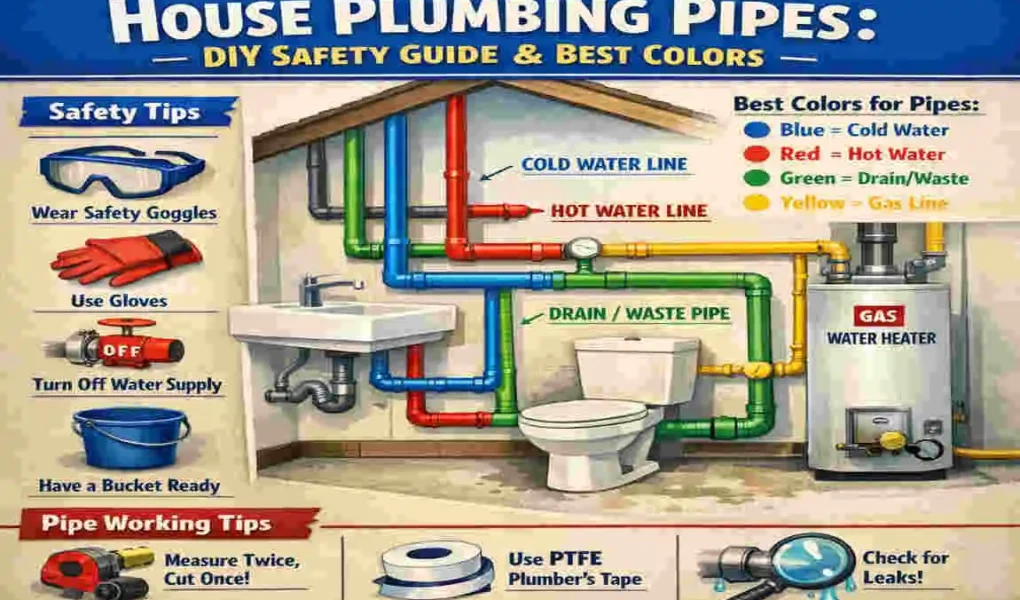
| Gas lines* | Generally do not paint (or only with approved markers, not full coats) because local plumbing codes often require clear identification. | Leave yellow or code‑required marker bands; painting can be unsafe or illegal. |
| Functional color‑coding | Industrial / commercial systems use color‑coding (e.g., green for water, red for fire‑sprinkler, yellow for gas). | For DIY, keep hot‑water lines reasonably light to reduce heat‑related stress on paint. |
But before you grab a brush, you need to know one important thing: not every pipe should be painted the same way. The pipe material, paint type, and condition all matter. If you’re wondering can you paint house plumbing pipes, the answer is yes—but the process depends on the pipe material and paint type.
Can You Paint House Plumbing Pipes?
Quick Answer
Yes, most house plumbing pipes can be painted. Copper, PVC, cast iron, and galvanized steel can usually be painted with the right prep work. The key is using the correct primer and paint for each material.
Why Homeowners Paint Plumbing Pipes
People paint pipes for a few simple reasons:
- To improve appearance
- To match wall or ceiling colors
- To protect metal pipes from rust
- To help pipes blend into basements or bathrooms
Painting is often a cosmetic fix, but it can also help slow down wear on some pipe surfaces.
When You Should Avoid Painting Pipes
You should be careful or avoid painting in these cases:
- Gas lines that need safety markings
- Very hot pipes that need heat-safe coatings
- Leaking or damaged pipes
- Flexible plastic connections
- Pipes that must stay visible for inspection
If the pipe has a problem, fix that first. Paint should never hide damage.
Types of House Plumbing Pipes You Can Paint
Copper Pipes
Copper pipes are common in water systems. They can be painted, but you should sand them lightly first and use a metal primer. After that, acrylic or enamel paint works well.
PVC Pipes
You can you paint PVC pipes? Yes, you can, but only with plastic-compatible paint. Standard paint may peel off quickly. Clean the pipe well and use a bonding primer made for plastic.
Cast Iron Pipes
Cast iron pipes are often found in older homes. They usually need rust removal before painting. After cleaning and sanding, a rust-resistant primer and enamel paint can help protect the surface.
Galvanized Steel Pipes
Galvanized steel can be tricky because its coating resists paint. These pipes need degreasing and a special bonding primer before painting. If you skip that step, the paint may not stick well.
PEX Pipes
PEX pipes are usually not recommended for painting. They are flexible, and paint can crack or peel as the pipe moves. In most cases, it’s better to leave them unpainted.
Benefits of Painting Plumbing Pipes
Improves Home Appearance
Painted pipes look cleaner and more finished. This is especially helpful in basements, laundry rooms, or open ceiling spaces where pipes are easy to see.
Helps Reduce Corrosion
On metal pipes, a good paint layer can help block moisture. That does not replace proper maintenance, but it can add some protection.
Helps Pipes Blend with the Room
You can paint pipes to match the wall, ceiling, or trim. This helps them disappear visually and makes the room feel more organized.
Makes Pipes Easier to Identify
Some homeowners use color to separate hot and cold lines. That can make future maintenance simpler.
Is It Safe to Paint Plumbing Pipes?
Safety Considerations Before Painting
Yes, it can be safe if you prepare properly. Make sure the pipe is:
- Clean
- Dry
- Cool
- Not leaking
If needed, turn off the water supply before working nearby.
Ventilation Matters
Always paint in a well-ventilated area. Open windows, use fans, and wear a mask when spraying paint. This is especially important in basements and bathrooms.
Avoid Harmful Paints Indoors
Choose low-VOC paint when possible. Avoid old lead-based coatings and strong fumes in closed rooms.
Heat and Fire Concerns
Do not use normal paint on very hot pipes unless the label says it is safe. For boiler pipes or other heat-exposed areas, use heat-resistant paint.
Tools and Materials Needed to Paint Pipes
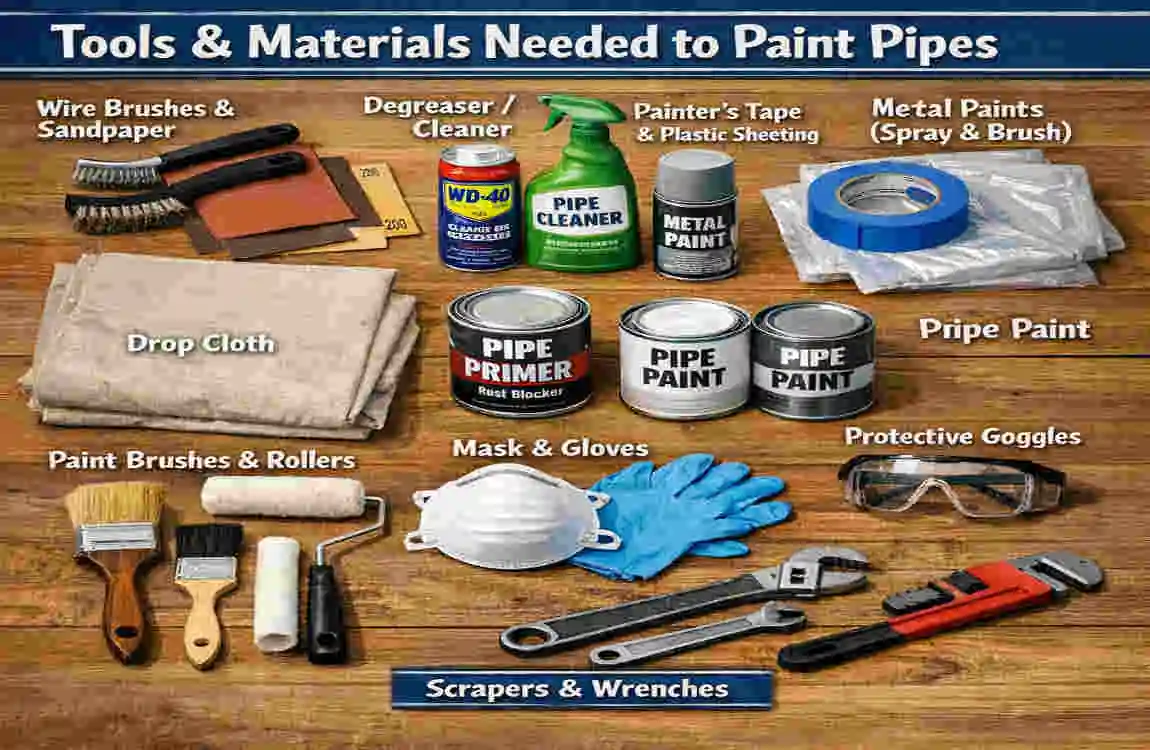
Essential Tools
Here are the basics you’ll likely need:
- Sandpaper
- Wire brush
- Painter’s tape
- Drop cloths
- Cleaning cloths
Best Paint Types
The best paint for plumbing pipes depends on the pipe material:
- Acrylic latex paint
- Epoxy paint
- Spray paint for metal and plastic
- Heat-resistant enamel
Primers You May Need
A good primer helps the paint stay on longer:
- Metal primer
- Rust-inhibiting primer
- Plastic bonding primer
Step-by-Step Guide: How to Paint House Plumbing Pipes
Inspect the Pipes
Start by checking the pipes for leaks, rust, dents, or loose fittings. If you see a problem, repair it before painting.
Clean the Surface
Wipe away dust, grease, and dirt. You can use soap and water or a mild degreaser. Let the pipe dry fully before moving on.
Sand the Pipe
Light sanding helps the paint stick better. It also removes loose rust and old peeling paint. For smooth pipes like PVC, sanding is still useful, but do it gently.
Apply Primer
Primer is important because it gives the paint something to grip. Use the right one for the material:
- Metal primer for copper or steel
- Plastic primer for PVC
- Rust-inhibiting primer for cast iron
Let the primer dry fully. Follow the drying time on the can.
Paint the Pipes
You can use a brush or spray paint.
- Brush painting gives more control
- Spray painting gives a smoother finish
Apply thin, even coats. Two coats are often better than one thick coat. Thick paint can drip, crack, or peel later.
Let the Paint Cure
Do not touch or use the area too soon. Drying and curing are not the same. The paint may feel dry fast, but it still needs time to harden.
Check the Final Finish
After the paint cures, inspect the pipe closely. Look for missed spots, thin areas, or rough edges. Touch up small spots if needed.
Best Colors for Plumbing Pipes in Homes
White Pipes
White gives a clean and simple look. It works well in bathrooms, laundry rooms, and bright utility spaces.
Black Pipes
Black is popular for an industrial style. It also works well on basement ceilings, making the area feel more polished.
Grey and Metallic Finishes
These colors suit modern homes and unfinished spaces. They help pipes look neat without drawing too much attention.
Matching Wall Colors
If you want pipes to disappear, paint them the same color as the wall or ceiling. This is one of the easiest ways to create a clean visual effect.
Bold Accent Colors
Some people use bold colors in lofts or creative spaces. This can turn pipes into a design feature instead of something to hide.
Best Paints for Different Pipe Materials
Pipe Material Recommended Paint Special Notes
Copper Acrylic metal paint Use metal primer
PVC Plastic spray paint Avoid solvent-heavy paints
Cast Iron Rust-resistant enamel Remove rust first
Galvanized Steel Oil-based metal paint Use bonding primer
Hot Water Pipes Heat-resistant enamel Must handle high temperatures
Common Mistakes to Avoid When Painting Pipes
Skipping Primer
This is one of the biggest mistakes. Without primer, paint may peel or chip much sooner.
Painting Dirty Pipes
Dust, grease, and rust keep paint from sticking. Always clean first.
Using the Wrong Paint
Metal paint is not always right for plastic, and plastic paint is not always right for metal. Match the paint to the pipe.
Painting Over Rust
Paint does not stop rust that is already active underneath. Remove rust first, or the damage can keep spreading.
Applying Thick Coats
Thick coats may look faster, but they often cause drips, cracking, and uneven drying.
Can You Spray Paint Plumbing Pipes?
Advantages of Spray Painting
Yes, you can spray paint plumbing pipes. It is often faster and gives a smoother finish, especially on curved surfaces.
Safety Tips
If you spray paint:
- Use ventilation
- Wear a mask
- Cover nearby surfaces
- Apply light coats
Best Spray Paint Options
Choose sprays made for:
- Metal
- Plastic
- Rust resistance
This is often the easiest method for small exposed pipes.
Should You Paint Exposed Basement Pipes?
Pros of Painting Basement Pipes
Painting basement pipes can make the space look cleaner and more finished. It can also help exposed ceilings look intentional instead of messy.
Best Colors for Basement Ceilings
- Matte black for a modern industrial style
- White for a brighter basement
Moisture Concerns
Basements can be damp, so choose paint that resists moisture. A mold-resistant finish is a smart choice in humid areas.
How Long Does Paint Last on Plumbing Pipes?
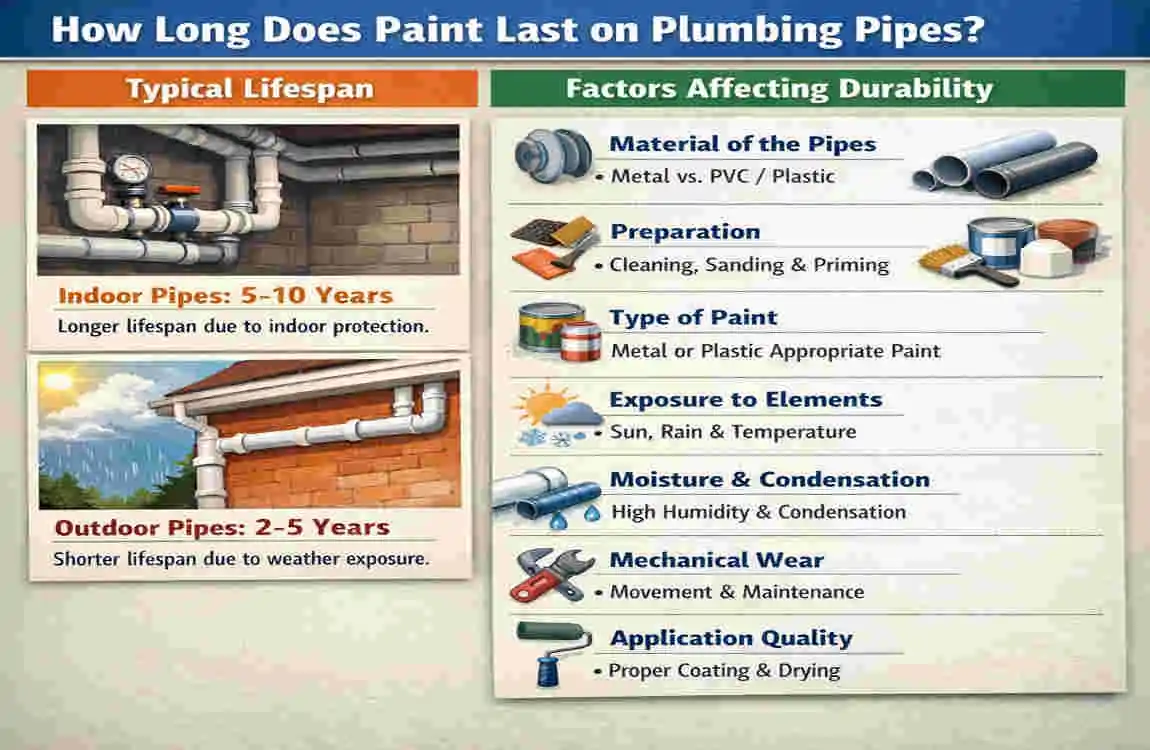
What Affects Durability
Paint life depends on:
- Humidity
- Pipe temperature
- Surface prep
- Paint quality
Simple Maintenance Tips
Check painted pipes periodically. If you see chips, peeling, or rust spots, touch them up early before the problem spreads.
DIY vs Professional Pipe Painting
When DIY Works Best
DIY is a good option for:
- Small exposed pipes
- Cosmetic updates
- Low-risk areas
When to Hire a Professional
Call a pro if you have:
- Heavy rust damage
- Hot water or boiler systems
- Hard-to-reach pipe runs
- Commercial plumbing
Cost Comparison
DIY is usually cheaper because you only pay for supplies. A professional costs more, but they can save time and handle more difficult jobs.
Frequently Asked Questions
Can you paint house plumbing pipes without sanding?
You can, but it is not a good idea. Sanding helps paint stick better and last longer.
What kind of paint works best on PVC plumbing pipes?
Use plastic-safe spray paint or a bonding paint for plastic.
Can painted pipes rust underneath?
Yes, especially if the pipe was not cleaned or primed well before painting.
Is spray paint safe for indoor plumbing pipes?
Yes, if you use good ventilation and choose the right product for the pipe material.
Should hot water pipes be painted?
They can be painted only with heat-resistant paint.
How long should pipe paint dry before use?
Follow the label on the paint can. Some paints dry in hours but need longer to fully cure.
Can you paint pipes the same color as walls?
Yes, and this is a great way to make them blend in.
Does painting pipes help prevent corrosion?
It can help reduce moisture exposure on metal pipes, but it is not a full replacement for maintenance.