When most people think about plumbing, they picture pipes carrying water in and waste out. But there’s a hidden hero working behind your walls that rarely gets any attention: the venting system. Plumbing venting is the network of pipes that lets air move through your drains so water flows smoothly, and sewer gases escape safely outside your home.
Every home needs proper venting to function correctly. Without it, your drains slow to a crawl, your toilets bubble, and foul odors can seep into your living space. Poor venting doesn’t just annoy you—it can damage fixtures, dry out protective water traps, and even create health hazards from trapped sewer gas.
What Is Plumbing Venting?
Before you can vent your plumbing correctly, you need to understand what venting actually does. Let’s break it down in simple terms.
Definition of a Plumbing Vent
A plumbing vent is a pipe that runs vertically from your drain system up through the roof of your home. Its main job is to bring fresh air into the plumbing pipes while letting sewer gases escape harmlessly into the open air outside.
Think of it as your drainage system’s breathing tube. Just like you can’t drink through a straw properly if you cover the top with your finger, water can’t drain smoothly if air can’t get behind it.
How Plumbing Vents Work
When water rushes down a drain, it creates suction behind it. This suction, called negative pressure, can pull water right out of the traps that block sewer gas. Vents solve this problem by letting air in, which balances the pressure and keeps everything flowing evenly.
At the same time, vents give sewer gases a safe path to leave your home. Instead of building up inside the pipes, these gases rise the vent stack and exit above your roofline, far away from windows and doors.
Difference Between Drain Pipes and Vent Pipes
People often confuse drain pipes and vent pipes, but they serve very different purposes. Drain pipes carry water and waste away from your fixtures and out to the sewer or septic system. They always slope downward to use gravity.
Vent pipes, on the other hand, carry only air. They run upward and connect to the drain system to keep air pressure balanced. Together, these two systems form what plumbers call the DWV system—drain, waste, and vent.
Why Proper Plumbing Venting Is Important
You might wonder why venting deserves so much attention. Here are the biggest reasons a well-designed vent system matters for your home.
Prevents Sewer Gas from Entering Your Home
Sewer gas contains methane, hydrogen sulfide, and other unpleasant, potentially harmful fumes. Proper venting directs these gases up and out through your roof. Without it, you’d smell rotten eggs inside your home—and breathe in something you really shouldn’t.
Maintains Proper Drainage Flow
Water needs air to flow freely. When your vents work correctly, air fills the space behind draining water, allowing everything to move at full speed. This keeps your sinks, tubs, and toilets draining the way they should.
Prevents Slow Drains
A poorly vented drain acts like that covered straw we mentioned earlier. Water trickles out slowly because a vacuum forms behind it. Good venting eliminates that vacuum and keeps drains fast and efficient.
Protects Plumbing Fixtures
Every fixture has a P-trap, a curved pipe that holds a small amount of water to block sewer gas. When venting fails, suction can siphon that water away, leaving the trap empty. Proper venting protects these traps so they keep doing their job.
Meets Building Code Requirements
Venting isn’t optional—it’s the law. Building codes in nearly every region require proper venting for safety and sanitation. If you ever sell your home or get an inspection, unvented plumbing can create real problems and expensive fixes.
Main Components of a Plumbing Vent System
To understand how venting works, you should know the key parts that make up the system. Let’s look at each one.
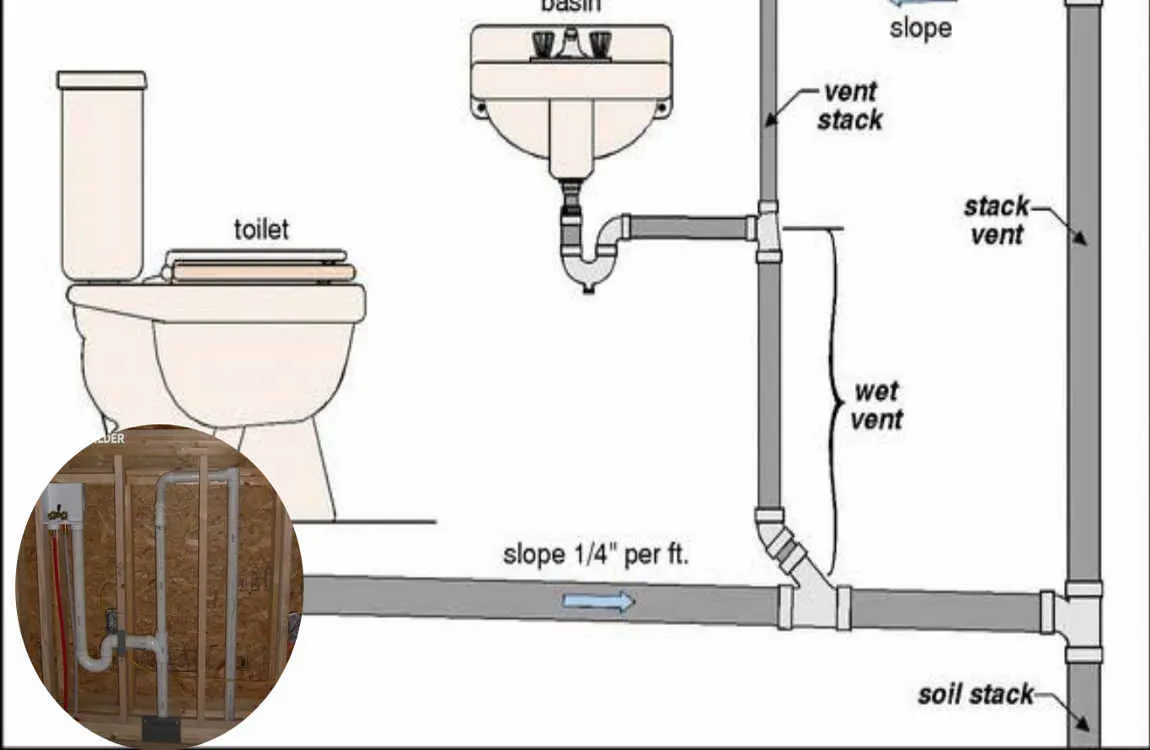
Vent Stack
The vent stack is the main vertical pipe that carries air throughout the venting system. It connects to your drain lines and runs up through the roof. This is the backbone of your entire vent setup.
Soil Stack
The soil stack is a large vertical pipe that carries waste from toilets and other fixtures down to the sewer line. The upper portion of this stack often doubles as a vent once it rises above the highest fixture.
Drain Pipes
Drain pipes carry wastewater away from each fixture. They connect to the larger stacks and always slope downward toward the sewer. While these aren’t vent pipes themselves, they work hand in hand with the vent system.
Trap Arms
The trap arm is the section of pipe between a fixture’s P-trap and the vent connection. Getting this length right is critical—if the trap arm is too long, the trap can lose its water seal.
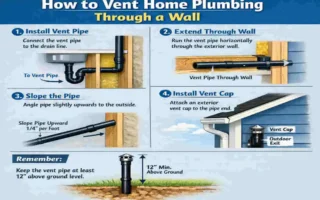
Vent Through the Roof
Finally, the vent must exit somewhere. The vent through the roof (often called the VTR) is where the vent stack pokes above your rooftop. This opening releases sewer gases safely into the outdoor air.
Types of Plumbing Vents
Not all vents look the same. Depending on your home’s layout and fixture arrangement, plumbers use several different venting methods. Here are the most common types you’ll encounter.
True Vent
A true vent is a vertical pipe that connects directly to a drain line and runs straight up through the roof without carrying any water. This is the simplest and most reliable vent type, ideal when a fixture sits near the main stack.
Wet Vent
A wet vent is a clever design where one pipe serves as both a drain and a vent for multiple fixtures. For example, a bathroom sink drain might also vent a nearby toilet. Wet vents save pipe and space, but they must follow strict code rules.
Common Vent
A common vent allows two fixtures placed back-to-back—such as sinks on opposite sides of a wall—to share a single vent pipe. This is a space-saving option commonly used in bathrooms.
Loop Vent
A loop vent is used for fixtures that can’t easily connect to a standard vertical vent, like an island sink. The vent loops upward as high as possible before running back down and tying into the drain system.
Island Vent
An island vent is a specialized version of the loop vent designed specifically for kitchen island sinks. Because there’s no wall to run a vertical pipe through, the vent loops under the counter and connects to the main system below the floor.
Air Admittance Valve (AAV)
An Air Admittance Valve, or AAV, is a one-way valve that opens to let air in when water drains and closes to block sewer gas. It doesn’t require a roof penetration, making it useful for tricky locations. However, AAVs aren’t allowed everywhere, so always check your local codes first.
How to Properly Vent Home Plumbing Step-by-Step Guide
Now for the main event. Here’s a clear, step-by-step process for venting your plumbing the right way. Follow these steps carefully, and always confirm the details with your local plumbing code.
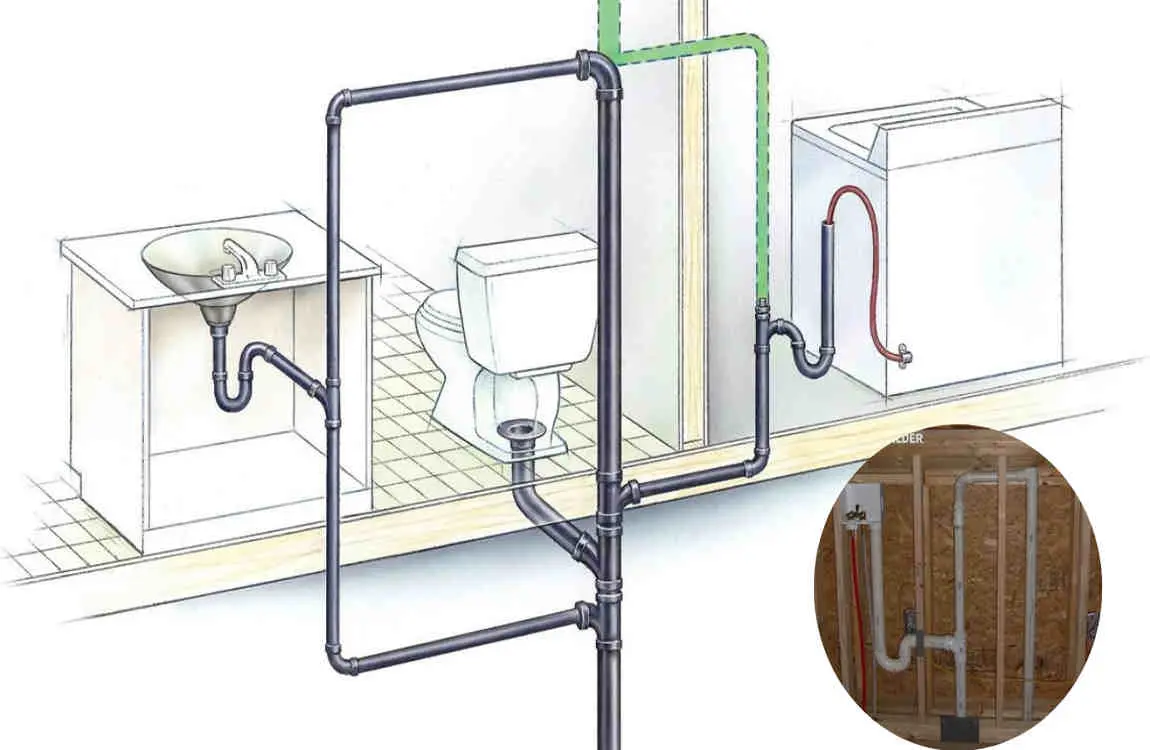
Understand Your Plumbing Layout
Before you touch a single pipe, map out your entire plumbing system. Note where each fixture sits, where the drains run, and where the main stack is located. A simple sketch helps you plan vent connections and spot potential problems early.
Locate Existing Vent Pipes
If your home already has plumbing, find the existing vent pipes. Look in the attic and on the roof for vertical pipes rising through the roofline. Understanding what’s already there saves you time and helps you tie new vents into the current system.
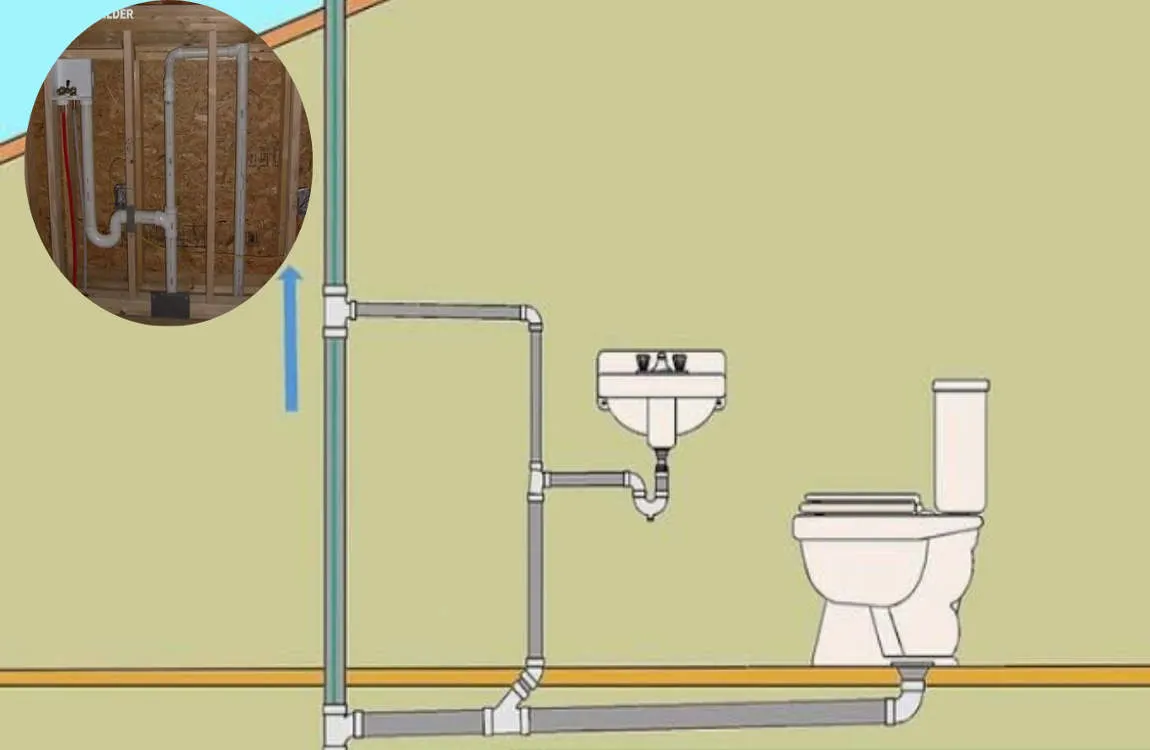
Connect Fixtures to the Vent
Each fixture needs a path to a vent. Connect the fixture’s trap arm to a vent pipe within the maximum distance allowed by code. This connection lets air enter behind draining water and protects the P-trap seal.
Maintain Proper Pipe Slope
Drain pipes must slope downward, usually about ¼ inch per foot, so gravity pulls water toward the sewer. Vent pipes, by contrast, should stay level or slope slightly upward toward the stack so no water gets trapped inside them.
Choose the Correct Vent Pipe Size
Pipe size matters a lot. Too small, and air can’t move fast enough; too large, and you waste materials. Match your vent pipe diameter to the fixture load and code requirements. We’ll cover exact sizes in the next section.
Plumbing Vent Pipe Size Guide
Choosing the right pipe size is one of the most important parts of venting. Undersized pipes cause drainage problems, while oversized pipes waste money. Use the table below as a general reference, but always double-check your local code.
Fixture Typical Vent Size
Bathroom Sink 1½ inches
Kitchen Sink 1½–2 inches
Toilet 2 inches
Bathtub 1½–2 inches
Shower 2 inches
Main Vent Stack 3–4 inches
Keep in mind that these are common residential sizes. The exact size you need depends on how many fixtures share the vent and how much water they discharge.
Signs Your Plumbing Vent Is Not Working Properly
Even a well-built vent system can develop problems over time. Watch for these warning signs that something’s wrong with your venting.
Slow Drainage
If your sinks and tubs drain sluggishly even though they aren’t clogged, poor venting is often the culprit. Without enough air, water simply can’t move quickly.
Gurgling Sounds
Hearing gurgling or bubbling noises from your drains? That’s air struggling to find its way into the pipes. It’s a classic sign that your vent is partially blocked or undersized.
Sewer Odors
A foul, rotten-egg smell inside your home usually means sewer gas is escaping where it shouldn’t. This often happens when a vent is blocked, or a trap has lost its water seal.
Bubbling Toilet
If your toilet bubbles or the water level rises and falls when you use another fixture, air pressure inside the system is out of balance—a strong indicator of a venting issue.
Water Trap Drying Out
When P-traps repeatedly lose their water, suction from poor venting may be siphoning it away. An empty trap opens the door for sewer gas to enter your home.
Common Plumbing Venting Mistakes
Whether you’re a homeowner or a beginner DIYer, it’s easy to make venting errors. Avoid these common pitfalls.
Using the Wrong Pipe Size
Installing pipes that are too small chokes airflow and creates drainage problems. Always match pipe size to the fixture load and code requirements.
Too Few Vent Connections
Some people try to save money by adding fewer vents than needed. This leaves fixtures poorly ventilated and leads to slow drains and gurgling.
Blocked Roof Vent
Leaves, debris, and even small animals can block the vent opening on your roof. A blocked vent traps air and gases inside your plumbing, causing all sorts of trouble.
Incorrect Pipe Slope
Getting the slope wrong is a frequent mistake. Drains that don’t slope enough won’t drain properly, while vents that sag can trap water and lose airflow.
Ignoring Local Plumbing Codes
Every region has specific venting rules. Ignoring them can lead to failed inspections, safety hazards, and costly rework. Always check your local code before starting.
Can You Install Plumbing Vents Yourself?
Many homeowners wonder whether venting is a DIY job or one best left to the pros. The honest answer depends on the project’s complexity.
DIY-Friendly Projects
Simple tasks are within reach for confident DIYers. Adding an Air Admittance Valve under a sink, clearing a blocked roof vent, or replacing a short section of vent pipe are all reasonable weekend projects if you’re handy and follow code.
When to Hire a Professional Plumber
Larger jobs call for a professional. If you’re rerouting the main vent stack, adding venting for an entire bathroom, or cutting new roof penetrations, hire a licensed plumber. Mistakes here are expensive and can compromise your whole system.
Safety Considerations
Working with plumbing can expose you to sewer gases and require roof access. Always wear gloves, ensure good ventilation, and use proper fall protection if you’re on the roof. When in doubt, call an expert—your safety comes first.
Plumbing Vent Maintenance Tips
A little regular care keeps your vent system working smoothly for years. Here are simple maintenance habits worth adopting.
Inspect Roof Vents Regularly
Take a look at your roof vents a couple of times a year. Make sure the openings are clear and the flashing around them is sealed and intact.
Remove Leaves and Debris
Leaves, twigs, and dirt love to collect in vent openings. Clear them out gently to keep air flowing freely through the pipe.
Check for Bird Nests
Birds and small critters sometimes build nests inside vent pipes. Check for blockages, especially in spring, and remove any obstructions you find.
Watch for Winter Ice Blockages
In cold climates, frost and ice can seal off vent openings. If you notice drainage problems during winter, a frozen vent may be to blame. Insulating the pipe can help prevent this.
Schedule Routine Plumbing Inspections
Finally, have a professional inspect your plumbing every few years. They can catch venting issues early, before they turn into major headaches.
Benefits of Properly Vented Plumbing
Investing in proper venting pays off in many ways. Here’s a quick rundown of what you gain when your system is vented correctly:
- Faster drainage so water disappears quickly
- Better plumbing performance across every fixture
- Fewer clogs thanks to smooth, consistent flow
- No sewer odors creeping into your living space
- Longer plumbing lifespan with less strain on pipes and traps
- Improved home value since buyers appreciate sound plumbing
- Code compliance that keeps inspections stress-free
These benefits touch everything from your daily comfort to your home’s long-term worth.
Frequently Asked Questions (FAQ)
How do you properly vent home plumbing? Proper venting connects drain pipes to a vent system that allows air into the plumbing while safely releasing sewer gases through the roof.
What happens if plumbing is not vented? Poor venting can cause slow drains, gurgling noises, sewer odors, and water trap failures.
Can every plumbing fixture share the same vent? Some fixtures can share a vent if local plumbing codes allow proper sizing and layout.
Does every drain need its own vent? Not always. Many plumbing systems use shared or wet vents depending on the fixture arrangement and code requirements.
Can a plumbing vent end in the attic? No. Plumbing vents should typically terminate outside the home, usually through the roof, to safely release sewer gases.
What size should a plumbing vent pipe be? The required size depends on the fixture load and local plumbing code, but common residential vent pipes range from 1½ to 4 inches.
| Topic | Information |
|---|---|
| Purpose of Plumbing Vent | Removes sewer gases and allows air into the drainage system for smooth water flow. |
| Why Venting Matters | Prevents slow drains, bad odors, gurgling sounds, and water trap siphoning. |
| Common Vent Types | Vent stack, individual vent, wet vent, circuit vent, and air admittance valve (AAV). |
| How It Works | Fresh air enters the vent pipe, balancing air pressure so wastewater flows freely. |
| Typical Vent Pipe Size | Usually 1½ to 2 inches for branch vents and 3 to 4 inches for the main vent stack, depending on local plumbing codes. |
| Vent Pipe Location | Runs vertically through walls and exits above the roof. |
| Signs of Poor Venting | Slow drainage, bubbling toilets, foul smells, and gurgling noises from sinks or tubs. |
| Installation Tips | Keep vents vertical, avoid unnecessary bends, and follow local building codes. |
| Common Mistakes | Blocking roof vents, undersized vent pipes, or connecting fixtures incorrectly. |
| Maintenance | Inspect roof vents regularly and remove leaves, nests, or debris that could cause blockages. |
| DIY or Professional? | Minor inspections are DIY-friendly, but new vent installations or major repairs should be handled by a licensed plumber. |
| Beginner Tip | Always plan the drain and vent layout together before installing any plumbing fixtures for the best performance. |