If you live in your RV at home, or you just want a simple way to manage waste during a long stay, learning how to connect RV to house sewer can make life much easier. It saves time, reduces trips to dump stations, and helps you handle waste more cleanly.
A proper RV sewer hookup at home can be a big convenience. You do not have to keep moving the RV, and you do not have to worry as much about holding tanks filling up too fast. It can also save money over time by reducing campground dump fees and unnecessary travel.
| Key Tips | ||
|---|---|---|
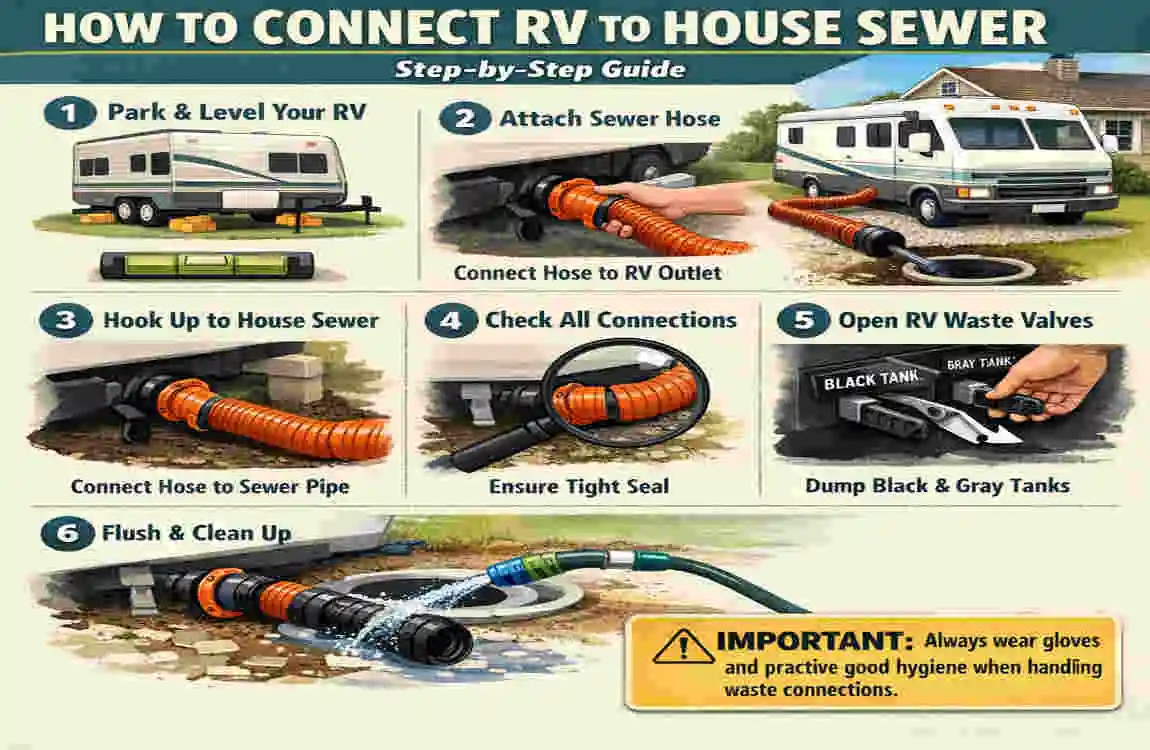
| Park & Level | Park where the sewer hose reaches easily; ensure RV is level for smooth drainage | |
| Glove Up | Put on disposable gloves to protect from germs and waste | |
| Find Sewer Connection | Look for a concrete pad with a lid or PVC pipe with a cap | |
| Attach Hose to RV | Connect bayonet-style fitting to RV waste outlet; twist until snug and leak-proof | |
| Use Hose Support | Place sewer hose support underneath to create downward slope and prevent kinks | |
| Connect to House Sewer | Attach elbow fitting to home sewer inlet; ensure tight, odor-proof seal (use donut seal if needed) | |
| Check for Leaks | Inspect entire connection before opening valves; fix any issues immediately | |
| Dump Black Tank First | Open black tank valve fully; keep open until empty, then close | |
| Dump Gray Tank | Open gray tank valve to flush residue from hose; close when empty | |
| Disconnect & Clean | Disconnect RV end first; rinse hose inside with garden hose or rinse cap; store clean |
Still, this is not something you should rush. Sewer work must be done properly. If you connect the wrong pipe, use the wrong hose, or ignore local rules, you can cause leaks, odors, or even sewer backups. That is why safety and legality matter just as much as convenience.
Understanding RV Sewer Systems Before You Start
Before you try to connect an RV to a house sewer, it helps to understand how the RV waste system works. Many problems happen because people assume RV plumbing works exactly like home plumbing. It does not.
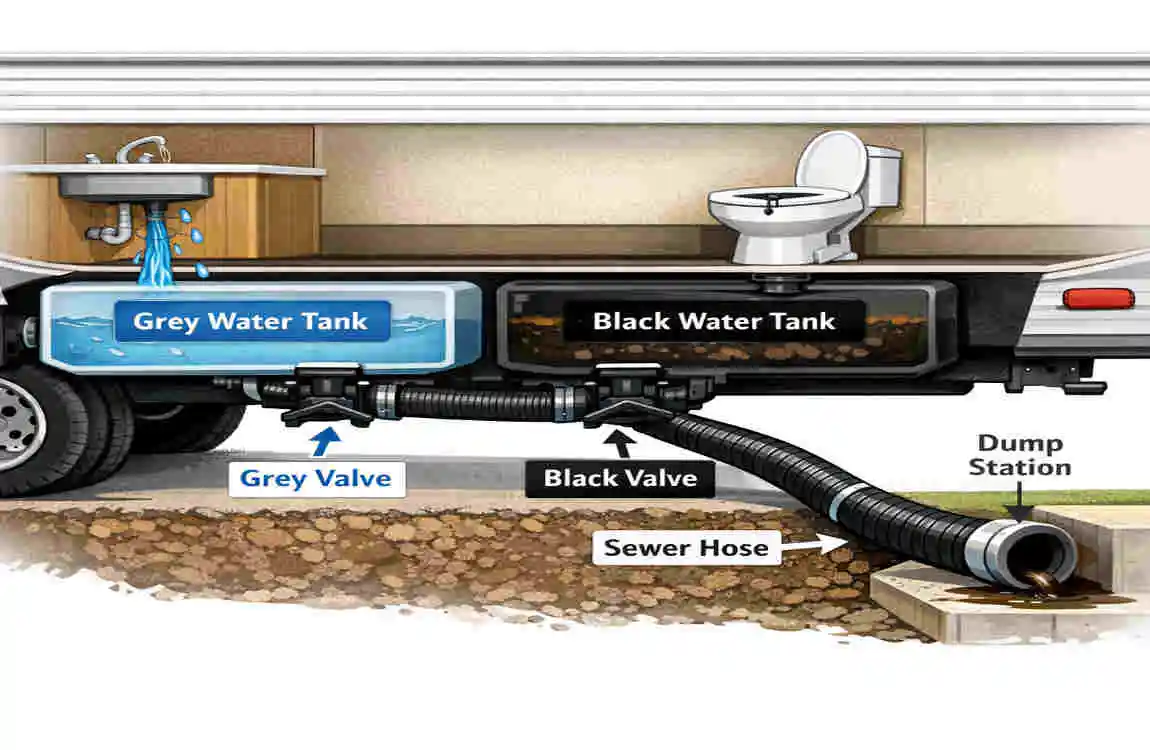
How RV Waste Systems Work
An RV usually has two main holding tanks.
The black water tank holds waste from the toilet. This is the tank that needs the most care because it carries sewage.
The graywater tank collects water from sinks and showers. This water is not as dirty as black tank waste, but it still contains soap, food particles, and grease.
Most RVs also have a sewer outlet valve. This is the point where waste leaves the RV through the sewer hose. When you open the valve, the tank drains out. When you close it, the tank holds waste again until you are ready to dump it.
Difference Between RV Sewer and Residential Plumbing
RV sewer systems are different from home plumbing in a few important ways.
First, pipe sizes vary. Home plumbing is installed in walls and floors, with venting and trap systems. RV plumbing is simpler and more compact.
Second, drainage flow is not the same. A house sewer line usually carries waste downhill through fixed pipes. An RV sewer hose is flexible, which means it can sag if you do not support it properly.
Third, ventilation systems are different. Houses use vent stacks to release air and help waste move smoothly. RV systems also need airflow, but they depend on tank vents and proper sealing to control odours.
Because of these differences, you should not just jam a hose into a random drain opening. You need the correct adapter and the right setup.
Can You Legally Connect an RV to a House Sewer?
This is one of the most important questions to ask first.
Local rules can vary by city, county, and state. Some places allow an RV to connect to a house sewer for temporary use. Other places may require special permits, or they may not allow it at all.
You also need to check HOA restrictions if you live in a neighborhood with one. Some HOAs limit long-term RV parking or sewer hookups.
Another big issue is whether your home uses municipal sewer or septic. A septic system can be overloaded if you send too much waste too quickly. If you have a septic tank, you need to be extra careful and may need professional advice before you connect.
Always check the rules before you start. That small step can save you from fines, repairs, and stress later.
Tools and Supplies Needed to Connect RV to House Sewer
Having the right equipment makes the job safer and cleaner. A good setup also helps prevent leaks and bad smells.
Essential Equipment Checklist
Here are the basic items you will likely need:
- RV sewer hose
- Sewer hose support ramp
- Threaded adapters
- Macerator pump if the drain location is far away or uphill
- Hose clamps
- Disposable gloves
These are the core tools for most RV sewer hose setup jobs. If you skip the right adapter or try to force a poor fit, you may end up with spills or slow drainage.
Recommended Sewer Hose Sizes
Most RVs use a 3-inch standard hose for black tank waste. That is the most common size and usually the best starting point.
Some hoses are heavy-duty, which means they are thicker and often more durable. These can last longer and resist punctures better.
Other hoses are lightweight, which makes them easier to carry and store. They may be fine for short-term use, but they may not hold up as well with frequent dumping.
If you plan to connect often, a stronger hose is usually worth it.
Optional Accessories for Easier Hookups
Some extra items can make the setup cleaner and simpler.
A clear elbow connector lets you see when waste has finished draining. That helps you know when the tank is empty.
A sewer cap helps seal the outlet when not in use.
A backflow preventer can help reduce the risk of waste moving backward into your RV or hose.
A portable waste tank can also help if you do not want to move the RV every time you dump waste.
These extras are not always required, but they can make the process easier and safer.
Quick Comparison Table
Item Best UseWhy It Helps
Standard 3-inch sewer hose Most RVs Fits common RV outlets
Heavy-duty hose Frequent use Lasts longer and resists damage
Clear elbow connector Visual check Helps monitor waste flow
Macerator pump Long distance or uphill Moves waste more easily
Hose support ramp Uneven ground Prevents sagging and blockages
Best Ways to Connect RV to House Sewer
There are a few ways to connect your RV to a house sewer system. The best method depends on your sewer access, distance, and whether you use septic or municipal lines.
Connecting Through a Sewer Cleanout
A sewer cleanout is usually the safest and easiest option. A cleanout is a pipe access point that gives direct entry to the home sewer line. It often has a cap on top and is found near the house, driveway, or yard.
This is usually the best option because it is designed for sewer access. You are not trying to force waste into a sink drain or another weak connection.
A cleanout hookup works well when:
- The cleanout is easy to access
- The pipe size matches your adapter
- You want a more secure temporary connection
Connecting RV to a Septic Tank
An RV-to-septic connection requires extra care. Septic systems are not designed for sudden heavy dumping, so you should not empty both tanks at once.
If you connect to septic, drain only as much as the system can handle. Dump in smaller amounts and avoid overloading the tank. Also, make sure the septic system is in good working condition before you start.
If the septic system is old, damaged, or already close to capacity, you should get professional advice before using it.
Using a Macerator Pump for Long Distances
A macerator pump breaks waste into smaller pieces and pushes it through a smaller hose. This is useful if the sewer point is far away or higher than the RV outlet.
You may need a macerator pump if:
- The sewer access is uphill
- The hookup point is far from the RV
- You need more control over flow
The big advantage is flexibility. You do not have to rely only on gravity. That can make a big difference in tricky setups.
Temporary vs Permanent RV Sewer Connections
A temporary connection is best for short stays or occasional use. It is usually cheaper and easier to remove.
A permanent connection may work better for full-time RV living. It offers greater convenience, but it may require more planning, additional parts, and possibly permits.
Here is a simple way to think about it:
- Temporary setup: lower cost, easier to remove, less commitment
- Permanent setup: more convenient, better for long-term use, may cost more upfront
If you are only staying for a short time, temporary is usually enough. If you live in the RV full-time, a more stable setup may make more sense.
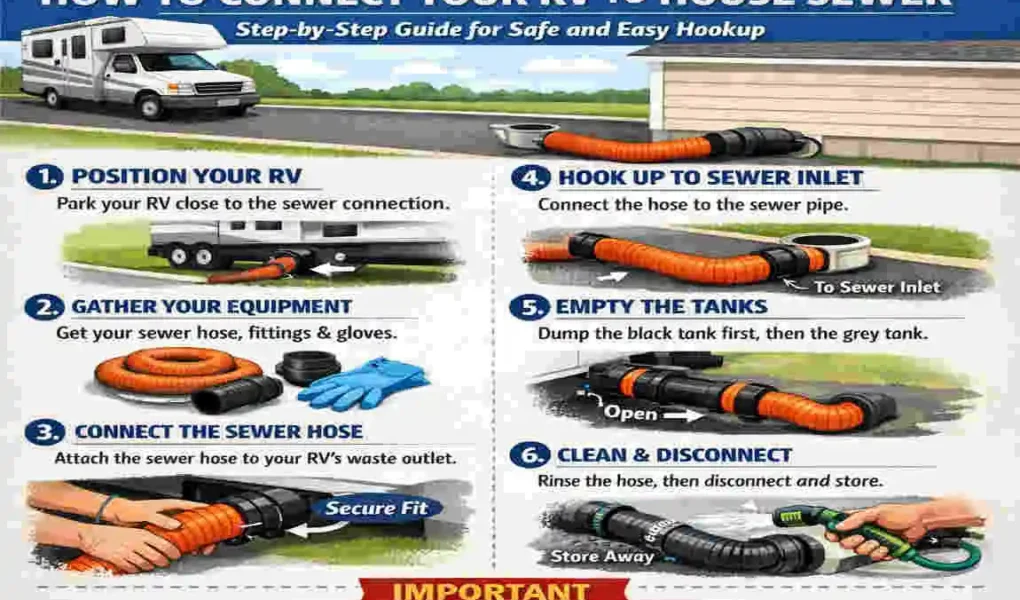
Step-by-Step Guide: How to Connect RV to House Sewer
Now, let’s walk through the process in a clear, simple way. This is the heart of how to connect RV to house sewer the right way.
Locate the House Sewer Cleanout
First, find the cleanout pipe. It is often located near the home foundation, along a side yard, or close to the driveway.
Look for a capped pipe that sits above ground or slightly below it. The cap may be round or square. If you are not sure which pipe is the cleanout, do not guess. It is better to confirm than to connect to the wrong line.
If you have trouble finding it, check the area where the main sewer line is likely to exit the house.
Prepare the RV Sewer Hose
Before you connect anything, inspect the hose.
Look for cracks, worn spots, loose fittings, or old seals. A damaged hose can leak and create a mess very quickly.
Next, make sure your fittings are secure. If the hose has locking ends, check that they click or twist into place properly.
Set up a hose support ramp if the hose will run across uneven ground. This keeps the hose from sagging and helps waste move smoothly.
Connect the Sewer Hose to the RV
Attach one end of the hose to the RV sewer outlet. Most RVs have a bayonet-style fitting or a similar locking system.
Make sure the connection is tight. You want a secure seal so waste does not leak out during drainage.
If the fit feels loose, check the gasket or locking ring. Do not force it. A better seal is more important than speed.
Attach the Hose to the House Sewer
Now connect the other end of the hose to the cleanout adapter or sewer inlet.
Choose the right adapter for the pipe size. This is very important because the wrong adapter can leak or pop loose.
Tighten the connection firmly, but do not overtighten to the point of damage. The goal is a stable fit that will stay in place while the tank drains.
Before you open any valves, check that the hose is straight, supported, and, if possible, pointed downward. This helps prevent spills and clogs.
Open the Black Tank Valve Carefully
Start with the black tank. Open the valve slowly and let waste flow out in a controlled way.
Do not rush this step. A sudden release can create pressure in the hose or splash waste where you do not want it.
Watch the flow as it moves through the hose. If you have a clear elbow, you can see when the waste starts to slow down.
If the flow seems blocked, stop and check the line before forcing anything.
Flush the Gray Tank
After the black tank drains, open the gray tank valve.
The gray water helps rinse the hose. It also helps wash away some of the waste left in the line.
This step is useful because it reduces odor and keeps the hose cleaner. Many RV owners use grey water as a natural rinse after dumping the black tank.
If your setup allows it, you can also add a brief clean-water rinse to further clear the hose.
Rinse and Store Equipment Safely
When you are done, close both tank valves and disconnect the hose carefully.
Rinse the hose and fittings with clean water. If needed, sanitise the equipment with an approved RV-safe cleaner.
Let everything dry before storage if possible. Store the hose in a separate container or storage tube to prevent contamination of other gear.
Good storage habits help extend the life of your RV sewer hose setup and keep your RV cleaner.
Common Mistakes to Avoid When Connecting RV to House Sewer
A simple hookup can go wrong if you skip key steps. These are some of the most common mistakes.
Dumping Waste Too Quickly
If you open the valve too fast, waste can surge through the line. That may cause overflow, splashing, or pressure problems in the pipe.
Always drain in a controlled way. Slow and steady is safer.
Using the Wrong Hose Size
If the hose is too small, too loose, or not made for RV waste, it can leak or drain poorly.
The wrong size can also lead to increased blockages. Always match the hose and adapter to the RV outlet and sewer access.
Ignoring Local Plumbing Codes
This is a mistake that can cost you money.
Local rules may control where and how you can connect. If you ignore them, you may face fines or be required to undo the setup.
Skipping Hose Supports
When a hose sags, waste can collect in low spots. That creates poor drainage and can lead to blockages.
A support ramp or similar tool helps keep the line moving the right way.
Leaving Valves Open Continuously
This is a very common RV mistake.
If you leave the black tank valve open all the time, liquid can drain away while solids stay behind. That can create a thick pile at the bottom of the tank, often called a pyramid buildup.
That causes bad odor and makes future dumping harder. Keep the valve closed until you are ready to dump.
Safety Tips for RV Sewer Hookups at Home
Safety matters every time you handle waste. These basic habits can protect both you and your RV.
Wear Protective Gear
Always wear gloves when handling sewer hoses or valves.
Eye protection is also smart, especially if you are dealing with older fittings or a setup that may splash.
Prevent Sewer Gas Exposure
Sewer gas can smell awful and may be harmful if it builds up.
Keep seals tight, use proper caps, and make sure the setup is not leaking air or waste. Good ventilation around the RV area also helps reduce odor buildup.
Avoid Cross-Contamination
Do not mix sewer gear with freshwater gear.
Keep waste hoses, adapters, and tools separate from those used for drinking or rinsing. This is one of the simplest ways to protect health and avoid contamination.
Inspect Connections Regularly
Check the hose, seals, and fittings every time you use them.
Small cracks or loose clamps can quickly turn into bigger problems. Catching damage early saves time and cleanup later.
Troubleshooting RV Sewer Connection Problems
Even with a good setup, problems can still happen. The good news is that most issues are easy to diagnose.
Slow Draining Sewer Hose
If waste drains slowly, the hose may be bent, sagging, or blocked.
Try straightening the hose and checking for dips where waste can collect. If needed, flush the hose or inspect the connection for debris.
Sewer Odors Around the RV
Bad smells often come from loose seals, open valves, or poor venting.
Check every seal and make sure the tank caps are secure. If odours persist, the hose or fittings may need to be replaced.
Leaking Hose Connections
Leaks often happen because a seal is worn or a fitting is not tight enough.
Inspect the gasket, replace damaged parts, and retighten the connection. Do not ignore even a small drip.
Macerator Pump Not Working
If your macerator pump stops working, start with the power supply.
Check the battery, wiring, and fuse. If the pump runs but does not move waste well, the impeller may need maintenance or cleaning.
Cost to Connect an RV to House Sewer
The cost depends on whether you do it yourself or hire a professional.
DIY Connection Costs
A basic DIY connection may include:
- Sewer hose
- Adapter
- Hose support
- Gloves
- Optional macerator pump
Simple setups can be affordable. If you already own some of the parts, your total cost may be low.
Professional Installation Costs
If you hire a plumber, labor will raise the price. Permit fees may also apply depending on your location.
This may be the better choice if the setup is complex, if you use septic, or if you want a more permanent installation.
Long-Term Savings
A good home sewer setup can save money over time.
You may spend less on campground dump stations, reduce travel, and make daily living easier if you stay in the RV for long periods.
Is Connecting an RV to a House Sewer Worth It?
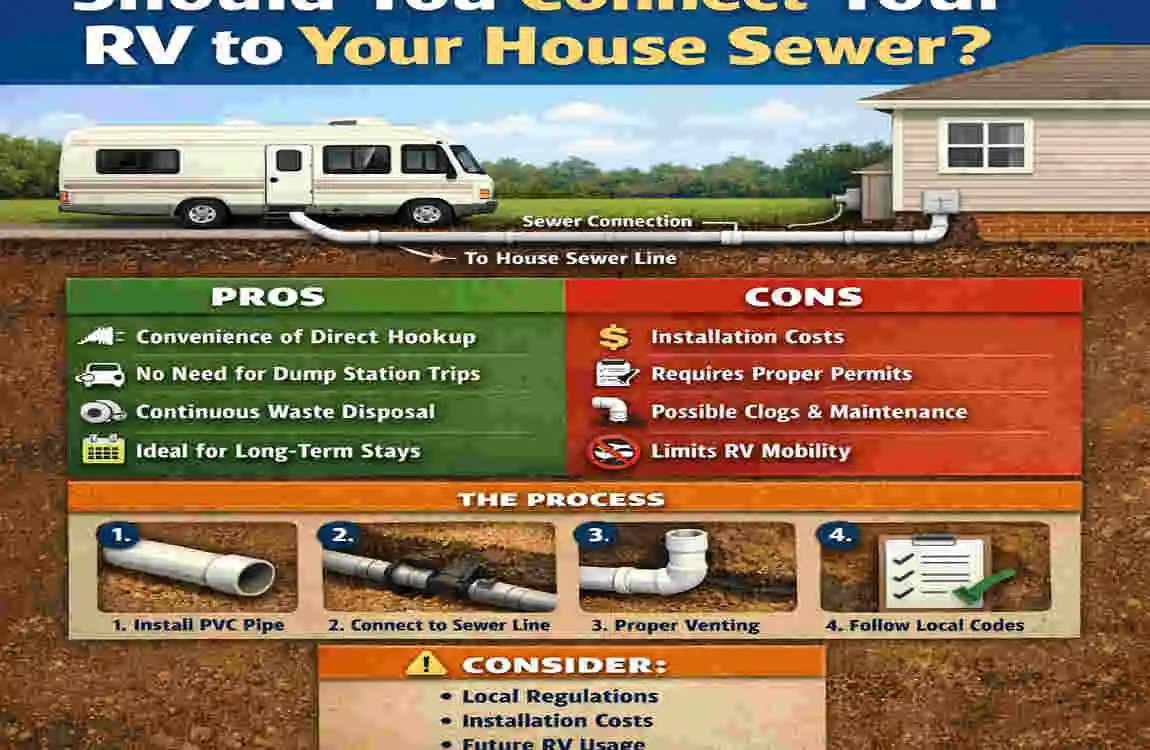
For many RV owners, the answer is yes. It is especially useful for full-time living or long stays at home.
Benefits for Full-Time RV Owners
A home sewer hookup makes maintenance easier. You do not need to move the RV as often, and you can manage waste with less stress.
It also gives you more flexibility in daily life.
When It May Not Be Ideal
It may not be the best choice if you have an older septic system or limited access to the sewer line.
In those cases, the setup may be too risky or too difficult to manage safely.
Alternative Waste Disposal Options
If a home sewer hookup is not a good fit, you can still use:
- RV dump stations
- Portable waste tanks
These options are useful when home connection is not allowed or not practical.
Frequently Asked Questions
Can I connect my RV directly to my septic tank?
You can sometimes connect to septic, but you need to be very careful. Septic systems can overload if too much waste enters too fast. Always check local rules and consider professional advice first.
Do I need a permit to connect RV to house sewer?
Sometimes yes. It depends on your local city, county, and HOA rules. Check before you install anything.
What size sewer hose do I need for my RV?
Most RVs use a 3-inch sewer hose. That is the standard size for many black tank systems.
How often should I dump my RV black tank?
That depends on use. Many RV owners dump when the tank is about two-thirds full. This gives the waste enough volume to move out properly.
Can I leave my RV permanently connected to sewer?
You can in some cases, but you should still manage the valves correctly. Do not leave the black tank valve open all the time. That can cause buildup and odor problems.
What is the best macerator pump for RV sewer hookups?
The best pump depends on distance, lift, and how often you use it. Look for one that matches your RV setup, has strong waste-moving power, and is easy to clean.