That rhythmic sound from the bathroom faucet isn’t just annoying; it sounds like money going down the drain. Your stomach tightens. You immediately think about calling a professional, but the thought of an emergency bill makes you wince. Then, the big question pops into your head: “Is plumbing hard, or am I just intimidated?”
If you are a homeowner asking yourself, ” Is plumbing hard, you are not alone. Most of us look at the maze of pipes under our sinks and imagine a catastrophic flood caused by turning the wrong screw. We worry about water damage, mold, and making a bad situation worse.
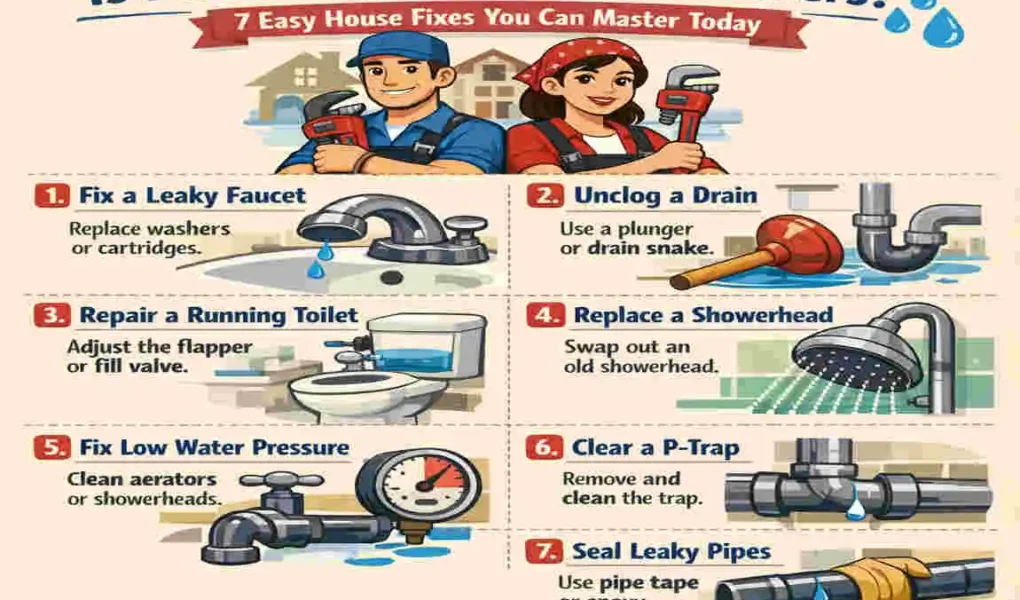
But here is the truth: While specialized tasks like roughing in a new bathroom or replacing a main sewer line require a licensed pro, the vast majority of day-to-day household plumbing issues are surprisingly simple. In fact, many common repairs—like fixing that midnight drip or clearing a stubborn drain—require nothing more than a few basic tools and a little bit of patience.
Why Plumbing Feels Hard (But Isn’t Always)
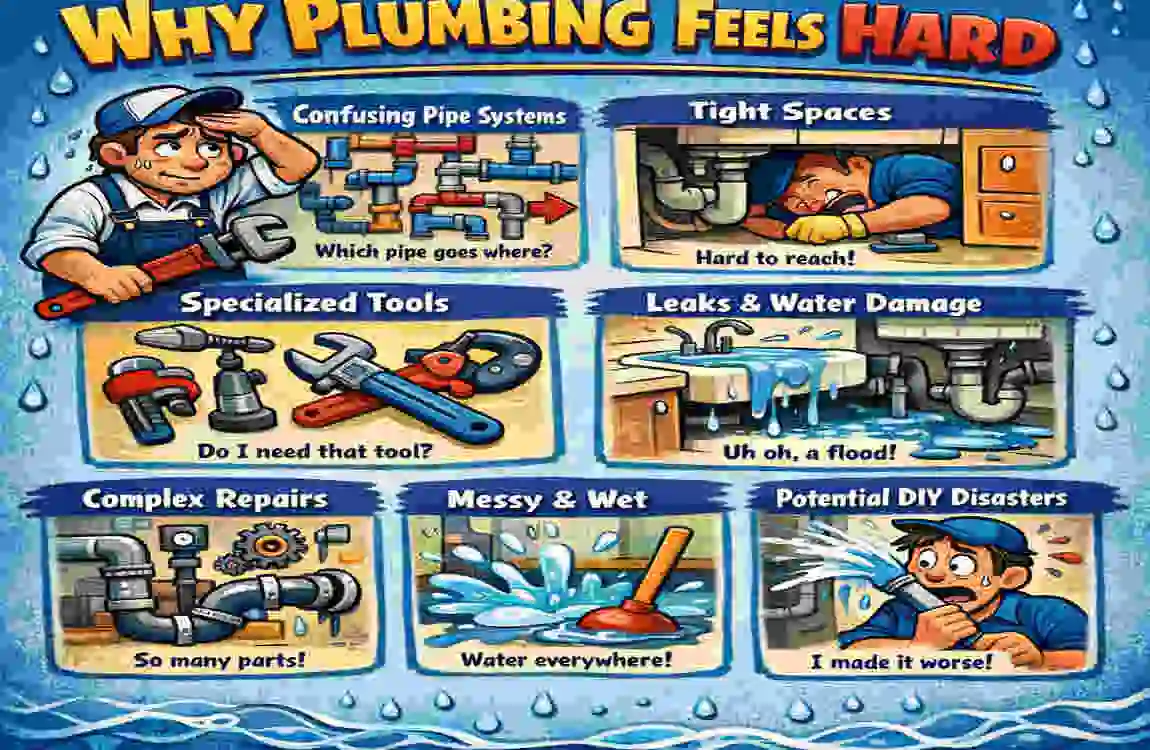
The fear of plumbing is psychological. Unlike painting a wall or fixing a squeaky door, plumbing involves water. And water has a nasty reputation for ruining floors, ceilings, and drywall if it escapes. This is the main reason why the search term “is plumbing hard” is so popular—people are terrified of the “what ifs.”
Breaking the Myths
Let’s look at the reality. According to industry pros, roughly 80% of residential plumbing calls are for minor issues that a handy homeowner could have fixed themselves. The fear usually stems from three big myths:
- The Flood Myth: “One wrong move and my house will be an indoor swimming pool.”
- Reality: Every fixture in your house (toilets, sinks, washers) has a shut-off valve nearby. If you know where your main water shut-off is, you have total control. You can stop the water in seconds.
- The Tool Myth: “I need thousands of dollars in specialized gear.”
- Reality: You likely have half the tools you need already. A basic plumbing kit can be assembled for under $50.
- The Mess Myth: “It’s going to be gross and dirty.”
- Reality: While unclogging a toilet isn’t a glamorous job, most plumbing (like replacing a faucet cartridge) is actually quite clean. It’s more like assembling furniture than digging in the mud.
The Benefits of DIY Plumbing
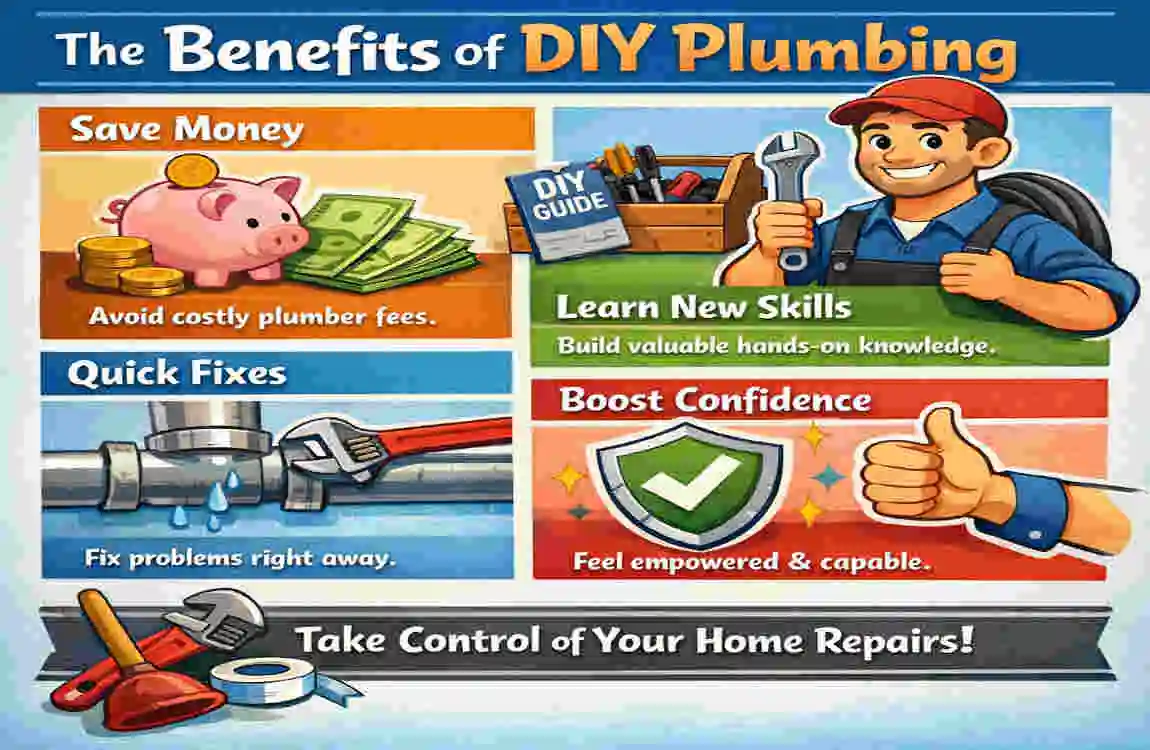
Why should you bother learning these skills? The biggest motivator is your wallet. A typical plumber’s service call fee ranges from $100 to $300 to show up and diagnose the problem. That doesn’t even include parts or labor hours. By mastering a few easy plumbing fixes, you are essentially paying yourself that money.
Furthermore, learning DIY plumbing for homeowners builds significant self-reliance. There is a specific kind of pride that comes from flushing a toilet you fixed with your own two hands.
When to Call a Pro
We want to be responsible here. Not everything is a DIY job. You should absolutely call a professional if:
- You smell gas (this is a plumbing job, but it’s dangerous).
- Your main sewer line is backed up (sewage coming up in the bathtub).
- You have no hot water (could be an electrical or gas issue).
- You need to move pipes behind walls.
But for everything else? You’ve got this. To see just how much you can save, take a look at this breakdown:
DIY vs. Pro Cost Comparison
Issue DIY Cost (Parts)Pro Cost (Avg.)Time Saved
Leaky Faucet $5 – $20 $150 – $250 30 – 60 min
Clogged Drain $5 (Chemicals/Snake) $200+ 15 – 30 min
Running Toilet $10 – $25 $150 – $200 20 – 45 min
Shower Head Swap $20 – $50 $100 – $150 10 min
Essential Tools for Easy Fixes

Before we dive into the repairs, let’s talk gear. You do not need a van full of equipment. To answer the question “Is plumbing hard?” with a “no,” you need the right leverage and sealants.
Here is your “Plumbing is Handled” starter pack:
- The Trusty Plunger: Do not buy the flat red cup plungers; those are for sinks. Get a flange plunger (the one with the extended rubber nose) for toilets. It creates a better seal.
- Adjustable Wrench: Also known as a Crescent wrench. You’ll want a medium-sized one for tightening nuts on supply lines.
- Pipe Wrench: These have teeth to grip round pipes. You usually only need this for bigger jobs, but having a small one is helpful.
- Plumber’s Tape (Teflon Tape): This is the white, non-sticky tape you wrap around threads to prevent leaks. It costs about $1.
- Hand Snake (Drain Auger): For about $15-$20, this tool can reach clogs that a plunger can’t.
- Bucket and Towels: Always anticipate water. A shallow bucket fits under the sink traps perfectly.
Unclog a Sink Drain
Let’s start with the most common annoyance: the slow-draining bathroom sink. A gross combination of hair, soap scum, and toothpaste usually causes this. Is plumbing hard when it comes to sinks? Absolutely not.
The Natural Method (Try This First)
Before you reach for harsh chemicals that can actually damage your pipes over time, try physics and chemistry.
- The Plunge: If the water is standing still, use your cup plunger. Fill the sink with enough water to cover the cup, block the overflow hole (the little hole near the rim) with a wet rag to create a vacuum, and plunge vigorously 10 to 15 times.
- The Volcano: If it’s just slow, pour a pot of boiling water down the drain. Follow this with 1/2 cup of baking soda and 1/2 cup of white vinegar. Cover the drain with a cloth. It will fizz like a science fair volcano.
- The Flush: Wait 15 minutes, then flush with another pot of boiling water. This melts greasy buildup.
The Mechanical Method (If the Clog Persists)
If the natural way didn’t work, you likely have a physical blockage (hairball).
- Check the Stopper: Most bathroom sink stoppers lift right out, or twist and lift. Pull it out and clean off the gunk. (Warning: It will smell bad.
- Snake It: Feed your plastic drain snake or a wire hanger into the drain. Twist it and pull it out.
- Clean the P-Trap: Look under the sink at the U-shaped pipe. Place your bucket underneath. Unscrew the two slip nuts holding the U-bend in place. Dump the water and gunk into the bucket. Rinse the trap and reassemble.
Stop a Running Toilet
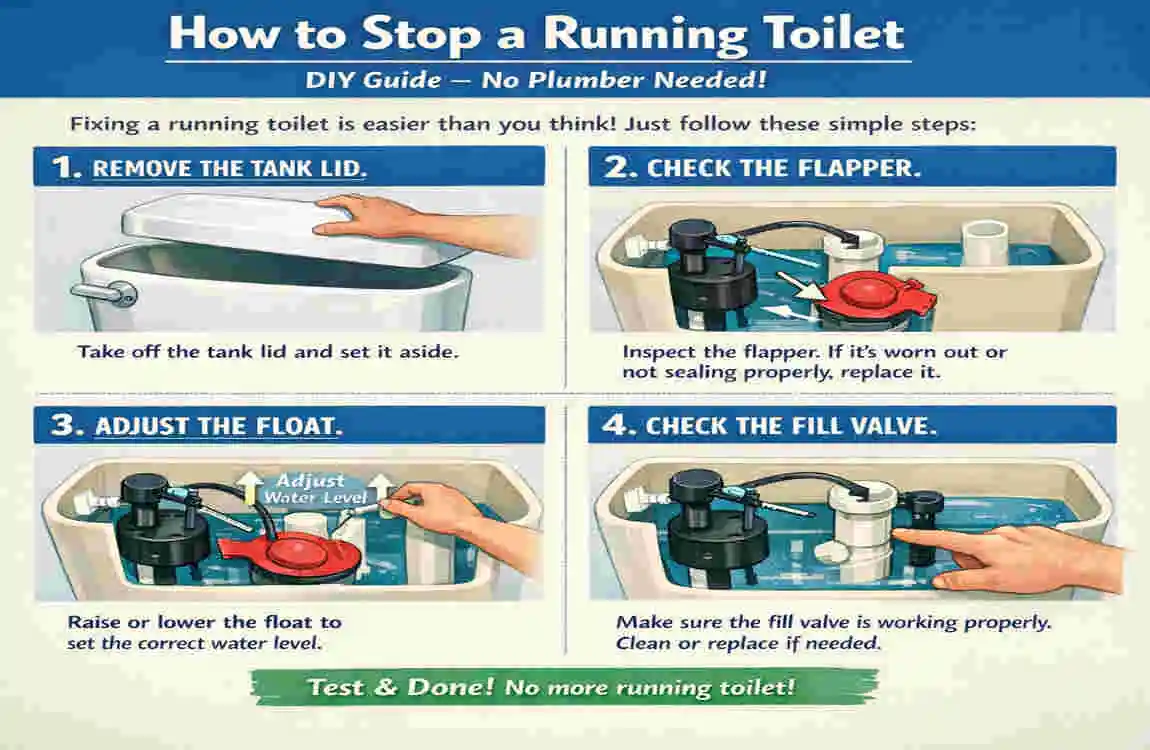
A running toilet is the silent killer of water bills. It can waste up to 200 gallons of water a day. If you hear your Toilet hissing or refilling randomly, don’t panic. This is one of the easiest home plumbing repairs.
How a Toilet Works
Take the lid off the tank. It looks like a complex machine, but it’s just two valves.
- Flush Valve: The flapper at the bottom that lets water into the bowl.
- Fill Valve: The tower that refills the tank after the flush.
The Fix
- Test the Flapper: Push down on the rubber flapper with a stick or your hand. If the noise stops, your flapper isn’t sealing.
- Inspect the Chain: erratic flushing is often caused by the Chain being too tight (holding the flapper open) or too loose (getting caught under the flapper). Adjust the clip so there is just a tiny bit of slack.
- Clean the Seat: Mineral buildup can prevent the flapper from sealing. Turn off the water, drain the tank (flush it), and scrub the rim where the flapper sits with a sponge.
- Replace the Flapper: If it looks old or warped, buy a new one for $5. It usually just snaps onto the overflow tube’s ears.
Fix a Leaky Faucet
The drip-drip-drip torture. A leaky faucet usually means a washer or a cartridge has worn out inside the handle. This fix scares people because it involves taking the faucet apart, but it’s straightforward.
Preparation
Crucial Step: Turn off the water supply! Look under the sink for the two valves (hot and cold) and turn them clockwise until they are tight. Open the faucet to drain the remaining water. Block the drain with a rag so you don’t drop small screws down it.
The Repair (Compression Faucet)
These are the older style with two handles that you turn.
- Remove the Handle: Pop off the decorative cap (usually says “H” or “C”) with a knife. Unscrew the screw underneath and pull the handle off.
- Remove the Stem: Use your wrench to loosen the packing nut. Pull the stem assembly out.
- Replace the Washer: At the bottom of the stem is a rubber washer held by a screw. Remove it and take it to the hardware store to find an exact match.
- Reassemble: install the new washer, reinstall the stem, and reinstall the handle.
The Repair (Cartridge/Ball Faucet)
These are single-handle faucets.
- Disassemble: Locate the set screw (often requires a Hex/Allen key), usually found under the handle or behind a cap. Remove the handle.
- Swap the Cartridge: You will see a plastic or brass cartridge. Pull it out (you might need pliers).
- Replace: Buy the exact replacement cartridge. Grease it with silicone grease (usually included) and slide it in.
- Test: Turn the water back on slowly.
Unclog a Toilet (Without Calling a Plumber)
We have all been there. The water rises instead of falls, and panic sets in. Is plumbing hard? Right now, it feels stressful, but the solution is usually manual labor.
The Technique
- Stop the Overflow: If the water is rising to the rim, quickly take the lid off the tank and push the flapper down to close it. This stops more water from entering the bowl.
- The Plunge: Use your flange plunger. Insert it into the hole to create a seal. The key is not pushing down, but pulling up. You want to use suction to dislodge the clog. Do this vigorously.
- The “Secret” Soap Trick: If the plunger fails, try this. Pour a generous amount of dish soap into the bowl, followed by a pot of hot (not boiling—boiling water can crack porcelain) water. Let it sit for 20 minutes. The soap acts as a lubricant, and the hot water helps break down waste.
- Flush: Try flushing again.
Clear a Shower Drain
Is your shower turning into a foot bath? Shower drains almost always clog due to hair.
The Easy Fix
- Remove the Cover: Some pop up, some have screws. Remove the drain cover.
- The Wire Hook: Take a wire coat hanger, straighten it out, and bend a small hook at one end.
- Fish It Out: Insert the hook into the drain and twist. Pull it up. You will likely pull out a clump of hair that looks like a wet rodent. It is gross, but it is instantly satisfying because the water will drain immediately.
- Clean the Trap: If you have a removable drain trap (common in modern showers), pull it out and rinse it.
Patch a Small Pipe Leak
Finding a leak under a sink or in the basement can be scary. While replacing a section of pipe might be a “Level 2” skill, patching it is a “Level 1” easy plumbing fix.
The Solution: Epoxy Putty
If you have a pinhole leak in a copper or PVC pipe:
- Shut Off Water: Turn off the main water valve.
- Dry the Pipe: The pipe must be bone dry for this to work. Use a towel and a hairdryer.
- Prepare the Putty: Buy “Plumber’s Epoxy Putty.” It comes in a tube. Slice off a piece and knead it with your fingers until the two colors mix and it turns gray.
- Apply: Press the putty firmly over the leak. squish it around the pipe to create a seal.
- Wait: Let it cure for the time on the package (usually 30-60 minutes) before turning the water back on.
Reset a Garbage Disposal
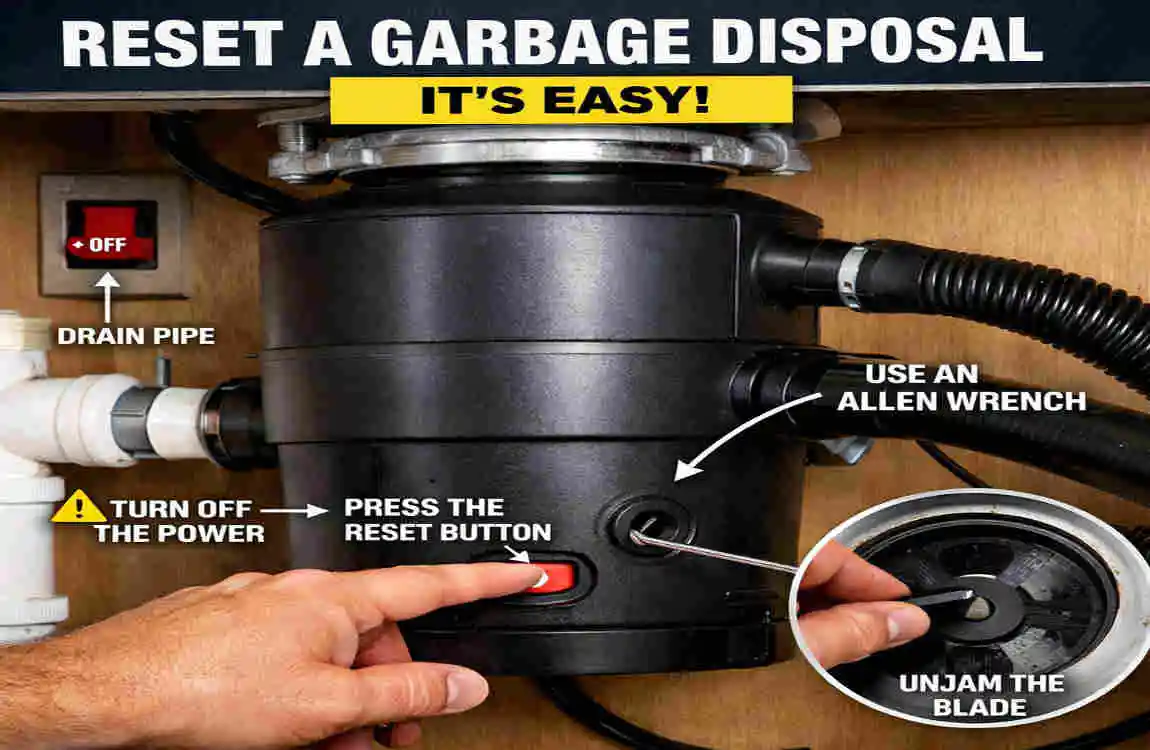
You flip the switch, and instead of the grinding sound, you hear a low, or nothing at all. The disposal is jammed. This is one of the most common kitchen panic moments, but the fix is built right into the machine.
The Hex Key Fix
- Safety First: Unplug the disposal from the outlet under the sink. Never put your hands inside the disposal while it is plugged in!
- Locate the Hole: Look under the sink at the very bottom of the disposal unit. There is a small hole in the center.
- Crank It: Your disposal likely came with a silver hex key (Allen wrench). If you lost it, a standard 1/4-inch Allen wrench plumbing works. Insert the key into the hole and crank it back and forth. You are manually turning the blades to break the jam.
- The Reset Button: If the unit was silent (no hum), the internal breaker tripped. Look for a small red button on the bottom or side of the unit. Press it.
- Test: Plug it back in, turn on the cold water, and flip the switch.
Prevention Tips for Homeowners
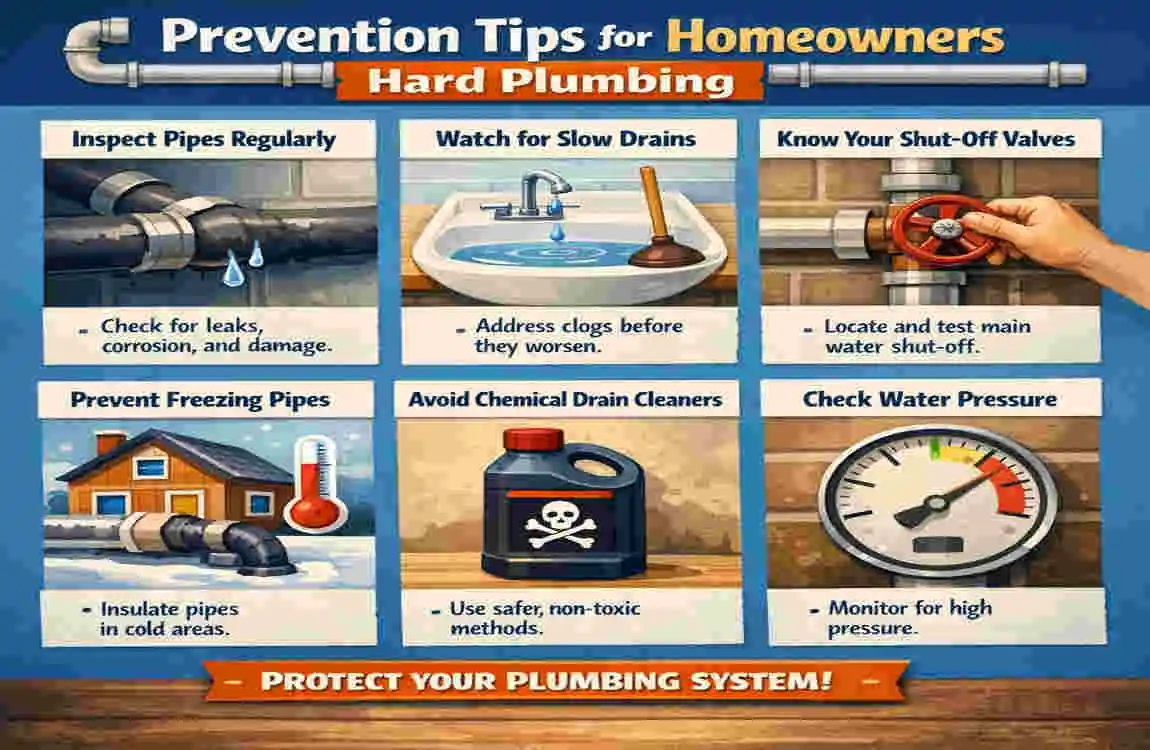
Now that you’ve answered “is plumbing hard” with a confident “no,” let’s talk about how to avoid these issues altogether. A little maintenance goes a long way.
- No Grease Down the Drain: Grease is liquid when hot, but turns into a solid plug when it cools in your pipes. Always drain grease into a can and throw it in the trash.
- Monthly Inspections: Once a month, use a flashlight to check under your sinks. Run your finger along the supply lines. Catching a small drip now prevents a rotten cabinet floor later.
- Know Your Main Valve: Ensure everyone in the house knows where the main water shut-off valve is and how to turn it. In an emergency, speed is everything.
- Winterize: If you live in a cold climate, disconnect outdoor hoses in the fall. If a freeze is coming, let your faucets drip slightly to keep water moving and prevent pipes from bursting.
FAQs: People Also Ask About “Is Plumbing Hard”
Is plumbing hard for beginners to learn?
Not at all! Plumbing basics are very logical. Water flows down, and pressure keeps it moving. If you can follow a recipe or assemble flat-pack furniture, you can handle basic repairs like changing a showerhead, stopping a running toilet, or unclogging a drain.
What is the hardest part of DIY plumbing?
The hardest part is usually working in tight spaces (like under a kitchen sink) or dealing with old, corroded pipes that won’t budge. If a nut is rusted or stuck, don’t force it—that is when things break. That is a good time to call a pro.
What if I make a mistake and cause a flood?
This is the #1 fear, but it’s easily managed. Always turn off the water before you start working. If you are working on a sink, turn off the valves under the sink. If you are unsure, turn off the house’s main water supply. As long as the water is off, you can’t cause a flood.
What are the best plumbing tools for a homeowner on a budget?
For under $50, you should get:
- A flange plunger (for toilets).
- A 10-inch adjustable wrench.
- A roll of Teflon tape.
- A pair of tongue-and-groove pliers (Channel Locks).
- A simple bucket.
Can I teach myself plumbing?
Yes, for minor repairs. There are endless resources, including blogs like this one and video tutorials, that walk you through every step. However, for major work such as re-piping or gas line installation, you need formal training and licensure to ensure safety and code compliance.