If your sink drains slowly, your toilet gurgles, or you keep catching a bad sewer smell in the bathroom, the problem may not be the drain itself. It may be the venting.
That is why so many homeowners ask the same question: can you vent home plumbing through a wall instead of sending everything up through the roof? The short answer is yes —in many places you can—but only if local plumbing rules allow it and the vent is installed correctly.
This option can be very useful for homeowners who want a simpler layout, less attic work, and fewer roof penetrations. It can also reduce the chance of leaks around the roof area. At the same time, wall venting is not something to guess your way through. The pipe must be placed carefully, kept clear of openings, and sealed well so you do not create new problems while fixing the old one.
| Step | Key Action | Why It Matters |
|---|---|---|
| Check local code | Confirm if sidewall vents are allowed (e.g., IRC P3103.1.4 or local rules). | Sidewall vents are allowed in many areas but must meet size, height, and distance rules. |
| Choose the right pipe size | Use at least 1.5–2 inch PVC (or as required by code) for the vent line. | Smaller pipes can freeze or restrict airflow; full‑size vents work more reliably. |
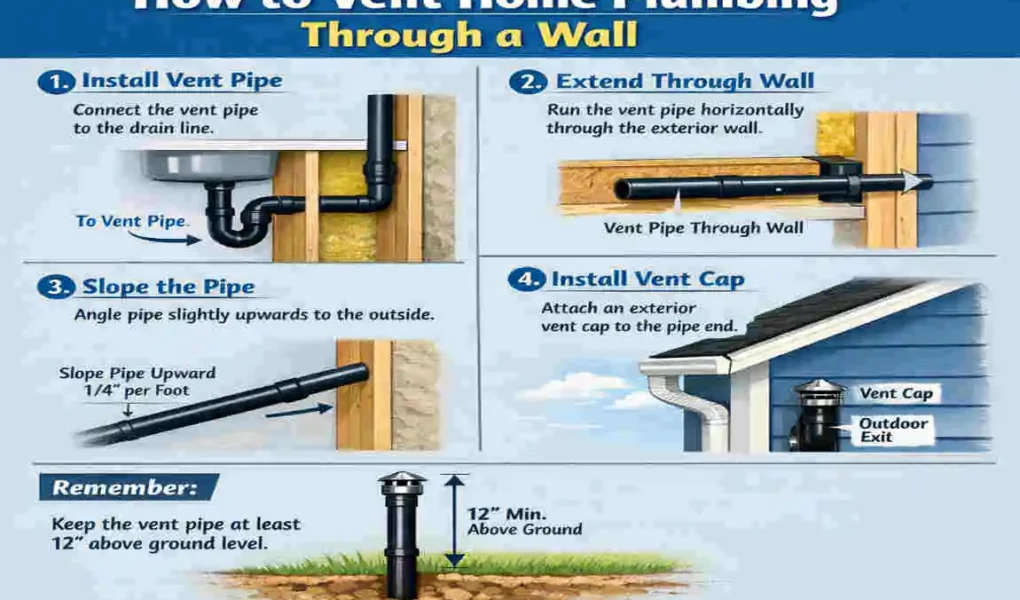
| Route vent inside wall | Run the vent pipe vertically from fixtures, then through the wall at a convenient stud bay. | Keeps piping hidden and out of the attic while still serving bathroom/kitchen fixtures. |
| Terminate outside the wall | Exit the pipe at least a few feet above grade and away from doors, windows, and intake vents. | Prevents sewer gas from being drawn back into the house or causing odor issues. |
Why Plumbing Vents Matter
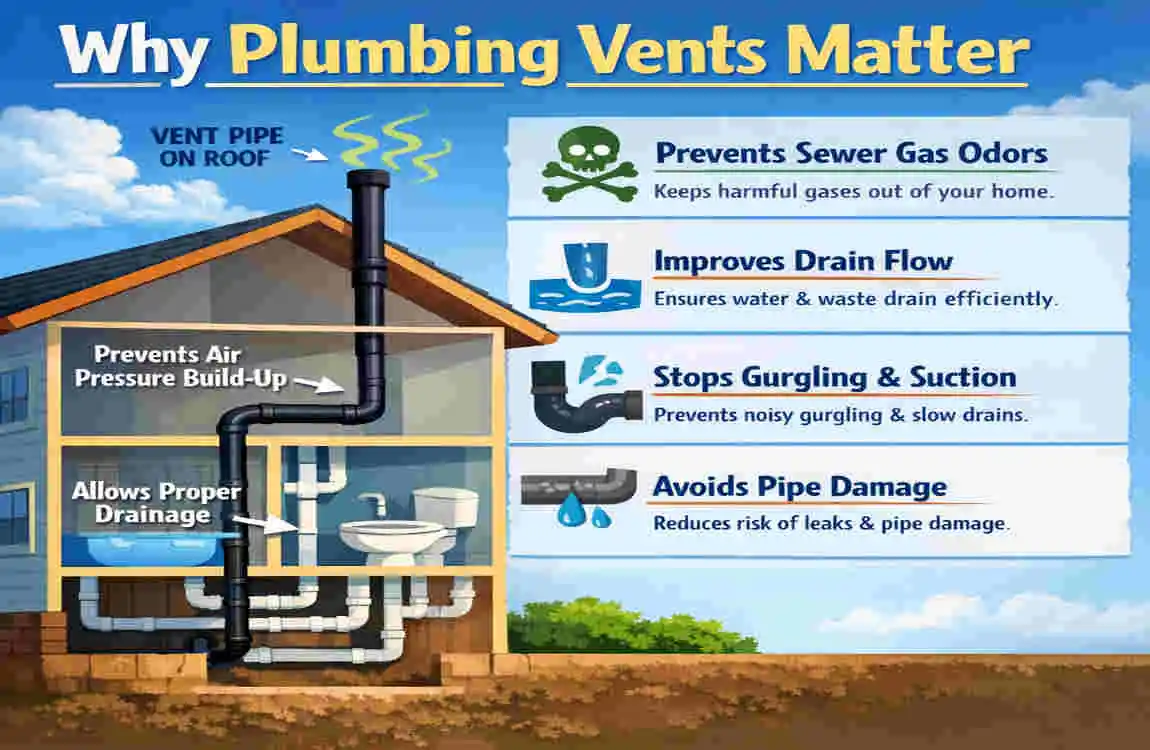
Plumbing vents do more than most people realize. They are not just extra pipes. They are a key part of the system that keeps water moving smoothly and prevents bad smells from entering your home.
How a plumbing vent works
Every drain in your home needs air behind it. When water flows down a pipe, it pushes air ahead of it and can also create a vacuum behind it. A vent pipe balances that pressure.
Without a vent, the drain can behave badly. Water may pull out of the trap, the pipe may gurgle, and odors may slip back into the room. A good vent keeps the pressure balanced so drains work quietly and traps stay filled with water.
Why the trap seal matters
Water sitting in a P-trap or S-trap acts as a small barrier. It blocks sewer gases from entering your home. If that water is siphoned away, the barrier is gone.
That is when you start noticing:
- Sewer smells
- Gurgling drains
- Slow drainage
- Frequent clogs
A proper vent helps protect that trap seal. In other words, the vent prevents the drain from “sucking” water out of the trap when large amounts of water flow through the line.
Roof vent vs. wall vent
Traditionally, plumbing vents go up through the house and out the roof. That is the standard method in many homes because it gives air a clear path and is familiar to inspectors and plumbers.
But a wall vent can be a practical choice in some layouts. It may be easier to install in certain bathrooms, laundry areas, or single-story homes where the pipe can exit through an exterior wall without a long roof run.
Here is a simple comparison:
Vent TypeProsConsBest For
Roof Vent Traditional, reliable, widely accepted Roof leaks if poorly sealed, attic work required Multi-story homes and standard layouts
Wall Vent Saves roof work, easier access, can be simpler in some homes Location rules are strict, may not suit every house Single-story homes, gable ends, certain remodels
Can You Vent Home Plumbing Through a Wall?
The short answer
Yes, can you vent home plumbing through a wall? In many places, the answer is yes if local plumbing code allows it and the termination point is placed safely.
That said, this is not a free-for-all solution. The wall vent must usually meet several rules about:
- pipe size,
- pipe material,
- slope,
- termination height,
- distance from windows, doors, and air intakes,
- and protection from damage.
If any one of those details is off, the vent may not work well or may fail inspection.
When wall venting makes sense
Wall venting can be a good idea when:
- the bathroom or sink is near an exterior wall,
- the roof structure makes venting difficult,
- you want to avoid opening up attic space,
- you want fewer roof penetrations,
- or the vent only needs to serve a simple fixture layout.
It can also work well during a remodel where the plumbing is already exposed. In that case, it may be easier to plan the vent route during the upgrade.
When wall venting is not the best choice
Wall venting is not always the smart option. It may be a poor fit if:
- the vent would be too close to a window or door,
- the pipe would exit in an awkward place on the exterior wall,
- the wall is load-bearing and hard to modify safely,
- you live in a climate where freezing is a concern,
- or local inspectors prefer a roof vent for that setup.
In short, the method is valid in some situations, but it is not automatically the best answer for every home.
Code and safety checks you should not skip
Before you start, check these items:
- Pipe size: Make sure the pipe is large enough for the fixture group.
- Material: Use approved vent pipe material such as PVC or ABS where allowed.
- Slope: The pipe should be installed so that moisture drains correctly.
- Termination distance: Keep the outlet at least 1 ft (0.3 m) from openings and fresh-air intakes.
- Protection: Make sure the pipe is not exposed to easy damage.
But local approval is still the key. Even a neat installation can become a problem if it does not meet building expectations. So treat the wall vent as a design choice, not a shortcut.
Tools and Materials Needed
Before you cut any wall, gather everything first. A clean setup saves time and helps you avoid mistakes halfway through the job.
Basic tools
You will usually need:
- Tape measure
- Level
- Pencil or marker
- Stud finder
- Hole saw
- Jigsaw
- Drill
- Caulk gun
- Screwdriver or drill driver
- Safety glasses
- Gloves
- Dust mask
Common materials
You may also need:
- PVC Schedule 40 pipe
- PVC elbows and couplings
- Vent cap or wall termination fitting
- Flashing or wall sleeve
- Pipe straps or brackets
- Exterior-grade sealant
- Pipe primer and cement if required
- Foam or weatherproof sealant for the wall opening
- Fasteners for straps and caps
Typical DIY cost range
Here is a simple estimate for a small wall-vent project:
ItemEstimated Cost in PKR
PVC pipe and fittings 3,000–7,000
Vent cap or wall termination 1,000–3,000
Sealant, straps, and flashing 1,000–2,500
Tools if you need to buy them 3,000–8,000
Approximate total 8,000–20,500
If you already own some tools, your total may be lower. If the wall is thick, finished nicely, or hard to access, the cost may go up.
Step-by-Step Installation Guide
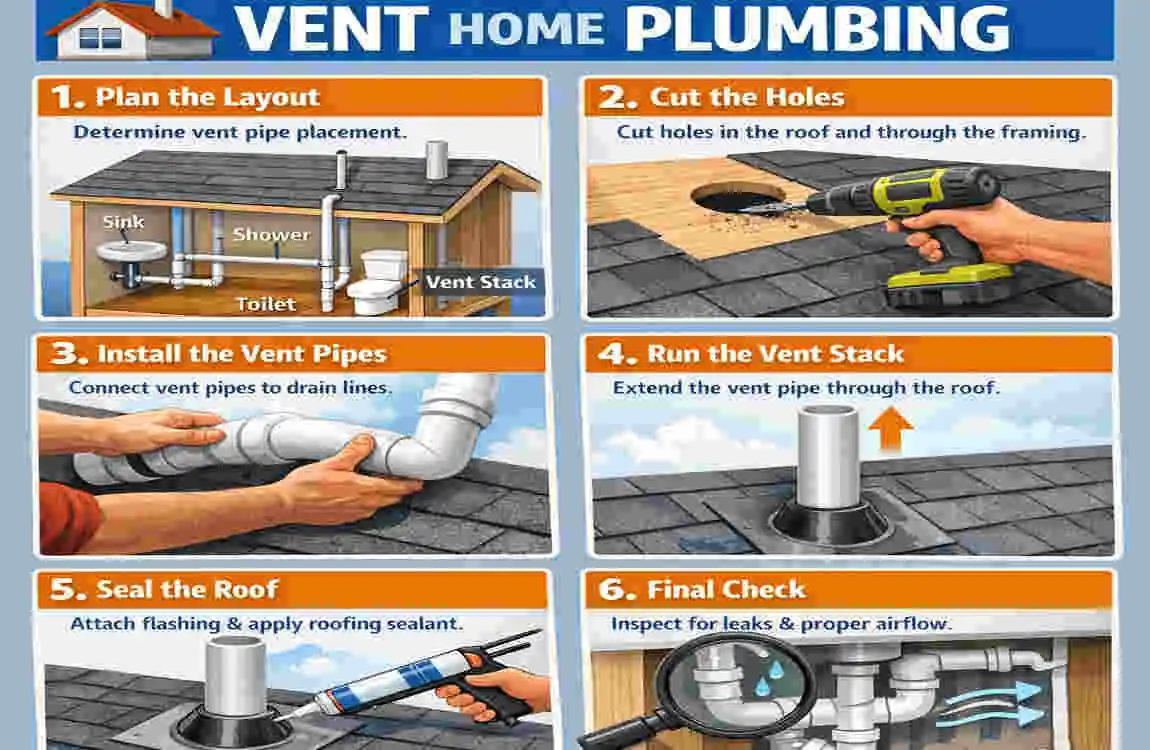
If you are planning to do this yourself, take your time. A plumbing vent is not the place to rush. The goal is not just to make a hole in the wall. The goal is to create a safe, code-friendly, and durable vent path.
Plan the vent location
Start by choosing the wall carefully.
You want an exterior wall that gives the pipe a clean route to the outside. Make sure the vent will not end up too close to windows, doors, air conditioners, or other fresh-air openings. Also check what is inside the wall before you cut.
Look for:
- electrical wires,
- water lines,
- studs,
- insulation,
- and any obstructions.
A stud finder and inspection hole can save you from serious mistakes. If the wall hides wiring or plumbing, do not guess. Stop and verify first.
Mark the entry and exit point
Once the location is safe, mark the pipe path on both sides of the wall if needed.
Measure carefully so the vent runs in a straight and practical route. If the pipe needs to rise slightly, keep the slope consistent. A clean line is important because water should not sit in the vent.
A common approach is to make the wall opening slightly larger than the pipe so you have room for a sleeve or flashing. For example, a 2-inch pipe may need a larger opening depending on the fitting and wall finish.
Cut the hole
Now cut the wall opening slowly and neatly.
Use a hole saw or jigsaw, depending on the size and material. Take care not to tear the exterior finish or damage hidden materials. If the wall is finished on both sides, work cleanly so the repair looks good afterward.
After the opening is made, test-fit the pipe. You want the line to pass through without forcing it. A tight, awkward fit often leads to leaks, cracks, or later movement.
Fit the pipe at the proper angle
The pipe should not be installed carelessly. In many cases, a slight upward or properly directed angle is important so moisture does not collect where it should not.
Secure the pipe with straps or brackets to keep it in place. Loose vent piping can shift over time, leading to cracks in the seal or sloppy performance.
If the vent section needs elbows, use them cleanly and avoid extra unnecessary bends. Every bend should serve a purpose. The straighter the route, the better the airflow usually behaves.
Connect the vent to the plumbing system
This is the part that must be done carefully.
The wall vent is not just a pipe that goes outside. It must connect correctly to the venting system inside the house. Depending on the layout, that may mean tying into a vent stack, connecting to a branch vent, or using another approved arrangement.
Do not create a random shortcut. Every vent must support the fixtures it serves. If you are not sure how your system is arranged, stop and study the existing drain layout before moving ahead.
If your setup requires an approved alternative, such as an air admittance valve in some locations, that may change the process. But again, only use it if it is allowed in your home and jurisdiction.
Seal the wall opening
Once the pipe is in place, seal around the opening.
Use exterior-grade caulk, foam, or flashing as needed to prevent rainwater, insects, and drafts from entering the wall. This step matters a lot. Even a tiny gap can turn into a moisture problem later.
Make sure the termination outside is neat and weather-resistant. A rough finish not only looks bad, but can also weaken the whole installation.
Install the exterior cap or termination fitting
The vent’s end should be protected.
A proper cap or termination fitting helps shield the pipe from debris and weather exposure. It can also improve the appearance of the finished project.
Do not completely block the vent opening. The goal is protection, not closure. Air still needs to move freely through the system.
Test the system
Now it is time to test.
Run water through the fixture connected to the vented line. Watch for:
- leaks,
- odd noises,
- slow drainage,
- sewer smells,
- or water coming back where it should not.
Listen for gurgling sounds. If the drain sounds strained, the vent may not be functioning properly. Check connections, slope, and sealing.
If everything runs smoothly, the installation is likely on the right track. Still, it is smart to monitor it for a few days after the job is done.
Troubleshooting table
ProblemLikely CauseFix
Gurgling drain Poor vent connection or blockage Check the vent route and clear obstructions
Sewer smell Trap seal lost or vent leaking Recheck trap water, seals, and joints
Condensation on pipe Temperature difference or poor insulation Insulate where needed and inspect slope
Water pooling in vent Incorrect angle or sagging pipe Reinstall with proper support
Exterior leaks Bad seal around wall opening Reseal with weatherproof materials
Safety warnings you should follow
Always:
- shut off nearby water if needed,
- wear eye protection,
- use gloves,
- check for hidden electrical lines,
- and work slowly.
If the wall is structural, heavily finished, or difficult to access, it is often better to bring in a professional plumber. DIY is fine for simple jobs, but plumbing mistakes can quickly become expensive.
Common Mistakes to Avoid
A wall vent can work very well, but only if the details are right. Many problems come from small mistakes that seem harmless at first.
Ignoring the slope
One of the biggest mistakes is installing the pipe without proper slope or alignment. When the vent is mispositioned, water can accumulate in the pipe, leading to problems.
Standing water can lead to:
- odors,
- condensation,
- mineral buildup,
- and reduced airflow.
A vent should stay open and dry enough to do its job well.
Cutting the hole too loosely
If the wall opening is oversized and poorly finished, the vent can move around. That can crack seals, let in pests, and create a sloppy exterior look.
A clean opening with proper flashing and sealing is much better than a giant gap that depends on caulk alone.
Placing the vent too close to openings
This is a serious issue. A vent outlet that is too close to a window, door, or intake can allow sewer gases to re-enter the building or nearby area.
Always think about where the air will go after it leaves the pipe. That matters just as much as the pipe itself.
Using the wrong material
Do not mix materials without confirming compatibility. Use approved pipe types and fittings that match the rest of the system and local rules.
A mismatched vent is more likely to leak, crack, or fail over time.
Skipping the final test
Some DIYers finish the pipe, seal the wall, and move on without testing. That is a mistake.
A simple water test and smell check can reveal problems before they become expensive repairs. Test it before you call it done.
Five quick pitfalls and fixes
- Poor slope → Reinstall the pipe with better alignment
- Loose seal → Add flashing and weatherproof caulk
- Bad location → Move the termination away from openings
- Wrong fittings → Replace with approved vent parts
- No testing → Run water and check the system before finishing up
Pros and Cons of Wall Venting
Like any plumbing choice, wall venting has strengths and weaknesses. It is helpful to see both sides before you decide.
AspectWall Venting ProsWall Venting Cons
Installation No roof work, easier access in some homes Strict placement rules
Maintenance Easier to inspect in some layouts Can be exposed to weather
Cost Often cheaper than complex roof work May require permits or extra planning
Appearance Can be tucked neatly into the design Exterior placement may be visible
Safety Less roof penetration means fewer roof leak points Needs careful code compliance
Why people like wall venting
The biggest advantage is convenience. You may avoid climbing onto the roof, cutting through attic insulation, or opening up a complicated roof path. That can save time and make the project feel more manageable.
It can also be a smart option in a simple single-story layout where the vent can travel directly through an exterior wall with minimal complication.
Why people hesitate
The downside is flexibility. Wall venting can be restricted by code, building design, and exterior layout. If the termination is not placed correctly, it can create more trouble than it solves.
So the method is practical, but not always easy. That is why planning matters so much.
Alternatives if Wall Venting Isn’t Feasible
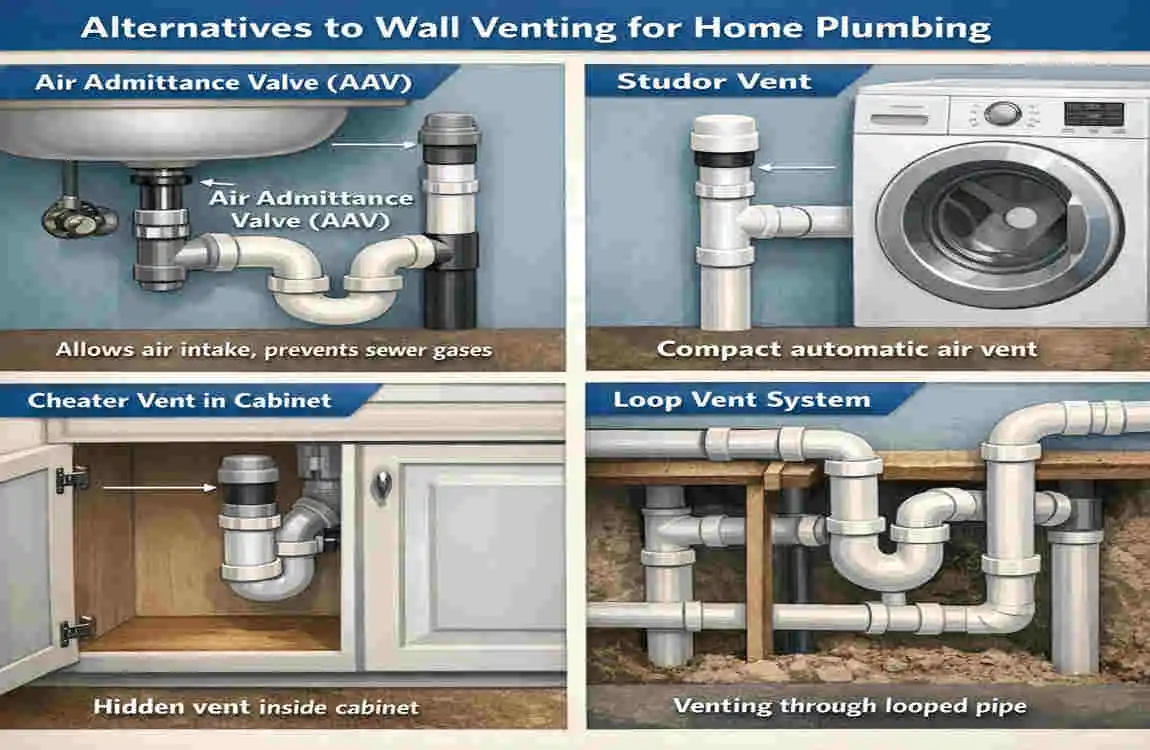
Sometimes wall venting is simply not the best option. That does not mean you are stuck. There are other ways to safely handle plumbing venting.
Air Admittance Valves
An air admittance valve or AAV is a mechanical device that allows air into the drain line when needed. It does not send vent air outside through a wall or roof, as a standard vent does.
This can be useful in tight remodels or specific fixture locations. However, AAVs are not ideal for every situation, and they are not accepted everywhere. You need to check whether they are allowed where you live.
Traditional roof venting
Roof venting is still the most familiar and widely used method. It may be the better choice for larger homes, multi-story layouts, or situations where the wall outlet would be awkward.
It takes more work, but it is often the simplest path from a code perspective.
Wet vents and loop vents
For some fixture groups, wet venting or loop venting may be a better design. These are more advanced arrangements that help certain drains share venting paths.
They are useful in specialized layouts but not beginner-friendly. If the system is more complex than a basic bathroom or sink install, it is wise to get professional help.
Quick comparison of alternatives
MethodBest ForMain BenefitMain Limitation
Wall vent Simple exterior wall access Saves roof work Strict location rules
Roof vent Standard homes Familiar and widely used More roof work
AAV Tight remodels No exterior vent pipe Not accepted everywhere
Wet/loop vent Special fixture layouts Flexible design More technical to install
If you are unsure which path is right, choosing the simplest code-compliant solution is usually the safest decision.
Cost Breakdown for DIYers
If you are planning this job, cost is probably one of your biggest questions. The good news is that a wall vent can be affordable if the layout is simple and you already have some tools.
Typical cost estimate
ExpenseApproximate Cost in PKR
PVC pipe and fittings 3,000–7,000
Vent cap and flashing 1,000–3,000
Sealant, straps, and small parts 1,000–2,500
Basic tools if needed 3,000–8,000
DIY total 8,000–20,500
Professional plumber hire 20,000+
What changes the price
The final cost depends on:
- wall thickness,
- finish quality,
- pipe distance,
- fixture complexity,
- labor charges,
- and whether you need extra testing or patching afterward.
A simple straight wall vent will cost much less than a job that requires wall repair, custom routing, or removal of a hidden obstacle.
When hiring a pro makes sense
You should seriously consider hiring a plumber if:
- the layout is complicated,
- the wall contains hidden wiring or plumbing,
- the vent must meet strict code rules,
- you are not comfortable cutting and sealing the wall,
- or you need the job finished quickly and cleanly.
DIY can save money, but a bad plumbing mistake can cost more in the long run.
Frequently Asked Questions
Can you vent home plumbing through a wall?
Yes, can you vent home plumbing through a wall ? In many cases, yes—but only if the design matches local building rules and the termination point is safe. Because requirements can vary, it is wise to confirm with a local plumber or the relevant authority before starting.
Is a 45-degree angle always required?
Not always, but a slight upward or correctly directed angle is often recommended to prevent moisture from sitting in the pipe. The exact angle depends on the system design and local rules. The main goal is to keep the vent working smoothly and avoid water buildup.
How far should a wall vent be from windows and doors?
It should be far enough away to prevent sewer gases from entering openings or nearby fresh-air intakes. The exact distance depends on code in your area. Do not place the vent outlet near a window just because it is convenient.
Can I use a wall vent for a bathroom sink?
Often yes, if the layout allows it and the system is designed correctly. A bathroom sink is one of the more common fixtures people consider for wall venting because it is often close to an exterior wall.
What happens if the vent is not installed correctly?
You may notice slow drainage, gurgling, odors, trap siphoning, condensation, or leaks. In some cases, the issue may not show up right away, which is why testing matters.