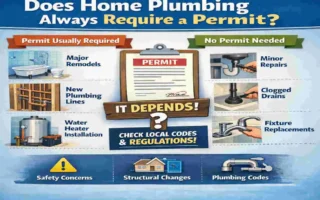
Modern home plumbing does more than move wastewater away from your fixtures. It also has to manage airflow, pressure, and safety inside the drain lines. If the system cannot breathe properly, drains slow down, traps lose water, and sewer odors can creep into the home. That is why venting matters so much in residential plumbing.
One common solution is the wet vent. This setup allows one pipe to carry wastewater from one fixture while also serving as a vent for another fixture. In the right layout, it can save space, reduce pipe use, and simplify plumbing.
| Topic | Simple Explanation |
|---|---|
| What a wet vent is | A wet vent is a drain pipe that also carries air to vent other fixtures, so one pipe does two jobs: waste drainage and air venting. |
| Where it’s used | Most common in bathrooms, where a single larger pipe can serve a toilet plus nearby sink, shower, or tub on the same floor. |
| How it works | The pipe is sized a bit larger so water can flow at the bottom while air moves above it, preventing gurgling and keeping traps from being sucked dry. |
| Wet vent vs dry vent | A dry vent only carries air, while a wet vent carries both wastewater and air for venting in the same section of pipe. |
| Main benefits | Saves materials and space, simplifies bathroom plumbing, and can reduce labor costs if designed and installed to local code. |
| Key things to watch | All connected fixtures usually must be on the same floor, pipe sizes must meet code, and clogs or sewer smells can signal vent problems. |
Many homeowners ask, “What is a wet vent home plumbing system, and why does it matter?” The short answer is that it is a smart way to combine drainage and venting into a single, efficient design. It is especially useful in bathrooms, compact spaces, and remodels where every inch counts.
What Is a Wet Vent in Home Plumbing?
Wet Vent Definition
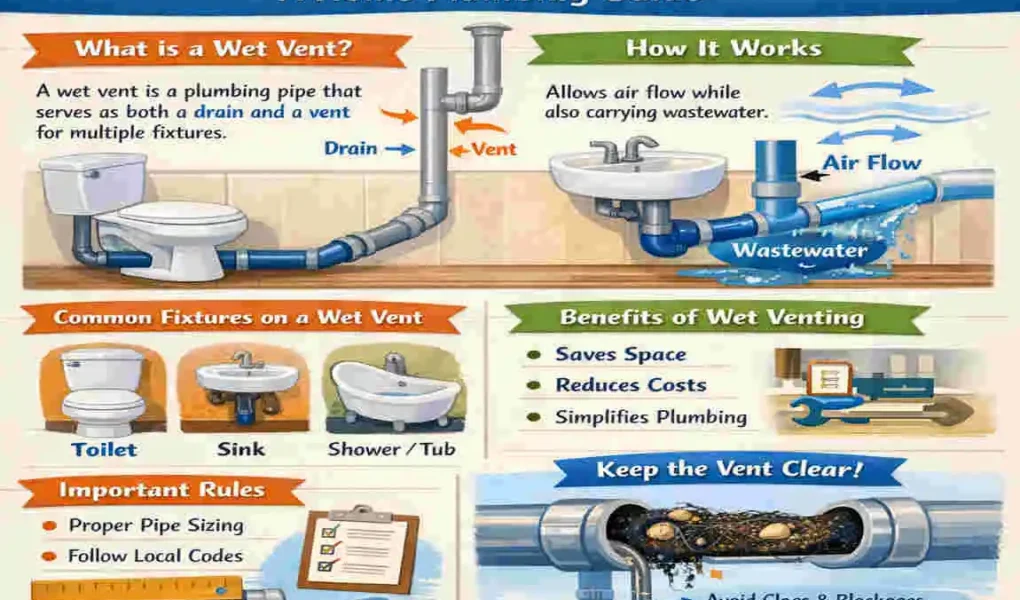
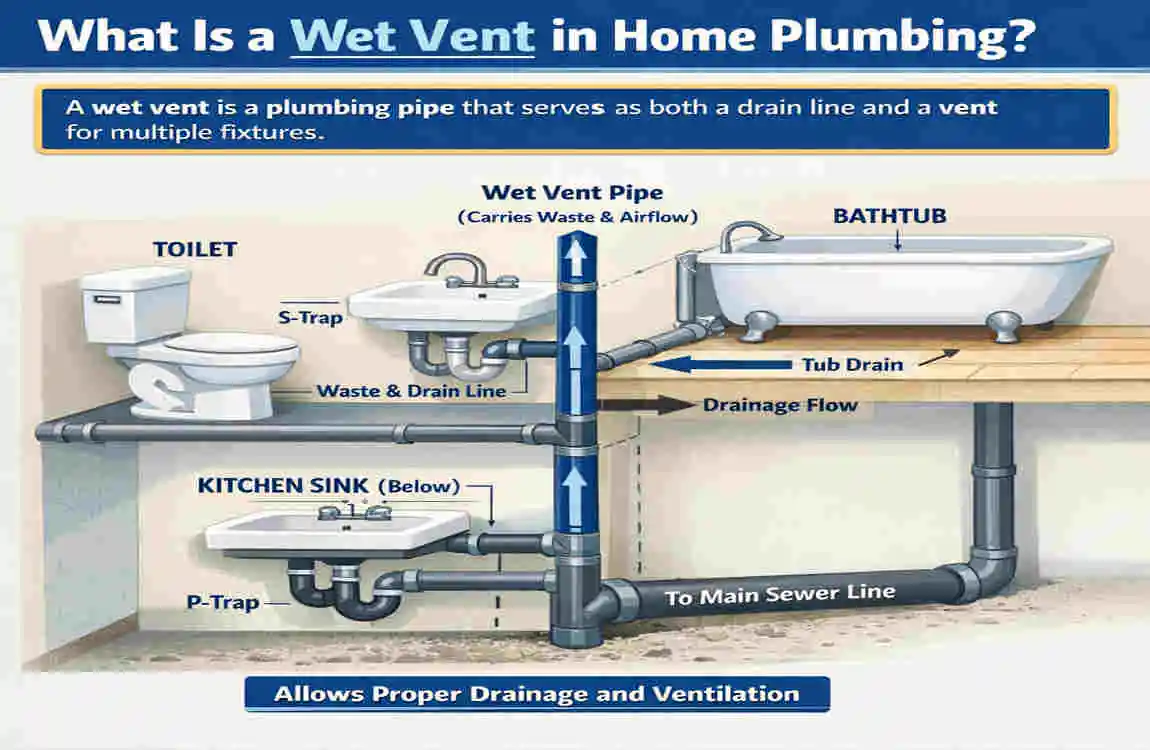
A wet vent is a pipe that does two jobs at once. It carries wastewater from one fixture and also acts as a vent for another fixture connected to the same system. In simple terms, one pipe handles both drainage and air movement.
That may sound unusual at first, but it is a common plumbing practice. Normally, a drain pipe removes waste water, while a vent pipe lets air into the system so water can flow smoothly. In a wet vent system, part of the pipe does both jobs, depending on where the fixtures connect.
This is different from a standard plumbing setup where drain pipes and vent pipes are usually separate. Wet vent plumbing is especially helpful in bathrooms because the fixtures are close together and often share a similar layout.
Why It’s Called a “Wet” Vent
It is called a wet vent because water actually passes through the pipe section, which also helps with venting. In a dry vent, the pipe only carries air. In a wet vent, both water and air use the same pipe at different points.
Think of it like a hallway that sometimes carries people and sometimes helps guide them in the right direction. The pipe is not always full of water, but enough of it carries waste that it is considered “wet.”
Where Wet Vents Are Commonly Used
Wet vents are most often found in:
- Bathrooms
- Powder rooms
- Small residential plumbing systems
- Multi-fixture layouts
They work best when several fixtures are grouped in one area. This is why they are popular in bathroom remodels and new compact home designs.
Simple Example of a Wet Vent System
A common example is a sink and toilet sharing a single vented drain line. The sink drain can help vent the toilet line, provided the layout complies with plumbing code.
For beginners, the idea is simple: the sink’s drain line isn’t just for draining water. It is also helping the toilet drain more smoothly by allowing air to move through the pipe system.
How Does a Wet Vent Work?
The Role of Airflow in Plumbing
To understand wet vent plumbing, you need to understand airflow. When water runs down a drain, it pushes air ahead of it and pulls air behind it. If the pipe system cannot balance that air pressure, the flow can slow down or stop.
A good vent system keeps air moving so the pipes do not create a vacuum. Without proper air balance, drains can gurgle, traps can empty, and sewer gas can enter the home.
How Wastewater and Air Move Together
A wet vent works because plumbing relies on gravity and the balance of air pressure. Wastewater naturally flows downward, and the vented section of the pipe allows air to enter and equalize pressure.
Here is the simple idea:
- Water from one fixture flows into the pipe
- Another fixture connects in a way that allows air to move through the same line
- This keeps drainage smooth and prevents suction problems
The pipe is not fully water-filled at all times. Instead, it carries wastewater in one section while still allowing air to move through the venting section.
Wet Vent Plumbing Layout Explained
A basic bathroom wet vent system often includes:
- Toilet
- Sink
- Shower or tub
In many designs, the sink is connected so it vents to the toilet or shower drain. The fixtures are arranged so the drain line slopes toward the main waste line, and the venting section stays high enough to do its job.
The layout matters a lot. If the pipe order or slope is wrong, the system may not vent correctly. That is why wet vent plumbing is not just about connecting pipes. It is about connecting them in the right sequence.
Wet Vent vs Dry Vent
A dry vent is a pipe that only carries air. It never carries wastewater. A wet vent carries both water and air, depending on the section of the pipe.
Here is a simple comparison:
FeatureWet VentDry Vent
Main purpose Drains waste and vents air Only vents air
Pipe use Shared function Separate function
Space needed Less space More space
Installation Can be simpler in small layouts Often needs more pipe runs
Best for Bathrooms and grouped fixtures General venting areas
A wet vent is often more space-saving, but it must be designed correctly. A dry vent gives more separation, which can be easier to understand in some layouts.
Main Benefits of Wet Vent Plumbing Systems
Saves Space
One of the biggest benefits of a wet vent is that it saves room inside walls and floors. Instead of running separate pipes for each function, a single pipe can handle multiple jobs.
This is especially useful in smaller homes, tight bathrooms, and remodels where wall space is limited. If you are trying to fit plumbing into an older house, this can make a big difference.
Reduces Plumbing Costs
Wet vent plumbing can also lower costs because it uses:
- Less piping material
- Less labor
- Less installation time
When fewer pipes are needed, the work often moves faster. That can reduce both material expenses and plumber charges. For many homeowners, this is a practical advantage.
Simplifies Bathroom Plumbing
Bathroom layouts often cluster fixtures in one area. A wet vent makes it easier to group those fixtures and keep the plumbing design cleaner.
Instead of creating a complicated web of pipes, you can often use a more direct layout. That can make the system easier to build, inspect, and understand later.
Improves Remodeling Flexibility
A wet vent is very helpful during remodels, especially in basements or older homes. When you do not have much room to move pipes around, a shared venting setup can make the project possible.
This is one reason many plumbers prefer wet vent plumbing in bathroom additions. It can help fit modern plumbing into older spaces without major structural changes.
Efficient Ventilation
Even though it uses fewer pipes, a wet vent still supports good airflow when installed properly. That helps prevent trap siphoning, slow drains, and pressure problems.
In other words, the system stays compact without giving up the basic job of a vent. That is why many homeowners and plumbers see it as a smart balance between function and space.
Common Fixtures Connected to a Wet Vent
Toilets
Toilets are one of the most common fixtures in a wet vent system. They move a large amount of wastewater, so they need proper venting to flush well and avoid pressure problems.
A toilet wet vent is usually designed so another fixture, often a sink, helps the line breathe. This improves flow and helps the toilet drain correctly.
Bathroom Sinks
Bathroom sinks are often part of the wet vent setup. Since the sink is usually close to other bathroom fixtures, it can serve as a vent point for nearby drains.
That is why many bathroom wet vent systems begin with the sink. Its drain line can be placed in a way that supports the rest of the bathroom group.
Showers and Bathtubs
Showers and bathtubs can also connect into a wet vent layout. They usually share the same bathroom branch line and benefit from the system’s venting support.
These fixtures need smooth drainage because standing water or slow flow can become a nuisance fast. Good venting helps reduce those issues.
Bidets and Other Bathroom Fixtures
Bidets and other bathroom fixtures may also be included if local code allows. The exact setup depends on the layout, pipe size, and fixture grouping.
Can Kitchen Fixtures Use Wet Vents?
Kitchen fixtures are usually handled differently. In many cases, kitchen sinks and related fixtures may not be allowed to share wet vent setups the same way bathrooms do. Grease, food waste, and different drainage loads make kitchen plumbing more complicated.
That is why plumbing code requirements matter so much. What works in a bathroom may not be allowed in a kitchen.
Wet Vent Plumbing Code Requirements
Why Plumbing Codes Matter
Plumbing codes exist to protect health, safety, and sanitation. They help make sure waste moves out properly and sewer gas stays where it belongs.
If a wet vent is installed the wrong way, it can lead to slow drainage, backups, or odor problems. Codes reduce those risks by setting rules for pipe size, layout, fixture order, and distances.
International Plumbing Code (IPC) Basics
The International Plumbing Code gives general rules for wet vent use. It often allows wet vents in bathroom groups when the layout meets the required standards.
In simple terms, IPC tends to be more flexible in some cases. That does not mean anything goes. The fixtures still need correct sizing, proper routing, and approved connections.
Uniform Plumbing Code (UPC) Guidelines
The Uniform Plumbing Code is often more restrictive than IPC in some areas. It may have tighter rules on which fixtures can be wet vented and how they must be arranged.
If your area uses UPC rules, you may need a more careful plan before starting work. This is one reason two houses with similar bathrooms may still have different plumbing requirements.
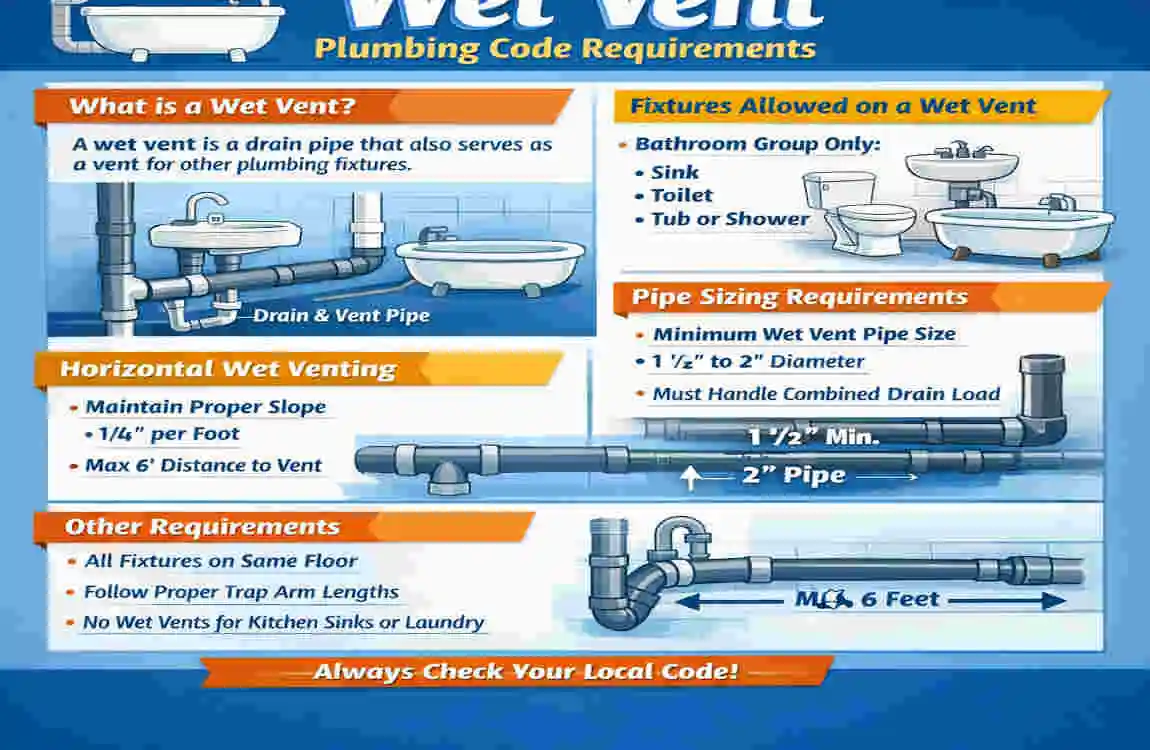
Pipe Size Requirements
Pipe size is a major part of wet vent code requirements. If the pipe is too small, it can overload the system and cause poor drainage.
Common rules often require:
- Proper minimum drain sizes
- Sufficient vent diameter
- A toilet drain sized for the expected flow
The exact size depends on the fixture load and the code in your area. This is not something to guess at.
Distance Limits for Fixtures
Another important rule involves distance limits. Fixtures have trap arms, and those trap arms cannot be too long before they connect to the vented portion of the system.
Slope also matters. The pipe must slope enough to drain properly, but not so much that water outruns solids or creates airflow problems.
Local Code Variations
Local plumbing codes can differ from national model codes. That means your city, county, or state may have special rules.
Before installing or changing a wet vent, check the local permit and inspection rules. A licensed plumber can help you understand what is allowed in your area.
Wet Vent vs Dry Vent: What’s the Difference?
Structural Differences
A dry vent is separate from the drain line. A wet vent shares part of the same line with the drain. That is the core difference.
With a dry vent, each function stays more clearly separated. With a wet vent, one pipe does more work.
Installation Complexity
A dry vent may be easier to understand because each pipe serves a single purpose. But it can take more pipe runs and more space.
A wet vent can simplify the layout, especially in bathrooms. Still, it must be installed in the right order and with the right dimensions.
Cost Comparison
Wet vent systems often cost less because they need fewer materials and less labor. Dry vent systems may cost more due to extra pipe and more complex routing.
Performance and Reliability
Both systems can work well when installed properly. Wet venting can be very reliable, but only if the pipe size, slope, and fixture arrangement are correct.
Which Venting Method Is Better?
There is no single answer. It depends on your home layout, the number of fixtures, and the code rules in your area. In many bathrooms, a wet vent is the more practical choice.
Common Wet Vent Plumbing Problems
Clogged Vent Lines
Over time, vent lines can clog with dust, debris, nesting material, or buildup. In some cases, hair and soap residue also contribute to flow problems in connected drains.
Slow Drains
If a wet vent is not working properly, you may notice slow drains in sinks, tubs, or toilets. Poor venting can stop wastewater from moving freely.
Sewer Gas Odors
A bad wet vent can lead to trap siphoning, where water is pulled out of the trap. When that water seal disappears, sewer gas can enter the room.
Gurgling Sounds in Pipes
Gurgling often means the system is struggling with air pressure. The pipe is trying to move water, but air cannot balance the flow properly.
Incorrect Pipe Sizing
One common DIY mistake is using the wrong pipe diameter. If the pipe is too small, the system can become overloaded and unreliable.
How to Install a Wet Vent System
Planning the Plumbing Layout
A good wet vent starts with a smart layout. Fixtures should be grouped to support proper drainage and venting.
Before cutting anything, think about:
- Where each fixture will sit
- How the pipe will run through the wall or floor
- Which fixture will serve as the vented part of the system
Planning saves time and helps avoid mistakes.
Choosing Proper Pipe Sizes
Pipe diameter matters a lot. The vent section and drain section must match the expected load and local code rules.
A pipe that is too narrow can slow the system down. A pipe that is too large in the wrong place can also create design issues. This is why sizing should follow code, not guesswork.
Connecting Fixtures Correctly
The order of the fixtures is important. In a wet vent system, the first fixture may help vent the others, so the connections must be placed carefully.
For example, a bathroom sink may be positioned to vent the toilet and shower. If the connections are reversed or placed incorrectly, the system may not work as intended.
Ensuring Proper Pipe Slope
A proper slope helps wastewater move away while leaving room for air to move. If the slope is too flat, water can sit in the pipe. If it is too steep, solids may not move correctly.
This balance is important for long-term performance.
Testing the System
After installation, the system should be tested for:
- Leaks
- Proper drainage
- Vent airflow
Testing helps catch problems before walls are closed up. That can save a lot of time and money later.
DIY vs Hiring a Professional Plumber
Small plumbing jobs can be tempting to do yourself, but wet vent systems are not always beginner-friendly. Because codes are specific and layout matters so much, many homeowners are better off hiring a professional.
If your project involves permits, inspections, or major changes to the drain line, a licensed plumber is usually the safest choice.
Signs Your Home May Have Wet Vent Issues
Recurring Drain Backups
If several bathroom fixtures back up repeatedly, the wet vent may not be working properly.
Bad Smells in Bathrooms
A sewer smell is often a warning sign that traps are losing water or venting is weak.
Bubbling or Gurgling Fixtures
These sounds usually mean air is trapped in the system. That points to a venting problem.
Frequent Toilet Problems
Weak flushing, unusual water levels, or poor drainage can all point to vent issues.
Mold or Moisture Around Pipes
Moisture near pipes can suggest a leak or hidden problem in the plumbing system.
Tips for Maintaining a Wet Vent Plumbing System

Regular Drain Cleaning
Keep drains clear so buildup does not spread into the vented line. Gentle maintenance works better than waiting for a major clog.
Avoid Flushing Problem Materials
Do not flush or wash down items that can cause buildup, such as:
- Grease
- Wipes
- Hair
- Other debris
These materials can create blockages over time.
Inspect Plumbing Vents Periodically
Roof vents and connected vent lines should be checked from time to time. Leaves, debris, or animal nests can block airflow.
Schedule Professional Plumbing Inspections
A regular plumbing inspection can catch small issues before they grow into bigger problems. This is especially useful in older homes.
Upgrade Older Plumbing When Necessary
If your plumbing is outdated, cracked, or undersized, repairs may not be enough. In some cases, replacing old pipe sections is the better long-term solution.
Frequently Asked Questions About Wet Vents
What is a wet vent home plumbing system?
It is a plumbing setup in which one pipe carries wastewater from one fixture and vents another. It is commonly used in bathrooms.
Is wet vent plumbing legal?
Yes, in many places it is legal, but it must comply with local plumbing code requirements. The allowed layout can vary by area.
Can a toilet and sink share the same vent?
Yes, that is one of the most common wet vent setups. The sink often helps vent the toilet line when the system is designed correctly.
Are wet vents safe?
Yes, when they are installed correctly and approved by code. A proper wet vent is a standard and safe plumbing method.
What pipe size is needed for a wet vent?
The size depends on the fixtures, layout, and local code. There is no single size that works for every home.
Can I install a wet vent myself?
Maybe for very small and simple work, but many wet vent systems should be handled by a licensed plumber. Codes, sizing, and permits can make the job more complex than it looks.