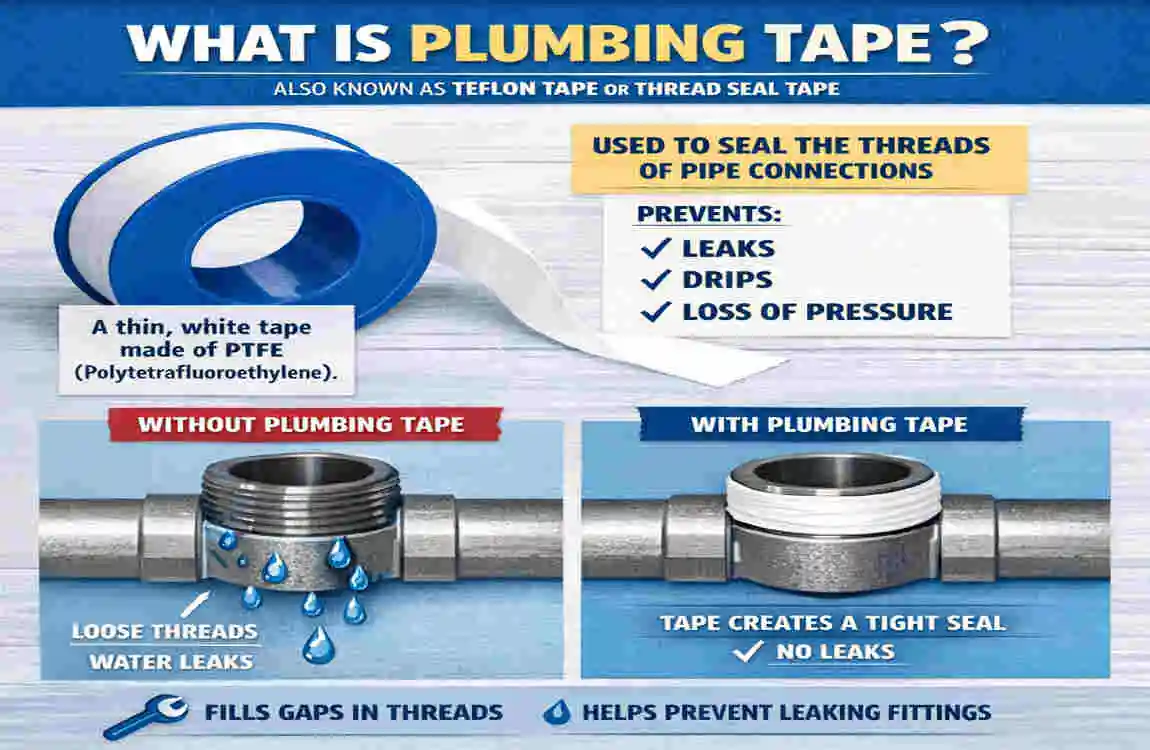
Plumbing tape, also called Teflon tape or PTFE tape, is a small tool that can make a big difference in home plumbing. It helps threaded pipe connections seal better, reduces the chance of leaks, and makes fittings easier to tighten properly.
But here is the tricky part: using too much or too little tape can cause problems. Too little tape may leave gaps that let water escape. Too much tape can make the fitting hard to tighten or even damage the threads.
That is why many homeowners ask the same question: how much house plumbing tape to use for different plumbing jobs. The answer depends on the pipe size, the type of fitting, and the condition of the threads. Just as important as the amount is the wrapping direction and the way you apply it.
What Is House Plumbing Tape and Why Is It Used?
Understanding Plumbing Tape (PTFE Tape)
Plumbing tape is a thin white or colored tape made from PTFE, which is a slippery, durable material. It is used on threaded pipe joints to help create a tighter seal.
There are a few common types:
- Standard white PTFE tape: Used for regular water plumbing jobs in the home.
- Yellow gas-rated tape: Made for gas line connections and should only be used where approved.
- Specialty tapes: These may be thicker or designed for certain plumbing systems.
The tape itself does not “glue” the pipe together. Instead, it fills tiny gaps in the threads so the connection seals better when tightened.
How Plumbing Tape Helps Prevent Leaks
Threaded fittings are not always perfectly smooth. Even small spaces between threads can let water or air pass through. Plumbing tape helps by:
- Filling small gaps between threads
- Improving the seal at the joint
- Helping fittings come apart later without sticking
- Protecting the threads from wear during tightening
This is why plumbing tape is so common in homes. It is simple, inexpensive, and effective when used correctly.
Where Plumbing Tape Is Commonly Used
You will often find plumbing tape used on:
- Showerheads
- Faucets
- Water supply lines
- Pipe fittings
- Toilet supply connections
- Outdoor hose fittings
It works best on threaded connections, not on joints that rely on rubber washers or compression rings.
How Much House Plumbing Tape to Use?
General Rule for Plumbing Tape Amount
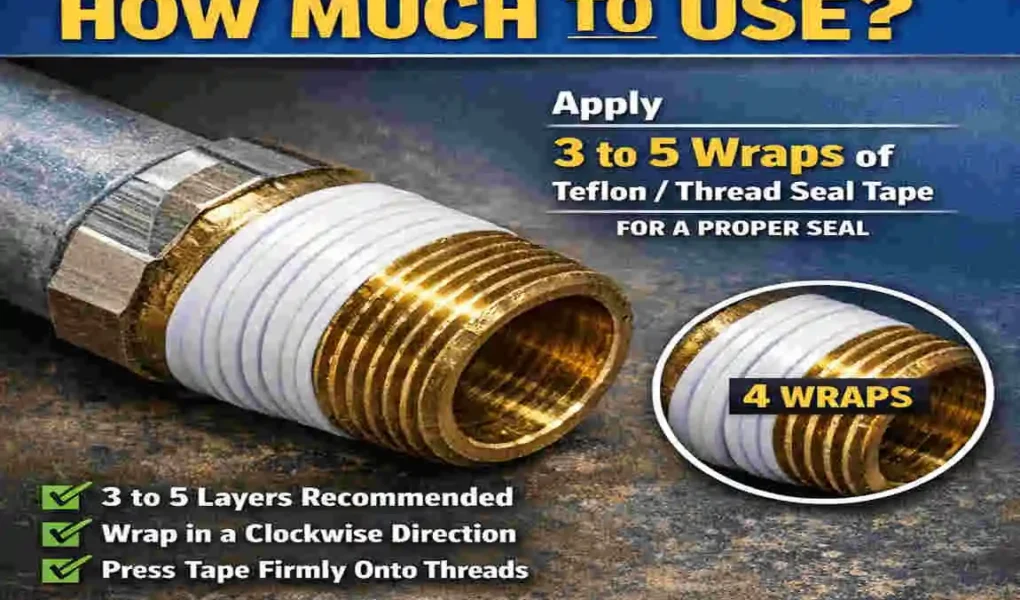
For most home plumbing jobs, the general rule is 3 to 5 wraps of tape around the threaded area.
That is usually enough to fill small gaps without making the fitting too thick. If the threads are rough, older, or slightly worn, you may need a little more. If the fitting is small and the threads are clean, fewer wraps may be enough.
The goal is simple: cover the threads evenly without piling the tape up.
How Many Times Should You Wrap Plumbing Tape?
Here is a simple guide:
Pipe Size Recommended Wraps
Small fittings (¼–½ inch) 3–5 wraps
Medium pipes (¾–1 inch) 4–6 wraps
Large pipes 5–7 wraps
This table is only a guide. The real answer still depends on thread quality and the type of fitting. If the fitting feels too tight before it is fully seated, you may have used too much tape.
Factors That Affect How Much Tape You Need
Several things change how much house plumbing tape to use:
- Pipe material: Plastic threads may need a gentler hand than metal ones.
- Thread quality: Worn or rough threads may need extra help sealing.
- Water pressure: Higher pressure can require a better seal.
- Pipe size: Larger fittings usually need more wraps.
- Type of fitting: Some connections are tighter or looser than others.
So while 3 to 5 wraps is a good starting point, it is not a strict rule for every job.
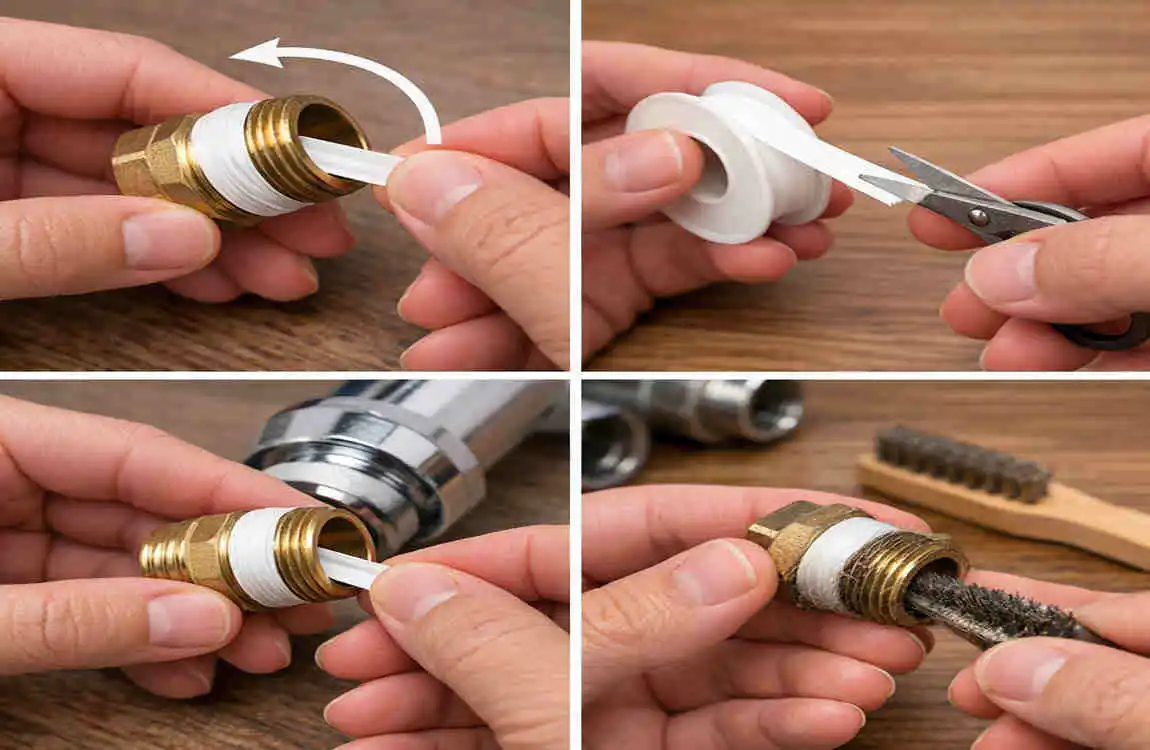
Step-by-Step Guide: How Much Plumbing Tape to Apply Correctly
Clean the Pipe Threads
Before adding new tape, make sure the threads are clean. Remove:
- Dirt
- Rust
- Old tape
- Any loose debris
Also, make sure the threads are dry. Tape sticks and works better on a clean, dry surface.
Start Wrapping in the Correct Direction
This step matters a lot. Wrap the tape clockwise when looking at the end of the pipe.
Why clockwise? Because when you screw the fitting on, the motion tightens the tape instead of loosening it. If you wrap it the wrong way, the tape can unwind as you tighten the joint.
Apply the Right Amount of Tension
As you wrap, keep the tape slightly stretched so it fits snugly into the threads. Do not leave it loose or wrinkled.
A good wrap should:
- Sit flat on the threads
- Cover the threaded area evenly
- Stay in place without bunching up
You do not need to pull it so hard that it tears. Just keep steady tension as you go.
Finish and Install the Fitting
Once you finish wrapping, tear the tape cleanly and press it lightly into the threads. Then screw the fitting on carefully.
Do not force it. If it feels too stiff too early, stop and check the tape amount. The fitting should thread on smoothly and tighten firmly.
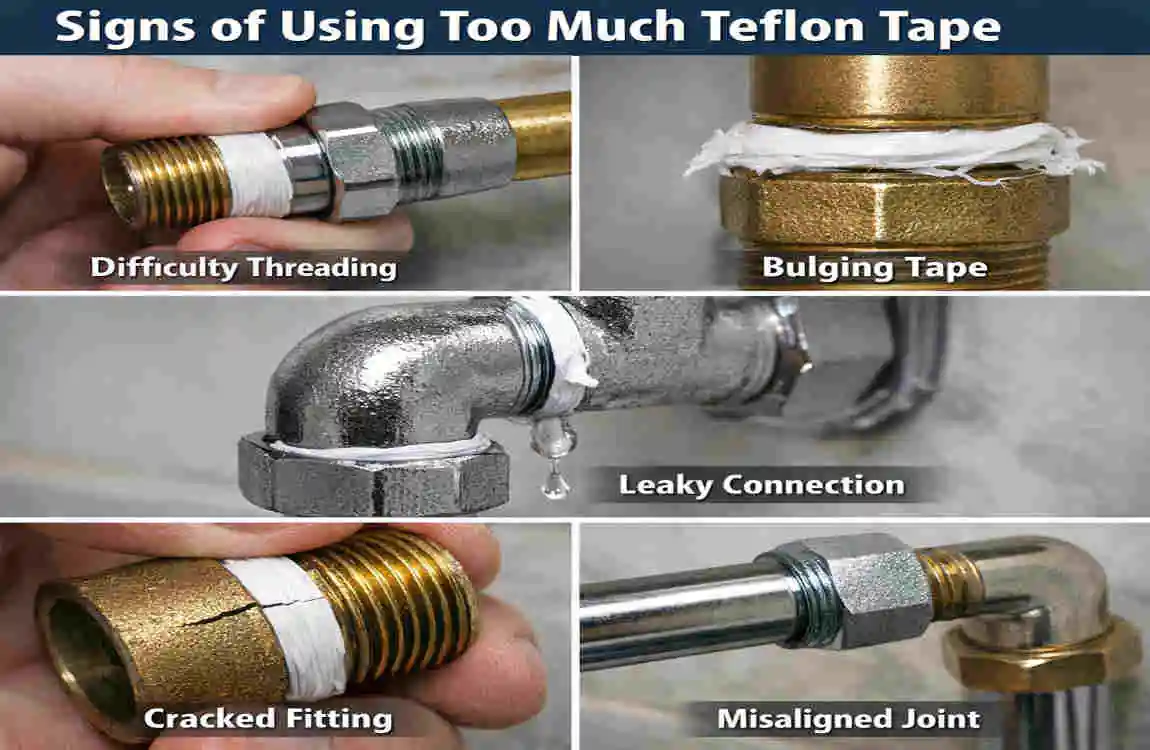
Signs You Used Too Much Plumbing Tape
Fitting Becomes Difficult to Tighten
One of the clearest signs of too much tape is that the fitting feels unusually hard to turn. The extra thickness can make the threads harder to connect.
Cracked or Damaged Fittings
Plastic fittings are especially at risk. If the tape makes the connection too tight, the pressure can stress the part and lead to cracks.
Tape Pieces Enter the Plumbing System
When there is too much tape, small pieces may tear off during installation. These loose bits can move into the system and affect valves or fixtures.
If you notice any of these issues, remove the fitting and start again with less tape.
Signs You Used Too Little Plumbing Tape
Water Leaks Around Threads
If the tape amount is too small, the threaded connection may not seal fully. You may see water seeping or dripping from the joint.
Loose Pipe Connections
A connection that feels loose after tightening may need more tape. Without enough buildup on the threads, the fitting may not lock in well.
Dripping After Installation
Sometimes a joint looks fine at first, but a small drip appears after the water is turned on. This usually means the seal is not strong enough.
If that happens, turn the water off, remove the fitting, and reapply the tape properly.
Common Mistakes When Using House Plumbing Tape
Wrapping Tape Backward
This is one of the most common mistakes. If you wrap tape in the wrong direction, it can loosen when the fitting is tightened.
Always wrap clockwise so the tape stays in place.
Covering the End of the Pipe
The tape should stay on the threads only. Do not let it hang over the edge of the pipe opening. If it blocks the opening, it may affect water flow or break off inside the line.
Using Plumbing Tape on the Wrong Connections
Plumbing tape is useful, but it is not for every joint. It is not the right choice for:
- Compression fittings
- Rubber washer seals
- Some push-fit systems
Those connections use other sealing methods, so tape may not help and can sometimes cause problems.
Using Damaged or Old Tape
Old tape can dry out, tear easily, or fail to sit properly on the threads. Always use fresh tape for the best result.
How Much Plumbing Tape Do Different Home Projects Need?
Here is a quick project guide:
Project Amount of Tape Needed
Installing a showerhead 3–5 wraps
Replacing a faucet connection 3–5 wraps
Connecting water pipes 4–6 wraps
Outdoor hose fittings 3–5 wraps
Gas line fittings Use approved gas tape only
The exact amount still depends on the thread condition and the fitting size. For most household water projects, though, 3 to 5 wraps is a very safe starting point.
Plumbing Tape vs Pipe Thread Sealant: Which Is Better?
Benefits of Plumbing Tape
Plumbing tape is popular because it is:
- Easy to use
- Clean to apply
- Affordable
- Great for quick home repairs
Benefits of Pipe Dope
Pipe thread sealant, often called pipe dope, is a liquid or paste used on threads. It can work well for bigger systems and certain professional jobs.
Which One Should Homeowners Choose?
For most small home repairs, plumbing tape is usually enough. It is simple and effective on common threaded connections.
Pipe dope may be better for larger, more demanding jobs or where a stronger seal is needed. Some plumbers even use both together on certain fittings, but for basic home use, tape alone is often all you need.
Expert Tips for Using Plumbing Tape at Home
Here are a few simple tips to help you get better results:
- Match the tape type to the job.
- Do not reuse old tape.
- Test the connection after installation.
- Keep tape away from the pipe opening.
- Use quality PTFE tape for a cleaner seal.
These small habits can save you from leaks and extra repairs later.
Frequently Asked Questions
How much house plumbing tape should I use?
Most household plumbing jobs need about 3 to 5 wraps of PTFE tape around threaded connections.
Can you use too much plumbing tape?
Yes. Too much tape can make the fitting hard to tighten and may damage the threads or the fitting itself.
How many layers of Teflon tape should I use?
Usually 3 to 6 layers are enough, depending on the pipe size and the condition of the threads.
Should plumbing tape cover the whole pipe thread?
No. It should cover the threaded area, but the pipe opening should stay clear.
Which direction should plumbing tape go?
Wrap it clockwise so it tightens with the fitting instead of loosening.
Can plumbing tape stop all leaks?
No. It helps seal threaded connections, but it cannot fix broken pipes, cracked fittings, or badly damaged threads.
Is white plumbing tape safe for water pipes?
Yes, standard white PTFE tape is commonly used for household water plumbing connections.