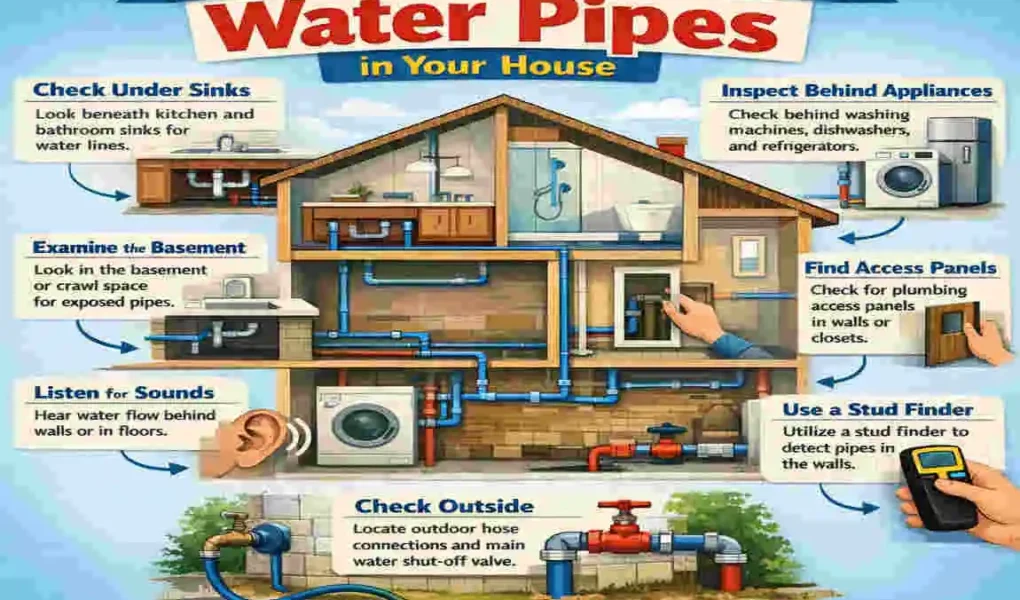
If you have ever wondered where are water pipes located in a house, you are asking the right question before doing almost any home project. Pipes are often hidden, but they follow patterns that you can learn to recognize. Once you understand those patterns, it becomes much easier to avoid accidents, protect your walls, and work with confidence.
Knowing the location of pipes in walls and floors matters for many everyday tasks. You may need this before drilling into a wall, hanging shelves, remodeling a bathroom, fixing a leak, or installing new cabinets. One wrong hole can lead to a water mess, expensive repairs, or damage to nearby electrical lines. That is why even simple jobs deserve a little planning.
How Water Pipes Are Typically Routed Through a House
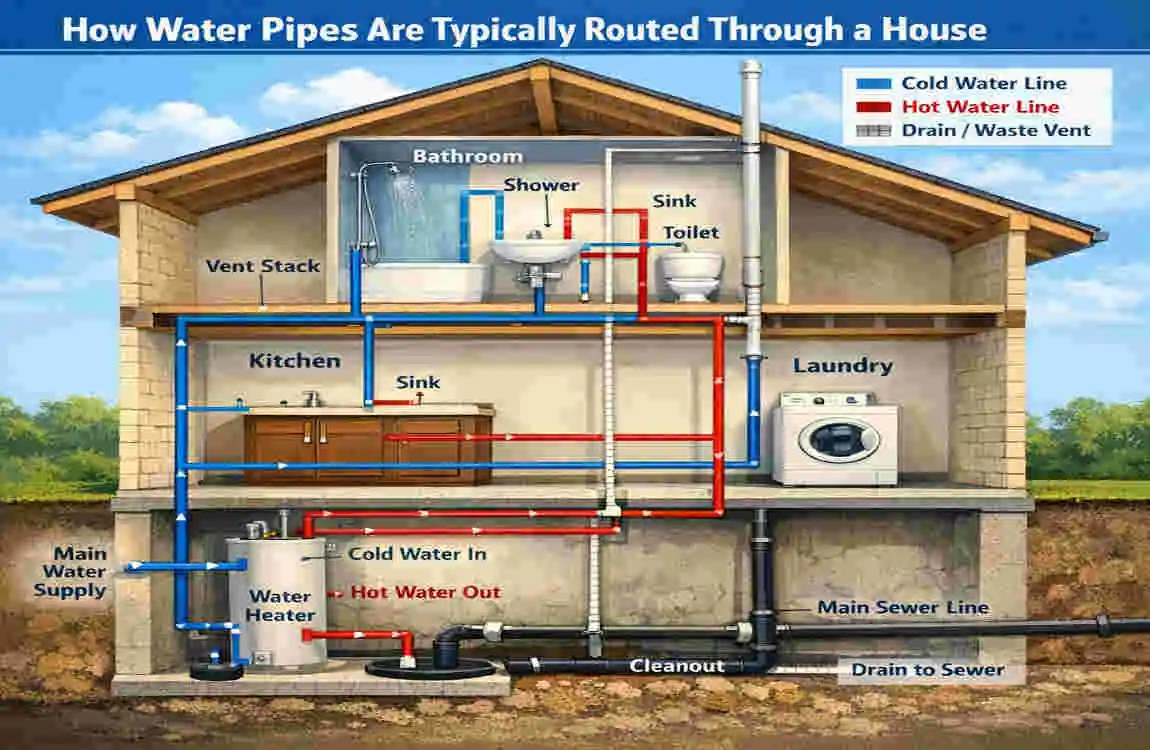
Before you try to locate water pipes in a house, it helps to understand how they are usually installed. Plumbing is not placed randomly. Most plumbers follow the shortest, safest, and most efficient route from the water supply to each fixture.
Main supply line
The main supply line is the pipe that brings fresh water into the house from the city line, well system, or other source. In many homes, this line enters through the basement, crawl space, garage, utility room, or a low exterior wall. Once it enters the home, it connects to a shutoff valve and then splits into smaller branch lines.
This main line is one of the first places to check when trying to understand the overall plumbing pipe locations in a home. If you can find where the water comes in, you already have a strong clue about the rest of the layout.
Branch lines
After the main supply line enters the house, it feeds branch lines. These smaller pipes carry water to individual fixtures such as sinks, tubs, toilets, showers, dishwashers, washing machines, and water heaters.
Branch lines are usually routed so they stay close to the rooms that need water. That is why kitchens, bathrooms, and laundry areas often have the highest concentration of hidden water pipes in the house. The goal is to keep pipe runs short and practical.
Supply pipes vs. drain pipes
It is easy to confuse supply pipes with drain pipes, but they do different jobs.
- Supply pipes bring clean water into fixtures.
- Drain pipes carry used water away from fixtures.
This difference matters because both types may appear in the same wall or floor area. However, if you are trying to locate pipes in walls before drilling, be aware that not every visible pipe is a water supply line. Some may be drains, vents, or even gas lines in certain areas.
Vertical and horizontal routing
In most houses, pipes move in two main directions:
- Vertical runs go up and down through walls, often between floors.
- Horizontal runs travel across basements, crawl spaces, ceilings, or floor cavities.
Vertical runs are common near bathrooms, kitchens, and utility rooms because pipes need to reach sinks, showers, toilets, and appliances on different levels. Horizontal runs are often easier to see in open spaces, such as basements or crawl spaces.
Plumbers usually keep pipe paths predictable. That is good news for homeowners, because once you understand the pattern, you can make a smarter guess about where water pipes are located in a house.
Where Are Water Pipes Located in a House?
This is the question most homeowners want answered first. The short answer is that water pipes are usually found behind walls, under floors, in basements or crawl spaces, inside ceilings, and near utility areas and exterior walls.
The exact pipe location depends on the age of the home, the type of foundation, the number of floors, and whether the plumbing has been updated over time. Still, there are common patterns you can use to narrow things down.
Behind walls
This is the most common place for water pipes in walls. Pipes behind walls usually serve bathrooms, kitchens, laundry rooms, and any other room with a sink or water-connected appliance.
You will often find them near:
- sinks
- toilets
- showers
- tubs
- dishwashers
- washing machines
Plumbing lines are often placed in a straight vertical path behind these fixtures. For example, if you see a bathroom sink on one side of a wall, there may be supply pipes running straight up or down behind that area. The same is true for shower valves, tub spouts, and toilet supply lines.
In some homes, pipes also run horizontally within wall cavities to connect one fixture to another. That is why it is risky to assume an empty wall is safe just because it looks plain on the outside.
When people ask where are water pipes located in a house, behind the walls is usually the first answer that matters most. It is also where hidden water pipes can cause the most trouble during drilling or renovation work.
Under floors
Pipes are also commonly routed under floors, especially in slab homes, crawl space homes, and many older single-story houses. In these homes, water lines may run through the floor structure to reach fixtures above.
Under-floor routing is common for both supply lines and drain lines, depending on the home design. In some cases, pipes come up through the floor directly behind a sink or toilet. In others, they travel below the floor before rising into a wall.
This is especially common in homes where the plumbing was designed before modern open-layout construction. Older homes often use floor-level routing because it was an efficient way to reach fixtures without tearing into large sections of the wall.
If you are trying to locate water pipes in areas of the house, such as kitchens or bathrooms, on the first floor, do not forget to check the floor line itself. Pipes may be just below your feet, not just inside the wall.
In basements and crawl spaces
Basements and crawl spaces are some of the best places to trace hidden water pipes because the lines are often visible. You may see pipes running along joists, beams, foundation walls, or the underside of floor framing.
This area is especially useful because you can often follow the main line and branch lines more easily than you can in finished living spaces. If your home has an unfinished basement, you may be able to map a large part of the house plumbing layout just by looking up and around.
Crawl spaces can also reveal how pipes travel from the main supply line to the rest of the house. You may find:
- the main shutoff valve
- exposed branch lines
- pipe elbows and joints
- lines that turn upward into the floor or wall above
If you are trying to figure out where are pipes located in a home, a basement or crawl space often gives you the clearest starting point. It is a great place to check direction before you inspect the upstairs walls.
In ceilings
Pipes can also run through ceilings, especially in multi-story homes. This is common when plumbing needs to reach upstairs bathrooms, laundry rooms, or wet bars.
Ceiling routing may happen:
- above a finished basement ceiling
- between the first and second floor
- through attic-adjacent spaces in certain layouts
- inside dropped ceilings or service ceilings
If your home has access panels, they can make inspection much easier. A small ceiling panel may let you see pipe paths without cutting into drywall. In some homes, utility lines are hidden above a bathroom ceiling so they can connect to an upstairs shower or toilet.
This is why the ceiling should never be overlooked when you are trying to find pipes in walls or locate water pipes in a house with more than one level.
Inside utility rooms, laundry areas, and mechanical spaces
Utility rooms, laundry areas, and mechanical spaces often contain important plumbing clues. These rooms may hold the water heater, shutoff valves, pressure tanks, filtration units, or manifold systems.
Because these areas handle the home’s water supply in one central place, they often reveal the path of the main water line and the direction of branch lines. You can sometimes follow a pipe from the wall or floor into the water heater or out to the rest of the home.
These spaces are useful because they are built for service access. That means pipes are often more visible here than in other rooms. If you are planning a remodel or trying to locate water pipes behind walls, always start by checking the utility areas first.
Near exterior walls
Many homes have pipes routed along outside-facing walls, especially in kitchens and bathrooms. This happens when builders want to keep the plumbing as short as possible between fixtures and exterior utility connections.
However, this can create freeze risk in cold climates. Pipes near exterior walls may be more exposed to low temperatures, which is one reason insulation matters so much in colder areas.
If you live in an older home, you may find that a sink, tub, or toilet is located near an outside wall with pipes running directly behind it. That makes the wall a likely place for hidden water pipes in the house, especially where rooms share plumbing lines.
How to Identify Pipe Locations by Room

Now that you know the common routes, let’s make this more practical. The easiest way to locate water pipes in a house is often to think room by room.
Kitchen
The kitchen is a major plumbing zone because it usually contains several water-connected fixtures.
Look for pipes:
- under the sink
- behind the dishwasher
- near refrigerator water lines, if your fridge has an ice maker or water dispenser
- inside the cabinet base or sink wall
The sink cabinet is often the best place to start. Remove items carefully and look for cutouts, access panels, or holes in the cabinet back where pipes pass through. The dishwasher line may also travel through the cabinet next to the sink before reaching the appliance.
If your kitchen has an island sink, the plumbing may run through the floor. In that case, pipe location in walls may be less obvious, but the under-floor route becomes more important.
Bathroom
Bathrooms usually have the most concentrated plumbing in a small space.
Check for pipes:
- behind toilets
- under vanities
- behind showers and tubs
- around tub spouts and mixing valves
The vanity cabinet often hides supply lines and drain pipes. The wall behind the toilet may also contain a water supply line, especially if the toilet is mounted close to an exterior wall or back wall.
Showers and tubs are important too. Shower valves are often buried in the wall at a fairly standard height. Tub spouts and mixing valves can also point to the exact pipe location. If you are looking for water pipes behind walls before a bathroom project, this room deserves special attention.
Laundry room
Laundry rooms usually have easy-to-spot plumbing, but the lines may still be hidden in the wall or floor.
Look near:
- washer hookups
- the drain standpipe
- adjacent walls for hot and cold water lines
- utility sinks, if present
The washer box or hookup area often marks where the supply lines enter the wall. The drain standpipe is another clue because it usually sits right next to the supply connections. If the laundry area is upstairs or in a hallway closet, the pipes may be tucked tightly into the wall to save space.
Basement or utility area
Basements and utility rooms are often the best places to map plumbing pipe locations. Here you can often find:
- water heater connections
- the main shutoff valve
- exposed branch lines
- pressure tanks
- filtration or softening equipment
These spaces can help you understand where the water travels after it enters the home. If you follow a line from the main shutoff valve to the rest of the house, you can often predict where pipes are hidden behind walls upstairs.
Helpful tip: Look for access panels, removable pipe covers, or boxed-in walls. Builders sometimes hide plumbing in neat framing chases, but these details can show you where the pipes are running.
Tools and Methods to Locate Water Pipes Safely
If you want to know how to locate water pipes in a house without causing damage, use a step-by-step approach. Do not start by drilling randomly. Start with clues, then move to tools, and only then consider opening a wall.
Review house plans or plumbing blueprints
If you have access to original house plans, renovation drawings, or plumbing blueprints, start there. These documents may show the general water pipe route, fixture locations, and access points.
Plans are especially helpful if:
- the home was recently built
- the house had major renovations
- you are working on a known plumbing wall
- you want to avoid cutting into a finished area
Even if the drawings are not perfect, they can still show where the supply lines were intended to go. That gives you a much better starting point than guesswork.
Trace fixtures backward
One of the simplest ways to find pipes in walls is to start with the fixture itself and work backward.
For example:
- start at the sink
- look under the cabinet
- trace the pipes to the wall opening
- follow the direction of the line to see where it continues
You can do the same with toilets, tubs, showers, washing machines, and dishwashers. Every fixture needs supply lines, and those lines usually travel in a predictable direction.
This method is simple but effective because it focuses on what you can already see. When people ask where water pipes are located in a house, the best answer often starts at the fixtures that use the water.
Use a stud finder with pipe detection
Some stud finders can detect metal pipes behind drywall. This can help you find pipes in walls before you drill.
That said, these tools have limits. They are more likely to detect:
- copper pipes
- galvanized steel pipes
- some metal fittings
They may not detect:
- plastic pipes
- PVC
- CPVC
- PEX tubing
So a stud finder can be helpful, but it should not be treated as perfect. Use it as one clue, not the only clue. It is best for narrowing down the likely area, especially when combined with fixture locations and visual inspection.
Check the main shutoff valve and water meter
The main shutoff valve and water meter are often connected to the home’s primary water entry point. This makes them very useful for understanding the main line’s general direction.
If you find the shutoff valve in a basement, crawl space, utility room, or on an exterior wall, trace the nearby pipe. That route usually tells you how water enters the home and where it branches off.
The water meter can also give you a clue. In many houses, the meter is located close to where municipal water enters the building. If you can identify that entry path, you can better predict where supply lines travel next.
Use a pipe or wall scanner
A pipe detector for walls or a wall scanner can help you find hidden water pipes, especially when the lines are metal or when the scanner uses multiple detection modes.
These tools are useful for:
- avoiding pipe damage before drilling
- checking walls near fixtures
- locating likely pipe paths in finished spaces
- scanning for both pipes and wiring in one pass
Professional-grade scanners often work better than basic models because they are more accurate and can reduce false readings. Still, no tool is perfect. Wall depth, pipe material, and wall construction can all affect the result.
Ask a licensed plumber
If the layout is unusual or the project is important, calling a plumber may save you time, money, and stress.
A plumber is especially helpful if:
- the home is older
- the pipes were altered during past renovations
- the walls are layered or heavily finished
- you suspect a hidden leak
- you need to drill, cut, or remodel near plumbing
A plumber can often confirm where are pipes located in a home much faster than a homeowner can. More importantly, a plumber can do it without risking damage to the walls, floors, or fixtures.
Pipe Materials and Why They Matter
The type of pipe in your home affects how easy it is to find. Some materials show up clearly on detectors, while others stay hidden from simple tools.
Pipe MaterialCommon inDetection NotesWhy It Matters
Copper Many older and mid-era homes Easier to detect with metal tools Often easier to trace behind walls
PVC / CPVC Modern supply and drain systems Harder to detect with metal-only tools May require scanners or visual clues
PEX Many newer homes and remodels Not always detected by metal tools Flexible routing makes paths less obvious
Galvanized steel Older homes Usually easy to detect, but may corrode Can be found more easily, but may need replacement
Why material matters
If a home has copper or galvanized steel pipes, a metal detector may help you locate the line more easily. If the house uses PVC, CPVC, or PEX, detection becomes more challenging.
That is one reason why two homes can look similar from the outside but have very different plumbing pipe locations. A newer home may have flexible PEX routes that curve through framing spaces, while an older home may have rigid metal pipes in straight lines.
So when you ask where are water pipes located in a house, you should also ask what are the pipes made of. The answer can change how you search.
Warning Signs That Pipes Are Nearby
Before you touch a wall, look for clues that suggest plumbing may be behind it. These signs are not proof, but they can help you narrow the search.
Common warning signs
- Small access covers
- Moisture stains
- Unusual wall bulges or boxed-in sections
- Warm or cool spots on walls or floors
- The sound of running water when fixtures are used
- Repeated nail or screw placements near fixture walls
If you notice a boxed-in area in a bathroom or laundry room, there is often a reason for it. Builders may have hidden pipes or shutoff valves inside that section. Moisture stains can also indicate a leak or a pipe running close to the surface.
A wall that feels warmer or cooler than surrounding areas may suggest water movement, though insulation and sunlight can also affect temperature. Likewise, sound can travel through framing, so hearing water does not always mean the pipe is directly behind the spot you are checking.
Use these clues as a starting point, not final proof.
Safety Tips Before Drilling, Cutting, or Renovating
If you are planning to drill, cut, or open a wall, safety should be your top priority. Water damage can happen fast, and plumbing work can also bring you close to electrical wiring.
Follow these safety steps
- Shut off the water if you are unsure about the pipe location.
- Turn off electricity before opening walls near plumbing.
- Use shallow pilot holes very carefully and only when you have a good reason.
- Check both sides of a wall if possible, especially in bathrooms and kitchens.
- Avoid drilling directly above or below known fixtures unless you have confirmed the space is clear.
- Wear protective gear such as gloves and safety glasses when opening access points.
- Stop and call a professional if anything feels uncertain.
These steps may seem simple, but they can prevent a major mess. A small amount of caution now is far better than dealing with a burst pipe, soaked drywall, or a costly repair later.
If you are trying to find water pipes behind walls for a remodel, this is the point where patience matters most. Go slowly, verify your assumptions, and do not force the project.
When to Call a Professional Plumber
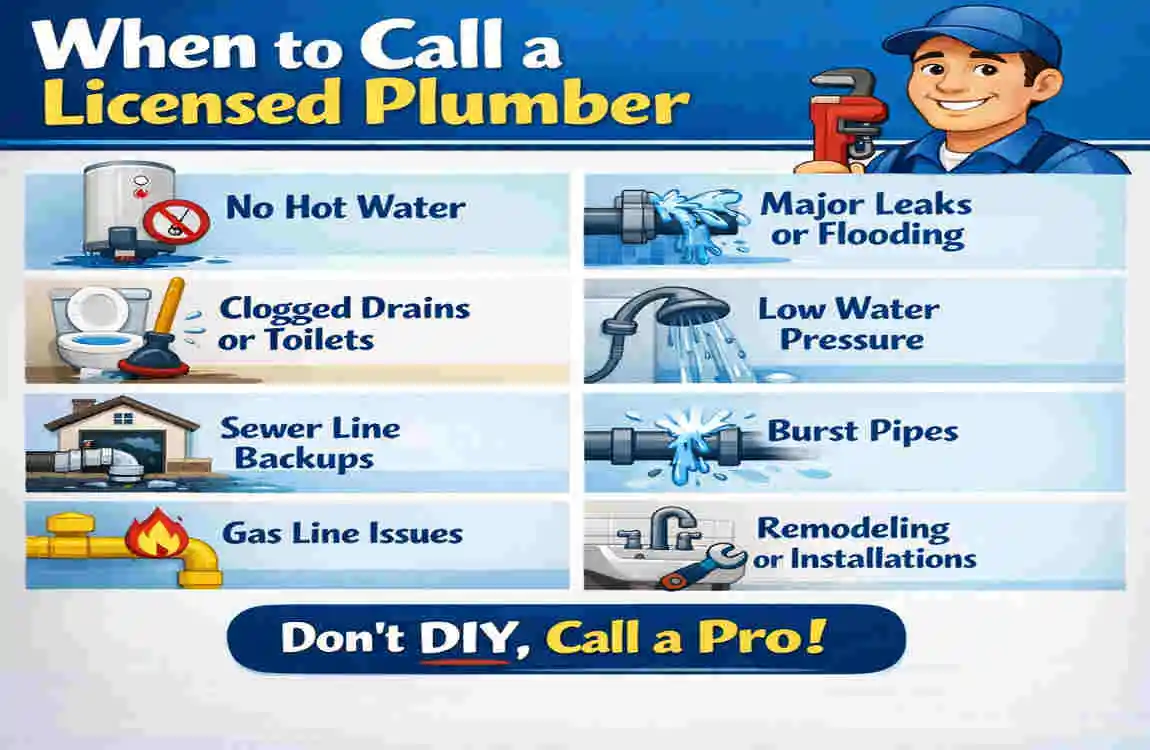
Sometimes the safest choice is to bring in a pro. A licensed plumber can confirm pipe location without turning your project into a guessing game.
Call a plumber if:
- the home has an unusual layout
- pipes are hidden in multiple wall layers
- you suspect a leak but cannot locate it
- you are remodeling bathrooms or kitchens
- you need accurate pipe mapping before major work
This is especially important in older homes, homes with many renovations, or homes where the plumbing has been repaired several times over the years. A plumber can often tell you much more than a wall scanner alone.
If you need to know exactly where are water pipes located in a house before opening walls, a plumber can give you the confidence and clarity that DIY methods sometimes cannot.
Frequently Asked Questions
Where are water pipes usually located in a house?
Water pipes are usually found behind walls, under floors, in basements or crawl spaces, inside ceilings, and near utility areas. Bathrooms, kitchens, and laundry rooms are the most common places because they require the most water connections.
How can I find water pipes inside walls?
Start by checking the fixture location, looking for access panels, and tracing pipes from the basement, crawl space, or utility room. A stud finder with pipe detection can help, but it may not detect plastic pipes. If you need to be certain, a plumber or wall scanner is a safer choice.
Are water pipes always behind bathrooms and kitchens?
Not always, but those are the most likely rooms. Pipes may also run through laundry rooms, hallways, basements, ceilings, and exterior walls. In multi-story homes, pipes often travel from one floor to another through hidden wall cavities.
Can a stud finder detect water pipes?
Sometimes, yes. A stud finder may detect metal pipes such as copper or galvanized steel. It usually will not detect plastic pipes like PEX or PVC very well. So it helps, but it should not be your only method.
Do all homes have the same pipe layout?
No. Pipe layout depends on the age of the home, the foundation type, the number of floors, the room arrangement, and past renovations. Two homes with the same floor plan can still have different plumbing pipe locations.
What is the safest way to drill near plumbing?
The safest way is to avoid drilling until you are confident about the pipe route. Review plans, inspect from basements or utility spaces, use a scanner, and check for warning signs. If you are still unsure, stop and call a plumber before proceeding.
| Location | Common Pipe Types | Typical Pipe Routes | Key Tips for Detection |
|---|---|---|---|
| Behind Walls | Copper, PEX, PVC | Vertical near sinks, toilets, tubs | Look near fixtures; use stud finder or scanner |
| Under Floors | Copper, PVC | Horizontal under slab or crawl spaces | Check crawl space or slab edges |
| Basements/Crawl Spaces | Copper, Galvanized | Along joists, beams, or walls | Pipes often visible; start tracing here |
| Ceilings (Multi-story) | Copper, PEX | Between floors to bathrooms or kitchens | Look for access panels; use inspection camera |
| Utility Rooms | Various | Near water heater, shutoff valves | Locate main supply and manifold systems |
| Near Exterior Walls | Copper, PVC | Along outside-facing walls | Watch for freeze risks in cold climates |