If you have ever dealt with dripping joints, noisy water lines, or a plumbing repair that cost more than expected, you are not alone. Many homeowners still rely on older pipe materials that can be expensive to replace and harder to work with. That is exactly why PEX has become such a popular choice in modern homes.
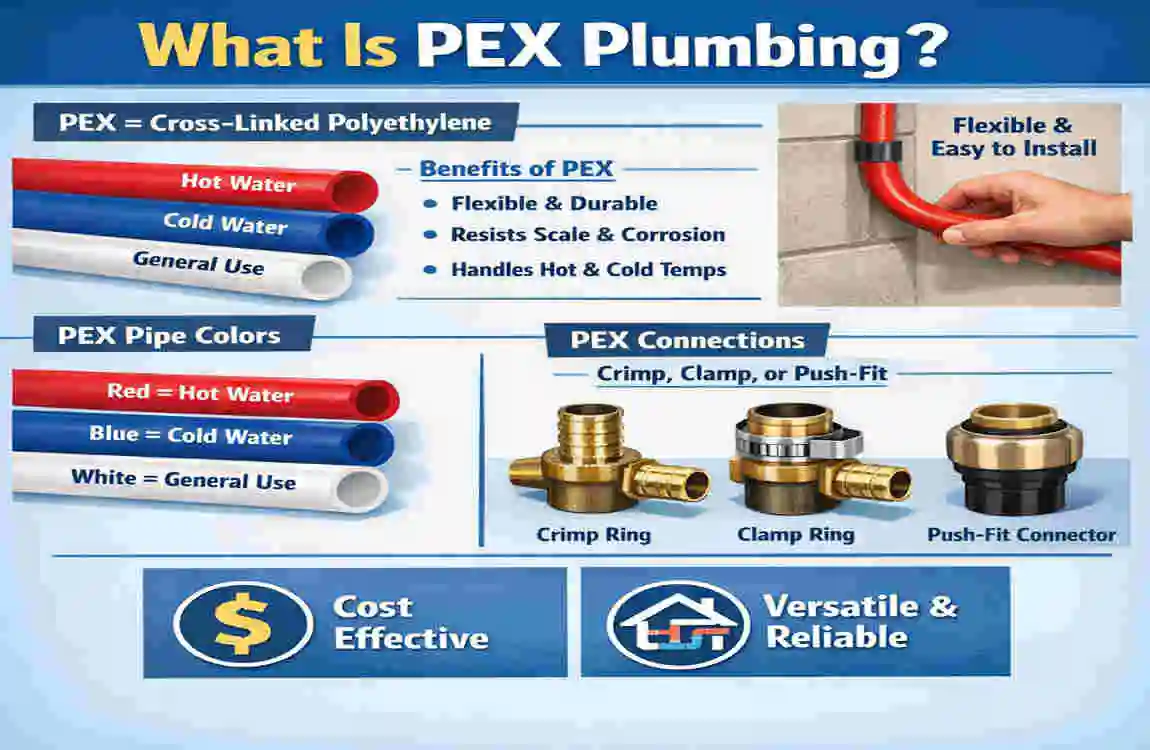
PEX stands for cross-linked polyethylene, which is a flexible plastic tubing made for plumbing. Since the 1980s, it has changed the way plumbers build and repair water systems in houses. It is easier to bend, faster to install, and often cheaper than traditional materials like copper. For many homeowners, that combination is hard to ignore.
What Is PEX Plumbing?’
PEX in simple words
PEX is flexible plastic tubing used to carry hot and cold water through a home. It is not the same as an ordinary plastic pipe. The material is specially treated through a process called cross-linking, which makes it stronger, more durable, and better able to handle heat and pressure.
One of the biggest reasons people ask how to use PEX home plumbing is that the material is so easy to route through walls, ceilings, and floors. Instead of cutting and joining a long line of rigid pipe every few feet, you can often bend PEX around corners and reduce the number of fittings.
The three main types of PEX
There are three common types of PEX, and each one is made a little differently:
PEX-A
This is the most flexible type. It expands more easily and is often preferred for systems that use expansion-style fittings. Many plumbers like it because it is forgiving during installation.
PEX-B
This type is slightly stiffer than PEX-A, but it is still widely used. It is strong, reliable, and popular in both residential and retrofit projects.
PEX-C
This version is also useful, but it is less common in some markets. It is a practical option for certain plumbing setups, though it is usually not the first choice for large home projects.
Colors and sizes you will see
PEX tubing often comes in red, blue, and white. Red usually marks hot water lines, blue marks cold water lines, and white may be used for either. The colors help make the plumbing easier to read later, especially when a repair or remodel is needed.
You will also see a range of sizes, often from 1/2 inch to 1 inch, for residential work. The size you choose depends on the fixture, the water demand, and the layout of the house.
Common features of PEX tubing
- Flexible plastic tubing in common sizes from 1/2 inch to 1 inch
- Safe for potable water when properly certified
- Widely used in new builds and retrofits
- Suitable for both hot and cold water lines
PEX has become a standard choice because it solves many of the problems that older pipes create. When you understand how to use PEX home plumbing correctly, you can build a system that is simpler to install and easier to maintain.
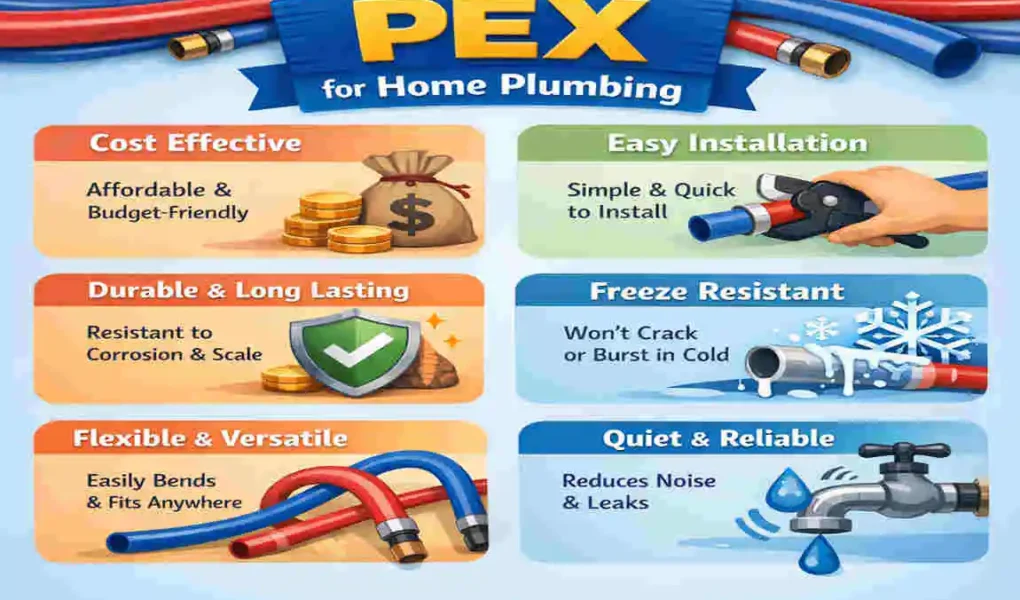
Key Benefits of PEX for Home Plumbing
Flexibility and fewer fittings
One of the strongest advantages of PEX is its flexibility. You can bend it around corners without adding a fitting every few inches. That matters because every fitting is another place where a leak could happen.
With fewer joints, the system becomes simpler and safer. In many cases, homeowners and plumbers can cut the number of connections by a large amount compared with copper or rigid plastic pipe. That makes using PEX home plumbing especially appealing for remodels and tight spaces.
Lower overall cost
PEX is often much cheaper than copper. The material itself costs less, and the labor usually costs less, too, because the work goes faster. You do not need to solder copper pipes, which saves time and reduces the number of tools you need on site.
For many projects, this lower cost can make a big difference. If you are replacing old lines in a full house, the savings can be significant. That is one reason many homeowners start researching how to use PEX home plumbing before they talk to a contractor.
Corrosion resistance
Metal pipes can corrode over time. They may build up scale, rust, or mineral deposits that slow water flow. PEX does not rust, and it does not react the same way as metal when water conditions change.
This makes it a strong option for homes where water quality varies or where old pipes have caused problems in the past. If you want a system that stays cleaner inside for longer, PEX has a clear advantage.
Faster hot water delivery
Because PEX systems can be designed with smaller, direct runs from a manifold, hot water often gets to the fixture faster. That means less waiting at the faucet and less wasted water down the drain.
This is a small daily comfort that becomes a big deal over time. If you care about convenience and efficiency, knowing how to use PEX home plumbing the right way can improve both.
Quiet operation
Metal pipes can create banging sounds when pressure changes quickly. PEX tends to absorb those vibrations better, so the system usually runs more quietly. That means fewer annoying pipe noises in the wall when someone turns a tap on or off.
For families, this can make the home feel more comfortable and modern.
Better freeze resistance
PEX handles freezing conditions better than rigid pipe because it can expand a little before bursting. That does not mean you should ignore winter protection, but it does give you a better safety margin if a line gets cold.
This is a big reason PEX is trusted in colder areas and in homes where pipes pass through unheated spaces.
Faster installation
PEX can save a lot of time during installation. A plumber can often run long lines with fewer interruptions, fewer joints, and less mess. If you are doing a repipe, that can shorten the project by a noticeable amount.
That is one of the main reasons people search for how to use PEX home plumbing when they want a faster and cleaner upgrade.
Easier maintenance and upgrades
PEX systems are easier to expand or modify later. If you need to add a bathroom, move a sink, or change part of the layout, the tubing is easier to work with than copper in many cases.
This flexibility makes PEX a smart fit for growing families and homes that may be remodeled again in the future.
Good for modern efficiency goals
PEX can support water-saving and energy-saving goals because it helps reduce waste and can improve hot water delivery. In many homes, that means less water running while you wait for the heat to arrive.
That is good for both your utility bills and the environment.
PEX benefits at a glance
BenefitPEX AdvantageImpact on Homeowners
Cost vs. copper : Lower material and labor costs save money on repipes
Lifespan: Long service life when installed properly. Fewer repairs over time
Leak risk: Fewer fittings and joints. Less chance of water damage
Hot water speed , Efficient line routing , Less wasted water and energy
Noise Quieter than a metal pipe More comfortable home
When you combine all these points, it becomes clear why so many people want to learn how to use PEX home plumbing in a practical, homeowner-friendly way.
PEX vs. Traditional Plumbing Materials
PEX vs. copper
Copper has been used for a long time, and it still has a strong reputation. It is rigid, durable, and familiar to many plumbers. But it also comes with higher costs and more labor.
Why PEX often wins
- It is more flexible
- It uses fewer fittings
- It is usually cheaper
- It is faster to install
- It handles freezing better
Copper can still be a good choice in some cases, especially where a rigid material is preferred, but for many homes, PEX offers a simpler and more affordable solution.
PEX vs. PVC and CPVC
PVC and CPVC are also common pipe materials. They are often used in certain water systems, but they are more rigid than PEX. That means they need more joints and more planning around corners.
Why PEX often feels easier
- It bends more naturally
- It is easier to route through framing
- It can reduce the number of glued or glued-and-fitted joints
- It is often better for retrofits and tight spaces
PVC and CPVC can still be useful for certain jobs, but for many residential water supply systems, PEX is more flexible and more forgiving.
Quick comparison table
FeaturePEXCopperPVC/CPVCWhy PEX Wins
Flexibility Very high Low Low Fewer fittings and easier routing
Cost per foot Lower Higher Lower to moderate Budget-friendly
Corrosion resistance Excellent Can corrode Good, with limits More consistent over time
Freeze resistance Strong Weak Moderate Better in cold conditions
Installation ease : Easy to moderate Harder, Moderate , Faster and less labor-heavy
When another material may be better
PEX is excellent for many homes, but it is not perfect for every situation. Some high-heat areas, exposed outdoor spaces, or very specific code requirements may point you toward another material.
That is why how to use PEX home plumbing should always start with the layout, the climate, and the local rules. A smart choice is not just about price. It is about matching the material to the job.
Tools and Materials for PEX Plumbing
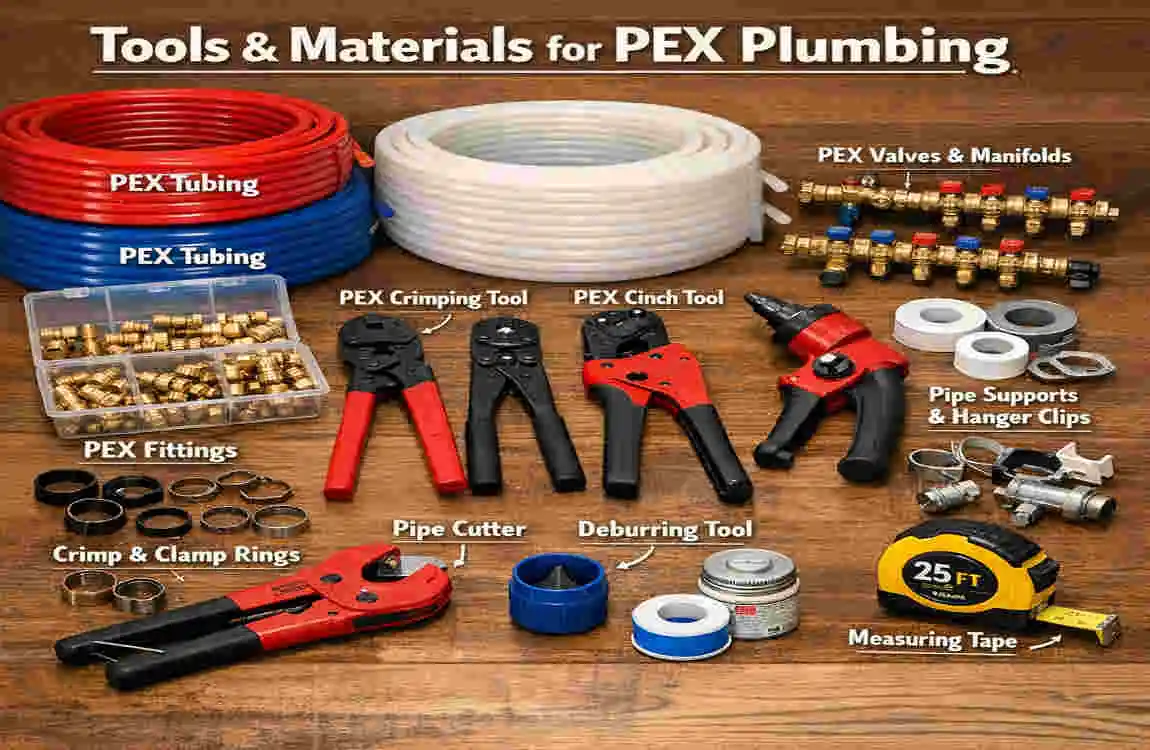
Basic tubing and fittings
You will need the right tubing diameter, along with fittings such as elbows, tees, couplings, and adapters. The fitting style depends on the type of PEX you choose and the connection method your system uses.
A manifold can also be very helpful. It lets you send individual lines to different fixtures from one central point, which keeps the system organized.
Cutting and connection tools
To work cleanly, you need tools made for PEX. A sharp cutter gives you a clean edge. Crimp tools or expansion tools help you make secure connections, depending on the fitting system.
Common tools include:
- PEX tubing cutter
- Crimp tool or expansion tool
- Go/no-go gauge
- Measuring tape
- Marker
- Pipe supports and hangers
Support hardware and accessories.
PEX should be supported properly so it does not sag or rub against rough edges. Hangers, clips, and protective sleeves help keep the tubing in good shape.
This is one of the smaller parts of how to use PEX home plumbing, but it matters a lot. Good support helps the lines last longer and stay quieter.
Budget expectations
A small DIY kit might be affordable, but a full home setup will cost more depending on the number of fixtures and the layout of the house. If you are hiring a plumber, labor will be a bigger part of the cost, but the job will usually move faster than with copper.
Simple budget guide
Project Type Materials Labor Typical Use
Small repair Low, Low , One leak or one fixture
Bathroom upgrade Moderate Moderate Sink, toilet, shower lines
Full repipe , Higher , Whole house water system
Before you begin, make sure you have all the parts on hand. A well-prepared project is much easier to finish without delays.
Step-by-Step Guide: How to Use PEX Home Plumbing
plan the layout first
Before you cut a single piece of tubing, study the house plan. Decide where water enters, where the fixtures are, and whether you want a home-run system or a more traditional branch layout.
A home-run design sends separate lines from a manifold to each fixture. This often makes using PEX home plumbing easier to manage and troubleshoot later.
Shut off the water and drain the lines
Turn off the main water supply before any work begins. Then open faucets and drain the system as much as possible. This reduces mess and helps you work safely.
Do not skip this step. Even a small amount of pressure left in the line can create a surprise leak when you cut into the pipe.
Measure carefully and cut straight
Use a tape measure and mark your tubing clearly. Then cut the PEX with a proper tubing cutter so the end stays clean and square.
A crooked cut can weaken the connection. If you want to know how to use PEX home plumbing to go smoothly, clean cuts are one of the most important habits you can build.
Route the tubing through the house
Run the tubing through studs, joists, or other framing areas according to your layout. Keep the bends smooth and avoid sharp turns that could stress the line.
Use hangers or clips to hold the tubing in place. A neat run is not just about looks. It also protects the pipe from movement and wear.
install the manifold
If you are using a manifold, mount it in a convenient location near the water heater or main supply point. Label the lines if you can. That makes future repairs much easier.
A manifold is one of the smartest ways to improve how to use PEX home plumbing because it keeps the system organized and reduces confusion.
Make the connections
Now connect the tubing to the fittings using the method that matches your PEX type. If you use crimp fittings, make sure the ring is seated properly. If you use expansion fittings, expand the tube evenly and connect it before it shrinks back.
Use the correct tool for the job. This is not the place to improvise.
Add elbows and transitions where needed
Although PEX bends well, some turns still need fittings, especially in tight or exact locations. Use elbows, tees, or adapters when the layout demands them.
Do not force the tubing into a bend that is too tight. That can create stress and reduce the life of the line.
Hook up fixtures.
Connect stub-outs for sinks, toilets, showers, and appliances. These are the final points where the water lines meet the fixtures.
This part of how to use PEX home plumbing often needs patience, because fixture connections must line up neatly with walls and cabinets. Take your time so the finished work looks clean.
Pressure test the system
Once everything is connected, test the system carefully. Check for leaks at every fitting and keep an eye on pressure over time.
A good pressure test tells you whether the job is truly done. It is much cheaper to fix a leak now than after the drywall goes back up.
Insulate and protect the lines
Cold lines should be insulated where needed, especially in attics, exterior walls, or other exposed spaces. You should also protect tubing from UV light and from places where rodents might damage it.
This final step is often forgotten, but it is part of doing the job right. Good protection helps how to use PEX home plumbing pay off for years.
Pro tips for a cleaner install
- Keep tubing away from direct sunlight
- Use protective sleeves where the pipe passes through the framing
- Avoid kinks and sharp edges
- Label lines when using a manifold
- Use proper support spacing
- Test before closing walls
When you follow these steps carefully, using PEX home plumbing becomes much less intimidating. The process is practical, logical, and easier to manage than many older plumbing methods.
Common Mistakes and How to Avoid Them
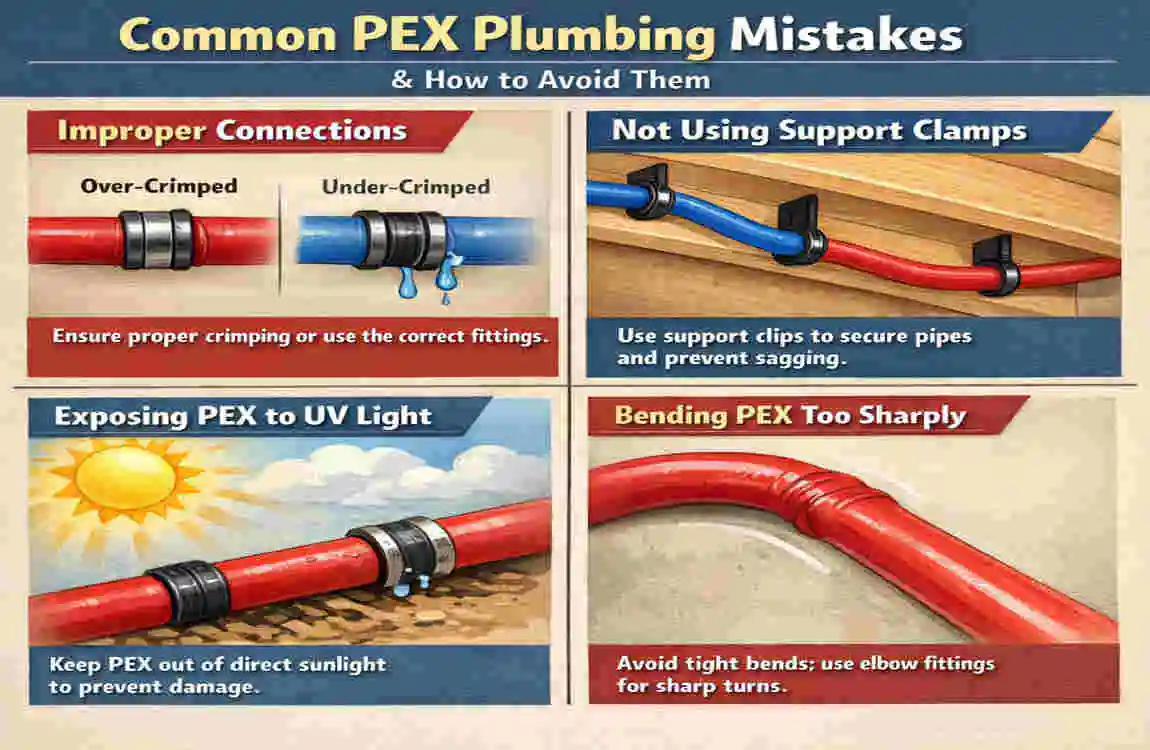
Over-crimping or under-crimping fittings
If you press a crimp ring too hard or too softly, the connection may fail later. Use the correct gauge to check each fitting.
This is one of the most common mistakes in how to use PEX home plumbing, and it is easy to avoid with the right tool and a careful eye.
Ignoring local plumbing codes
Every area has its own rules. That includes line support, pipe routing, fixture placement, and sometimes approved fitting types.
If you are in Lahore or another city with local requirements, always check the rules before closing walls. It can save you from expensive rework later.
Skipping the pressure test
Some people feel tempted to move on too quickly. But skipping the test is risky. A hidden leak can create expensive water damage behind the walls or under the floor.
Do not rush. Proper testing is a non-negotiable part of how to use PEX home plumbing.
Leaving tubing exposed to sunlight or heat
PEX should not sit in direct UV light for long periods. Heat can also damage it if it is placed too close to a hot surface without protection.
Using the wrong fitting style
PEX-A, PEX-B, and different connection systems do not always use the same method. Make sure your fittings match your tubing and your tool.
A mismatched part can undo all your good work.
Cost Breakdown and ROI
What homeowners often spend
The final cost depends on the size of the project, the number of fixtures, and whether you hire a professional. A small bathroom repipe will cost much less than a full-house upgrade.
Example cost table
Project Scale, Material Cost, Labor, Typical Savings vs. Copper
Bathroom repipe Low to moderate Good savings
Kitchen lines Moderate Moderate Strong savings
Full house repipe Higher, Higher , Very strong savings
Why the return can be strong
PEX often pays back over time because it is cheaper to install and less likely to cause problems from corrosion or freeze damage. You may also save on water waste if your hot water reaches fixtures faster.
That means how to use PEX home plumbing is not just about the installation day. It is also about the money you keep from future repair bills and wasted energy.
A practical way to think about ROI
If the upfront cost is lower and the repair risk is reduced, the system starts working in your favor right away. Over three to five years, many homeowners begin to see the real value in the choice they made.
For anyone comparing options, PEX often gives the best mix of price, performance, and long-term peace of mind.
Safety, Codes, and Best Practices
Drinking water safety
When properly certified, PEX is safe for drinking water. That is one reason it is used in so many homes. Still, you should always buy products that are approved for potable water use.
If you are unsure, ask your supplier or plumber before starting the work. Safety should always come first.
Follow the local code.
Plumbing codes help protect your home and your family. They cover things like pipe support, venting, spacing, and approved materials. Our internal guide on plumbing safety codes is a helpful starting point if you want to understand the basics before you begin.
Watch heat and fire exposure.
PEX should not run too close to very hot surfaces unless it is properly protected. Keep it away from areas where temperatures can rise beyond what the material is designed to handle.
Best practices for homes in Lahore
In Lahore, hot weather, changing water pressure, and aging infrastructure can all matter. That is why it helps to plan carefully and inspect the route before you install anything.
If your home is older, think about the condition of the walls, the access behind fixtures, and whether the wiring or other systems need attention, too. In larger remodels, plumbing often overlaps with other trades. That is why our internal guide on electrical wiring basics and our article on home renovation costs can be useful when you are planning a bigger project.
Build for the future.
If you are going to open walls or lift floors, consider adding a little extra support or a better route now. It is much easier to do it once than to fix it later.
Good planning is a major part of how to use PEX home plumbing the right way.
PEX Tubing Guide: Sizes, Colors, and Layout Choices
Choosing the right diameter
The size of the tubing matters. A line that is too small can reduce pressure at the fixture, while a line that is too large can waste material and make the system less efficient.
Common size use
- 1/2 inch: often used for individual fixture lines
- 3/4 inch: often used for main distribution lines
- 1 inch: may be used for larger supply needs or the main line
Reading the color system
The red and blue color system helps you keep hot and cold lines separate. That makes repairs easier and reduces the chance of confusion later.
White tubing may be used in some systems as well, but you should still label it clearly if there is any chance of mix-up.
Home-run vs. trunk-and-branch
A home-run system sends one line from a manifold to each fixture. It is neat, easy to trace, and often a favorite for modern homes.
A trunk-and-branch system uses a main line with branches feeding off it. This can work well too, especially in some retrofit jobs.
Which layout should you choose?
- Pick a home run for easier control and cleaner organization
- Pick trunk-and-branch if the layout is simple or the budget is tighter
Routing through different parts of the home
PEX works well in walls, ceilings, and certain floor systems. It can also work in slabs if installed properly and protected according to the code.
Important routing reminders
- Avoid tight bends
- Keep lines supported
- Protect from sharp edges
- Keep away from prolonged UV exposure
- Insulate where needed
Understanding tubing layout is a big part of how to use PEX home plumbing successfully. The better the route, the better the whole system performs.
When PEX Is Not the Best Choice
Strong UV exposure
PEX is not a good fit for long-term outdoor exposure without protection. Sunlight can weaken it over time.
If the pipe will be outside, it needs a proper covering, or a different material may be better.
Very high-heat locations
PEX is made for normal plumbing use, but it is not ideal for every very hot application. Areas close to extreme heat may require another solution.
Special structural needs
Some situations call for rigid pipe because the system needs extra support or a very specific shape. In those cases, copper or another material may make more sense.
When to pause and reassess
If your project has unusual pressure conditions, very old infrastructure, or complex code issues, stop and review the plan before you install anything.
That is the smart way to approach how to use PEX home plumbing in real life. It is not about forcing one material into every situation. It is about choosing the right material for the job.
FAQs
Is PEX safe for drinking water?
Yes, PEX is safe for drinking water when it is properly certified for potable use. Always check that the product you buy is approved for residential water systems.
Can I use PEX outdoors?
Only with care. PEX should not be left in direct sunlight for long periods. If it must be used outside, it needs strong protection from UV exposure.
Can I run PEX in a slab?
Yes, PEX can be used in slab installations if it is installed correctly and protected according to code. This is a job where planning matters a lot.
How long does PEX last?
When installed properly and protected from damage, PEX can last for decades. Many homeowners choose it because of its long service life.
Can I mix PEX with copper?
Yes, you can connect PEX to copper with the right adapters and methods. The connection has to be done correctly so the system stays reliable.
Is PEX good for a whole-house repipe?
Yes, it is often an excellent choice for a whole-house repipe because it is flexible, fast to install, and cost-effective.
Do I need a professional plumber?
Not always, but a professional is a smart choice if the project is large, if local codes are strict, or if you are not confident working with plumbing tools.