It’s Saturday morning, and you’ve finally decided to tackle that leaky sink, or perhaps you’re upgrading your laundry room. You’ve got your new fixtures ready, but then you see it—the rigid, shiny copper piping standing between you and a finished job. For many homeowners, the idea of cutting house copper pipe feels like a task reserved for professionals with years of trade school under their belts.
Why Cutting Copper Pipe at Home is a Game-Changer

Before we grab the tools, let’s talk about why you should even bother learning this. Why not just call a plumber? Well, for starters, the average service call can cost anywhere from $150 to $500 just for the visit. If you can learn how to cut house copper pipe yourself, you’ve already paid for your tools tenfold in a single afternoon.
The Versatility of Copper
Copper has been the gold standard for home plumbing for decades. It is durable, resists bacterial growth, and can handle extreme temperature changes without cracking. Because it is so common, you will encounter it in almost every home built in the last 60 years. Mastering the cut means you can handle bathroom renovations, kitchen upgrades, and outdoor spigot repairs without waiting for a contractor’s schedule.
The Importance of a Clean Cut
You might think, “It’s just a pipe, why does the cut need to be perfect?” Here is the deal: if your cut is jagged or slanted, your fittings (the pieces that connect pipes) won’t sit flush. This creates weak spots. If you are soldering (sweating) the pipe, a bad cut prevents the solder from flowing evenly. If you are using “push-to-connect” fittings like SharkBites, a burr (a sharp metal edge) on the pipe can actually slice the O-ring inside the fitting, leading to a slow, silent leak behind your walls. Cutting copper pipe cleanly isn’t just about aesthetics; it’s about the structural integrity of your home.
Understanding Your Pipe Types
Not all copper is created equal. In your home, you’ll likely see three types:
- Type K: The thickest wall, usually used for underground water mains.
- Type L: Medium thickness, often used for interior plumbing and heating.
- Type M: The thinnest wall, ubiquitous for residential branch lines because it’s affordable and easy to work with.
Knowing which one you have helps you decide how much pressure to apply when cutting. Don’t worry, though—the hacks we are about to discuss work on all of them!
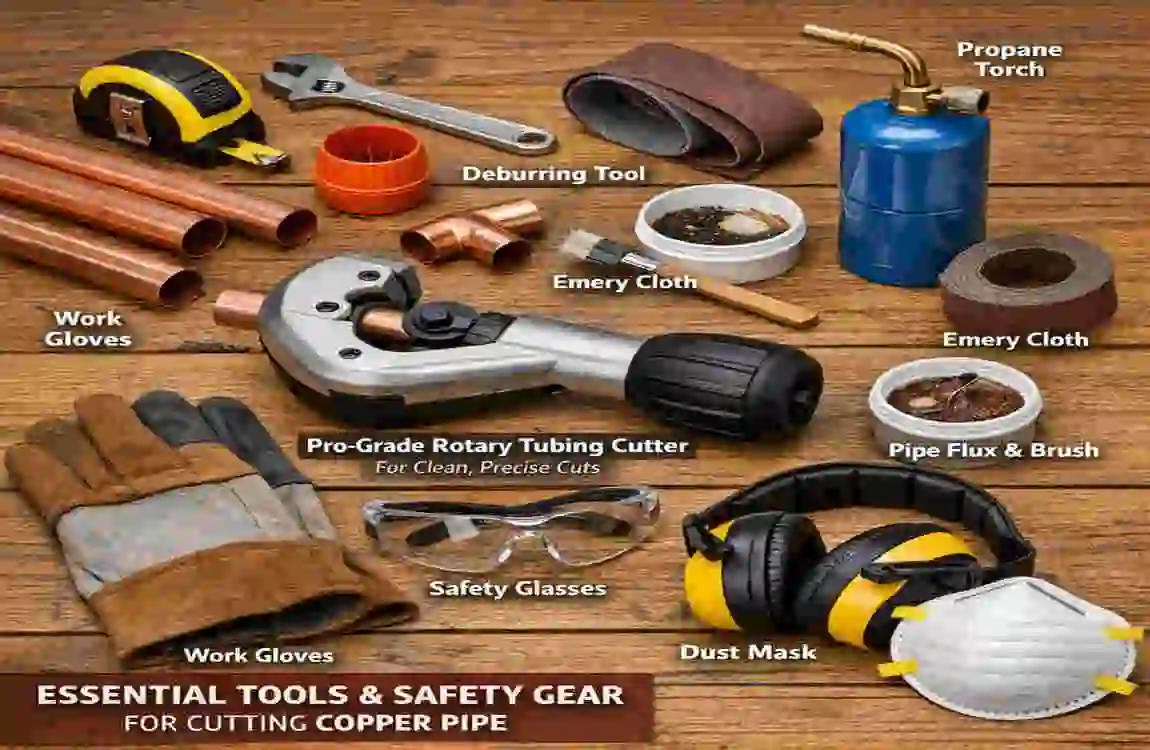
Essential Tools and Safety Gear for Cutting House Copper Pipe
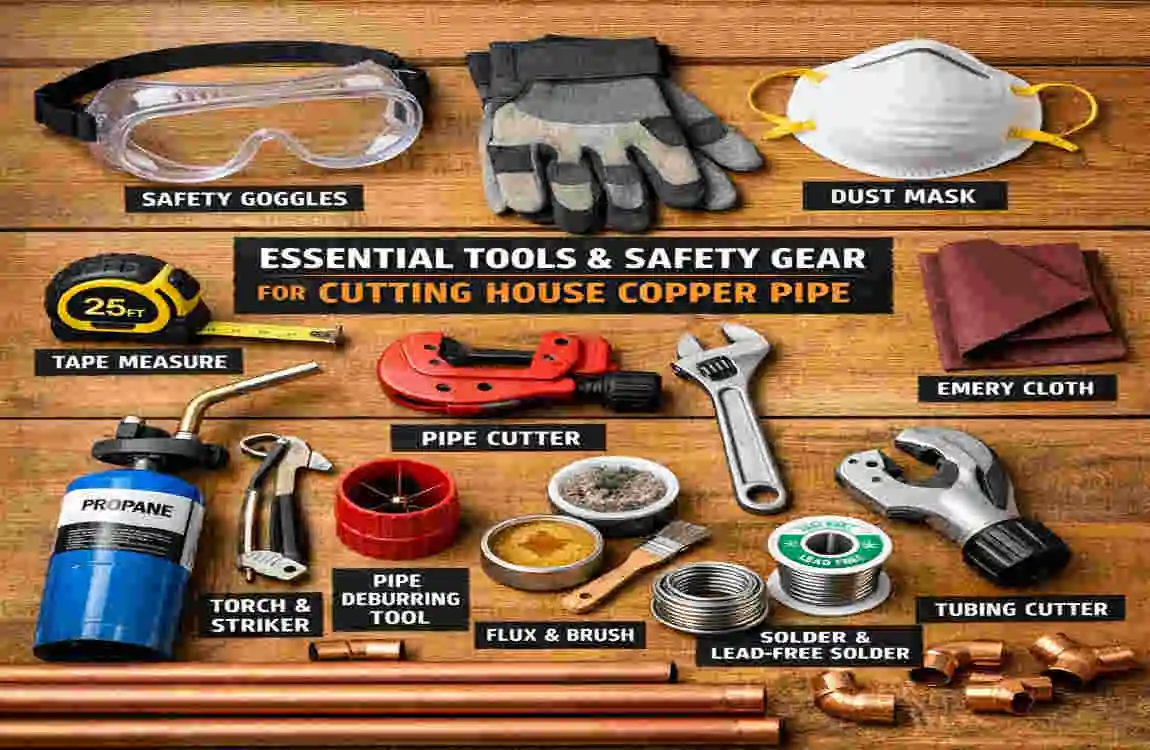
You wouldn’t perform surgery with a butter knife, right? While you don’t need a massive toolbox, having the right tools makes the job safer and yields much better results. If you are looking for DIY copper pipe cutting success, start with this checklist.
The “Must-Have” Toolkit
- Tubing Cutter: The “holy grail” of plumbing. It’s a small C-shaped tool that rolls around the pipe.
- Hacksaw: Great for tight spots where a circular tool won’t fit.
- Deburring Tool: This looks like a little pen or a plastic cone. It removes the sharp “lips” left behind after a cut.
- Measuring Tape and Sharpie: Accuracy is everything. A 1/4-inch mistake can ruin an entire afternoon.
- Sandpaper or Emery Cloth: You’ll need this to polish the ends so they are shiny and ready for connection.
Safety First: Don’t Skip This!
Working with metal means working with sharp edges and flying shards. Always wear safety glasses. A tiny flake of copper in the eye is a quick trip to the ER. Also, wear work gloves, especially when using a saw. Copper gets hot when you cut it due to friction, and the freshly cut edges are sharper than a razor blade.
Tool Comparison: Which One Should You Buy?
To help you decide which tool fits your budget and project, I’ve put together this handy table.
Tool Cost Best For Cleanliness Rating Ease of Use
Mini Pipe Cutter $10 – $15 Tight spaces (under sinks) Excellent Very Easy
Large Tubing Cutter $20 – $40 General plumbing/Long pipes Superior Easy
Hacksaw $5 – $15 Emergency/Rough cuts Good (needs work) Moderate
Rotary Tool (Dremel) $30 – $80 Hard-to-reach areas Fair Advanced
PEX Cutter $15 – $25 Soft copper tubing only Good Easy
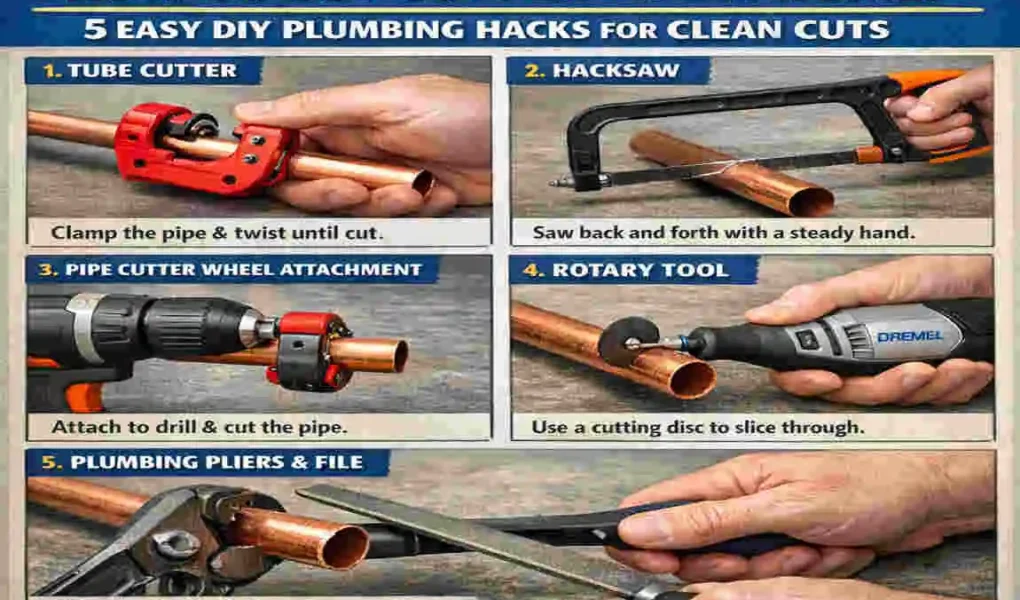
The Classic Pipe Cutter Method
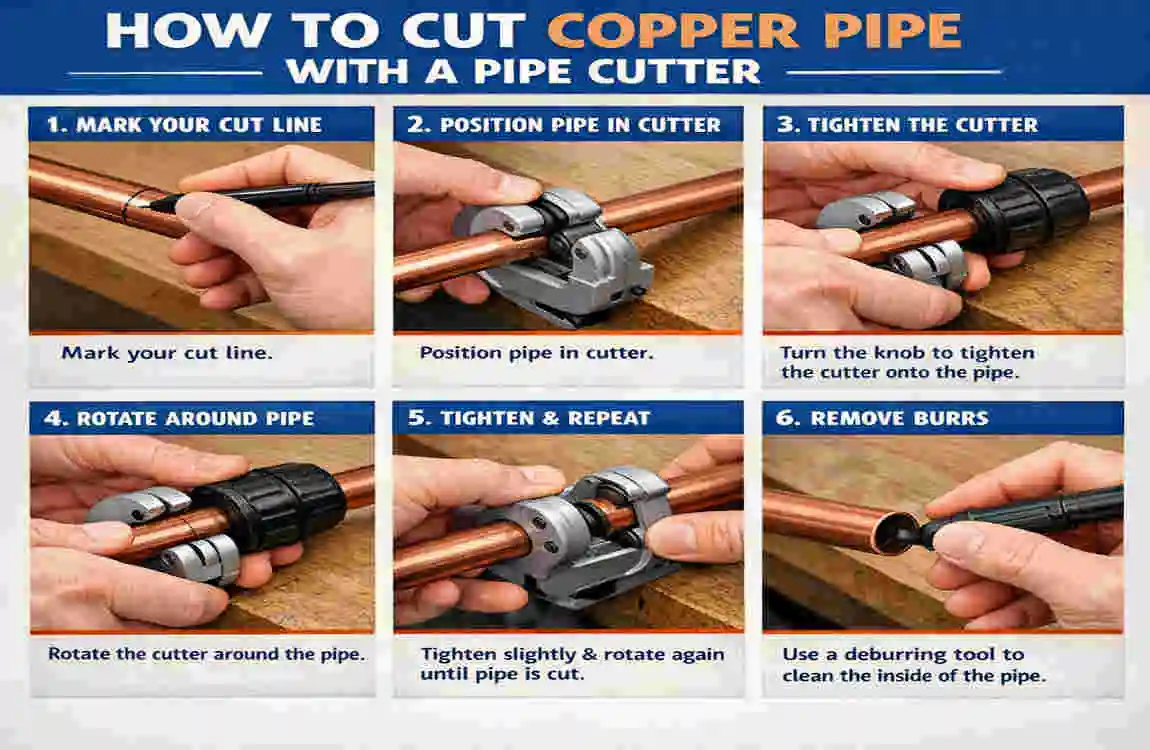
If you ask any plumber the easiest way to cut house copper pipe without power tools, they will point to the manual tubing cutter. This tool doesn’t actually “saw” the metal; it displaces it. It uses a hardened steel wheel to press a groove into the pipe, deeper and deeper, until it snaps cleanly.
Step-by-Step Instructions
- Mark your spot: Use your tape measure and a marker to put a clear line where you want the cut.
- Position the tool: Open the cutter by turning the screw handle. Place the pipe between the rollers and the cutting wheel. Align the wheel exactly with your mark.
- Tighten slightly: Turn the handle until the wheel touches the copper. Give it a tiny extra turn to “set” the blade.
- The First Rotation: Spin the tool around the pipe once. Check to make sure it created a perfect circle and didn’t “spiral” down the pipe like a screw thread.
- Tighten and Spin: Turn the handle a quarter-turn, then spin the tool again. Repeat this process—tighten, spin, tighten, spin—until the pipe pops off.
Why This Works
Because rollers guide the tool, it ensures a perfectly 90-degree square cut. This is vital for a leak-free fit. Pro Tip: Don’t try to force the cut by tightening the handle too much at once. If you do, you might crush or “egg” the pipe, making it oval-shaped instead of round. Patience is your best friend here!
Hacksaw with Miter Box for Precision

Sometimes, you don’t have a fancy pipe cutter, or you are in a position where a circular tool won’t fit. This is the budget hack for cutting house copper pipe straight with tools you likely already have in your garage.
Setting Up the Cut
A hacksaw alone can be “wobbly.” To get a straight cut, use a miter box. This U-shaped guide holds your saw at a perfect 90-degree angle.
- Place the copper pipe in the miter box.
- Use a clamp or your hand (safely!) to hold the pipe firmly against the back wall of the box.
- Choose a fine-tooth blade. For copper, you want a blade with 24 to 32 TPI (Teeth Per Inch). Thin teeth prevent the saw from “snagging” on the soft metal.
The Sawing Technique
Start your cut by pulling the saw toward you to create a small notch. Once the notch is set, use long, steady strokes. Use the full length of the blade. Don’t press down too hard; let the teeth do the work. If you press too hard, you’ll create more heat and more burrs.
Cleaning Up the Mess
A hacksaw cut is “dirty.” It leaves a lot of metal shavings and a very rough edge. You must use sandpaper and a file afterward. If you leave those jagged edges, your plumbing fitting will never sit correctly. Think of this method as the “rough draft” that needs a good edit afterward.
Rotary Tubing Cutter for Pro-Level Cleanliness
If you have a lot of pipe to cut—say, you’re replumbing an entire bathroom—you might want to upgrade to a rotary tubing cutter. This is the fastest method for flawlessly cutting house copper pipe.
What Makes it Different?
Unlike the mini-cutters, these often have a spring-loaded mechanism or a quick-release button. They are designed for ergonomics. You can get through a 3/4-inch pipe in about three rotations.
How to Use It Like a Pro
- The “Score” Move: Professional plumbers often perform a single light “score” rotation to ensure the track is straight.
- Constant Motion: Keep the tool moving. The momentum helps maintain even pressure.
- Integrated Reamer: Most high-end rotary cutters have a fold-out triangular blade on the back. This is your best friend! Use it immediately after the cut to clean the inside of the pipe.
This tool is ideal for rigid pipes (Type L and M). It gives you that “factory edge” look that makes your DIY work look like a master tradesman did it.
PEX Cutter Hack for Soft Copper

Now, this is a “hack” in the truest sense. Most people use ratcheting cutters for PEX (plastic) piping. However, if you are working with soft, annealed copper—the kind that comes in a coil and you can bend with your hands—a PEX cutter can actually work!
When to Use This
This is a no-fuss DIY on how to cut house copper pipe with household tools if you are working on something like a refrigerator water line or a small dishwasher hookup.
The Process
- Ensure the copper is the “soft” variety. Do not try this on rigid, straight-length pipes; you will ruin your blade.
- Open the ratcheting cutters wide.
- Slowly squeeze. The sharp blade will slice through the soft copper like a heavy-duty pair of scissors.
- Warning: This method often slightly flattens the end of the pipe. You will need to use a pair of needle-nose pliers or a reaming tool to “round out” the end again so it fits into your connector.
Dremel or Angle Grinder with Cut-Off Wheel
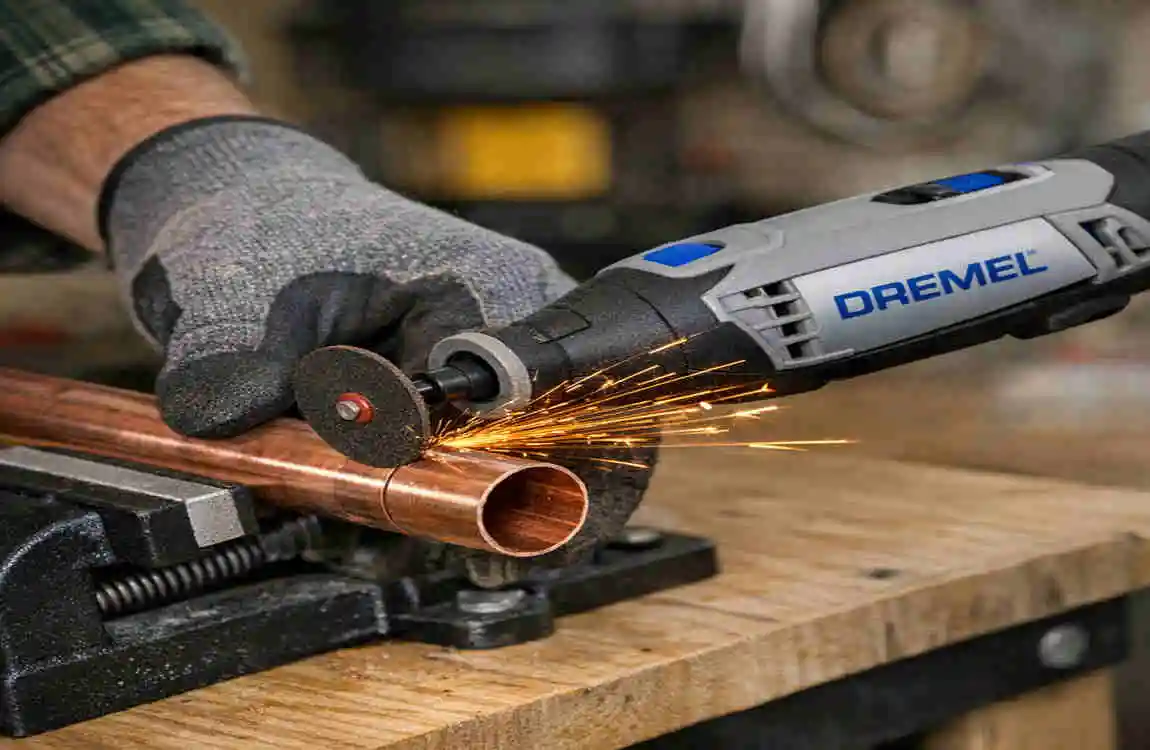
Sometimes, the pipe is buried deep inside a wall, and you can only reach it with one hand. Or you are cutting a large-diameter pipe that your manual cutter can’t handle. This is the power hack for cutting house copper pipe at home.
Safety Gear is Non-Negotiable
When using a Dremel or an angle grinder, you will see sparks. Even though copper doesn’t spark as readily as steel, friction will throw off hot metal dust. Wear your goggles and a face mask.
Execution
- Secure the pipe: If it’s loose, clamp it to a workbench. If it’s in the wall, make sure it’s stable.
- High Speed, Light Touch: Turn the tool to a high RPM. Gently touch the cut-off wheel to the copper.
- Rotate the tool, not the pipe: Move the Dremel around the circumference of the pipe.
- Be mindful of the “Kickback”: Power tools can jump if the blade gets pinched. Hold the tool with both hands if possible.
This method is speedy, but it is also the messiest. You will have copper dust everywhere, so have a vacuum ready!
Finishing Touches: Deburring, Fitting, and Testing
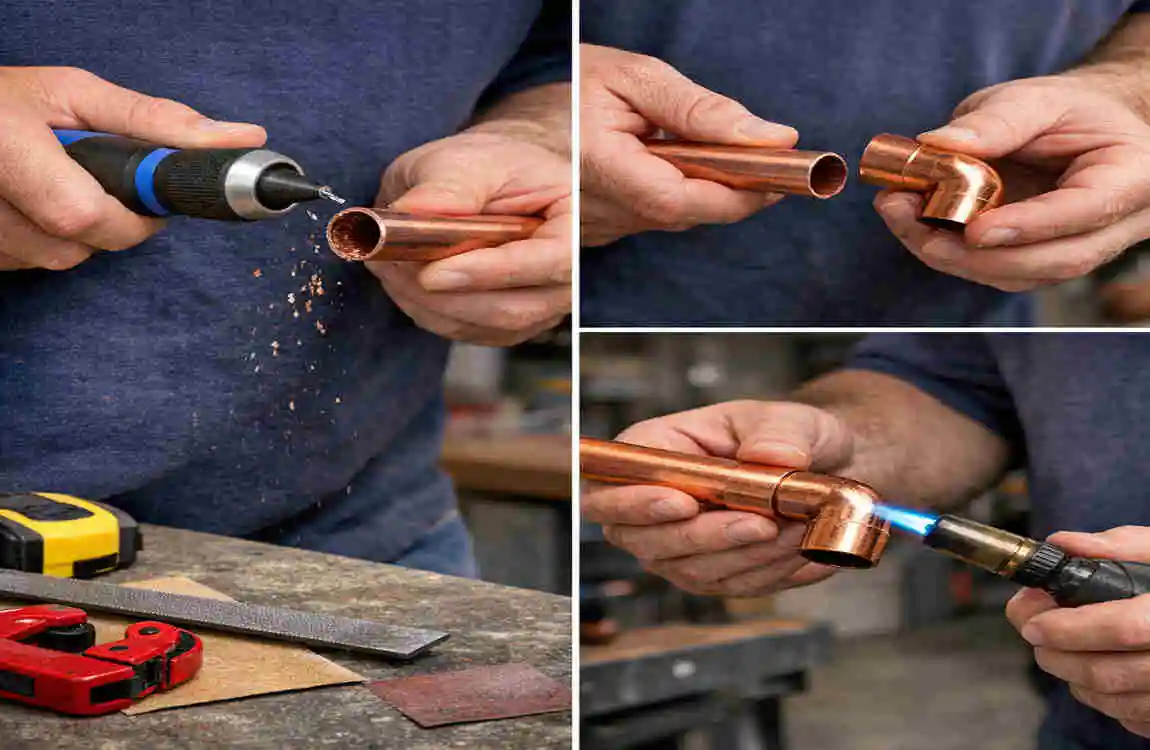
You’ve made the cut. You’re done, right? Not so fast! The “finishing” stage is actually the most essential part of cutting house copper pipe.
The Art of Deburring
When you cut copper, the metal is pushed inward, creating a small “lip” inside the pipe. This lip causes turbulence in the water flow. Over the years, this turbulence can actually wear a hole in the pipe from the inside out!
- Inner Deburring: Use a reaming tool or a round file to scrape the inside edge until it feels smooth to the touch.
- Outer Deburring: Use a flat file or sandpaper to remove the sharp edge on the outside. This ensures the pipe slides into the fitting without damaging the seal.
Polishing for Perfection
Take a piece of emery cloth or fine-grit sandpaper and wrap it around the end of the house pipe. Twist it back and forth until the copper is bright and shiny. This removes oxidation. If you are soldering, solder will not stick to oxidized (dull) copper. If you are using a SharkBite, the shiny surface ensures a perfect airtight grip.
The Pressure Test
Once your fittings are on, don’t just close the wall and walk away.
- Slowly turn the water back on.
- Watch the joint for at least 10 minutes.
- Take a dry paper towel and wipe the joint. Even a microscopic drop of water will show up on the paper.
- If it’s dry, you’re golden!
FAQs: How to Cut House Copper Pipe
Q: Can I cut copper pipe with wire cutters? A: Absolutely not. Wire cutters will crush the pipe flat, making it impossible to attach any fittings. You need a tool designed to maintain the pipe’s round shape.
Q: What is the best tool for 3/4-inch pipe? A: A standard-sized tubing cutter is best. It provides the most leverage and the cleanest cut for that specific size, which is common in main water lines.
Q: Do I really need to sand the pipe if I’m not soldering? A: Yes! Even for “push-fit” connectors, sanding removes burrs that could tear the internal rubber seals. It’s a 30-second step that prevents a massive headache.
Q: How do I cut a pipe that is flush against a wall? A: This is where the mini pipe cutter or a Dremel shines. Mini cutters are explicitly designed for “close quarters” where there isn’t much room to swing a tool.
Q: Is it okay if my cut is slightly diagonal? A: Ideally, no. A diagonal cut means the pipe won’t “bottom out” in the fitting correctly. If it’s just a bit off, you can fix it with a file. If it’s a major slant, re-cut it.