You wake up on a Tuesday morning, already running late for work. You step into the shower, expecting a refreshing blast of hot water to wake you up, but instead, you are greeted by a sad, weak trickle that barely reaches your knees. Or worse, you walk into the kitchen to make coffee, and the sink refuses to drain, staring back at you with a pool of murky water.
Most homeowners immediately panic and reach for the phone to call a plumber. But wait! Before you spend anywhere from $200 to $500 on a service call, you need to know that many of these issues are solvable with a little elbow grease. Whether it is mineral buildup from hard water, debris stuck in the pipes, or just a simple clog, you have the power to fix it.
Signs of Clogged Water Lines
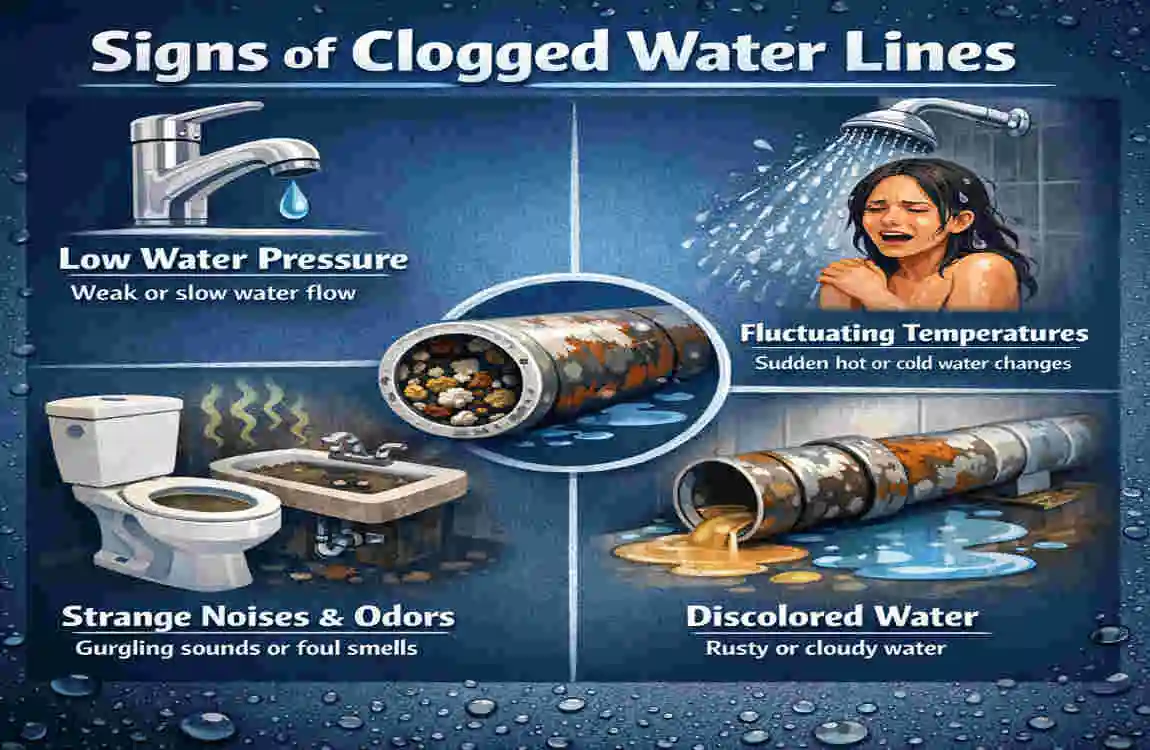
Diagnosing the problem is half the battle. When people think of a clog, they usually picture a toilet that won’t flush. However, clogged water lines—specifically the supply pipes that bring fresh water to your faucets—manifest differently than drain pipes that carry waste away.
Understanding the symptoms will help you choose the right fix. Here is what you need to look out for to determine if you need to learn how to unclog water lines in the house.
It’s Not Just About Backups
While a backed-up sink is obvious, supply line clogs are sneakier. They usually show up as low water pressure. If you turn on a faucet and the water sputters, spits, or flows unevenly, you likely have a blockage in the supply line. This is often caused by sediment, rust, or calcium buildup restricting the flow inside the pipe, much like a clogged artery.
The “Gurgle” Effect
Listen closely to your house. Do you hear a gurgling sound coming from the toilet when the washing machine drains? Does the shower drain make a noise when you flush the toilet? These “ghostly” sounds are air pockets trapped in the lines due to a blockage. It means the water is fighting to get past an obstruction.
Discolored Water
If you turn on the tap and see brown, yellow, or rusty water, this is a major red flag. It usually indicates rust inside galvanized steel pipes or sediment that has been disturbed in the main water line. This isn’t just a clog risk; it’s a water quality issue.
Common Symptoms Checklist
Here is a quick breakdown to help you spot the issue:
- Low pressure in multiple fixtures: If the kitchen sink and the bathroom shower are both weak, the clog is likely deep in the main line.
- Slow-filling tanks or pools: Does your toilet tank take forever to refill after flushing? That is a supply line restriction.
- Fluctuating hot/cold water flow: If the water suddenly gets scalding hot or freezing cold when someone else uses a fixture, the pressure balance is off due to a restriction.
- Sputtering Faucets: Air trapped behind a clog causes the water to “spit” at you.
Urgency Alert: Ignoring these signs isn’t just annoying; it is dangerous for your home. High pressure building up behind a clog can cause pipe joints to leak or even burst, leading to thousands of dollars in water damage.
Tools and Materials Needed
The best part about DIY plumbing is that you don’t need a van full of expensive equipment. You likely have most of these items under your kitchen sink or in the garage. If not, a quick trip to the hardware store will cost you far less than a professional visit.
Here is your shopping list to tackle the project of how to unclog water lines in the house.
Essential Gear Breakdown
We have grouped these by the method you will be using. We recommend gathering the “Basic” and “Safety” items before you do anything else.
Category Items Why Needed Cost Estimate
Basic Plunger (Cup & Flange), Bucket, Rubber Gloves. These are your first line of defense for basic access and containing messes. ~$10 – $15
Chemical: Baking Soda, White Vinegar, Enzyme Cleaner. These create a natural chemical reaction to dissolve organic clogs and mineral scale. ~$15
Mechanical Plumbing Snake (Auger), Pipe Wrench, Teflon Tape. For physically breaking through stubborn clogs deep in the line. ~$25 – $40
Advanced Garden Hose, Hydro Jet Kit (optional) Used for flushing out main lines using water pressure. ~$30+
Don’t Forget Safety!
Plumbing can be messy and surprisingly sharp. Always have:
- A strong flashlight: It is dark under sinks and in crawlspaces.
- Old towels: You will get wet. Be prepared.
- Safety Glasses: When working with pressurized water or drain snakes, protect your eyes from splashback.
Preparation Steps

You are eager to fix the problem, but patience pays off. Jumping in without preparation can lead to flooded floors or damaged valves. Follow these steps to ensure a safe workspace.
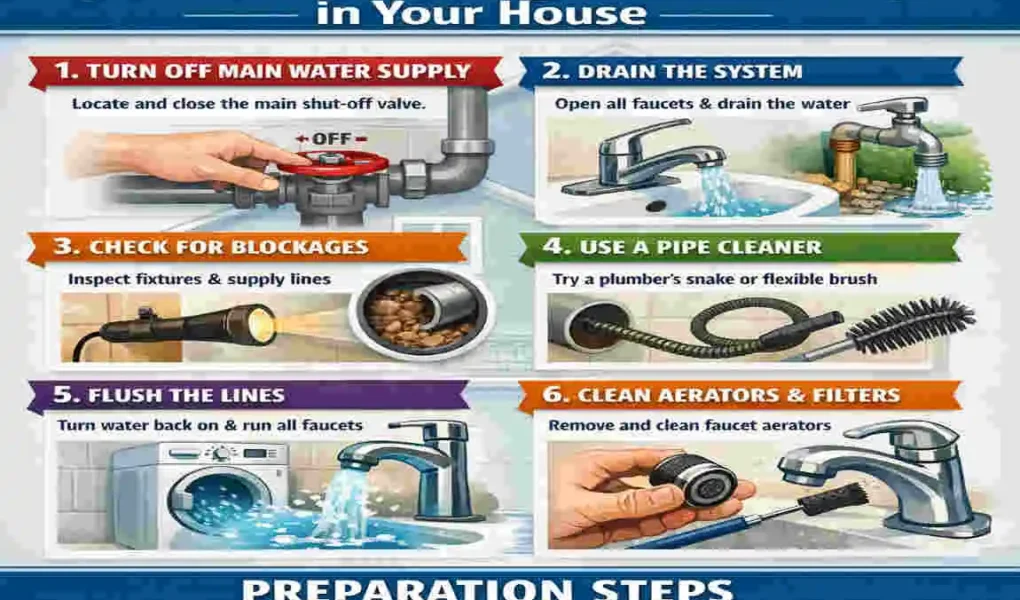
Shut Off the Water
This is the golden rule of plumbing. You must locate your main water shut-off valve.
- Where is it? It is usually located in the basement, a crawlspace, the garage, or outside near the street in a concrete box (the water meter).
- How to do it: Turn the valve clockwise (to the right) until it stops. If it is a lever handle, turn it so it is perpendicular to the pipe.
Test the Shutoff
Don’t just assume it is off. Go to the lowest faucet in your house (usually a basement sink or an outside spigot) and turn it on. The water should slow to a drip and then stop completely. If water is still flowing strongly, your main valve might be faulty, and you should not proceed with opening any pipes.
Clear the Area
Remove everything from under the sink or around the access panel. You need room to move your arms and fit a bucket. If you are working in a finished area, lay down plastic sheeting or towels to protect your flooring from “sludge water”—it stains!
Drain the Lines
Once the main water is off, open the faucets on the highest floor of your home and the lowest floor. This drains the remaining water out of the vertical pipes, preventing a gush of water when you unscrew a fitting.
Warning for PVC Pipes: If you are planning to use boiling water (Method 1), check your pipe material. PVC pipes can soften or warp if exposed to water over 140°F (60°C). If you have PVC, stick to hot tap water rather than boiling water.
Boiling Water and Natural Cleaners
If you are dealing with a slow drain or low pressure caused by mineral buildup in a faucet, this is your first and easiest move. It is the eco-friendly way to learn how to unclog water lines in the house without harsh chemicals.
When to Use This
This method is perfect for:
- Grease clogs in kitchen sinks.
- Soap scum in bathroom showers.
- Mineral deposits (calcium/lime) in faucet aerators are causing low pressure.
Step-by-Step Guide
For Drains (Grease/Soap):
- Boil the Water: Fill a kettle or large pot with water and bring it to a rolling boil.
- The Pour: Carefully pour the boiling water directly into the drain opening. Do this slowly in stages. Pour a little, let it work for a few seconds, then pour more.
- The Fizz Factor: If the water doesn’t clear the clog, pour 1/2 cup of baking soda down the drain. Follow it immediately with 1/2 cup of white vinegar.
- Cover and Wait: The mixture will fizz violently—this is good! It’s scrubbing the pipe walls. Cover the drain with a plug or cloth to keep the reaction down in the pipe. Let it sit for 15 to 20 minutes.
- The Final Flush: Flush the drain with another pot of hot water.
For Low Water Pressure (Supply Lines): The “clog” for low pressure is often right at the spout!
- Unscrew the Aerator: This is the little mesh cap at the end of your faucet. You might need a wrench and a cloth (to prevent scratching) to get it off.
- Inspect: You will likely see tiny white rocks or sediment blocking the screen.
- Soak: Drop the aerator into a bowl of hot vinegar. Let it sit for an hour. The acid eats the calcium.
- Rinse and Replace: Scrub it with an old toothbrush, rinse, and screw it back on. Turn on the water—you might see a 50% pressure increase instantly!
Pros and Cons
Pros Cons
Zero Cost: Uses items you have. Limited Power: Won’t fix tree roots or solid objects.
Eco-Friendly: Safe for the environment. Plastic Risk: Boiling water can damage cheap plastic pipes.
Fast: Takes less than 30 minutes. Surface Level: Only works on nearby clogs.
Plunger Technique
The plunger is the classic hero of plumbing, but many people use it incorrectly. It isn’t just for toilets; it’s a vacuum tool that can dislodge blockages in sinks and tubs, too.
Choosing the Right Plunger
- Cup Plunger: This has a red, flat rubber cup. It is designed for sinks and bathtubs (flat surfaces).
- Flange Plunger: This has a fold-out flap inside the cup. It is designed for toilets.
- Note: Do not use your toilet plunger on your kitchen sink for hygiene reasons! Buy a separate one for sinks.
The Technique
- Seal the Overflow: This is the crucial step everyone forgets! Sinks and tubs have an “overflow” hole (the little hole near the rim to prevent flooding). If you don’t seal this, the air pressure from plunging will escape through that hole instead of pushing the clog. Stuff a wet rag firmly into the overflow hole.
- Create a Wet Seal: Fill the basin with about 2-3 inches of water—enough to cover the plunger cup. You cannot plunge air; you need water to create hydraulic pressure.
- Position and Plunge: Place the plunger over the drain. Ensure a tight seal. Push down gently to get the air out, then pull up and push down vigorously. It’s the pulling action that often dislodges the clog, bringing it up so it can break apart.
- Repeat: Do this for 20-30 seconds. Lift the plunger.
- Flush: If the water drains, run hot water for a few minutes to clear the debris.
Troubleshooting
If the plunger isn’t working, check underneath the sink. You will see a U-shaped pipe called the P-trap. Often, the clog is stuck right in that bend. Place a bucket under the pipe, unscrew the slip nuts on the P-trap by hand (or with a wrench), and remove the trap. You can manually clean this piece out in a bucket. It’s gross, but 100% effective for local clogs.
Plumbing Snake or Auger
When the plunger fails, and the baking soda makes a fizzy mess, you need to bring in the heavy artillery: the plumbing snake (also called a drain auger). This tool physically reaches deep into the pipe to hook or break up the obstruction.
When to Use This
- Stubborn Clogs: When water completely refuses to drain.
- Deep Blockages: When the clog is past the P-trap, deep in the wall or floor.
Step-by-Step Guide to Snaking
- Access the Cleanout: Look for a “cleanout” plug. This is usually a threaded cap on a pipe in your basement, crawlspace, or on the exterior wall. If you are working on a sink, you can snake directly through the drain opening (remove the sink stopper first) or the pipe where you removed the P-trap.
- Insert the Snake: Loosen the thumbscrew on the drum of the snake. Pull out a few feet of the metal cable and insert it into the pipe. Push it in by hand until you feel resistance.
- The “Turn and Burn”: Once you hit the clog (resistance), tighten the thumbscrew so the cable is locked. Rotate the handle of the drum clockwise.
- Why Clockwise? This screws the tip of the auger into the clog like a corkscrew.
- Push and Pull: As you rotate, gently push forward. If it feels stuck, pull back slightly, then push again. You are trying to break up the mass or hook it.
- Retrieve: Once the resistance is gone (or you have hooked the debris), pull the cable back out. Have a garbage bag ready—what comes out will be covered in black sludge and possibly hair or grease. Wipe the cable with a rag as you pull it out to keep the machine clean.
- Flush: Once the snake is out, run hot water to flush the remaining loose debris down the line.
Pipe-Specific Tips
- Galvanized Steel: Be aggressive. These pipes are tough.
- Copper: Be gentle. Copper is softer, and a sharp auger tip can scratch or puncture old copper bends.
- PVC: Do not pour chemicals down the drain after snaking. If the snake scraped the plastic walls, chemicals can eat into those scratches.
Warning Box: Never force the snake if it hits a hard stop. You might be hitting a pipe bend or a joint. Forcing it can crack the pipe, turning a $0 fix into a wall-demolition nightmare.
Hydro Flushing and Vinegar Soaks
This method is specifically for how to unclog water lines in the house that are suffering from generalized low pressure due to years of mineral scale buildup inside the supply pipes. It’s effectively “rebooting” your water lines.
The Science Behind It
Over time, minerals in hard water coat the inside of your pipes. This reduces the diameter of the pipe, restricting flow. Vinegar (acetic acid) dissolves these minerals.
The Process
- Isolate the Heater: Turn off the valve to your hot water heater so you don’t drain it accidentally.
- Reverse-Flow Setup: This is advanced. You can push water backwards through the system, or flush it out at a low point.
- The Vinegar Soak (For Tankless Heaters or specific lines): If you have a tankless heater, you likely have service valves. You can use a small sump pump to circulate a bucket of white vinegar through the heater for 45 minutes. This is standard maintenance that drastically improves pressure.
- Whole House Flush (Simpler Version): Turn off the main water.
- Open every faucet in the house (sinks, showers, tubs).
- Remove the aerators from all faucets.
- Turn the main water back on full blast.
- The sudden rush of high-pressure water through the open lines (without aerators restricting it) can blast out loose sediment and rust flakes that were settling in the pipes. Let it run for 5 minutes.
- Turn off faucets, clean aerators, and replace.
Troubleshooting Low-Pressure Specifics
Sometimes, the issue isn’t a clog in the pipe, but a mechanical failure. If you have tried the methods above and still have low pressure, check these culprits:
The Pressure Reducing Valve (PRV)
Most homes have a bell-shaped valve located right after the main water shut-off. This is the PRV. Its job is to lower the high municipal water pressure to a safe level for your home (usually 40-60 PSI).
- The Fix: PRVs fail over time. If yours is old, it might be stuck in the “low” position. You can try adjusting the screw on top (clockwise increases pressure), but often it needs replacement by a pro.
The Water Meter Valve
Did you recently have utility work done? Sometimes the city worker doesn’t turn the meter valve back on all the way. Check the meter box at the street. Ensure the valve is fully open (parallel to the pipe).
Cartridge Issues
If you have low pressure in only the shower, but the sink next to it is fine, the issue is inside the shower handle. The mixing cartridge inside can get clogged with minerals.
- The Fix: Turn off the water, remove the handle, and pull out the cartridge. You can try soaking it in vinegar, but usually, buying a replacement ($20-$40) is the best long-term fix.
Prevention Tips

Congratulations! You’ve unclogged your lines. Now, let’s make sure you never have to do this again. Prevention is easier (and cheaper) than repair.
install a Water Softener
If you live in an area with hard water, mineral buildup is inevitable. A whole-house water softener removes calcium and magnesium before they enter your pipes. It’s an investment ($500+), but it saves your pipes and appliances.
The Monthly “Hot Flush.”
Once a month, pour a large pot of boiling water down your kitchen sink. This melts grease that has started to accumulate before it hardens into a solid clog.
Be Mindful of What You Flush
Your pipes are not trash cans. Never flush:
- “Flushable” wipes (they are not actually flushable!).
- Cooking grease or oil.
- Coffee grounds.
- Feminine hygiene products.
Annual Inspections
Make a calendar reminder to check your water pressure and inspect exposed pipes for leaks or corrosion once a year. Catching a rusty pipe early prevents a burst later.
When to Call a Professional
We are big fans of DIY, but there is a time to wave the white flag. Knowing when to call a pro can save you from causing catastrophic damage.
Call a plumber if:
- Backups are ubiquitous: If you flush the toilet and water comes up the shower drain, you have a main sewer line blockage. This is often deep underground and requires industrial equipment.
- Tree Roots: If you snake a line and pull back roots, stop immediately. Roots grow into pipes through tiny cracks. You need a camera inspection and potentially a hydro-jetting service or pipe repair.
- Sewer Smells: A persistent smell of sewage indicates a broken seal or a cracked vent pipe, which can be a health hazard.
Cost Reality Check: A basic professional auger service runs $150-$400. However, replacing a pipe you cracked by forcing a DIY tool can cost $1,000+. If you are unsure, the service fee is worth the peace of mind.
FAQs
Q: How long does it typically take to unclog water lines in the house? A: Simple clogs using boiling water or a plunger can take 15-30 minutes. More complex issues requiring a snake or system flush might take 1 to 2 hours.
Q: Are these methods safe for septic systems? A: Yes! Baking soda, vinegar, and boiling water are perfectly safe for septic tanks. Avoid using harsh commercial chemical drain openers (like Drano) frequently, as they can kill the healthy bacteria your septic tank needs.
Q: Which is better: Vinegar or Chemical Cleaners? A: For maintenance and minor clogs, vinegar is better because it doesn’t damage pipes or harm the environment. For total stoppages, an enzyme cleaner is a great middle ground. Avoid sulfuric acid cleaners unless absolutely necessary, as they can eat through old metal pipes.
Q: Can I use a garden hose to unclog my kitchen sink? A: Technically, yes, utilizing a device called a “blow bag” or “drain bladder” attached to a hose can force water into the drain to clear it. However, be careful—if the clog doesn’t move, that water pressure has to go somewhere, and it might come shooting back out at you!