Roughing in plumbing is the process of installing the basic plumbing system before the final finishes are added to a home. When it comes to slab foundations, proper rough-in plumbing is essential for a functional, long-lasting plumbing system.
Understanding Rough-In Plumbing for Slab Foundations
What is Rough-In Plumbing?
Rough-in plumbing is the initial installation of pipes, fittings, and fixtures before walls, floors, and ceilings are finished. It’s the foundation of your home’s plumbing system, and it’s crucial to get it right from the start.
Slab Foundations and Plumbing
Slab foundations are a popular choice for many homes, especially in warmer climates. However, plumbing for slab foundations differs from other foundation types. With a slab foundation, plumbing pipes are installed below the concrete slab, so they must be carefully planned and installed to avoid future issues.
Challenges and Importance of Planning
Roughing in plumbing for a slab foundation can present some unique challenges. The pipes need to be precisely placed and sloped to ensure proper drainage and prevent leaks. That’s why planning is so important. By taking the time to carefully plan your plumbing layout before pouring the concrete, you can save time, money, and headaches down the road.
Benefits of Learning How to Rough In Plumbing for Slab
Learning how to rough in plumbing for slab foundations can be incredibly beneficial. Not only can it save you money on labor costs, but it also gives you a sense of accomplishment and control over your home’s construction. Plus, by doing it right the first time, you can prevent costly future plumbing issues.
Essential Tools and Materials Needed
Before you start roughing in your home’s plumbing for a slab foundation, gather the right tools and materials. Here’s a list of what you’ll need:
Tools
- Pipe cutter
- Tape measure
- Levels
- Wrenches
- Hacksaw
- Drill
- Hammer
Materials
- PVC or CPVC pipes
- Fittings (elbows, tees, couplings)
- Plastic cement
- Test plugs
- Rebar and anchor bolts (if required)
- Safety gear (gloves, safety glasses)
Safety and Code Compliance
When working with plumbing, it’s essential to prioritize safety. Always wear the appropriate safety gear and follow local building codes and regulations. Failure to comply with these codes could result in costly fines or even the need to redo the plumbing work.
Preparation Tips
Before you start the project, take some time to prepare. Clear the workspace, gather all the necessary tools and materials, and familiarize yourself with the plumbing layout plan. By being well-prepared, you’ll set yourself up for success and minimize the risk of mistakes.
Step-by-Step Guide to Rough In Plumbing for Slab Foundations
Now that you have a solid understanding of rough-in plumbing for slab foundations and have gathered the necessary tools and materials, it’s time to dive into the step-by-step process. Let’s walk through each stage of roughing in your home’s plumbing for a slab foundation.
Planning Your Plumbing Layout
Drawing a Detailed Plumbing plan
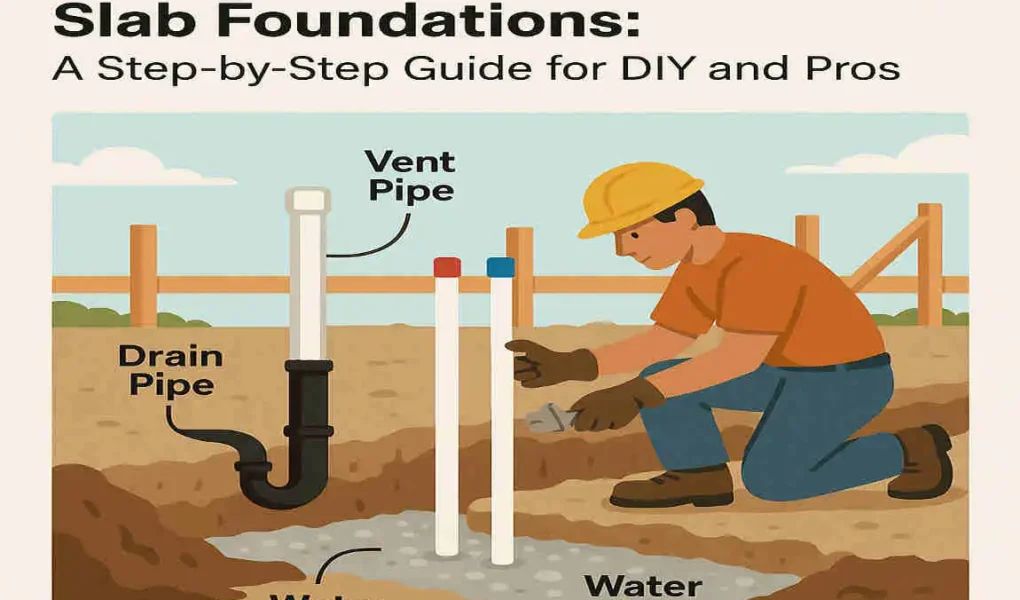
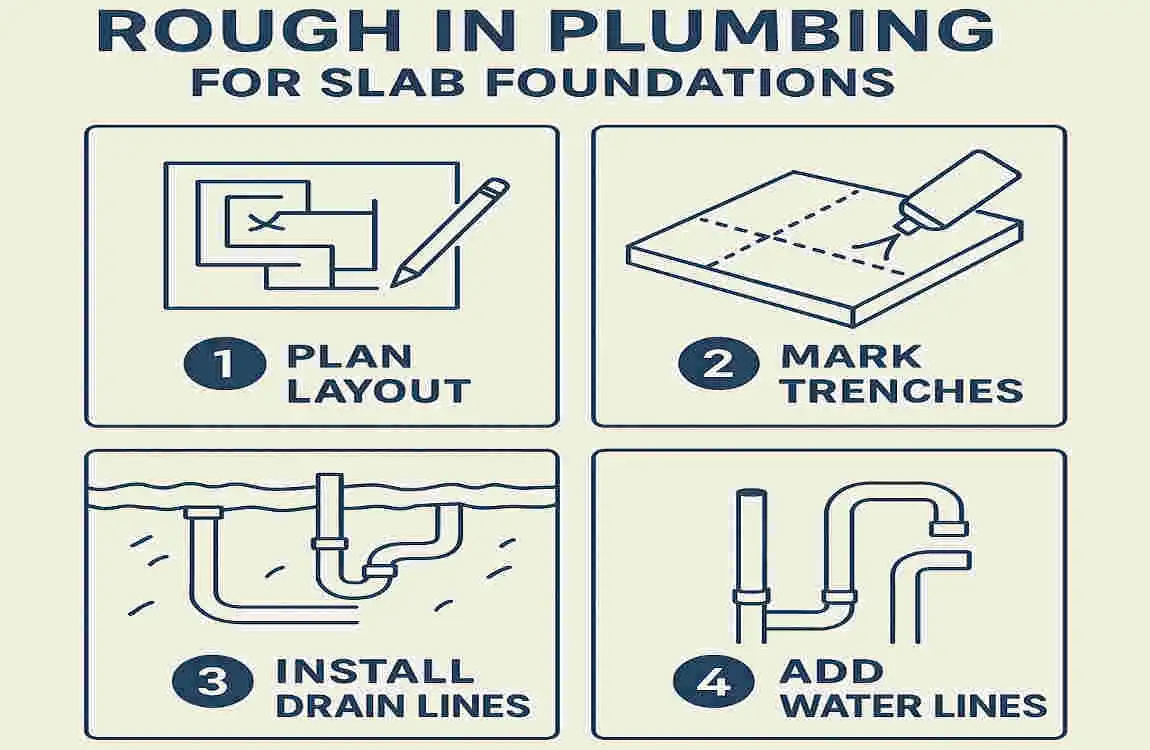
The first step in roughing in your home’s plumbing for a slab foundation is to create a detailed plumbing plan. This plan should include the location of all fixtures, such as sinks, toilets, and showers, as well as the routes of the pipes.
Take the time to measure and map your plumbing layout on paper carefully. This will help you visualize the system and ensure that everything is positioned correctly.
Locating Fixture Positions and Pipe Routes
Once you have your plumbing plan, it’s time to transfer it to the slab. Use a tape measure and spray paint to mark the locations of the fixtures and the pipe routes.
Double-check your measurements to ensure accuracy. Even a small mistake at this stage could lead to significant problems later.
Tips to Double-Check Measurements
To avoid costly mistakes, take the time to double-check your measurements. Use a level to ensure that your marks are straight and a tape measure to confirm the distances between fixtures and pipes.
It’s also a good idea to have someone else review your measurements and layout plan. A fresh set of eyes can help catch any errors you have missed.
Preparing the Slab Area
Clearing the Workspace
Before you start installing the plumbing, it’s essential to clear the workspace. Remove any debris, tools, or materials that could get in the way or cause damage to the pipes.
Inspecting the Slab for Cracks or Damage
Carefully inspect the slab for any cracks or damage. If you find any issues, address them before proceeding with the plumbing installation. Failing to do so could lead to leaks or other problems down the road.
Installing Rebar and Anchor Bolts
Depending on your local building codes and the specific requirements of your home, you may need to install rebar and anchor bolts in the slab. These help reinforce the concrete and provide a solid foundation for the plumbing system.
Ensuring a Level Surface
Before you start installing the plumbing, make sure the slab is level. Use a level to check the surface and make any necessary adjustments. A level slab will help ensure that your pipes are properly sloped for drainage.
Installing the Drainage System
Excavating Trenches Below the Slab
The next step is to excavate trenches below the slab for the drainage pipes. Carefully use a shovel or a trenching tool to dig the trenches to the proper depth and width.
Proper Pipe Sizing and Placement
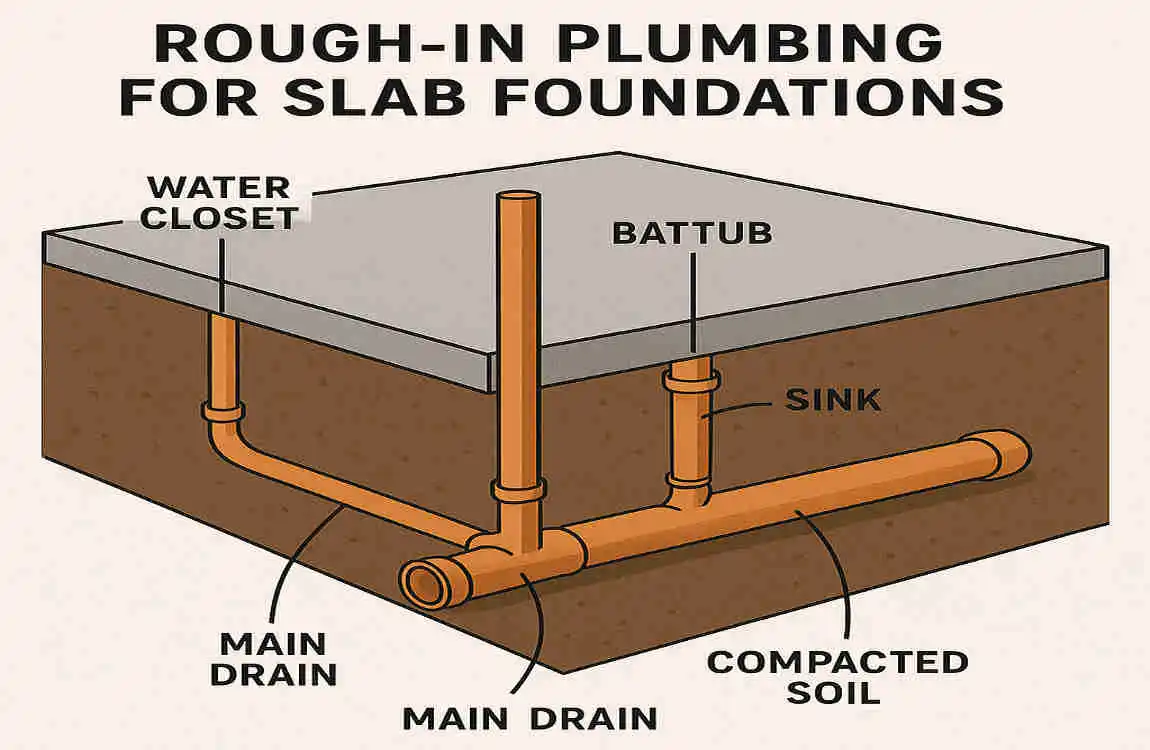
When installing the drainage pipes, it’s crucial to use the right size and place them correctly. Refer to your plumbing plan and local building codes to determine the appropriate pipe sizes for each fixture.
Achieving the Correct Slope
Proper drainage relies on the correct slope of the pipes. The general rule of thumb is to maintain a slope of 1/4 inch per foot. Use a level and a string line to ensure that your pipes are properly sloped.
Connecting Pipes Using Fittings and Cement
Once the pipes are in place, use fittings and plastic cement to connect them securely. Follow the manufacturer’s instructions for applying the cement and allow it to dry completely before proceeding.
Installing Clean-Out Tees and Vents
Don’t forget to install clean-out tees and vents as part of your drainage system. These provide access points for maintenance and help prevent clogs and backups.
Installing Water Supply Lines
Routing Hot and Cold Water Supply Pipes
Now it’s time to install the water supply lines. Carefully route the hot and cold water pipes according to your plumbing plan, ensuring that they are correctly sized and positioned.
Using Correct Fittings and Securing Pipes
Use the appropriate fittings to connect the water supply pipes, and secure them in place using pipe hangers or brackets. This will help prevent movement and potential leaks.
Pressure Testing Water Lines
Before proceeding, it’s essential to pressure-test the water lines to detect leaks. Use a pressure gauge and test plugs to pressurize the system and monitor for any pressure drops.
If you detect any leaks, address them immediately before moving forward with the installation.
Finalizing Plumbing Rough-In
Installing Test Plugs for Hydrostatic Testing
To ensure the integrity of your plumbing system, it’s essential to perform a hydrostatic test. Install test plugs in the pipes and fill the system with water to check for any leaks or issues.
Backfilling Trenches and Protecting Pipes
Once you’ve completed the hydrostatic test and are satisfied with the results, it’s time to backfill the trenches. Use sand or gravel to carefully backfill around the pipes, taking care not to damage them.
Pouring and Leveling a Concrete Slab
With the plumbing rough-in complete, it’s time to pour the concrete slab. Work with a professional to ensure that the slab is properly poured and leveled around the plumbing pipes.
Tips to Avoid Damage During Concrete Pour
To avoid damaging the plumbing pipes during the concrete pour, take a few precautions. Use protective sleeves or wrap the pipes with insulation to provide an extra layer of protection.
Additionally, communicate clearly with the concrete crew to ensure they are aware of the plumbing locations and to ensure they take care not to disturb the pipes during the pour.
Common Mistakes to Avoid When Roughing in Plumbing for Slab
Even with careful planning and execution, it’s easy to make mistakes when roughing in plumbing for a slab foundation. Here are some common pitfalls to watch out for:
- Inaccurate measurements leading to misaligned fixtures
- Improper pipe slope causing drainage issues
- Using the wrong pipe types or fittings
- Skipping pressure testing
- Not adhering to local plumbing codes
By recognizing these common mistakes, you can take steps to avoid them and ensure a successful plumbing rough-in.
Tips for DIY vs. Professional Plumbing Rough-In
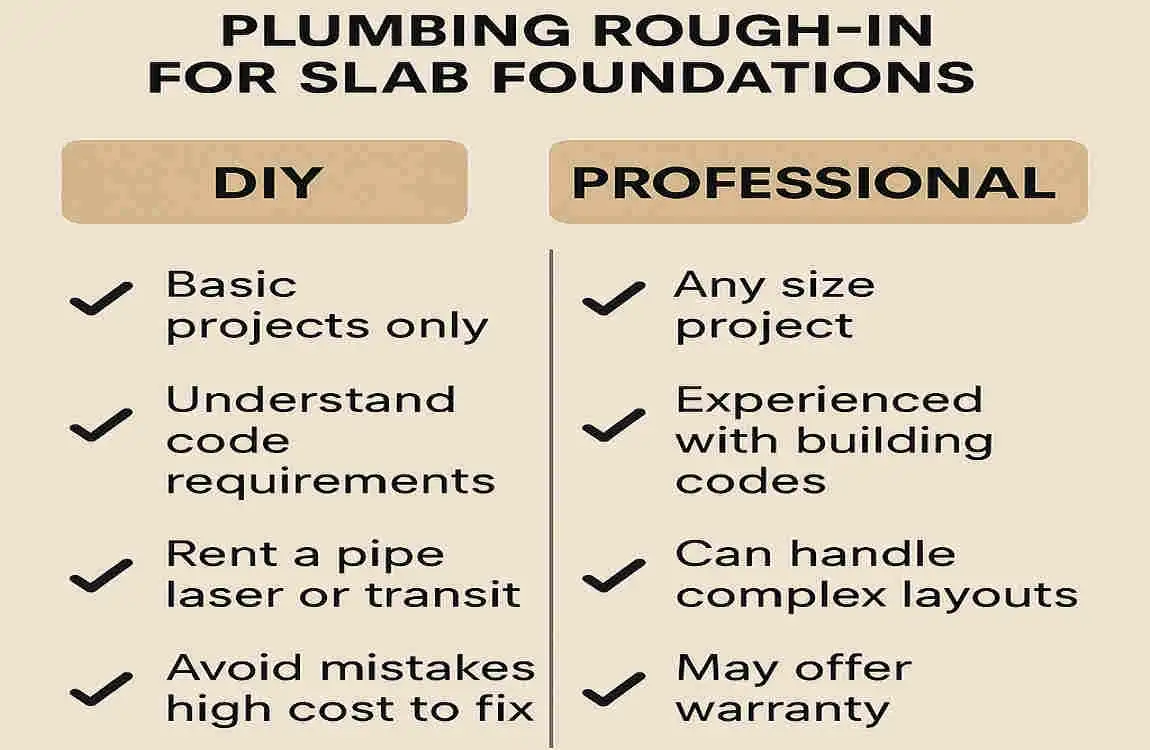
When it comes to roughing in plumbing for a slab foundation, you have two options: tackle it yourself as a DIY project or hire a professional plumber. Here are some tips to help you decide which route is best for you:
When DIY Rough-In is Feasible
If you have plumbing experience and feel confident in your ability to follow the step-by-step process, a DIY rough-in may be a good option. It can save you money on labor costs and give you a sense of accomplishment.
However, keep in mind that roughing in plumbing for a slab foundation is a complex task that requires careful planning and execution. If you’re unsure about any aspect of the process, it’s better to err on the side of caution and hire a professional.
When to Hire a Professional
If you’re short on time, lack plumbing experience, or have a particularly complex home layout, it’s best to hire a professional plumber. They have the knowledge, skills, and tools to get the job done right the first time.
A professional plumber can also help ensure that your plumbing rough-in meets local building codes and passes inspections. This can help you avoid costly mistakes and delays on your construction project.
Tools and Skills Required for Successful DIY Rough-In
If you do decide to take on a DIY plumbing rough-in, make sure you have the necessary tools and skills. Some essential tools include a pipe cutter, a tape measure, levels, wrenches, and a drill.
In terms of skills, you’ll need to be comfortable with basic plumbing concepts, such as pipe sizing, slope, and fittings. You should also have experience with reading and interpreting plumbing plans and following local building codes.
Ensuring Code Compliance and Getting Inspections
When roughing in plumbing for a slab foundation, it’s crucial to ensure that your work complies with local building codes. Failure to do so could result in fines, delays, or even the need to redo the plumbing.
Importance of Following Local Building Codes
Local building codes are in place to ensure the safety and functionality of plumbing systems. By following these codes, you can help prevent issues like leaks, backups, and contamination.
Take the time to familiarize yourself with the relevant codes and regulations in your area. If you’re unsure about any aspect of the codes, consult with a local building inspector or a professional plumber.
Scheduling Rough-In Inspections
Before pouring the concrete slab, you’ll need to schedule a rough-in inspection with your local building department. This inspection will ensure that your plumbing rough-in complies with the required codes and standards.
Be sure to schedule the inspection well in advance and have all the necessary documentation and plans ready for the inspector. If the inspector finds any issues, address them promptly before proceeding with the concrete pour.
Common Code Requirements for Slab Plumbing
While specific code requirements may vary depending on your location, some standard requirements for slab plumbing include:
- Proper pipe sizing and placement
- Correct pipe slope for drainage
- Use of approved materials and fittings
- Adequate venting and clean-out access
- Compliance with water supply and pressure requirements
By understanding and adhering to these standard code requirements, you can help ensure a successful plumbing rough-in.
How Inspections Protect Your Investment
Rough-in inspections may seem like an extra step, but they play a crucial role in protecting your investment. By catching issues or code violations early, inspections can save you from costly repairs or rework down the road.
Additionally, a successful rough-in inspection can give you peace of mind knowing that your plumbing system is safe, functional, and compliant with local regulations.
Maintenance and Future-Proofing Your Plumbing System
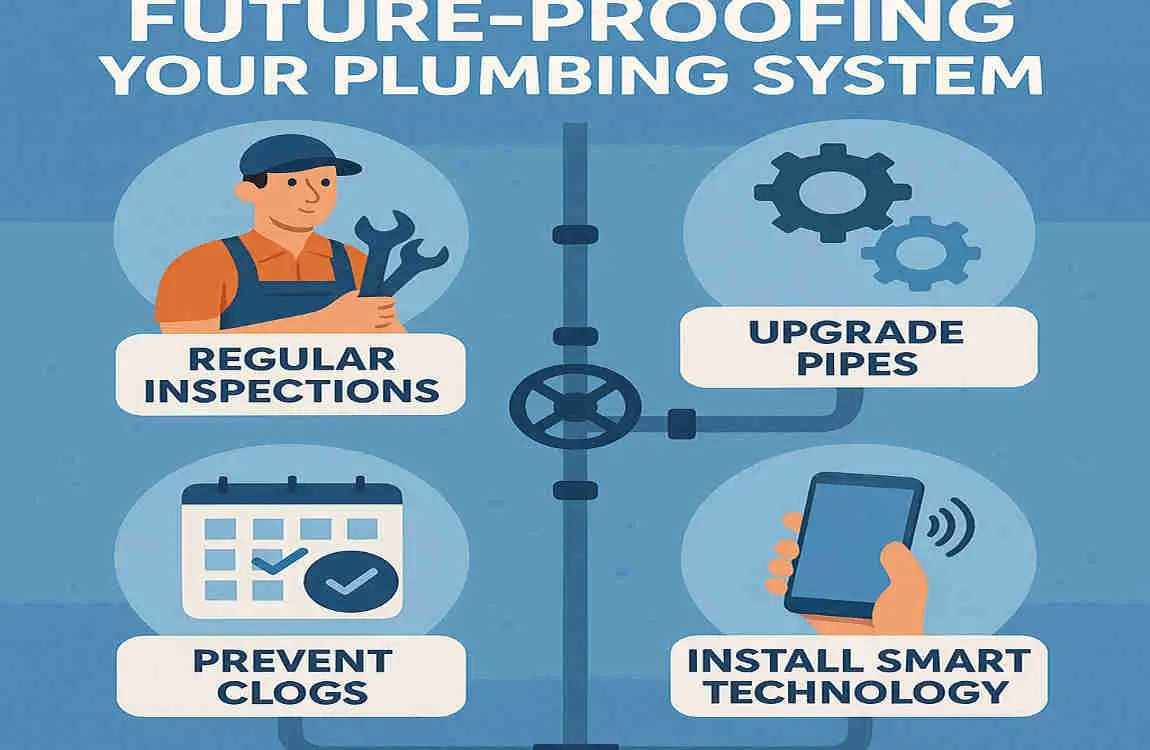
Once your plumbing rough-in is complete and the concrete slab is poured, it’s essential to think about maintenance and future-proofing your system. Here are some tips to help you keep your plumbing in top shape:
Tips to Protect Plumbing Within Slab
- Avoid heavy impacts or pressure on the slab surface that could damage the pipes
- Keep an eye out for any signs of leaks, such as damp spots or musty odors
- Consider installing leak detection systems for added protection
- Be mindful of what you put down your drains to prevent clogs and backups
What to Expect from Slab Plumbing Long-Term
With proper installation and maintenance, slab plumbing can last for many years. However, it’s essential to be aware of some potential long-term issues, such as:
- Corrosion or deterioration of pipes over time
- Shifting or settling of the slab could cause pipe damage
- Difficulty accessing pipes for repairs or upgrades
By understanding these potential issues, you can be proactive in maintaining and addressing them as needed.
How to plan for Repairs or Upgrades
While it’s impossible to predict every plumbing issue that may arise, you can plan for repairs or upgrades. Some tips include:
- Keeping detailed records of your plumbing layout and materials used
- Budgeting for potential repairs or upgrades in the future
- Considering the installation of access panels or clean-outs for easier maintenance
- Consulting with a professional plumber for advice on long-term planning
How to Rough In Home Plumbing for Slab FAQ
What is Rough-In Plumbing for a Slab Foundation?
Rough-in plumbing refers to the initial installation of pipes, drains, and vents before the final finishes are added to a home. For slab foundations, this process happens before the concrete is poured. The goal is to create a basic skeleton of the plumbing system that will be hidden beneath the slab .
Why is Rough-In Plumbing Important for Slab Foundations?
Proper rough-in plumbing is essential for slab foundations because it sets the stage for the entire plumbing system. If done correctly, it can help prevent future issues like leaks, clogs, and sewer gas leaks. However, if the rough-in is done incorrectly, it can lead to costly repairs and rework once the slab is already poured .
What are the Key Considerations for Rough-In Plumbing on a Slab?
When roughing in plumbing for a slab foundation, there are several important factors to keep in mind:
- Gravity: Position drain lines so they angle downward to take advantage of gravity for proper drainage .
- Horizontal Drains: Avoid long horizontal drain line runs as much as possible to prevent clogs and slow drainage.
- Pipe Connections: Ensure all pipe connections are secure and properly sealed to prevent leaks .
- Pipe Angles: Use sweep 90-degree elbows to ensure smooth flow and reduce the risk of clogs. After the 90-degree elbow, maintain straight vertical (plumb) pipes where possible .
How is the Rough-In Plumbing Process Done for a Slab Foundation?
The rough-in plumbing process for a slab foundation typically involves the following steps:
- Digging Holes and Channels: Plumbing workers will dig holes and channels to lay the drainage pipework into. If it’s a raised slab, the digging is relatively easy and can be done by shovel .
- Constructing Pipework: The plumbing contractor will construct the pipework, including drains, vents, and supply lines, according to the home’s plumbing plan .
- Covering Pipes: Once the pipework is in place, the pipes are covered with sand or crusher dust to protect them before the concrete is poured .
- Hydrostatic Pressure Testing: Before the slab is poured, a hydrostatic pressure test using water is performed to check for any leaks in the system.
Can I Do the Rough-In Plumbing for a Slab Foundation Myself?
While it’s possible for a DIY enthusiast to tackle some aspects of rough-in plumbing, it’s generally not recommended for slab foundations. Roughing in plumbing for a slab is a one-shot deal, and mistakes can be costly and difficult to fix once the concrete is poured. It’s best to hire a professional plumbing contractor for this critical stage of the construction process.