Renovating your and dreaming of a clean island layout with a sink right in the middle? Then you may already be facing one big question: how to reroute home plumbing without turning your project into a mess.
That is a very common situation. People search for this topic when they want to add a new bathroom, move a kitchen sink, fix a leak in old pipes, or deal with slab problems in older homes. In many homes, the plumbing was installed for a different layout, a different family size, or a different style of living. Once you start changing the space, the old pipe layout often no longer fits.
The good news is that rerouting plumbing lines can solve a lot of these problems. It can also make your home work better for you. You may get stronger water flow, fewer hidden leaks, and a cleaner setup that supports modern materials like PEX piping. In some cases, a smart reroute can even save you from much bigger repair bills later.
But this is not a job to rush. A home plumbing reroute needs planning, careful measuring, the right tools, and a solid understanding of how water and drains move through the house. If you skip steps, you can end up with leaks, clogs, bad pressure, or even code violations.
| Key Notes | ||
|---|---|---|
| Define your goal | Decide why you’re rerouting: adding a bathroom, moving fixtures, bypassing slab leaks, or upgrading old pipes. | |
| Assess existing plumbing | Map current water and drain lines, note pipe material (PVC, copper, PEX), and identify where you’ll cut in or reroute. | |
| Plan the new layout | Sketch the new route, choose pipe sizes and materials, and decide whether to run through walls, attic, or under floors. | |
| Check permits and codes | Confirm local plumbing codes and whether you need a permit, especially for new fixtures or major layout changes. | |
| Shut off water supply | Turn off the main water valve and individual shutoffs, then drain remaining water to avoid flooding. |
Why Reroute Plumbing?

Common Reasons Homeowners Reroute Plumbing
There are many reasons someone might need to reroute plumbing pipes. Some are small and practical. Others come from major renovations or age-related damage.
One common reason is adding a new bathroom or shower. This is especially common in growing family homes where one bathroom no longer feels enough. If you want to create a more comfortable layout, you may need to move supply and drain lines to the new spot.
Another major reason is old pipe damage. Many older homes still have galvanized pipes or worn lines that corrode over time. These pipes can narrow inside, rust, and reduce water flow. In some cases, they start leaking behind walls or under floors. At that point, rerouting may be smarter than repairing the same weak section again and again.
A third reason is slab leaks. If a pipe under the floor breaks, accessing it directly can be expensive and messy. In many situations, it is easier to reroute the plumbing above the slab instead of digging through the concrete.
Kitchen and bathroom remodels also create a need for rerouting. Maybe you want to move a sink, add a dishwasher, shift a toilet, or make room for a larger vanity. Once the fixtures move, the plumbing usually has to move too.
Benefits of a Plumbing Reroute
A good reroute does more than fix a problem. It can also improve the whole home system.
First, it can improve water pressure. If your old pipes are clogged, corroded, or poorly sized, new lines can help water move more freely.
Second, it gives you a chance to switch to PEX pipes, which are flexible and easier to route through tight spaces than rigid copper. That flexibility can save time and reduce the number of joints.
Third, it can help prevent future bursts and leaks. If you are already opening walls or floors for a renovation, it makes sense to replace weak plumbing before it fails on its own.
Here is a simple look at the most common reroute situations:
ReasonDIY FeasibilityAvg. Savings
New fixture add Medium $500–$2,000
Leak repair Low $1,000+
Full remodel Pro recommended $2,000–$5,000
A plumbing reroute is often one of those projects that seems expensive at first, but becomes a smart investment when you compare it with emergency repairs, water damage, and repeated fixes.
Planning Phase
Assess Your Current System
Before you cut a single pipe, you need to understand what is already inside your home. This is the stage where careful observation saves you time, money, and frustration.
Start by finding where the pipes run. In many homes, you can check the basement, crawlspace, attic, or utility chase areas. If your home has hidden plumbing inside walls or under a slab, you may need to trace the visible sections first and use that as a guide.
You also need to identify the pipe material. Common materials include PVC, copper, galvanized steel, and PEX. Each one behaves differently. Copper is rigid and durable. PEX is flexible and easier to install. PVC is often used for drains. Galvanized steel is older and often a sign that rerouting may be wise.
Take notes and photos if you can. Sketch the current layout on paper. Mark where the fixtures are, where the main line enters, and where the drains exit. This gives you a base map before you design the new route.
If you are unsure about what you are seeing, take your time. A rushed guess can lead to the wrong pipe being cut, and that can turn a simple job into an emergency.
Permits and Local Codes
This part may not feel exciting, but it matters a lot.
Most plumbing reroutes are regulated by local building rules. In many places, you will need a permit for drain changes, major supply line changes, or any work that affects structural parts of the home. If you are in a place like , you should check the local building requirements before starting. The same goes for any city or town where you live.
Local rules tell you what can be changed, what must be inspected, and what kind of work needs a licensed professional. National rules may also apply in some cases, especially where water safety or sanitation is involved.
Do not guess here. If your project needs approval, get it first. A permit may feel like an extra step, but it protects you from fines, delays, and future resale problems. It also gives you peace of mind that the work is being done correctly.
If you are planning a project that includes bathrooms, drains, or shared lines, code compliance becomes even more important. Plumbing is not only about making water go where you want. It is also about making sure wastewater leaves safely and vents properly.
Design the New Route
Once you know your current system, you can plan the new one.
The goal is to create a route that is short, practical, and safe. You want to avoid cutting through important structural parts of the home unless a qualified pro says it is okay. For example, you should not casually cut through load-bearing joists to make the line fit better.
A good design should also keep the drain slope in mind. Most drain lines need about 1/4 inch of slope per foot so wastewater can move naturally. If the slope is too flat, waste can sit in the pipe. If it is too steep, water can move too fast and leave solids behind.
Try to keep supply lines easy to access. Pipes hidden in places you cannot reach later can become a problem if they ever leak. It is better to place them where future repairs will be simpler.
Here is a simple way to think about the planning stage:
- Map the old pipes
- Mark the new fixture locations
- Check for obstacles
- Confirm slope for drains
- Review code requirements
- Decide whether the job is DIY-friendly
A small sketch can save a lot of stress. Draw the room, then trace the pipes like you are planning a path on paper. If the new route seems crowded, complicated, or too close to electrical lines, that is a sign to slow down and reconsider.
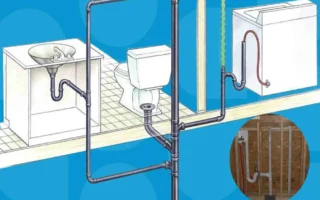
Visual Guide Placeholder
Diagram idea: Show the original pipe path versus the new rerouted path around a kitchen island or bathroom wall.
That visual makes it easier to understand how rerouting plumbing pipes works in a real renovation.
Essential Tools and Materials
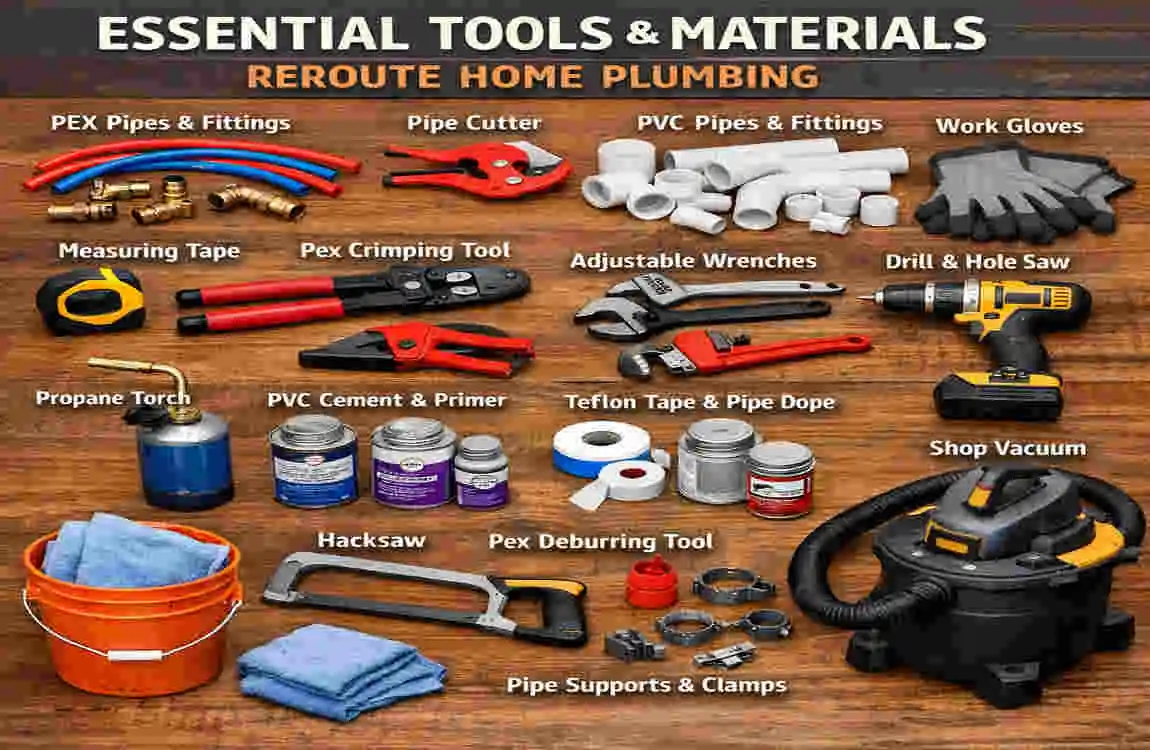
What You Need Before You Start
Good tools make the job cleaner and safer. Poor tools make it slower and riskier. If you are learning how to reroute home plumbing, gather everything first so you do not stop in the middle of the work.
For most DIY plumbing reroute jobs, you may need:
- Pipe cutter for clean cuts
- Adjustable wrenches for fittings
- PEX crimper if you are using PEX
- Hacksaw for tougher sections
- Teflon tape for threaded joints
- Primer and cement for PVC drain work
- Leak detector for testing
- Pressure gauge for final checks
- Measuring tape and marker
- Support straps for pipe mounting
If you are using PEX, you will also need the right fittings and connectors. If you are working with copper, the tools and process may be different, especially if soldering is involved. Always match your tools to your material.
Tool and Material Cost Table
Category Must-Haves Cost (PKR)
Cutting Tubing cutter, hacksaw 2,000–5,000
Joining SharkBite fittings, tape 3,000–7,000
Testing Pressure tester 1,500
The exact cost depends on what you already own and how many lines you are moving. One smart tip is to rent specialty tools like a crimper or pressure tester if you only need them for a single project.
Materials You May Need
Along with tools, you will need the right pipe materials.
For supply lines, PEX is often the easiest choice for a DIY plumbing reroute. It bends around corners more easily than copper, and it usually requires fewer fittings. That means fewer places for leaks to start.
For drains, you may need PVC or ABS, depending on your local standards and existing system. Drain lines need to match the right size and slope, so do not guess on pipe diameter.
You may also need pipe hangers, insulation sleeves, caps, connectors, and wall patch materials. Keep extra fittings on hand. Small mistakes happen, and it is better to have one extra connector than to stop the job halfway through.
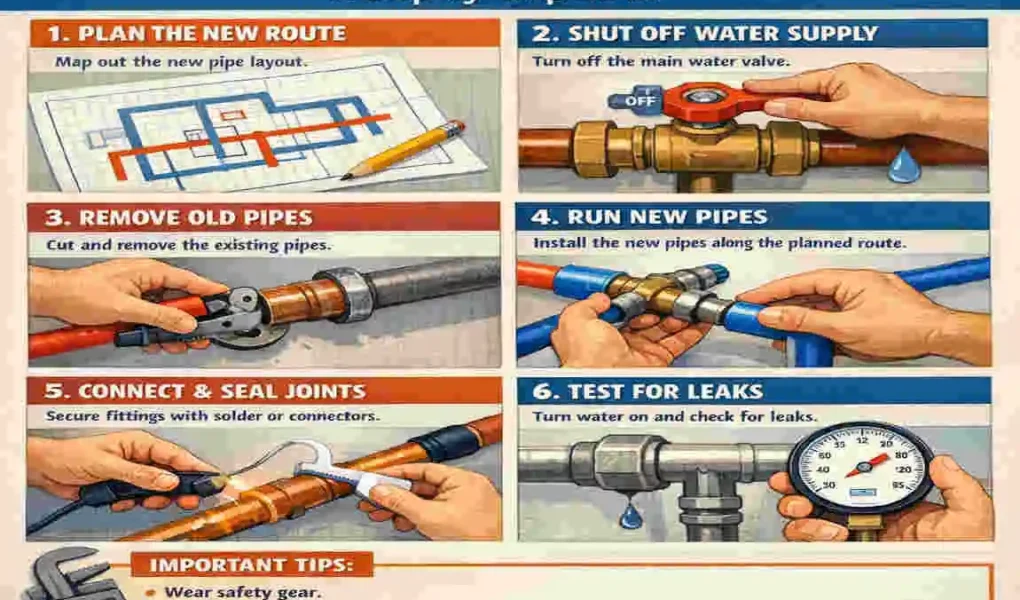
Step-by-Step Guide
Shut Off the Water
Before anything else, turn off the main water supply. This is the first rule of safe plumbing work.
Find the main shutoff valve and close it fully. Then open a few faucets in the house to drain the lines. This reduces pressure and helps clear leftover water from the pipes you plan to disconnect.
If you are working on only one branch of the plumbing, you may also have smaller shutoff valves near the affected fixture. But do not rely on those alone if you are making a major reroute. Use the main shutoff if needed.
Take your time here. Many DIY mistakes start because someone thinks the water is off when it is not.
Disconnect the Old Pipes
Once the water is off and the lines are drained, you can begin disconnecting the old section.
Cut carefully. Use the right tool for the pipe material, and make sure your cuts are straight. A clean cut makes it easier to attach the new line without stress on the fittings.
After cutting, cap the open ends so you do not accidentally get debris or insects into the system. Capping also helps you control the old line while you work on the new one.
If the pipe is badly corroded or brittle, be gentle. Old pipes can break in unexpected ways, especially when you start twisting or pulling on them.
plan and Cut Access
Now you need access to the new route.
For wall reroutes, a drywall saw or similar cutting tool can open the section you need to reach. Make the opening large enough to work comfortably, but not so large that the repair becomes harder later.
If the route goes through a floor or slab area, stop and think before cutting. Slab reroutes are much more complex and may require professional help. Concrete work can create dust, structural stress, and expensive mistakes if done wrong.
Inside walls, check for hidden wires, insulation, and framing before you cut. A wall may look empty, but it often holds more than you expect. This is especially important in bathrooms and kitchens, where plumbing and electrical systems may run close together.
A good rule is simple: open only what you need, and make every cut with a reason.
install New Supply Lines
This is where the reroute starts becoming real.
Run the new supply lines along the planned path. If you are using PEX, keep the line supported and avoid sharp bends. PEX is flexible, but that does not mean you should force it into a tight corner. Tight bends can stress the pipe over time.
Use straps or clips to hold the pipe in place. This keeps it from sagging or rubbing against rough surfaces. If pipes move too much, they can wear down at contact points.
Keep the new route neat and logical. The more direct the path, the easier it is to understand and repair later. Try not to create unnecessary turns. Every extra joint is another possible leak point.
If the line must pass near cold areas, consider insulation. This helps protect against temperature changes and reduces the chance of freezing in colder seasons.
Reroute Drains and Waste Lines
Drain lines need even more care than supply lines because they depend on gravity.
When rerouting drainage, you must keep the correct slope. Remember the basic rule: about 1/4 inch per foot. That slight tilt allows wastewater to move without pooling inside the pipe.
You also need to protect the venting system. If a drain is rerouted without proper vent support, water can drain slowly or cause gurgling and trap siphoning. That is why drain work often becomes more technical than supply line work.
Make sure the pipe size matches the fixture. A sink, shower, and toilet all have different needs. A line that is too small can clog. A line that is too large in the wrong place can create other flow problems.
If you are changing a drain route in an older home, take extra care with the trap and vent layout. A small mistake here can create odors, slow drainage, or repeated clogs.
This is one of the reasons many homeowners can handle parts of a reroute, but still call a professional for drain redesigns.
Secure the Fittings
Once the pipes are in place, secure all joints carefully.
For PEX, this usually means crimping or using approved push-fit connectors, depending on the system you choose. For threaded connections, use thread tape to help create a tighter seal. For copper systems, soldering may be needed, which requires skill and safe handling.
The goal is simple: every joint should be tight, aligned, and supported.
Do not over-tighten fittings. Many people think tighter means safer, but that can damage threads or crack fittings. Tight enough is enough. If a fitting needs extra force to seal, stop and check what is wrong instead of pushing harder.
Before closing the wall, look at each connection one more time. Ask yourself: Does this look clean, straight, and supported? If not, fix it now. It is much easier to adjust a fitting now than to find a hidden leak later.
Connect the Fixtures
Now connect the rerouted pipes to the sink, toilet, shower, or appliance.
Before finalizing the wall, test-fit everything. This is your chance to catch alignment problems while the pipes are still visible. Fixtures should sit naturally without pulling on the lines.
If you are adding a new fixture in a different location, check both the water supply and drain reach. Many people focus only on the supply line and forget that the drain needs a proper path too.
At this stage, patience matters. A clean fit now saves you from opening the wall again later.
Insulate and Patch
Once the plumbing is connected and looking right, insulate any pipes that need protection.
Foam sleeves are common for this. They help reduce heat loss and protect pipes from temperature swings. They also give the line a cleaner finish inside walls or under sinks.
After insulation, patch the wall, floor, or access opening. Use the right repair material for the surface. Drywall repairs should be smooth and secure so you can finish painting or tiling later.
This part is not glamorous, but it matters. A good plumbing reroute should blend into the home, not look like a temporary repair.
Pressure Test
Before you close everything permanently, pressure test the system.
Turn the water back on slowly and watch for leaks at every joint. If possible, let the system sit under pressure for a while and check it again. Some leaks show up right away. Others appear after the system settles.
A 24-hour check is even better for a larger reroute. That gives you more confidence that the lines are holding properly.
If you see moisture, do not ignore it. Even a small drip can become a bigger problem inside a wall.
Final Inspection
After testing, do a full system check.
Run each fixture and watch the flow. Listen for strange sounds. Look for slow drains, weak pressure, or signs of air in the line. If everything runs smoothly, you are in good shape.
This final check is also the point where you should confirm that your reroute follows local rules and that any required inspection has been completed. If your project needed a permit, do not skip the final sign-off.
At this stage, the plumbing should feel invisible again. That is usually the sign of a good job.
Numbered Warning Checklist
- Do not close walls before testing.
- Do not force pipe bends.
- Do not ignore the drain slope.
- Do not skip permits when they are required.
- Do not assume a small leak will stay small.
Visual Guide Placeholder
Image idea: Side-by-side photos of a pipe before reroute and after reroute, showing a cleaner, more direct layout.
CTA
If the process feels bigger than expected, book a free consultation with a qualified plumbing expert before you close up the walls.
Safety and Common Mistakes
Key Safety Precautions
Safety should always come first when you learn how to reroute home plumbing.
Wear gloves to protect your hands from sharp pipe edges. Use goggles when cutting, drilling, or working overhead. Small pieces of plastic, metal, or drywall can fall into your eyes very quickly.
If you are soldering, keep the space ventilated. Fumes can build up in a closed room and make the job uncomfortable or unsafe. Good airflow matters more than many people think.
Also, never assume local rules do not apply to you. Even a simple reroute can fall under building code rules. If code requires a certain pipe type, slope, or vent setup, follow it.
A safe job is not just about avoiding accidents in the moment. It is also about preventing hidden damage that shows up months later.
Common Mistakes to Avoid
One of the biggest mistakes is a wrong slope on drain lines. If the pipe is flat or angled badly, clogs are almost guaranteed.
Another mistake is skipping permits. That can lead to fines or delays, especially if you plan to sell the home later.
A third mistake is not testing before closing the wall. A hidden leak can quietly damage framing, insulation, and finishes for a long time before you notice it.
People also make the mistake of choosing the wrong materials. Using the wrong fitting with the wrong pipe type can lead to failures that are hard to see at first.
When to Hire a Professional
Some jobs are fine for a confident DIYer. Others are best left to a plumber.
Hire a pro if:
- The home is multi-story
- The reroute involves slabs or concrete
- You need a major drain redesign
- The piping is old and brittle everywhere
- The job affects multiple bathrooms
- You are not sure how to meet local code
In other words, if the project feels like it could affect the whole house, a professional can save you a lot of time and stress. Knowing when to call a plumber is part of being smart, not part of failing.
Costs Breakdown
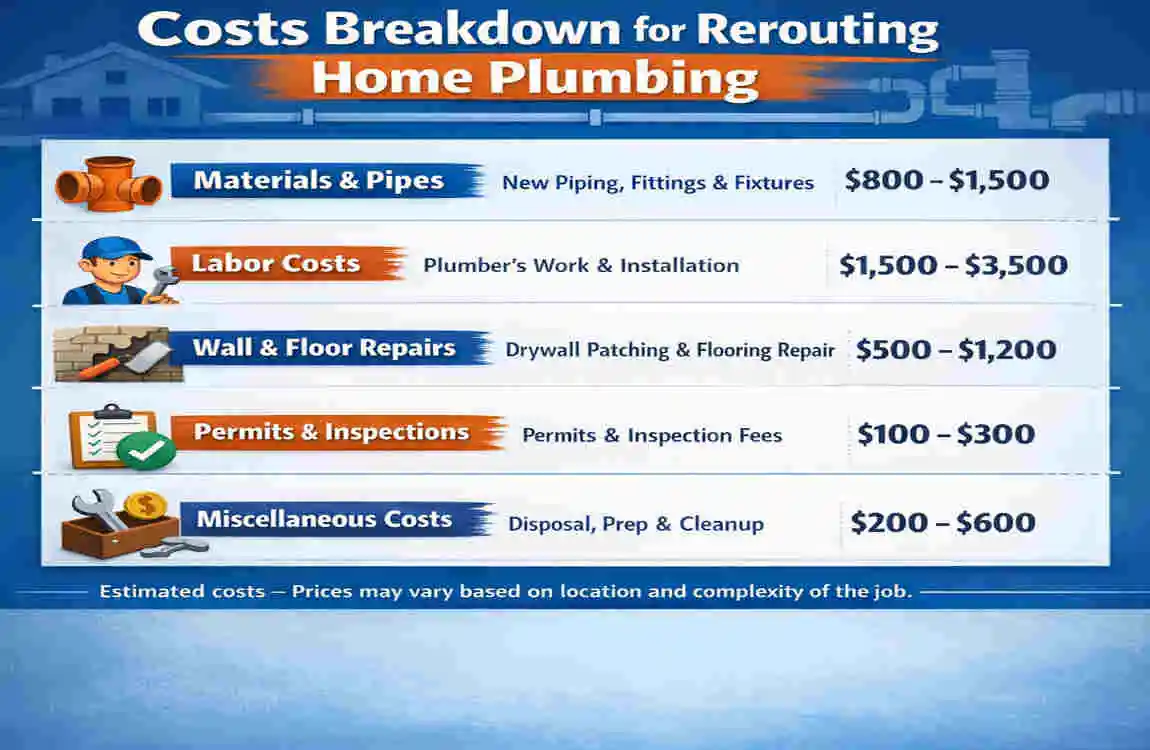
DIY vs. Professional Cost Comparison
The cost of a reroute depends on the amount of pipe, the material, the fixture location, and whether the work is simple or complex. Still, it helps to compare DIY and pro pricing in a general way.
ItemDIY Cost (PKR)Pro Cost (PKR)
Materials 10,000–30,000 Included
Tools (rent) 5,000 N/A
Permits/Labor 2,000 50,000–150,000
Total 17,000–37,000 50,000+
A DIY plumbing reroute can save a lot of money if the layout is simple and the materials are easy to access. But if the work is complicated, a pro may be the better financial choice in the long run because it lowers the risk of leaks, delays, and rework.
What Changes the Price?
Several things affect the reroute plumbing cost.
Home size matters. A larger home usually means longer pipe runs and more material. Pipe length also matters because every extra foot adds cost.
The route itself matters too. A straight move in one room is much cheaper than moving plumbing across floors or around difficult framing.
Material choice also changes the bill. PEX is often more affordable and easier to install than copper. Drain work can become more expensive if the route is hard to reach.
If the job includes wall repair, tile repair, or slab work, the cost rises fast. That is why planning carefully at the start can save you money at the end.
FAQs
How long does it take to reroute home plumbing?
For a simple DIY project, it often takes 1 to 3 days. That includes planning, cutting, installing, testing, and patching. Larger jobs take longer, especially if permits or inspections are involved.
Is PEX better than copper for rerouting?
For many home reroutes, PEX is the easier choice. It is flexible, quicker to install, and usually needs fewer fittings. Copper is durable, too, but it is less forgiving and often takes more skill to install.
Can you reroute plumbing under a slab?
It is usually better to reroute over the slab, not under it, if possible. Slab work is messy, expensive, and risky. In many cases, rerouting above the slab is a smarter option than breaking concrete.
Is rerouting plumbing legal in rentals?
Usually, you need landlord approval before making any plumbing changes in a rental property. Even small changes can affect the structure or the plumbing system, so always get permission first.