If you are trying to learn how to drain downspout water away from house, you are already ahead of many homeowners. That is because the real problem is not usually the rain itself. The problem is where that water ends up after it leaves the gutter.
When downspouts discharge water too close to your home, it can soak the soil near the foundation, create puddles, weaken the ground, and eventually lead to cracks, leaks, and other costly damage. This may start as a small wet patch after a storm, but over time it can become a much larger repair issue.
The good news is that you do not need a giant budget or a complicated drainage system to make a real difference. In many homes, a simple downspout extension is enough. In other cases, a French drain, dry well, or underground pipe can move water farther away and provide stronger foundation protection. The right solution depends on your yard, your soil, your climate, and how much water your roof sends down during heavy rain.
Why Proper Downspout Drainage Matters
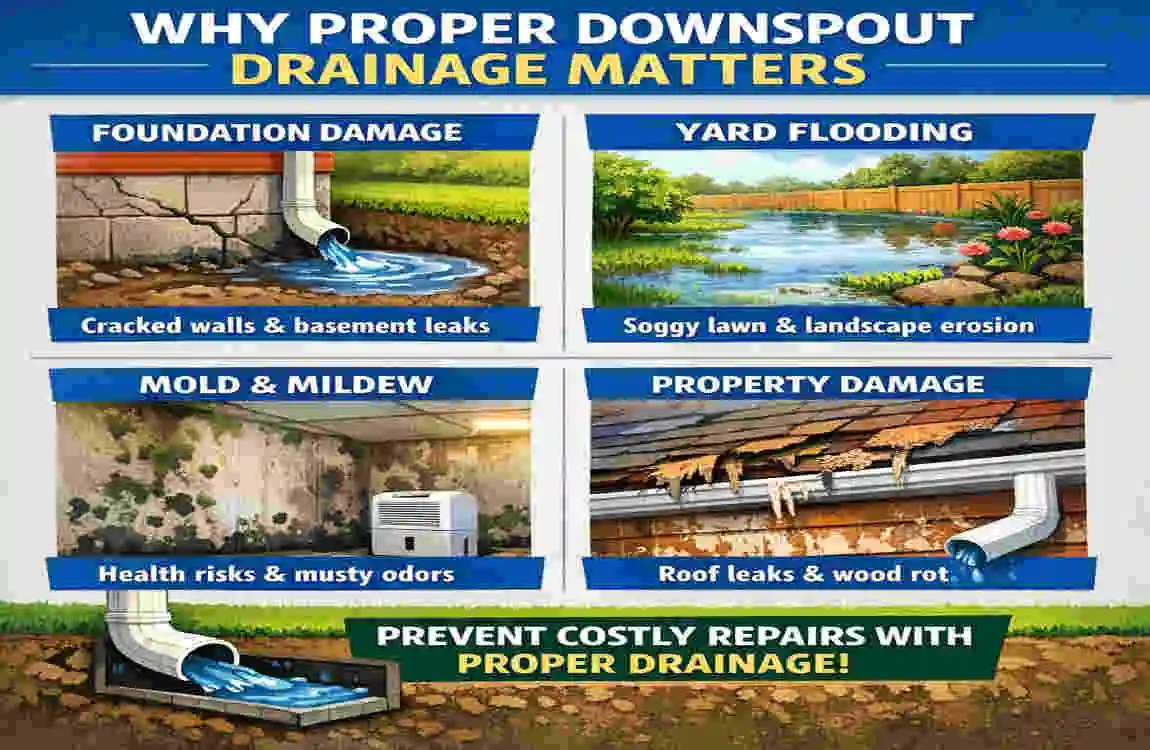
A lot of homeowners focus on gutters, but the real job isn’t finished until the downspout directs water to a safe place. Gutters collect rain from the roof. Downspouts carry it down. But if the water simply runs off to the side of the house, the soil around the foundation becomes a sponge.
That is where the trouble starts.
When water gathers near the foundation, it can slowly exert pressure on the basement walls. This pressure, called hydrostatic pressure, can force moisture through small gaps or cracks. Even if you do not see a flood, you may notice damp walls, musty smells, or white mineral stains on the concrete. These are all signs that water is lingering where it should not.
Poor drainage can also wash away soil near your home. Over time, that erosion changes the support around the foundation. The ground may settle unevenly, and that can lead to cracks in walls, sticking doors, or sloping floors. In other words, a drainage problem can become a structure problem.
There is also the issue of mold. Moisture near the house creates an environment where mold can grow more easily. That is bad for your home and for the people living in it. If you want a healthier space, keeping rainwater away from the foundation is one of the simplest ways to do so.
Common signs of poor downspout drainage
Watch for these warning signs around your home:
- Puddles near the foundation after rain
- Soil erosion or bare patches below downspouts
- White staining on basement walls or foundation blocks
- Damp basement corners
- Musty smells indoors after storms
- Cracks in the foundation or nearby steps
- Water running back toward the house instead of away from it
A well-planned drainage system also enhances curb appeal. A yard that stays drier usually looks cleaner and healthier. It is easier to maintain, and the home feels more cared for. That matters whether you plan to stay long term or sell later.
There is another benefit people often overlook: water management can support eco-friendly living. If you capture and redirect rainwater properly, you can use it more effectively, such as sending it to a rain garden or a soakaway, rather than letting it run off the roof and waste it against the house.
The bottom line is simple. How to drain downspout water away from house is not just a maintenance question. It is a foundation protection strategy. And the sooner you fix it, the better your home will perform in the long run.
Assess Your Current Setup Before You Choose a Method
Before you install anything, take a close look at your current drainage setup. This helps you avoid wasted time and money. Sometimes the real issue is a clogged gutter. Sometimes the problem is the yard’s slope. Sometimes the downspout itself is too short.
Start with a simple hose test. Run water through the gutter system and watch where it goes. You do not need a special tool for this. Just observe whether the water flows smoothly, backs up, spills over, or pools near the house.
Next, check the ground around the foundation. If the soil slopes toward the home, water will naturally move in the wrong direction. A good yard should slope away from the house so rain can drain out naturally. Even a small slope makes a difference.
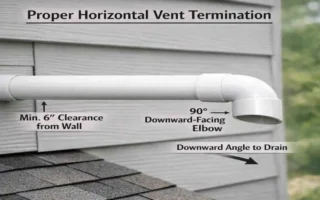
You should also measure how far the downspout currently releases water from the wall. If it stops within a foot or two of the foundation, it is almost certainly too close. In most cases, you want water discharged several feet away from the house, not beside it.
Simple tools for inspection
You only need a few basic items:
- A tape measure
- A level
- A hose
- A shovel, if you want to check the soil
- A notebook or phone to record problem spots
Common problems to look for
Issue Symptom Quick Fix
Clogged Overflow Clean annually
No Slope Pooling Regrade soil
Short Discharge Wet walls Extend 6 ft
If your yard is flat, clay-heavy, or already saturated after storms, you may need more than a simple extension. That does not mean the problem is severe. It just means you should choose a method that matches your soil and the amount of water your roof produces.
Once you understand your starting point, it becomes much easier to choose the right fix for draining downspout water away from the house.
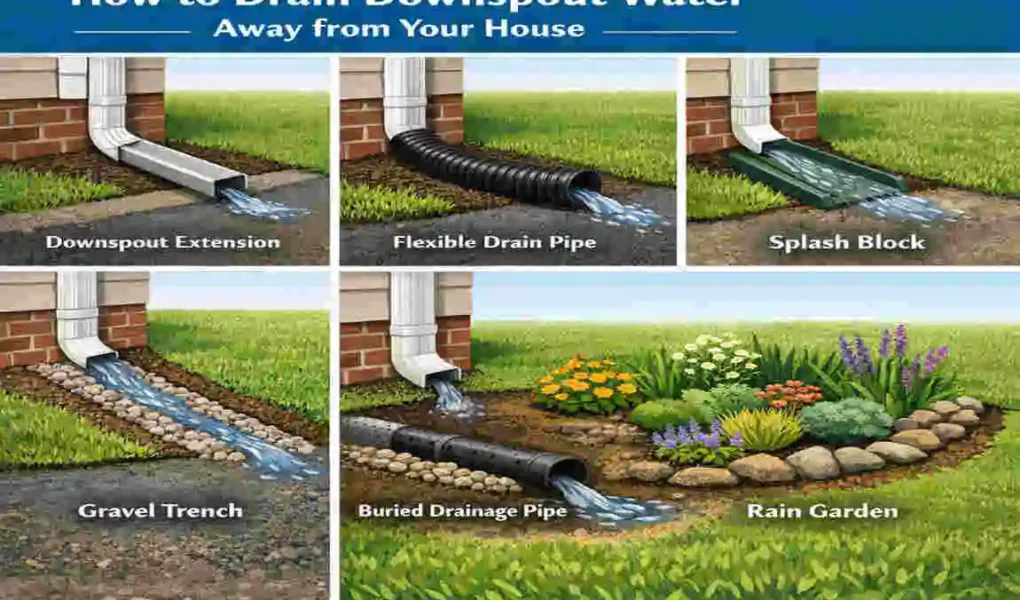
Top Methods to Drain Downspout Water Away from House
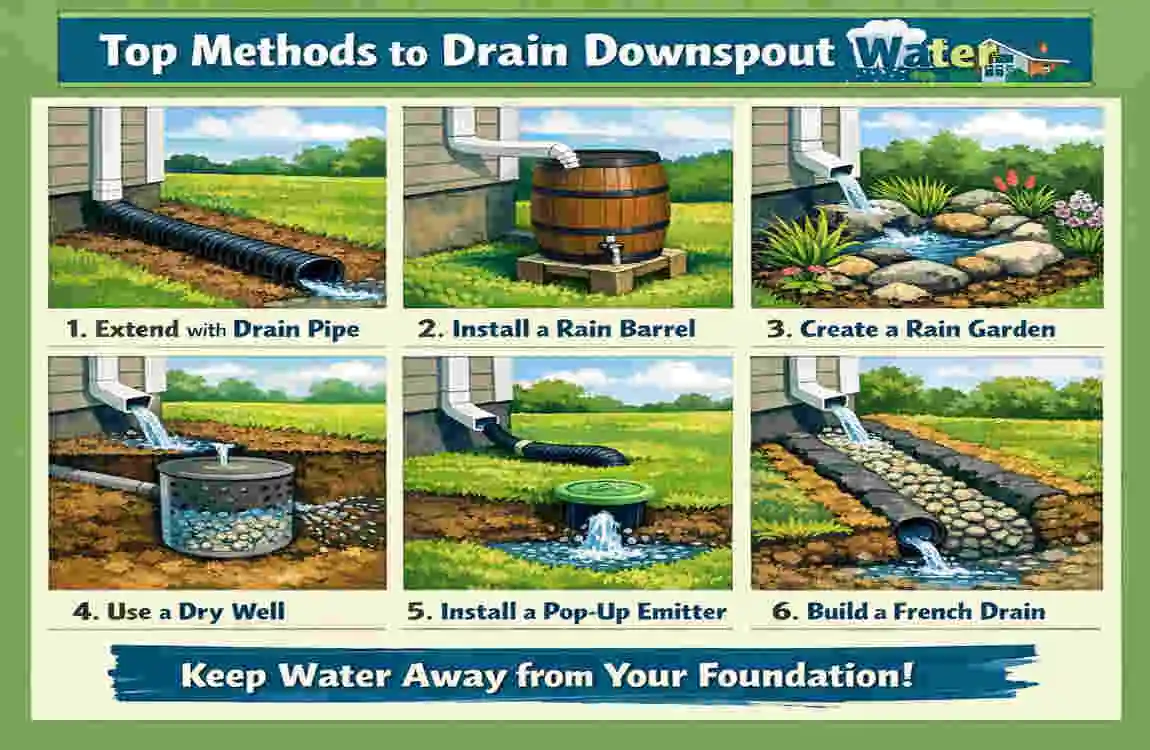
There is no single best drainage solution for every home. The right choice depends on how much water you have, how much space your yard offers, and how much effort you want to put into the project.
Some methods are quick and cheap. Others take more digging but give you a cleaner, longer-lasting result. Below, we will break down the most practical gutter drainage solutions so you can choose the one that fits your home.
Downspout Extensions
Downspout extensions are the easiest and most common fix. They attach to the end of your downspout and move water farther away from the house. Some are flexible. Others are rigid. Both styles can work well.
This is usually the first option to try because it is simple, affordable, and fast to install. If your yard slopes away from the house, an extension may solve the problem without any digging.
You can place the extension so it runs along the ground and ends in a safer drainage area. In many cases, moving water just a few extra feet is enough to protect the foundation.
Why people like extensions
The biggest advantage is cost. They are inexpensive and easy to install. You also do not need special tools or heavy labor. If you want a quick weekend project, this is a great place to start.
Possible drawbacks
Extensions are visible, so they may not look as neat as buried drainage. They can also shift if not secured properly. In cold climates, they may freeze if water sits inside them for too long.
Best use case
Extensions work well for:
- Flat lawns
- Mild drainage problems
- Temporary fixes
- Homes with enough yard space to move water away
Materials you may need
- Flexible or rigid extension pipe
- PVC elbows
- Screws or fasteners
- Splash block, if needed
If you are learning how to drain downspout water away from house for the first time, extensions are usually the smartest first step.
Splash Blocks and Simple Deflectors
Splash blocks are placed under the downspout to spread water out and reduce erosion. They do not move water a long distance, but they help control the flow so it does not dig a hole right beside the foundation.
These are especially useful when combined with a slight soil slope. The block sends water outward, and the ground guides it away from the home.
A splash block is not a full drainage system, but it can be a helpful part of one. Think of it as a small support tool rather than a complete answer.
Pros
- Very affordable
- Easy to install
- Good for small water volumes
- Helps reduce soil washout
Cons
- Limited distance
- Not ideal for heavy rain
- Does not solve deeper drainage issues
Type Durability Cost
Plastic Medium $10
Concrete High $20
If your home gets only moderate runoff and your yard already slopes away from the foundation, a splash block may be enough when paired with regular maintenance.
Underground PVC Pipes
If you want a cleaner look and a stronger solution, underground PVC piping is a smart choice. This method carries water from the downspout through a buried pipe and releases it farther away from the house.
This is one of the best ways to redirect rainwater without leaving visible pipes across the lawn. It works well when you want a neat appearance and a more permanent drainage path.
How it works
You connect the downspout to a buried pipe, then place the pipe in a shallow trench with a slight slope. Water flows through the pipe and exits through a pop-up emitter or open outlet in a safer area of the yard.
Why it is effective
The buried pipe keeps water from soaking the soil near your foundation. It also reduces tripping hazards and makes the yard look cleaner.
Things to remember
The trench must slope properly so water keeps moving. If the pipe is flat or installed backward, water can pool inside and cause clogs. That is why careful setup matters.
Materials needed
- 4-inch PVC pipe
- Downspout adapter
- Elbows and fittings
- Gravel
- Pop-up emitter
- Shovel and level
Best use case
This method is ideal if:
- You want a cleaner finish
- You have room to bury a line
- Your yard can support a sloped trench
- You want long-term drainage improvement
For many homeowners, underground piping is one of the best ways to drain downspout water away from the house because it combines function with appearance.
French Drains
A French drain is a trench filled with gravel and a perforated pipe. It collects water and guides it away from problem areas. This is one of the most flexible and reliable foundation protection methods, especially if your yard holds too much water after heavy rain.
French drains work especially well in clay-heavy soil, where water drains slowly. Instead of letting water sit near the home, the drain provides a path for it to move away.
How it helps
The pipe inside the trench gathers excess water from the soil. The gravel around it allows water to enter easily. This makes it a good choice when you need to control both surface runoff and underground moisture.
Pros
- Strong long-term solution
- Good for wet yards
- Helps manage standing water
- Can connect to other drainage systems
Cons
- More labor-intensive
- Higher cost
- Needs proper planning
- May require professional help
Best use case
Choose a French drain if:
- Your yard stays soggy
- You have clay soil
- Water pools for long periods
- You need a more advanced system
If you want a serious solution for draining downspout water away from the house, a French drain is often one of the best upgrades.
Dry Wells and Soakaways
A dry well is an underground pit designed to collect rainwater and let it slowly soak into the surrounding soil. It works well when you have nowhere obvious to send the water, but the ground can still safely absorb it.
This is a good option for homes with moderate runoff and enough space for an underground soak area. It is also useful when you want to keep water on-site without sending it into a nearby street or ditch.
Why homeowners choose dry wells
Dry wells are hidden, which makes them attractive if you care about your yard’s appearance. They also help manage rainwater in a controlled way, rather than letting it flood a single area.
When they work best
Dry wells are most effective in soils that can absorb water at a reasonable pace. They are less effective in heavy clay or places where the soil remains saturated for long periods.
Basic materials
- Gravel
- Landscape fabric
- Perforated container or pit
- Pipe connection from the downspout
A dry well can be a practical middle ground when you want a clean solution without installing a full drainage field.
Rain Gardens and Dry Creeks
A rain garden is a planted area designed to absorb runoff. A dry creek bed is a decorative channel made with rocks that carries water away during storms but stays dry most of the time.
These two methods are both functional and attractive. They can improve your yard while also improving drainage.
Why they are popular
They blend into the landscape instead of looking like a technical fix. That means you can solve a water problem while improving curb appeal.
Rain garden benefits
A rain garden uses plants that tolerate wet conditions. These plants slow down runoff and help water sink into the ground. If you choose native plants that fit your climate, maintenance becomes easier.
Dry creek benefits
A dry creek bed provides a visible path for water to follow. Rocks guide the runoff and reduce erosion. This is useful if you want water to move through the yard in a controlled way.
Best use case
These options work well for:
- Decorative landscapes
- Mild to moderate runoff
- Homeowners who want a natural look
- Areas where you want to improve both drainage and design
For homeowners who want a more beautiful way to drain downspout water away from the house, rain gardens and dry creeks are excellent choices.
Permeable Pavers and Swales
Permeable pavers allow water to pass through gaps or porous surfaces rather than pooling on the surface. Swales are shallow, grassy channels that guide water away from the house.
These methods are especially useful in yards, driveways, and pathways where you want water to move without creating mud or standing puddles.
Permeable pavers
These are great for updating a patio, walkway, or driveway. They look neat and help manage runoff simultaneously.
Swales
A swale is simple but powerful. It uses the yard’s natural slope to channel water away from the foundation. When designed properly, it can be one of the easiest low-maintenance drainage aids.
Why they matter
Both methods help reduce the amount of water that collects in one place. They are useful additions when you are building a larger drainage plan.
Professional Drainage Systems
Sometimes the issue is bigger than a simple home fix. If your basement floods, your yard stays wet for days, or water keeps returning no matter what you try, you may need a professional system.
This can include catch basins, drain tile, sump pumps, or full perimeter drainage. These systems are designed for serious water problems. They are often the right answer when the foundation is already at risk.
When to call a pro
You may want expert help if:
- Water enters your basement
- The ground stays wet for long periods
- You have foundation cracks
- Your home sits in a low area
- DIY methods are not enough
Professional systems cost more, but they can prevent much larger repairs later. For severe drainage problems, they are often worth it.
How to Drain Downspout Water Away from House: Step-by-Step DIY Guide
If you want a simple project, this basic process can work for many homes. It applies to extensions, buried pipe setups, and even some garden-based solutions.
Clean the gutters
Before anything else, clear out leaves, dirt, and debris. If the gutter is clogged, water will overflow and the downspout will never work properly.
Choose the discharge point
Pick a place where water can safely exit. In most cases, the goal is to send it at least several feet away from the foundation and toward a lower area of the yard.
Measure the slope
Use a level to make sure the pipe or trench slopes away from the house. Water should always move downhill, not sit in place.
Dig if needed
If you are using a buried pipe or French drain, dig the trench to the proper depth. Keep the slope steady and avoid sharp dips.
Connect the pipe
Attach the downspout adapter, then connect the extension or underground pipe. Make sure the joints fit securely so they do not leak or separate.
Test the flow
Run water through the system and watch what happens. This is the easiest way to check whether the setup works before you cover everything.
Cover and finish
If everything looks good, finish the area with gravel, soil, sod, or mulch depending on your design. Try to keep the final look neat and practical.
Basic tools you may need
- Shovel
- Tape measure
- Level
- PVC cutter or saw
- Gloves
- Fasteners
Safety tip
Always call for utility marking before you dig. That one step can save you from a dangerous and expensive accident.
If you want a practical weekend project, this is one of the simplest ways to start solving how to drain downspout water away from house.
Costs and Maintenance at a Glance

The right drainage solution is not only about performance. It is also about price, upkeep, and how much work you want to manage over time.
Solution DIY Cost Pro Cost Maintenance
Extensions $20–50 $100+ Annual clean
Underground $50–200 $1000+ Flush yearly
French Drain $300+ $2000+ Inspect plants
Maintenance tips to remember
- Clear leaves from gutters at least once or twice a year
- Check that downspout extensions still point away from the house
- Regrade soil if water starts pooling again
- Inspect buried pipes for clogs after major storms
- Watch for erosion around outlets and splash blocks
A drainage system only works well if it stays open and properly sloped. Small checks now can prevent bigger repairs later.
Choosing the Right Solution for Your Home
The best method depends on your yard and your budget.
If you want the fastest and cheapest fix, start with downspout extensions. If you care more about appearance, underground piping may be a better fit. If your yard stays wet or your soil drains slowly, a French drain or dry well may be the better choice. If you want to add beauty while improving water management, rain gardens and dry creek beds can do both jobs at once.
Here is the simplest way to think about it:
- Use extensions for quick, low-cost drainage
- Use underground pipes for a clean, hidden system
- Use French drains for serious water control
- Use dry wells when you want water to soak in on-site
- Use swales or rain gardens for landscaping-friendly drainage
- Use professional systems when the basement or foundation is already under stress
The key is not choosing the fanciest option. The key is choosing the one that actually solves your water problem.
FAQs
How far should downspouts drain from the house?
A good rule is to move water at least 5 to 10 feet away from the foundation. In some yards, more distance is better, especially if the soil stays wet.
Can I connect downspouts to a sewer line?
That depends on local rules. In many places, this is restricted or not allowed. Always check local code before connecting drainage to any public system.
What is the best option for a sloped yard?
Swales, underground pipes, and French drains often work very well on sloped ground because they can use the natural grade to move water away.
Are downspout extensions enough?
For many homes, yes. If the soil drains well and the yard slopes away from the house, extensions can be a simple and effective fix.
Which option is best for heavy rain?
For heavy runoff, buried pipes, French drains, or professional drainage systems are usually stronger choices than surface-only fixes.